Ceramic tiles have been used as flooring for many hundreds of years, and OSB boards appeared only a few decades ago. Is it possible to use these materials, which are very different in all operational characteristics and technical parameters, together? This question interests many inexperienced developers, and it is very difficult to find a specific objective answer. We will help you sort out the problem and give real, not advertising, characteristics of the materials. But each developer will have to draw conclusions individually; he must personally bear responsibility for his actions and not shift it to unknown third parties.
Is it possible to lay tiles on an OSB board on the floor?
Technical characteristics of OSB boards
This is a very important point; you need to have a good understanding of all the features of the material; such knowledge will help in making the optimal decision. There is a universal rule in construction - the more materials differ in their physical characteristics, the more undesirable it is to use them together . True, at present there are quite effective impregnations and primers that allow various materials to “take root”; they serve as a kind of reconciling layer.
Oriented Strand Board (Russian – OSB, English – OSB)
Several types of slabs are produced, the classification is made taking into account strength and moisture resistance.
Important. You should not think that moisture-resistant boards can be used in direct contact with water; in such conditions, in a few hours they will completely lose their original dimensions and strength.
OSB - what is it?
The process of connecting layers in an OSB sheet
Features of OSB . Downloadable file (click the link to open the PDF in a new window).
Features of OSB
What is the difference between ordinary and moisture-resistant slabs? At an air temperature of +20°C, ordinary ones can be operated at a relative air power of no more than 65%. Moisture-resistant ones can be used at air humidity up to 85% and only for a short time when it rises to 95%. Direct contact with water is strictly prohibited.
OSB boards can be moisture resistant
In the future we will give the average parameters of OSB boards.
- Flexural strength ≈ 22 N/mm2. Of course, the value varies greatly depending on the thickness, but the EN test method is taken into account here
- Water absorption ≈ 20% . The most moisture-resistant absorbs approximately 12%. There is no OSB that does not absorb and is not afraid of moisture at all; this must always be remembered.
Another advantage of OSB board is its versatility.
The surface of the slabs can be coated with varnishes and paints, but before doing this it is imperative to use effective primers. They not only increase the adhesion coefficient between coatings, but also serve as reliable protection against moisture penetration. Like any wooden structures, slabs with increasing relative humidity significantly increase in volume and reduce their physical strength parameters. Both of these phenomena are extremely undesirable for floor coverings.
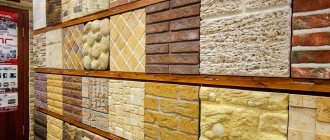
Type and size of material
Prices for OSB (oriented strand boards)
OSB plate
This material is universal
OSB material appeared on the market quite recently and has become an alternative to chipboard or plywood coatings. OSB is used for the construction of frame buildings and as insulation in individual construction. OSB boards are most widely used as leveling, heat and sound insulating floor coverings. The slabs can be laid on concrete and wooden floors, on joists, as well as on any surface prepared for finishing.
OSB boards are a universal material; they can be used for both interior and exterior decoration.
OSB boards of different classes are suitable for the following applications:
OSB-2 is suitable for installation in dry rooms, as it swells quite strongly when exposed to moisture. OSB-3 can be used both indoors and outdoors. The material withstands moisture quite well and has sufficient strength. OSB-4 has the greatest strength and resistance to moisture. The material can be used as load-bearing supports and structures at high humidity levels.
The thickness of the coating is selected based on the characteristics of the existing floor. If there are minor irregularities, then the surface can be leveled using slabs no more than 10 millimeters thick. The surface with holes and potholes of sufficient depth is leveled with material up to 15 millimeters thick. If OSB is laid on logs, its thickness varies from 15 to 25 millimeters.
Technical characteristics of ceramic tiles
We will not consider all the indicators of ceramic tiles; many of them only affect the design appearance or durability. These parameters are also very important, but only from the users' point of view. Construction technologists are interested in the ratio of tiles to moisture; it is this characteristic that is considered critically important for all types of flooring and has a great influence on the algorithm for laying tiles.
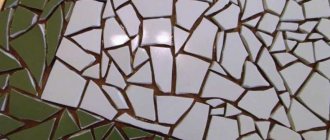
The particle board is brittle and has poor adhesion
- Water absorption is no more than 3% , while the linear dimensions of the tile remain stable, only the weight increases and problems may arise when freezing.
- Bending strength of at least 55 N/mm2. Unlike OSB boards, when permissible loads are exceeded, the tiles do not bend, but crack.
Now it is clear that between OSB boards and ceramic tiles there are almost no identical physical properties, but there are many opposite ones. This means that laying tiles on OSB is very difficult. But modern technologies and innovative materials make it possible to combine these materials in one design.
Technical characteristics of OSB boards
Preparation
The main task at the first stage is to protect the surface from moisture, ensuring maximum adhesion of materials. There are several ways to achieve this result. Let's look at three of them:
- Primer. The polymer solution will protect the wood from moisture. Before priming the surface, it is thoroughly sanded with sandpaper. After this, the solution is applied with a roller. Do this in two layers, giving the first one about an hour to dry. The gluing of the tiles begins after 12 hours.
- Additional layer. The second method does not involve directly gluing the tiles to the OSB, but is quite popular. Logs are nailed to the base in half-meter increments, and plywood or moisture-resistant drywall is attached to them with self-tapping screws. At this stage, it is important to ensure that the plane is as flat as possible. Otherwise, the glued cladding may fall off.
- Reinforcement . One of the advantages of the third option is additional leveling of the wall. A special reinforcing mesh is used for this. Install it using fasteners or glue. In the second case, the mesh is pressed into the pre-applied composition and covered with it on top. The next day the wall is primed, dried, and after that it is ready for work.
If OSB boards are varnished, the glossy coating is removed from them, otherwise it will significantly reduce adhesion. Use medium-grain sandpaper for this.
What not to do
Unfortunately, on the Internet you can find recommendations written not by professional builders, but by ordinary amateurs. They have not hammered a single nail with their own hands, but they allow themselves to give advice on complex issues to others. How not to lay tiles on an OSB board?
Table. What recommendations should you ignore?
| Bad recommendation | Short description |
| Place the OSB board on a concrete floor; in this position it will not sag. | This is very strange advice, one wonders why we need an OSB board at all? The answer is that after a few months the ceramic tiles absorb water from the concrete base, swell and peel off. The developer must remove everything, go to the store again for materials and refinish the floor. And do this until he understands the meaninglessness of his actions. |
| Fill the OSB board with a modern self-leveling screed. | Such materials are expensive and are used to level concrete or cement bases. It’s not clear what the OSB board has to do with it. There is no positive effect from its use for laying tiles on OSB. |
| Make a reinforced cement-sand screed on the slab. | Firstly, the thickness of such a screed must be at least 5 cm, otherwise it will not be able to withstand loads as a single structure. There is a high risk of cracks due to excessive mechanical loads. Secondly, it is much easier, simpler, faster and cheaper to lay the screed on a concrete slab than to additionally use OSB. |
For minor defects in rough concrete floors, you can get by with “local measures” in the form of chipping off bumps and sagging with a pick, or filling up holes and cracks with putty
To ensure the strength of adhesion of ceramic tiles directly to OSB, everything possible must be done to ensure that the slabs do not sag at all and provide the required adhesion parameters with tile adhesives. We have already talked a little about what construction technologies can be used to achieve results in this article above.
Tools
We assume that the first option for protecting OSB from moisture is chosen - priming. To do this you will need the following materials and tools:
- polymer primer;
- roller;
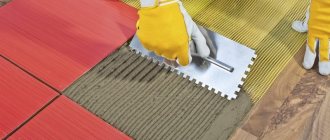
- metal spatula with teeth 6-10 mm;
- adhesive composition;
- hydraulic level and square;
- device for cutting ceramics;
- grout and a silicone spatula for leveling it (or a foam sponge);
- tile spacers;
- moisture-resistant impregnation for grouting.
If you choose the second or third option for processing the base, you will also need logs, plywood (or drywall), reinforcing mesh and self-tapping screws.
Primer of OSB board surface
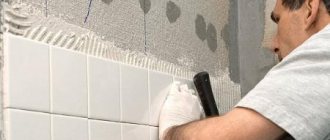
Buy only high-quality primer; you can tear it with a roller or paint brush. Before starting work, carefully read the manufacturer’s instructions and do not deviate from the recommended technology. For example, consider a warm floor with infrared heating in the kitchen. The base for ceramic tiles is OSB-3, 12 mm thick.
Using a primer, you can significantly increase the adhesion of any building materials, and particle board is no exception.
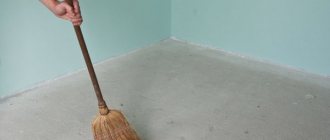
Step 1. Prepare the surface of the OSB board, it should be clean and smooth, especially carefully remove oily stains. Clear the area of the room from foreign objects; nothing should interfere during work.
The surface of the slabs must be properly prepared
Step 2. Prime the surface of the slab for the first time, carefully rub the solution into all the recesses. Do not spread the primer over the surface, but rather rub it in. The brush should pass over one place at least three times, and it is very advisable to change the direction of movement. Allow time to dry, it depends on the type and physical parameters of the primer.
Applying primer
Step 3. After the first layer has completely dried, you can begin re-processing the OSB board.
Practical advice. Buy waterproofing based on polyacrylic. This material satisfies all the quality requirements of builders and is quite affordable for the vast majority of developers.
Polyacrylic waterproofing mastic
You should always start work from the furthest part of the room and gradually move towards the exit. Do not leave gaps; if the primer is absorbed very quickly in a certain area, you can immediately apply another layer.
Work needs to start from the back of the room
Ceramic tiles can only be laid on the second day; before this, it is recommended to check the degree of drying of the primer. If the layer is very thick, it will take longer to harden. Don’t rush, it’s much better to wait than to eliminate a defect later.
Calculator for calculating the amount of adhesive for laying tiles
Go to calculations
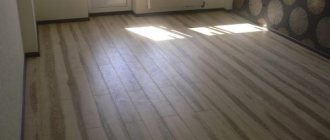
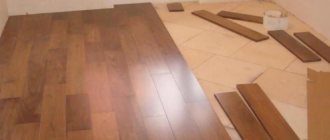
Leveling the ground plane of the floor using OSB plywood
Is it possible to lay tiles on Osby? It is possible, but certain conditions must be met. One of the most reliable methods of leveling the floor for laying ceramic tiles on a wooden base is OSB plywood. It is a slab of oriented and pressed glued chips. This material has sufficient strength and can withstand heavy bending loads. Sheets with a thickness of 12 and 20 mm are widely used. The advantages of the plate include primarily:
- High fire resistance. The stove is impregnated with a special composition that does not burn well, and in the absence of a catalyst is not flammable at all.
- OSB board repels water well. Due to the strong and hard impregnation, moisture cannot be absorbed into the material, thereby preserving what is underneath. Ceramic tiles on OSB will lie firmly and will not deform, which is usually observed on shock-absorbing surfaces.
So. Let's return to the technology of how to lay tiles on a wooden floor in the bathroom. OSB slabs can be laid directly on the floors, but the distance between them should not exceed 50 cm. The slabs can be laid not only on joists and floors. In case of careful treatment and complete prevention of sub-plank floors, they can be laid directly on old boards.
OSB board installation technology
It is important to know that it is better to use floorboards that have already lain down, but are very strong, because they are less prone to drying out and deformation when temperature and humidity change. At this stage, maximum leveling of the base is carried out by placing plastic substrates in the required places
To level the floor for fastening OSB boards, shingles can be made in places where it is necessary to raise the level. Plus, some distance between the rough boards and the slabs will be a passage for ventilation of both the boards themselves and the OSB sheets. In addition, to improve ventilation, it is recommended to drill holes in the boards at even intervals. This condition allows us to confidently answer the question whether it is possible to lay tiles on an OSB slab
At this stage, maximum leveling of the base is carried out by placing plastic substrates in the required places. To level the floor for fastening OSB boards, shingles can be made in places where it is necessary to raise the level. Plus, some distance between the rough boards and the slabs will be a passage for ventilation of both the boards themselves and the OSB sheets. In addition, to improve ventilation, it is recommended to drill holes in the boards at even intervals. This condition allows us to confidently answer the question of whether it is possible to lay tiles on an OSB slab.
The technology of laying tiles on an OSB board requires a solid base, so the slabs must be laid in two layers. Moreover, each upper one should overlap the lower one by 50% with a shift in both directions. This arrangement of sheets will ensure the required strength of the floor in all respects:
- will withstand point loads well;
- the base will perfectly withstand the forces created over a large area.
A double layer of OSB plywood will provide a durable surface for laying ceramic tiles, and at the same time will not interfere with the free movement of the subfloor boards.
Important to remember! In order to lay tiles on an OSB board efficiently, it is necessary to ensure its ability to expand thermally. Therefore, a certain distance (3-4 mm) should be left between the sheets to provide free opportunity for the plates to change their geometric dimensions under the influence of temperatures
This space must be filled with a shock-absorbing compound; a sealant is good for this. In the same way, the distance should be set aside from all perimeter walls.
Laying tiles on GVLAfter fastening the slabs with self-tapping screws, you can begin the process of installing the tiles. But at the same time, to lay tiles on a wooden floor, you will need not a simple cement-sand glue, but a two-component adhesive composition, which, when hardened, has some elasticity, which will ensure a strong fastening of the ceramics to the OSB floor.
Laying tiles on OSB boards
For greater reliability and durability of the wooden flooring, the surface before laying the tiles should be treated with high penetration primer and allowed to dry thoroughly. Video on laying tiles on the floor.
Laying tiles
The tiles can be laid with Ceresit glue or sealant. We will consider the option with silicone sealant; this material can compensate for the relatively large linear vibrations of the OSB board and has excellent adhesion to ceramic tiles and primers.
PVA construction adhesive has good properties for gluing any materials. It will be able to firmly connect the surface of ceramic tiles and OSB boards
Step 1. Open the sealed tube of glue, screw the plastic spout onto it and cut off the tip. It is necessary to cut at an angle of approximately 30°; such an angle makes it possible to more accurately apply a strip of sealant to the surface, press it a little and level it.
First you need to open the tube of glue
Step 2. Apply a bead of sealant to the back of the tile around the perimeter, then make diagonal lines. The height of the sealant is approximately 5 mm, the OSB board is flat, this layer is quite enough to level the front surface of the flooring.
Applying adhesive and laying tiles
Step 3. Take turns preparing and placing the tiles in their place, adjusting their position. Always use crosses to control the width of tile joints.
Floor tiles laid
Using the same algorithm, continue working on the entire floor surface. After the sealant has hardened, the crosses must be removed and the cracks sealed with special mastic. If everything is done correctly, the tiles will serve for a long period of time and will easily compensate for fluctuations in the size of the base.
Grouting joints
This is the final stage of laying ceramic tiles. You need to know that grout performs several important functions.
Consider a master class on grouting tile joints
- Improves the decorative appearance of the floor . We have already mentioned that when laying tiles there may be slight deviations from linearity; seams make it possible to level out these problems. Without grouting, the unevenness of the width is noticeable, but it completely hides it.
- Increases coating adhesion . Modern grouting materials have very high adhesion parameters, fitting tightly into the cracks between the tiles, they increase their stability. In addition, each tile has rigid stops around the perimeter, which makes it much more difficult to loosen.
- Increases the waterproofing of OSB bases . Grout, like ceramic tiles, does not allow moisture to pass through. If everything is done correctly, the material completely covers all the cracks between the individual tiles and does not allow water to get under the flooring. Even after prolonged direct contact of the floor with water, the base does not increase the relative humidity, which is very important in the case of wooden OSB boards.
Grouting floor tiles
In order for the grout to meet expectations, you must strictly follow the recommended technologies. To work, you need to prepare a rubber spatula, a plastic and foam smoother, and a container of water.
The tile is ready for grouting
Step 1. Prepare the mixture according to the instructions; the consistency should resemble thick, fatty sour cream. This is a very important condition; if the mass is too liquid, it will shrink or crack during drying. It is impossible to thoroughly fill the tile seams with a very thick solution without air pockets. Be sure to allow 10–15 minutes for the solution to infuse. During this time, all the smallest dry particles of grout will disappear, it will become more flexible and of higher quality.
Preparing a solution for grouting joints
Step 2. Apply a small amount of the mixture to the floor area and, using a spatula or trowel, press it firmly into the tile joints. Don't rush, don't release the pressure.
A little mass is laid down
Practical advice. The gap is considered filled only when, when pressing another portion of the solution, its excess appears on both sides of the tool.
The mass is pressed into the seams
Grouting process
Step 3. Carefully remove the excess fugue into the container, do not throw it away, the material is quite suitable for further use. Inspect the cracks and correct any gaps if necessary.
Excess fugue is removed
Step 4. Wait until the thinnest layer of grout on the surface of the tiles dries, the material will change color. Take a tool with foam rubber and carefully rub in the mixture, leveling its surface in the seams. The foam should be slightly damp, but not wet. Rub in circular motions, slowly move the trowel over the entire surface to be treated. Fill in all the little holes and gaps. Wait a few minutes again, the fugue should dry on the surface of the tiles.
The mixture is rubbed in with a foam rubber tool
Step 5. Wash off excess solution from the foam rubber and remove excess water from the side of the container. Start cleaning the floor surface, periodically rinse the tool in clean water. There is no need to worry that whitish streaks will remain on the tiles after drying; do not try to immediately achieve a perfectly clean floor surface. These remaining masses can be easily removed with a dry cloth after the fugue has completely hardened.
Final surface cleaning
Preparatory work
Before laying tiles on vertical or horizontal surfaces lined with OSB, it is necessary to take measures to increase the adhesion of materials and prevent their deformation. All work is done by hand:
- First of all, it is necessary to clean the surfaces from dirt and dust after previous procedures. To do this, remove everything unnecessary from the room and vacuum it with a device with a dust catcher. Wet cleaning is also carried out. This is done with special care, since ceramic or tile products can only be glued onto a clean base.
Cleaning oriented strand boards is a mandatory procedure before decorative finishing
- The absence of protruding areas, screws, and nails is checked. Naturally, the flooring of oriented strand boards must be made in a single plane, without differences. To do this, you should check everything for level again.
- The seams between adjacent panels are sealed with elastic putty.
- Prepare the primer, brush and roller. The most preferable composition in this situation is concrete contact, which increases the adhesion of the coating to the glue and reduces the influence of substances used in the production of slabs.
- Before using the primer mixture, the type of panel is determined. For interior work, OSB-2 and OSB-3 are most often used. The latter option has additional moisture-resistant protection, which significantly complicates the process, since it does not allow the ceramic to be securely fastened. Such surfaces are degreased with alcohol or solvent.
Facing moisture-resistant slabs requires additional manipulations
- You need to prime carefully, treating all areas without gaps. It is recommended to carry out the initial finishing in two layers, after each application the base is dried.
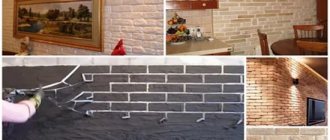
- To increase the reliability of adhesion, especially if the walls and floor are made of OSB-3, reinforcement is carried out. The mesh is rolled out over the surface and secured with a stapler. Sagging should not be allowed, so the product is kept taut.
When covering walls made of OSB with tiles, as well as other heavy materials, the surface is reinforced with fiberglass mesh
- To eliminate the harmful effects of a loose mesh, the entire surface is coated with a mixture of concrete contact and PVA. Reinforcing products cannot be glued with purposefully complex compounds.
- The room is left until the coatings dry.
It is not recommended to use the object immediately after preparation.
How to cut tiles with a grinder
Every professional tiler has special equipment for cutting ceramic tiles. This can be an ordinary, fairly simple cutter or a complex machine with water cooling and a diamond blade. It is not economically feasible for non-professional builders to purchase such tools to finish one room. How then to cut the tiles? A simple grinder, every owner has one, you just need to buy a special diamond blade. It should not have radial slots; such tools are used for cutting concrete. In this case, a lot of dust is formed, it must be quickly removed, which is what the slits do. The accuracy and quality of edges for concrete do not matter. For tiles, the opposite is true; therefore, you need to have special cutting tools.
Diamond blade for grinder (without notches)
Check the grinder; if the axis oscillates, then it is not recommended to use it for cutting ceramic tiles - there will definitely be chips. The tiles should be cut without much pressure; for each pass, the depth should increase by a few tenths of a millimeter.
The tiles must first be marked
Practical advice. Without load, turn on the angle grinder with the disc installed. If your hand feels vibration, then it is better not to use such a tool.
The disc should cut through the tile from the front side; place a flat board under the back side. Achieve the same groove depth along the entire length of the tile. To reduce the likelihood of chipping, it is recommended to seal the cutting line with masking tape. Experienced tilers claim that such measures do not affect quality; tape cannot reduce the number of chips; they receive too strong blows from the rotating disk. But the tape minimizes the risk of tile particles getting into your eyes, so there is some benefit from it.
Cutting ceramic tiles with a grinder
Another photo of the cutting process
General Tips
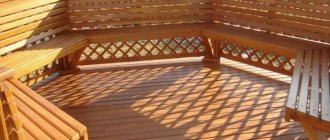
- Before starting work, make several options for laying out the tiles, while taking into account the appearance of the front surface. The tiles can be laid diagonally, in a checkerboard pattern, offset, etc. The design of the room depends on the chosen method; it can significantly increase in volume, become lighter and more spacious.
Options for laying tiles on the floor
- If you have little experience working with tiles, then always use crosses . They make it possible to hide small errors. The gap between the tiles allows you to slightly shift their position in the desired direction; after several rows you can eliminate differences of up to 3–5 mm. Small displacements are hardly noticeable, and after grouting they can only be seen by a very experienced tiler.
- The axis of symmetry of the tile row should be strictly in the center of the entrance door, no matter where it is located. The fact is that when you open the door, a violation of symmetry immediately catches your eye, and the overall appearance of the room suffers from this.
Wood tile layout
- When cutting tiles, work only with a special diamond disc; there should be no slots on it . The slots hit the edges of the ceramic tiles, causing chips. A slotted blade is used for cutting concrete.
Universal advice – don’t rush. All technological operations, from laying out and marking to grouting joints, must be done very carefully.
Gluing tiles to walls
It is easier to lay tiles on vertical surfaces, but only in the case of small product formats. Any type of glue can be used for the process. The technology is as follows:
- Preliminary marking is carried out. It is recommended to divide the base according to the size of the parts, taking into account the seam.
- Due to the fact that it is better to place the trimmed area from below, the laying begins from the second row. To do this, the holding and guiding profiles are aligned evenly.
- The mixture is applied either to the base and the reverse side of the parts, or only to the tile. The latter method is suitable when using the composition in tubes, which are laid along the points, perimeter or crosswise, which is more preferable.
- Each element must be glued in its place and aligned according to the level and markings.
- The parts should be laid in rows, but no more than three at a time, this will prevent the coating from slipping.
All activities are carried out only at positive temperatures, constant humidity and the absence of drafts.