The need to lay ceramic tiles is caused by several reasons, all of which have a great influence on the choice of production technology. It should be said right away that the best option for laying ceramic tiles is on a concrete slab with a cement-sand screed . But this option is not always possible; builders have to make non-standard decisions.
Is it possible to lay tiles on a wooden floor?
Inspection of the condition of the wooden floor
This is where work should begin after making a decision. How to technically correctly assess the actual condition of the structure, since the strength and durability of a ceramic tile floor largely depends on this?
- Visual inspection. Pay attention to the reliability and stability of the wooden elements, walk and jump on the floor. If the coating oscillates after dynamic loads, then further inspection is necessary. Immediately pay attention to the horizontal plane of the coating. Any subsidence or swelling indicates existing problems. Various deviations are indicated by the position of the skirting boards; they leave a mark on the walls. If subsidence is noticeable, this also indicates problems with the lower structural elements. Everything is normal - get to work. Suspicions have arisen - it is necessary to do an in-depth audit.
The first step in the preparatory work is a thorough inspection of the wooden base
- Dismantle the boards. At first, you can only remove the damaged ones; the resulting holes will allow you to assess the condition of the joists. You don't have to remove the entire coating to do this. If there are spots on the joists with a changed color, this is evidence of the beginning of putrefactive processes. It is advisable to change such elements if the logs are still in good condition - you can limit yourself to antiseptic impregnation.
In some cases, a complete replacement of the wooden base is required
Work on laying tiles is allowed to begin only after high-quality repair of the base. The boards may not be changed or used in the future, but the logs must be changed.
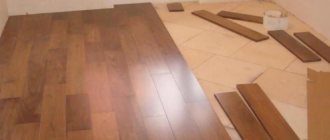
To level the floor before laying tiles, various materials are used, for example, fiberboard
Important. If a wooden floor is affected by putrefactive processes, this indicates gross violations of the technology of its arrangement. Most often, natural ventilation is absent or ineffective. Be sure to correct any technological errors found, otherwise the new floor will quickly become unusable.
Diagram of a wooden floor covered with ceramic tiles
Selection of adhesive composition
For work on wooden bases, only special types of adhesives are suitable, which contain components with high elasticity. They must withstand the linear expansion of the boards, preventing the tiles from moving from the base and cracking.
These parameters correspond to the products of the following brands:
- Unis – super elastic adhesive and super polymer;
- Knauf Flex;
- Ceresit CM17, etc.
If a concrete screed was made on top of the floorboards, it is permissible to use a classic mortar based on sand and cement.
Among the non-standard methods offered by folk craftsmen, we can mention liquid nails and liquid glass (silicate glue)
In some cases, homemade mixtures of nitrocellulose varnish with polystyrene foam dissolved in gasoline or acetone are becoming popular.
Read more about tile adhesive for the bathroom in the article - How to choose adhesive for tiles in the bathroom
Important! When using homemade glue, there is no guarantee that the cladding will last long and be strong.
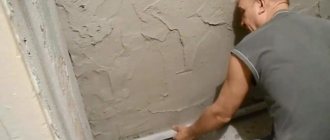
Preparing the base
The quality of preparation of the base for the floor has a significant impact on the technology of laying ceramic tiles. Currently, builders use two methods of preparing the foundation, each of them has its own strengths and weaknesses.
Table. Methods for preparing the base.
| Substrate preparation method | Technical description and performance characteristics |
| Dry | The fastest and cleanest method for preparing a foundation. Old wooden floors are covered with slabs of plywood, OSB or special plasterboard. All materials must be moisture resistant. The slabs are laid horizontally, and all possible measures are taken to increase their stability. Ceramic tiles are mounted on this base using glue; the installation technology does not differ from the usual one. The advantages of the method are speed and minimal amount of construction waste. Disadvantages: relatively low mechanical strength, negative reaction to prolonged contact with water. |
| Wet | A cement-sand screed is made on the wooden floor. The solution is semi-dry, which reduces the volume of water. Waterproofing must be installed between wooden structures and the screed. You can use expensive modern special membranes, or you can use cheap polyethylene film. The effect of these materials in this case is the same, but the cost of installation differs significantly. The thickness of the screed is approximately 5 cm; to increase strength, it is recommended to use a metal or polymer reinforcing mesh. The advantages of the method are high strength. Disadvantages - heavy weight, time-consuming work, a lot of garbage. |
Dry preparation of wooden floors for laying ceramic tiles
The choice of a specific method depends on many factors and should be made by a specialist on site.
Drying oil is a popular and environmentally friendly product for treating wooden surfaces.
Calculator for calculating the amount of adhesive for laying tiles
Go to calculations
Mineral wool was used as insulation for the flooring.
Briefly about the main thing
Ceramics are quite difficult to “make friends” with wood, especially when it comes to covering a floor that experiences constant vibration loads. Wood expands and contracts under the influence of varying temperatures and humidity, while ceramics have little or no effect. Therefore, before laying tiles in a wooden house, the floors should be strengthened, leveled, protected from moisture and ensure their stability. This is done using a dry or wet screed, onto which the finishing coating is subsequently mounted.
Ratings 0
Step-by-step instructions for laying tiles on a dry base
For example, we will take new construction, the room has a subfloor. It is in excellent condition, the joists and boards are new, no visible damage was found. The room is on the ground floor, it is recommended to install electric floor heating.
Scheme of installing a heated floor under tiles or laminate in a wooden house
Step 1. If the temperature outside is already below freezing, and the house is not yet heated, then all measures must be taken to preserve heat. Seal all cracks and check windows and doors. The room must be at least +5°C, this temperature is normal for building materials. But you need to take care not only of ceramic tiles, you also need to take care of your health in time, especially since illnesses are expensive these days. It is very inconvenient to work with gloves and a winter jacket. Use any electric heater and raise the temperature to at least +15°C.
All cracks need to be closed
Step 2. If there are remnants of polyurethane foam between the floor and the door frame, they need to be carefully trimmed. At the same time, carefully inspect the entire surface and check for evenness. There are options for installing doors using wooden spacers. They are large in size, with some elements protruding onto the surface of the coating. They also need to be removed, the easiest way to do this is with the help of a renovator.
Excess polyurethane foam is trimmed off
You need to cut the foam carefully
Removing protruding elements using a renovator
Step 3. Carefully remove construction debris; it is recommended to vacuum the floor surface.
Construction waste is removed
Step 4. Check how much you need to raise the surface of the new floor. Ideally, it should lie in the same plane as the threshold of the door frame. In our case, the height difference is 6 centimeters. To level the position, take two sheets of PPS 2 cm thick and one sheet of gypsum fiber board one centimeter thick. The rest of the difference will be covered by glue and tiles.
Check how much you need to raise the surface of the new floor
If there are doubts about the physical strength of the lining materials, then fold them in the required order and jump in firm shoes; there should be no dents left on the surface.
Step 5. Start laying the PPS sheets. As already mentioned, you need to make two layers with overlapping seams. To do this, the first row begins with wholes, and the second with halves. The cut piece is then used near the opposite wall.
Laying of PPS sheets
The material is laid in two layers
Practical advice. You can find recommendations to coat special shelves at joints with glue or sealant. If you wish, follow these tips. Although practice shows that such an operation does not give any effect other than wasting time and money.
Step 6. Place gypsum fiber board sheets on the foam. This is a very hard material, made with the addition of cement. You can cut it with a mounting knife, but you need to make a lot of effort. It is allowed to cut with a grinder with a metal disc, this is much easier and faster. But one problem arises - a lot of dust is formed. Cutting outside is cold and takes a long time, working indoors - dust will spread throughout all the rooms. The average dusty option is an electric jigsaw. Make a decision on the spot depending on the existing conditions.
Cutting gypsum fiber board with a mounting knife is not easy
GVL cutting
Practical advice. If in a small area there is a significant difference in height of the subfloor, then this problem can be eliminated with the help of polyurethane foam. Apply it and immediately replace the foam. If you have doubts about the strength, first level the surface with pads of appropriate thickness, and then fix them with polyurethane foam.
Differences can be eliminated with polyurethane foam
Attach the sheets to the surface of the subfloor with self-tapping screws, screw in the hardware in a checkerboard pattern at a distance of about 40 cm. Leave a gap of about one centimeter between the wall and the floor; it is needed to compensate for the thermal expansion of the base and ceramic tiles.
Laying gypsum fiber sheets
It is important to leave a gap of approximately 1 cm
Step 7. Attach damper tape around the perimeter of the room. It is glued to the floor. Important. GVL easily breaks off at the corners; if this occurs, it is recommended to place a piece of the board on glue. Due to this, the reliability of the fit will significantly increase.
Damper tape
Broken corners can be put on glue
Step 8. Cover the base surfaces with a special primer. Work with a paint roller; in the corners it is better to use a brush. The primer serves two purposes.
Strengthening primer
- Increases the adhesion coefficient of adhesive for tiles with GVL. Due to this, the strength of fixation is increased and the risk of tearing off the ceramic tiles is minimized.
- The surface of the slab absorbs less moisture. After drying, the primer acts as additional water protection.
Primer applied to the base
Step 9. To ensure that the joints between the slabs can be filled with a gypsum-based plaster mixture. This will increase the stability of the base and reduce heat losses from floor heaters. The cracks are covered with a stainless steel spatula; work should be done quickly; the gypsum solution will soon harden.
The joints between the slabs are covered with plaster.
At this point, the preparatory stage of laying tiles is completed. To guarantee, check the quality of the coating again, remove dust and debris. Now you can start installing underfloor heating.
Expenses
How much does the work usually cost? Prices may vary, but in any case it will be more expensive than installing a tile covering on concrete. This is due to the costs that usually accompany the preparatory stage. As for the final stage itself - laying the tiles itself, its price can also vary. The cost depends on both the material used and the installation method. The most expensive floor is a floor laid out with a pattern or made from an exotic type of material.
You can learn about the features of installation in rooms with high humidity from the video.
© 2022 prestigpol.ru
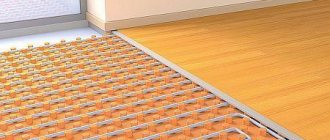
Installation of heating system
We will install electric heating; in all respects it is much better than water heating.
Step 1: Drill a hole in the wall for the thermostat. It is exactly the same size as the socket.
Drilling a hole for the thermostat
Thermostat installation location
Step 2. Cover the surface of the base with a special plastic waterproofing material.
Ready waterproofing
Important. Use only this type of mastic; hard ones will crack during linear vibrations of the heated floor.
Application of waterproofing material
Read the instructions for use and strictly follow the manufacturer's recommendations. It is easier to work with a small roller.
Step 3: Use waterproofing tape to seal the joint between the floor and the walls. The tape is first glued to the mastic, and then another layer of material is applied on top.
You also need to apply a special waterproofing tape
The top of the tape is also covered with mastic
Step 4. Lay out the electric heating mats, secure the sensors, and connect the electrical power cord. Carry out all work according to the instructions, it is included with each package.
Electric heated floor mats unfold
Mounting the temperature sensor
Arrangement of a waterproofing layer
You can install waterproofing immediately after using latex impregnation, without waiting for it to harden. The waterproofing layer has important functional significance, so you should not neglect the basic nuances and principles of its arrangement.
We recommend watching - How to waterproof a bathroom under tiles?
Damping layer
Any rolled materials can be used as a waterproofing layer:
- parchment;
- glassine;
- bitumen paper;
- paraffin paper;
- thick polyethylene.
The materials are laid overlapping and secured with tape. For better protection, it is necessary that the layer extends at least 10 cm onto the walls.
To prevent deformation and moisture penetration, a layer of damper tape is used. It withstands temperature changes typical for a bathroom, prevents heat loss and reduces noise.
But the shock-absorbing properties of the damper tape are of particular value - it compensates for possible movements of the floorboards and fixes the coating.
Important! To maximize the compensation effect, the tape is laid on the subfloor with the elastic surface and the hard surface facing the ceramic tile side.
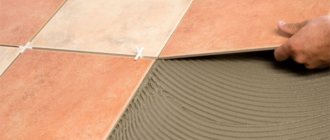
Installing tiles
Pre-think about the layout of the tiles on the floor surface. There are quite a few ways; the specific choice should take into account the characteristics of the room and flooring. It is recommended to take into account the design style of the rest of the house.
Preparation of cement mortar for tiles
Step 1. Prepare special glue. It should have a slight ductility to compensate for changes in tile dimensions during heating/cooling.
Preparing tile adhesive
Step 2. Using a spatula, apply an even layer of adhesive to the floor, approximately 0.5 cm thick, above the heating mat cables.
Practical advice. Due to the fact that protruding cables do not allow you to spread the glue tightly with a flat spatula, you must use a needle roller to remove air pockets.
A layer of glue rolled with a needle roller
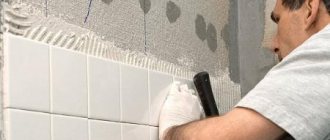
Step 3. Use a notched comb to make grooves and glue the tiles to them one by one. Constantly check their position with a bubble level and a rule. Remember that fixing a defect is always much more difficult than preventing it during work. To control the distance between individual tiles, use plastic inserts or crosses.
Tile laying begins
Maintain the distance between individual tiles
Important. Only experienced tilers can lay tiles without gaps. These works are much more difficult than with a gap. The fact is that the gaps between the tiles allow you to correct minor errors, and after they are sealed, the coating looks perfectly smooth.
Large tiles can be leveled using a special system. After the glue hardens, the wedges are removed, and the protruding parts of the system are broken off with gentle blows of a hammer. But professionals do not use such a device; it takes a lot of time. They have enough skill to level the tiles, it's much faster.
Tile laying process
If glue appears on the surface, it must be removed immediately. You should always have a damp and clean cloth on hand.
Step 4. If the tile does not fit in size, then it needs to be cut. It is best to use a special cutter with a diamond circular saw. This tool gives an even cut and can cut not only floor tiles, but also those for outdoor use or ceramic tiles. The latest materials have increased strength indicators; they are very difficult to cut with an ordinary cutter. The machine is professional, only builders have it. It is not practical for non-professionals to buy such expensive equipment.
Cutting tiles with a diamond circular saw
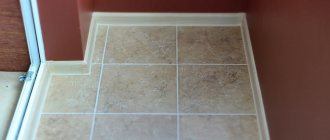
Step 5. Lay tiles near the doors. We must remember that this is the place where the load is greatest; the tiles must be securely fixed. The best option is to use only whole tiles near the threshold; sections can be mounted only as a last resort. This axiom must be kept in mind when choosing a layout even before installing the covering.
Laying tiles at doors
Step 6. After the glue has completely cured, remove the wedges and spacers. The wedges can be reused. Clean the seams from any excess glue to a depth of at least three millimeters, and carefully remove it with the tip of a small metal spatula. Otherwise, the grout will not stick and will definitely fall out over time. This is a problem; opened cracks greatly spoil the appearance of the flooring. In addition, dirt accumulates in them, and it is very difficult to remove it from there.
After the glue has hardened, the wedges and spacers are removed
All trash must be removed
Step 7: Remove debris from the floor. Prepare grout of the appropriate color and seal the cracks with a rubber spatula. Press the solution with great force. It should fill all voids and penetrate into the gaps as deeply as possible.
Grout applied
Excess grout is removed after 20–25 minutes, use a slightly damp sponge. It is advisable to glue the foam rubber onto a metal or wooden smoothing board. This tool allows you to improve the quality of the floor; fresh grout is not removed from the cracks, but only the planes are precisely leveled.
Excess grout was removed with a soft sponge
The final cleaning of the floor is done the next day; the material must have time to harden.
Step 8. Glue the baseboards. They can be plastic, wood or stone.
At the end the thermostat is connected
We have described the instructions for the so-called dry tile bases. It is much more difficult to make wet ones; you need to prepare a large volume of mortar, lay out beacons, make a screed on them, etc. If there is a possibility of floor movement, the screed is strengthened by reinforcement.
Choosing tiles
The floor should be tiled with anti-slip tiles. Matte textured varieties of floor tiles with a corrugated or rough surface are perfect.
You will have to discard thick tiles - a wooden floor is not resistant to high loads. The same applies to large-area ceramic elements - their installation will require more glue or mortar, which means the facing layer will be more massive.
It is better to opt for thick but light floor tiles, which will match the color and design of the main style of the room.
It should be taken into account that large tiles in small bathrooms will visually reduce and conceal the space.
Complexity and features of installation
Natural wood has its own specific characteristics and physical properties. This raises certain operational requirements. Wood is a porous, hygroscopic material, which presents certain difficulties when laying tiles. Tile can serve for decades without treatment with special means, which cannot be said about wood.
Floor tiles are often used to protect wooden floors in the bathroom, kitchen, and bathhouse. A tiled floor laid on dry boards will become deformed and the seams will crack within a few months.
Tiles do not make good contact with surfaces that expand or contract over time. Priming the wooden base and laying waterproofing will help correct the situation. Rotten boards are covered with chipboard sheets. The cracks at the joints of the slabs and near the walls are carefully filled with foam to provide additional strength to the base.
Details worth paying attention to
According to their characteristics, wooden coverings at first glance are completely incompatible with tiles. Wood is not static during use. Even floors made from well-dried and treated boards still shrink within 2-3 years.
Daily temperature and atmospheric fluctuations lead to the fact that the surface “plays” - sometimes expanding, sometimes shrinking. These processes go unnoticed by humans, which cannot be said about tiles: they can peel off, crumble, and literally burst at the seams.
To prevent this from happening, it is necessary to study the reasons affecting the deformation of the ceramic coating and, if possible, eliminate them.
Wooden floors require careful preparation
Basic requirements for masonry
In order for ceramic tiles to have a presentable appearance, a perfectly flat surface is required for laying them. A smooth surface of the base will prevent the possibility of cracks in the tiles and their crumbling, as well as rapid abrasion of the tile layer.
Previously it was believed that a wooden floor was absolutely unsuitable as a base for ceramic tiles. The disadvantages of a wooden base are manifested in the appearance of rot, stagnation of moisture and the appearance of woodworm larvae. However, with the help of special professional techniques, you can make the foundation sufficiently resistant to negative factors. The main requirement for a wooden base is the ability to withstand the weight of ceramic tiles and other objects.
The main task of the ceramic tile installer is to ensure that the wooden base, which is prone to linear expansion, is hard, even and completely immobile.