Laminate is one of the most common and affordable floor coverings that is used everywhere, but certain requirements must be met before installation. They consist in preparing the base on which the laminate is laid. Regardless of whether it is a tile or concrete floor, a prerequisite is an absolutely flat surface.
One of the frequently asked questions is whether laminate can be laid over tiles, since these materials have different characteristics. To answer this question, consider the installation process and the conditions necessary to ensure a long service life of the floor covering.
Laying laminate on tiles
Popular building materials
Laminate is used as a floor covering, as well as to create decorative fragments in the decoration of walls and ceilings. Easy to install, practical, wear-resistant, it is available in different colors, textures, with or without patterns.
A common building material made from baked clay is ceramic tiles. Can be used as a base for laminate with proper preparation. The disadvantage of the tile coating can be considered absolute resistance to moisture, which requires additional vapor barrier.
Builders have different views on the interaction of these two materials. There are disputes over the use of ceramic tiles under laminate and linoleum.
What are the surface requirements?
Installation of the laminate is carried out on a flat horizontal surface, cleared of debris and dust.
The material is very demanding on the condition of the surface, the permissible deviations from a straight line are only 2 mm per 1 m of length.
Failure to comply with this requirement causes creaking, changes in the geometry of the panels, and in difficult cases, cracks and destruction of the locking joints, leading to failure of the material.
The subfloor must be dry; capillary moisture or other possibilities of wetting the base are not allowed. If necessary, bitumen waterproofing is applied and a cutoff layer is laid from a material that does not react to moisture.
In addition, the subfloor should not have unstable or moving areas . The rigidity and strength of the base guarantee long service life of the floor covering.
Principles of working with laminate
Laminate is a plate consisting of four layers. On top there is a wear-resistant film, the purpose of which is to protect against abrasion and impacts. The second layer is decorative: paper with a given pattern. The third is dense fiberboard. A lock is cut out in this layer to secure the slabs. The last, bottom layer increases rigidity and protects against deformation.
Purpose of laminate layers
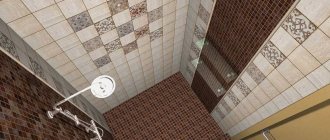
Color combinations
It is important to keep in mind: you should not select the exact shade of tiles and laminate. Firstly, this will not work, since the slightest discrepancies will in any case be two or three tones. Secondly, this technique makes the flooring boring and unattractive. Thirdly, the texture, which is different in any case, will be lost against the background of the general color spot.
In order not to rack your brains about how best to choose a shade and create a stylish design technique for floor covering, it is worth considering three main ways of combining tiles and linoleum:
Neutral reception
A mix of shades of the same color scheme is an inconspicuous flooring option with an emphasis solely on functionality, excluding accentuation of space.
These can be approximately the same light or dark tones that do not contrast with each other:
- universal (light wood + gray, beige + coffee with milk, sand + caramel);
- bleached with gray and beige (white + arctic, light gray, gray marble + bleached, pale sand + diluted khaki);
- honey and chocolate tones (golden + beige, chocolate + dark beige, brown-gray + gray).
The success of the choice is the simultaneous purchase of two materials: this way you can better see how they fit together.
If the question of choice is open, and laying tiles is no longer tolerated, it is better to buy a café-au-lait color in one tone or with a stone-like texture. Any type of laminate will work with this tile.
Game of contrasts
The technique in which one shade is much lighter than the other is the most popular. This makes it easier to choose two tones, especially if they are both neutral. This will allow you to further furnish the hallway with any furniture and accessories. In this case, it makes no sense to go to extremes, opting for a “black and white” solution that has a spreading effect.
It is better to choose such contrasts:
- textured with light (brown + pale gray, cream, vanilla, beige) or rich with khaki or marble gray;
- dark wenge with vanilla, zebrawood with beige, bright brown with sand or gold;
- mocha + honey, light gray wood + marsh granite, white laminate and sandstone.
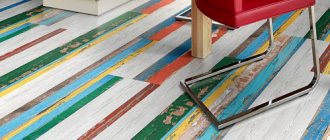
Imitation and drawing
In this case, the combination involves a bright tile pattern and a muted tone of the laminate. The technique is divided into two groups: the use of patterns and wood, marble textures, as well as a combination of textures and plain tiles.
The most interesting color schemes are combinations:
- terracotta and sand, dark beige and brick red (an excellent solution for dark rooms);
- bleached beige with coral, powdery, peach;
- cold beige with diluted turquoise and lilac.
For harmony, you can use a pattern in which one of the shades matches the color of the laminate. However, it is important to take into account: there should not be a lot of support for one tone: this way the shade can merge into a single spot.
Features of laminate coating
The layered structure ensures the strength and moisture resistance of the laminate panel. Its base is impregnated with resin or waxed on the bottom and covered with melamine or acrylic compounds on top, protecting the decorative layer from moisture. The material is practical, lightweight, easy to install, and relatively inexpensive. All types of laminate are equally moisture-resistant, durable, warm, and noise-absorbing.
Note! The retail chain offers laminate of classes 22, 23 (household), 31,32, 33 (commercial) and even class 34. The higher the number, the more expensive the product and the higher its quality. Class 23 is quite applicable in apartments, has a 6-year warranty, and is available with two types of connections - locking and adhesive.
The service life of a laminate floor is not limited to one decade and depends on the quality of the lock, the correctness of the layout, and the quality of the substrate.
Styles
There are no restrictions when a creative designer gets down to business. He knows how to combine the incongruous in such a way that the combination of materials looks appropriate, demonstrating his commitment to any style.
If we take the ideas of professionals as a basis, we can perform this cladding in the style of:
- classic;
- modern;
- minimalism;
- high tech;
- avant-garde;
- English;
- Empire;
- Arab;
- art deco;
- loft;
- African;
- Biedermeier;
- bionics.
The main thing for a successful solution is to take into account the furnishings: sometimes they are the ones who complete the interior composition in the right way.
When choosing a style, color and texture are important: in some cases, the interior needs matteness and nobility, some modern trends breathe simplicity, ethnic styles need a touch of vintage.
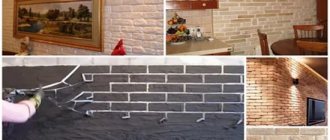
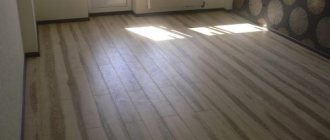
Laying linoleum on tiles
Ceramic tiles are a good base for subsequent coatings: durable, warm, sound insulating. It will ensure the strength and durability of the top layer, linoleum or laminate.
Assortment of linoleum
Linoleum as a material is often used in repairs. The main reason why old tiles will serve as a substrate for a new floor is the cost of preparatory work. There is no need to spend money on dismantling tiles, providing sound insulation, thermal insulation and other preparatory work. In addition, the tiles were laid on a flat cement surface, and the linoleum will lie flat. Special glue will firmly fix the coating.
Note! To smooth out possible unevenness of the substrate (intertile seams, laying defects, chips and cracks), it is advisable to choose dense linoleum, for example, on a felt basis.
Stages of laying linoleum
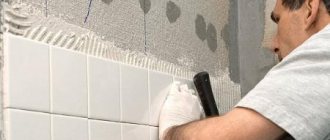
Before gluing linoleum, it is necessary to cover the cracks or deep tile seams with the solution. The surface must be clean, even and smooth, but if the tiles on the floor were glossy, they must first be sanded for better adhesion to the linoleum.
To quickly and efficiently lay linoleum on top of ceramics, unroll the roll and allow the material to level out. Then it is cut out, coated with glue and, after leaving for half an hour, linoleum is laid, smoothing from the middle to the edges. After the glue has dried, install the baseboards.
Laying linoleum on tiles - stages
Creating comfortable conditions
In order for the laminate flooring to last for a long period of time, it is important to make sure that all conditions are met:
- The floor must be perfectly flat, there may be differences, the height of which should be no more than a couple of millimeters for every meter.
- There must be a layer of high-quality waterproofing so that moisture cannot get to the base of the coating. This layer must be present on the tile, regardless of the fact that it belongs to moisture-proof materials.
- If there are small differences, it is necessary to use substrates.
If all the above requirements are met, you can begin laying the coating. If there are any defects, they must be eliminated before proceeding with installation work.
Laying laminate on tiles
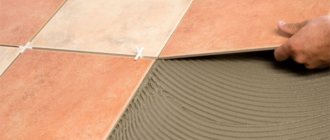
Laminate, like linoleum, can be laid on old tiles. This saves time and money, and besides, removing the tiles can deform the floor. Possible unevenness of the floor, minimal discrepancy in length, width, thickness must be corrected. Errors of up to 2 mm are allowed, otherwise problems will arise with the installation and further operation of laminate panels. Preparing the base is extremely important.
How to lay laminate according to technological rules
Advantages and disadvantages
Laying laminate flooring on tiles has certain advantages and disadvantages.
The advantages of this method include:
- There is no need for expensive and labor-intensive tile removal.
- Removing tiles can expose serious subfloor imperfections that require labor-intensive repair.
- The surface of the tiled floor is smooth and durable, with no weak or moving areas.
The disadvantages of this method include:
- Existing tile irregularities are difficult to eliminate.
- Protruding parts of the tiles can destroy the locking joints of the laminate.
- The floor surface changes its level, which creates differences with other rooms.
- There may be problems opening doors.
In any case, the lack of preparatory work, which takes a lot of time and effort, outweighs all possible disadvantages of the method.
Preparing the base for laminate
The preparatory stages are similar in all cases:
- thorough surface cleaning;
- floor condition assessment;
- elimination of irregularities, chips, chips;
- laying the coating in accordance with technology.
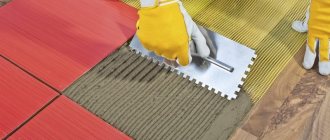
Since old tile floors have wide seams, the laminate surface can sag over these seams over time and become deformed. It would be correct to lay a special shock-absorbing layer that will level out minor irregularities. It is advisable to simultaneously take care of the soundproofing of the floor by choosing a special underlay for the laminate board.
Substrate options
The most in demand are film polyethylene foam and polyurethane foam. The film is thin, rolled into large rolls, and can be cut with a sharp knife. Advantages of polyethylene foam:
- strength;
- good interaction with concrete, ceramic tiles;
- ability to absorb sounds;
- chemical, bacteriological and biological passivity.
The disadvantage is the thinness of the propylene film, but laying it in two or three layers conceals minor unevenness in the floor and at the same time increases sound insulation.
Propylene film - characteristics
Polyurethane foam (expanded polystyrene) is thicker, hides imperfections better, is compatible with heated floors, but loses its shape over time. Both materials are flexible, easy to install, and last a long time.
Another option is extruded polystyrene foam, produced in sheets. This substrate combines the positive qualities of previous types; it is durable, convenient and easy to use.
A great option is a cork. Its options: cork mixed with rubber, with bitumen, cork cloth or crumb. Eco-friendly, strong, durable, able to hide unevenness. But cork is not moisture resistant enough and is expensive.
Among the new products on the market, coniferous sheets have appeared - the material is good in all respects, except that it is not flexible enough. The advantage over others is high breathability, which ensures fresh air in the room.
Selecting a substrate
Tiles are a strong and rigid base with high density. These characteristics make it a good conductor of sound, which forces us to take care of high-quality sound insulation.
In addition, possible unevenness, imperfections in the laying of tiles or differences in heights inherent in this material require the presence of a durable and elastic substrate.
The combination of these requirements dictates special conditions and a specific approach to laying the substrate. When choosing it, you should ensure maximum safety and noise insulation for the laminate, so it is recommended to use a double layer of backing.
The bottom layer should be a composite of cork with rubber crumbs. This type of substrate has sufficient rigidity to compensate for possible differences in tile heights. In addition, the double layer of backing increases the mobility of the panels when walking, which creates a danger for the locking joints.
Cork with rubber crumbs, having high elasticity, is quite dense and does not dent so much, which eliminates the problem to some extent.
Isolon or polyurethane foam can be recommended as a second layer. These types of substrate provide a high degree of sound insulation, preventing the propagation of sound waves .
In addition, both types have low vapor permeability, which helps create a barrier to the spread of steam under the laminate.
CAREFULLY!
Ceramic tiles have a protective layer of glaze or enamel; if water vapor is not cut off, moisture will begin to accumulate under the laminate. Sooner or later it will saturate the substrate and the supporting layer of material, which will cause the destruction of the coating.
Option for laying laminate on IR film
Laminate is perfect as a floor covering when installing a heated floor. Before laying the laminate, it is necessary to make a cement screed as a base; it is also allowed to lay a film heating element on ceramic tiles. Tile is a durable, even coating necessary for installing a warm film floor.
Principles of laying film on the floor
The technology of laying a film heating element on the floor does not involve dismantling the tiles. If the floor is in normal, not worn condition, it should only be cleaned of dust and small debris. The next mandatory step is laying out the insulation.
Sheets of film flooring should be laid only on the usable area of the room, no closer than 20 cm from the baseboards; the film should not be placed under furniture or heavy household appliances. The area covered with film can be from 40% to 80% of the room, depending on its purpose.
Film heated floor
When laying infrared film for a heated floor, an important factor in the successful completion of the work is considered to be a correctly designed layout of contacts and connections. Since the film heated floor is placed under the laminate, all its cable connections pass through the substrate. Accordingly, grooves for connections need to be cut in it.
Infrared heated floors are installed strictly according to the installation diagram. It gives laminate a huge advantage, especially when the decision to replace the flooring was due to low levels of thermal insulation.
The main stages of laying laminated panels over ceramics
The technology for laying all types of laminate over ceramics is simple, but it requires attention, skills, and taking into account some nuances. Consists of several stages.
The first stage is preparing the base
A ceramic tile floor meets the requirements for the base on which the laminate will be laid if three criteria are met:
- Smooth surface;
- strength;
- absence of moisture, dust.
You should make sure that there are no significant cracks, irregularities, or depressions; if necessary, remove the defects with a solution.
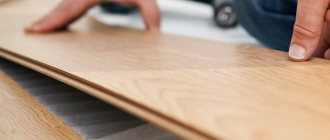
The second stage is preparing the laminate
The entire volume of laminated panels for installation in a given room, without unpacking, is laid out on a flat plane for adaptation within about 2 days. This will make further work easier.
Laminated panels - what types are there?
Tools
Before you start, you need the following tools:
- jigsaw/hacksaw;
- knife/scissors for opening packages;
- steel bracket for installing the last panel in a row;
- wedges for maintaining the distance between the panel and the wall;
- pencil, square, tape measure.
Selecting the direction of the panels
The options for the arrangement of panels relative to the walls can be different, the most applicable are herringbone, diagonal, and straight. “Herringbone”, like the diagonal, visually enlarges the room and requires more time, material and skill of the craftsman. Direct installation is easier, and when placed parallel to the window, the room visually expands. Placing the panels along the flow of light lengthens the room.
Laying laminated panels
Regardless of the base of the covering, laying the laminate begins from the far left corner, having previously installed restrictive wedges around the perimeter of the room. The comb should face the wall.
Note! In order to impart strength to the structure, each subsequent row must be shifted relative to the previous one by a third or half so that the seams do not coincide.
After the panels are laid over the entire surface, a small gap will remain along the walls, the so-called temperature gap, which will disappear under the baseboard. Installation of the plinth is the last stage of the work.
In what cases should you not put
Laying laminate on tiles is impossible, first of all, if significant irregularities are detected in the geometry of the coating - folds, bulges, dents or depressions on the surface. If laminate is laid on such a basis, the panels will be partially suspended.
When any load appears, the locking connections will begin to break, for which they are completely unprepared. The result of this condition will be destruction of the canvas, which will require replacement of the coating .
In addition, you cannot lay laminate flooring without tiles if this method would raise the floor level to an unacceptable level that would prevent the use of doors.
It is not always possible to trim the door leaf from below, and the resulting step between the laminate and the covering in other rooms sometimes becomes a cause for falls and other troubles.