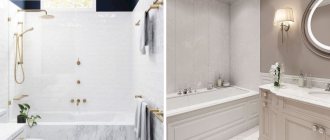
The choice of tiles for walls is huge: many colors, a variety of textures and variations in sizes. Medium-sized square tiles are versatile - they are equally good for both large and small bathrooms, regardless of their style. But now rectangular tiles are more in demand - they have fewer “seams” and more layout options. After all, rectangular tiles can be laid horizontally, vertically or in a mixed way (combining horizontal and vertical laying). Which way is better?
Features of modern bathroom design
Different types of tiles on the floor and walls are characteristic of a modern interior design. Therefore, check out what criteria such a design must meet:
- A complete rejection of classical editing. Nowadays, structural materials with a matte and heterogeneous texture are in fashion.
- Laying standard single-color tiles in different patterns with a combination of facing materials of the opposite tone.
- The use of decorative items: friezes, borders, tiled plinths. A selection of drawings to match the color of the interior.
- Use for finishing finished collections in the bathroom: with ornament, decoration, unusual arrangement, intersecting seam.
- Using the horizontal masonry method to visually expand walls with diagonal floor placement.
- The use of vertical wide friezes is justified. This approach will help “raise” the ceiling and make the room lighter and more spacious.
Do not forget that for modern interior solutions it is important to highlight the internal corners of the room. Therefore, use tiles of a contrasting tone in relation to the base for their cladding. For example, for a room in a pastel color palette, a material is chosen to highlight the corners of red, green, and black. In these places, laying elongated decor is also encouraged. It will make the perimeter of the room perfectly smooth and hide design flaws.
Ornament in the bathroom with brown and patterned tiles Source design-vannoy.com
Important! The use of black tiles should be thoughtful and organic. It is best to combine it with a red ornament, a panel or a collection of drawings in the area of functional areas.
Vertical stripes in the bathroom of contrasting colors Source 3dlancer.net
Method No. 3. Diagonal laying
This is a very difficult and costly method in terms of the material used, so inexperienced performers should avoid it. As in basic masonry, the butt seams here resemble crossed lines, and their correct location should be controlled by a triangle and a level, which are applied to the axes. The advantage of diagonal laying is that it can be used to visually correct non-parallel walls, as well as “push” the frames of a small room.
Popular layout options
The most difficult thing is to choose a pattern that can be used to decorate the walls and floor in the bathroom. If you create the ornament correctly, it is interesting to combine the seams between the tiles, you can get a unique effect. It will emphasize the sense of taste and add the finishing touches to the interior.
Correct placement of tiles in the bathroom from the corner horizontally Source m.my.mail.ru
Masonry from the corner
This method involves installing one tile in a row from the corner. From here they lay out the entire wall, using tiles without a pattern with the same surface. When you reach the next corner, there is usually empty space left. It is finished with cut fragments of tiles from the same collection. As a result, we may see a corner filled incorrectly. In appearance, it visually supports the ceiling and makes it higher. To ensure that such an element is clearly visible, a contrasting shade is used for grouting joints.
Placing tiles in the bathroom, starting from the center of the wall to the sides Source plitkahelp.com
Correct laying from the center
Installation begins from the center of the wall. When completing a row on both sides, the last tile is not fixed. Unfilled spaces on both sides are leveled and lined with material of the opposite color. The following combinations look good: light green and orange, brown and milky, peach and pink, white and black.
Installing tiles from the center using decor in height Source folksland.net
Laying squares from the center in the bathroom Source yandex.ua
See also: Catalog of companies that specialize in finishing materials.
Central masonry in different directions
For such a composition, background tiles and decorative elements are used. For the entire bathroom you will need at least 3 vertical rows of them. Laying begins from the center of the wall without architectural structures (built-in niches, bulges). Having reached the end of the row, they return to the center and carry out a similar installation of tiles in the opposite direction. At the end of each line a vertical decor is inserted. The same thing is done on the other edge of the row. This composition is repeated along the entire height of the wall. You can use not only friezes and borders, but also equally cut pieces of tiles of a different color.
Each method is guaranteed to be suitable for different conditions: with curvature of walls, lack of level.
Placement with ornament
Typically, this method is acceptable for tiling the floor in the bathroom. With the correct selection of geometric patterns, a tiled carpet is created. For such compositions, be sure to use edging around the perimeter of the room. It is chosen in dark, eye-catching tones. You can continue the framing with a plinth, also made from the remains of tiles.
Floral ornament on the wall in the bathroom Source roomester.ru
Using this technology, it is necessary to accurately calculate all dimensions. An error of a few millimeters can cost a shift and visual disruption of the diagonals in the room. Designers do not recommend using ornaments on the floor in small bathrooms. This is explained by the fact that the composition should be visible at the entrance. You can't clutter it with a headset.
Using patchwork tiles for masonry in the bathroom Source plitkahelp.com
Patchwork masonry
Patchwork is used for modern and vintage styles. It looks original in the bathroom. This interior will be remembered for a long time. It is equally used for finishing floors and walls. Screens under shower boxes or bathtubs are often decorated with this design. This option should be used sparingly. Otherwise, the composition will turn out to be a kaleidoscope that hurts your vision.
Bathroom with patchwork tile decor in the functional area Source plitkahelp.com
When covering the floor in a patchwork style, the walls should be left light and monochromatic. If you want to decorate the walls in a similar pattern, then choose only one, preferably the far one. The patchwork will always be visible on it. The remaining walls are made monochromatic (as in minimalist style). A multi-colored pattern can be placed in a small fragment behind the side of the toilet, under the washbasin, between wall shelves, opposite the mirror.
Patchwork tiles for decorating adjacent walls in the bathroom Source uutvdome.ru
For narrow and elongated bathrooms where a shower is installed, you can line two adjacent walls forming a corner with a patchwork pattern. Tiles are laid on the floor in diamond shapes or small squares. They try to use a light shade of the surface, and make the seams one tone darker.
Bathroom with shower with patchwork tiles Source remontbp.com
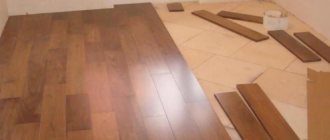
Bathroom with tiles on the walls in the form of parquet boards Source topplitka.ru
Step-by-step instruction
The technology for laying paving slabs consists of sequential steps:
- preparing a concrete pad;
- installation of curbs;
- fixing slabs;
- filling seams;
- coating processing.
Preparing a concrete pad
concrete pillow
To increase the durability and reliability of the foundation, it is recommended to use a geogrid. Honeycomb-shaped structures are made of synthetic raw materials that are resistant to damage by mold, rot, and the effects of aggressive alkaline agents. After stretching, the lattice acts as a frame that can withstand horizontal or vertical stress. The design makes it possible to reinforce different compounds in cells.
The geogrid is laid out on the base of the trench and covered with a layer of gravel up to 15 cm. The cushion is compacted, and a reinforcing mesh is placed on top. The formwork is set according to the level of the markings completed.
The components for the concrete composition are mixed, which is laid out in the formwork. After pouring the mixture, a submersible vibrator is used to mix the composition to prevent the formation of water bubbles.
The concrete layer is covered with polyethylene to prevent the material from drying out. The road surface must be moistened with water for 3-7 days.
When forming a covering with a large area, it is necessary to lay expansion joints every 2-3 m. To do this, boards are placed perpendicular to the formwork. After the composition has dried, they are removed and the openings are filled with elastic material. When temperature conditions change, the seams will prevent cracks in the concrete base.
To remove moisture from the concrete surface during pouring, parts of asbestos-cement or polypropylene pipes are installed. Before laying, drainage holes are filled with fine gravel. After the concrete base has hardened, the formwork is disassembled.
Installation of curbs
installation of curbs
Curbs are installed in the recesses of the formwork. Installation of the elements helps prevent chipping of the edges and increases the wear resistance of the road surface. In the manufacture of the structure, elements made of stone, polymer-sand tiles, and vibration-pressed products are used.
Up to 50% of the curb dimensions are hidden under a layer of soil. The soil must be thoroughly compacted to increase the strength of the base and the stability of the structural solution.
Concrete with a rigid structure is used to adhere curbs to the surface. The material is laid out in the ditch, and border elements are installed on top. To compact the base, the blocks are tapped with a rubber mallet.
The openings between the elements are filled with liquid concrete mixture. According to technical requirements, the height of the curbs should be 20-30 mm lower than the paving stones for unhindered outflow of water. It is necessary to allow the solution to harden for 1 day. Then the opening between the curb and the trench walls is filled with sand.
How to put it correctly?
Then you can begin installing the slabs on the concrete blind area; knowing the size of the blocks in accordance with the purpose of the site will tell you how to lay them correctly. Slabs 4-5 cm thick are laid on the pedestrian sidewalk; paving stones at least 6 cm thick are installed on parking areas and driveways to the house.
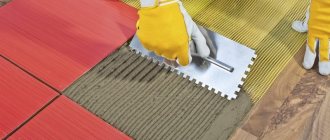
After preparing the cement mortar to a creamy consistency, lay the blocks. The solution is laid out on the surface with a trowel, the blocks are mounted according to the chosen pattern and compacted with a mallet. It is necessary to check the horizontal position of the masonry using a building level.
When using dry mixtures, the material is poured onto the surface in a layer of at least 3-5 cm and leveled using the rule. Paving slabs are installed on the cushion. In a dry state, the mixture will not be able to hold the elements, so it is necessary to spill the coating with water after completion of installation. After drying, the composition firmly holds the blocks together.
Paving slabs can be laid out in different patterns, creating original compositions in adjacent spaces and near public buildings. The list of common block installation schemes includes:
- “herringbone”;
- "network";
- diagonally;
- “chess”.
installation diagrams for paving slab blocks
Sealing seams
sealing seams
The seams between the slabs are filled with a dry mixture and watered. Work is carried out until the composition has completed shrinkage. After 2-3 days the materials should harden. It is necessary to remove debris and sweep away dust with a broom. The sidewalk is watered with a hose under strong pressure.
How to fill the seams of paving slabs
Schematic illustration of tile laying
For walls and floors, it is important to use different schemes when performing cladding. It is important to choose the right sized tiles. You can choose models of different colors and styles. The main thing is that the modules are successfully combined:
- Horizontal. The most common option. They try to use it for narrow bathrooms. One color of tile is located halfway up the wall from the floor. White-orange, white-pink, beige-brown compositions look great.
- Vertical. This option, on the contrary, is suitable for rooms with low ceilings. The same tiles are laid in several rows up to the ceiling, then replaced with a different color. This way you can alternate and make several stripes with similar masonry, or you can divide the bathroom in half.
- Contrasting zones. For this effect, you will need several tiles of a color that will stand out against the general background of the walls. Bright highlighting can be done near functional areas.
- Placing tiles with panels. Plain tiles in a bathroom without decoration are already outdated. Now they focus on panels with patterns and floral designs. Such drawings look very beautiful with a floral frame.
- Diagonal laying. It involves covering walls or floors with square tiles placed along diagonals. This effect has a beneficial effect on visualization. The atmosphere acquires notes of freshness and an original approach to execution.
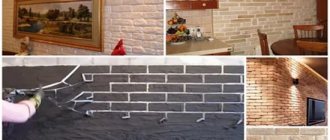
- Brickwork. The use of this option is typical for the loft interior design. Light tiles are used. The seams are grouted with a product that matches the tile or is several shades darker. It is important here that the accent is visible.
- In a cage. This option is more suitable for finishing the floor. The work is very painstaking and requires care. You will need three types of tiles: long fragments, small squares and basic squares. Large tiles are laid out, narrow fragments on four sides, and small pixel squares in the corners.
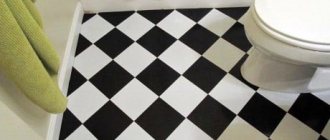
- Chess board. This method is common in bathrooms of medium size. Such compositions make the room attractive, in-depth, and original. For this purpose, tiles of contrasting colors are used: blue and green, black and white, red and purple.
Complex and offset patterns can also be used. They will require several types of tiles. It is advisable to choose options from the same manufacturer. Each tile must match in thickness for easy laying.
Method number 1. “Seam to seam”
Perhaps the simplest installation method, in which the rows of tiles are located parallel to the walls of the bathtub. In this case, vertical directional accuracy is measured by a plumb line, and horizontally - by a triangle. In a similar way, you can lay both square and rectangular tiles. Separately, it should be noted that this method allows you to save material, and the process of laying tiles becomes as simple as possible. In addition, the “seam to seam” method allows you to harmoniously decorate the room with various ornamental borders.
When laying, you should not rely on the accuracy of your eye; be sure to use special plastic crosses.
Toilet in minimalist style
Combination of several techniques
If you want to make your bathroom original, you can use several masonry techniques at the same time. For example, the base is an imitation of brickwork, and the interior panel in the shower is in the form of a parquet board. You can use elite tiles with a beautiful figured shape. It is used to line the following areas: near the sink, faucets, and shower head riser.
Beautiful bathroom design with tiles Source dizajninterer.ru
Simulation programs
Virtual visualization of the bathroom interior can be done through online editors and specially developed modeling programs.
We invite you to familiarize yourself with the list of the most popular of them:
- 3D Superb
- TilePlanner
- Domus 3D.
We take into account the parameters of the room
In order for the selected layout to look good in the bathroom, you need to take into account several parameters. For example, for small rooms it is better to choose tiles measuring 15x15 cm or 20x20 cm. Also consider the list of important points:
- Use small and large tiles alternately or simultaneously for spacious rooms.
- In compact bathrooms, it is better to use a material with a glossy glazed surface.
- For large rooms, laying matte tiles on the floor and in work areas is relevant.
- Avoid a lot of dark colors, they can distract attention from interesting masonry options.
- Sharp tones and contrasting transitions can be used for bathrooms with showers and rooms with irregular geometry.
- A large number of decorative borders and friezes are optimal for wide bathrooms.
On a note! If you urgently need to visualize the height of the ceiling, use vertical masonry, long friezes, and highlight the corners.
Laying tiles on the floor with a matte texture and ornament Source satu.kz
Preparatory work
You should start by measuring the entire perimeter of the room. You need to check the angles for various discrepancies. To assess the scale of the proposed work, remove the old flooring. The entire area should be cleared of paint and linoleum.
At this stage, it is important to decide on the size, color, texture of the tiles and installation method. You need to make a list of all the necessary tools and materials
These may include: self-leveling mixture, glue, tile cutter, primer, grout, protective composition and cleaning products after completion of all work. The preparation process may take varying amounts of time.
You need to evaluate the quality of the floor. For an uneven one with a large number of cracks and a slope, additional materials will be required. Identified deficiencies should be corrected as soon as possible. In order for the result of the work to please the master and the owners of the premises, it is necessary to strictly follow the entire technology of the process.
Screed
Preparing the base is the initial stage. The cleaned surface must be prepared and impregnated with antifungal agents. After the impregnation has dried, you can begin laying the waterproofing. Then they make a screed and, after waiting for it to dry, proceed to the primer. For uneven floors, a self-leveling mixture is used.
There are other preparation methods for concrete. A special device is used to mark protrusions of more than three centimeters and remove them. All cracks and joints are treated with primer, and then a layer of cement is applied. After it dries, all dust and debris should be removed with a vacuum cleaner. The surface is treated with an antifungal agent.
The waterproofing layer in the bathroom and kitchen should be given special attention. You can use polyethylene film, waterproof varnishes and paints as it
If there is a wooden floor, polyurethane foam is poured into all cracks. Some people prefer to add additional plywood. A reinforcing mesh with cells is placed on top of it and filled with a special solution for wooden materials. Drywall is also used to level surfaces with differences of more than six centimeters. Then the remaining building mixtures are applied.
Leveling the floor
To level the floor in an apartment or house yourself, you need significant experience in construction. For those who do not have sufficient skills or time, self-leveling mixtures will come to the rescue. They easily spread over the floor and, filling all the depressions, form a smooth surface.
This mixture consists of a very fine filler to which gypsum or cement has been added. Other special components speed up the hardening process and promote leveling. The solution can be used on concrete and wood floors.
Gypsum mixtures. They have a high degree of strength and wear resistance, and are suitable for all rooms, regardless of their size, where there is no excess humidity level. An excellent choice for a "warm floor" system. This type of coating has a number of undeniable advantages. It does not generate dust, has strong wear resistance, dries quite quickly and weighs little.
Cement. Cement-based mixtures are slightly more expensive. They are best used for the bath and kitchen, as the composition is ideal for damp areas
It is important to remember that the cement level performs leveling of about five centimeters. If it is necessary to level a much greater height, then the work must be carried out in two or three stages.
In construction stores there is a huge selection of such products. It is best to familiarize yourself with the composition before purchasing and contact a specialist in the store. If there is a need to combine two mixtures of different composition, then you need to use a damper tape, the thickness of which is no more than one centimeter. This is necessary in order to avoid cracks due to different coefficients of thermal expansion.
Application
The self-leveling mixture is applied to the already dried screed. It must be remembered that before starting work it must be primed, having previously been cleared of dust. Then secure the beacon screws in level. They will become a guide for the thickness of the layer - usually it should not exceed five millimeters.
Then the floor is covered with the mixture and spread over the surface with a spatula. To remove air bubbles, the composition is leveled with a needle roller. Drying lasts from 6 to 12 hours, but you can start laying tiles only on the third day.
A slope is provided for the bathtub so that if water gets on the tiles, it flows towards the door. It is better that the floor level is lower than in the room where the door opens and a high threshold must be equipped
These are precautions against flooding of the apartment
Method No. 10. “Kaleidoscope” or “Patchwork”
This method is more suitable for creative and cheerful people, because in this case your bathroom will turn into a colorful kaleidoscope, in which tiles of several colors will be randomly or orderly scattered throughout the room. Such a cheerful atmosphere will certainly charge you with a positive mood and vigor for the whole day.
Method number 9. Equality of colors
This scheme involves the use of two or three primary colors, and they are introduced evenly, but not mixed with each other. One half of the bathroom is decorated with one tile, the other half, and so on. Equality of colors is realized as follows: the half in which the bathtub is installed is decorated with one tile, and the wall opposite and the areas adjacent to it are tiled with tiles of a different color.
At the same time, both colors can be used to decorate the floor, joining them in the middle or laying them out in a checkerboard pattern.