Can tiles be laid on gypsum plaster? We can say “yes” with confidence. Just before doing this, you should pay due attention to the preparatory work.
It is better to prime the surface 2 times. The primer must contain an antiseptic to prevent the appearance of fungus.
Be sure to align the first tile, because the entire row will be aligned with it. If you follow all the recommendations and the algorithm of actions, the tile will stay on the surface for a long time. In this case, fungus will not appear.
Laying tiles on the PGP
Let me remind you that ceramic tiles are laid on flat walls with a deviation from the vertical level of no more than 2-3 mm per meter of length. The unevenness of the surface of the wall in the light should also not exceed 2-3 mm.
A correctly laid partition made of PGP allows you to obtain the required evenness without any problems. At the same time, if significant flaws were made during the installation of the PGP, the partition can be leveled with a gypsum plaster mixture. (For more details, see the article Is it necessary to plaster tongue-and-groove slabs).
Waterproofing
The basis of the PGP slab is gypsum and the surface of the PGP partition belongs to gypsum bases with high hygroscopicity. This means that the gypsum surface absorbs water well and gradually deteriorates in a humid environment.
In the classic version, the gypsum surface is protected from moisture with a two-layer deep penetration primer, followed by treatment with a coating polymer primer. For example, weber.tec 822.
However, the use of moisture-resistant GGP boards makes it possible not to waterproof the walls. Although it is recommended in any case to treat places where walls are in direct contact with water (shower, bath) with a layer of waterproofing.
In addition, waterproofing using a special waterproofing tape is mandatory at the junction of the walls made of PGP and the bathroom floor. This is especially true in apartments where PGP walls were made instead of a destroyed plumbing cabin. The destruction of the cabin, a priori, removed the layer of waterproofing on the bathroom floor, it needs to be restored.
Choosing adhesive for laying tiles on PGP
In theory, any universal tile adhesive of class C1T is suitable for laying tiles on gypsum, pre-primed surfaces. For example, Unis adhesives.
In practice, read the information on the glue packaging. It is necessary that the glue is suitable for gypsum bases. To be on the safe side, you can choose an adhesive that is designed for complex substrates. For the paranoid, I recommend C2E class glue. For example, LITOFLEX K80 glue.
By the way, the tile adhesive class is deciphered as follows (EN 12004 standards):
- The letter C means cement adhesive;
- Letter E – the time for open application on the wall has been increased.
Number 2 – improved technical characteristics;
Choice of grout
The main purpose of grouting the joints between the tiles is not decoration, but to protect the layer under the tiles from water and humidity.
When following all the above rules, namely the use of moisture-resistant slabs, abundant primer, waterproofing and the use of moisture-resistant glue, the choice of grout type does not matter. Any high-quality grout will do, including cement grouts with mineral fillers, such as Ceresit or Atlas.
When in doubt, use expensive two-component epoxy grout (Litokol Litochrome or Sopro Topas).
About the bathroom and GGP slabs
The main feature of the bathroom for all renovation work is the humidity in the bathroom. All construction and finishing materials are selected based on humidity, and appropriate work technologies are selected.
If you decide to use GGP boards in the bathroom, then you need to buy moisture-resistant boards designed for installation in wet rooms. At the same time, you don’t need to think that moisture-resistant PGP can be wetted under running water. It is forbidden. They can only withstand high humidity. Their water absorption is normalized to no more than 5%.
By the way, in simple GGP slabs, the water absorption parameter is simply not standardized.
Can plaster be used as tile adhesive?
Each mixture is designed for its own purposes.
Plaster has a greater solution viability and less adhesion than tile adhesive.
Tile adhesive dries faster and has good adhesion.
Therefore, it is better to glue the tiles with tile adhesive and plaster them with plaster.
1 Good answer
Is it possible to lay stoves with cement mortar?
Cement mortar, which consists of sifted cement, sand and water, is used only for laying foundations in damp places and for laying pipes
9 Good answer
Is it possible to glue wallpaper onto rotband without putty?
Rotband can be leveled to almost perfect condition. The main thing is strict adherence to the recommendations of the Knauf company. At the same time, the plaster is glossed and rubbed to a smooth surface. Thick wallpaper can be glued to such a surface without additional putty.
Few people use this technology with Rotband, so putty is most often used.
Can floor unevenness be corrected using tile adhesive?
Of course, and even necessary, since let’s say 5 mm on the plane, we put the tiles in a 12 mm joint, and a gap of 3 mm needs to be left. Therefore, the depth can reach 20 mm, and this depth is filled with tile adhesive. This format is possible on areas of 10-20-30 square meters.
When the format of laying tiles of 100-300-500 square meters 5 mm matters, but not so fundamentally.
4 Good answer
What glue should I use to glue tiles onto gypsum plaster?
Hello, most experts recommend rotband glue, as it holds tiles on gypsum plaster best. We hope our advice helped you.
How to plaster aerated concrete inside a house?
For better moisture insulation, it is worth using so-called deep penetration mixtures. For the correct combination with “finishing” materials, we choose plaster mixtures based on silicates (liquid glass), cement-lime base with additives, or gypsum plasters with perlite sand.
1 1 · Good answer
Tongue and tongue block, how to prepare for gluing tiles in the bathroom
Hello, can you tell me what and how you treated the tongue-and-groove blocks in the bathroom before tiling? I went over it with concrete contact, it seems to be holding on and doesn’t come off, but it’s time to gouge and in the places where it was gouged it peeled off a little, you start to pull it away from the wall (you pry it up) and it moves away from the wall. Maybe you should have primed it first or made some notches? And in general, should concrete contact stick strongly to the surface? Tell me if you can. Thank you.
He, concrete contact, is what he is. If you pull as you pull, a crazy force per mm2 is created. If you multiply by the area, then one tile will require several tons of force to tear it off.
Vadim S wrote: Maybe it should have been primed first
would be better. Even better was to just prime and lay.
those. the concrete contact is subject to vertical force, and over time it will not peel off along with the tiles in the bathtub
If the blocks are level, I also bluntly prime and lay the tiles.
What if I just prime the tiles and they won’t fall off in a year or two?
Vadim S Just prime. The primer for almost all occasions is Ceresit “ST-17”. Vacuum the walls, then the primer and tiles. Everything will last forever.
Well, what prevents you from reading recommendations on the Knauf website? As far as I remember, in wet rooms it is necessary to coat plaster walls with acrylic waterproofing such as Feydal Flechendicht. And only then glue the tiles. Not the cheapest glue.
Bruegel wrote: Well, what prevents you from reading recommendations on Knauf’s website?
Yes, very desirable. You can, for example, . You can catch a lot more on their forum and on this one. All about the peeling of waterproofing. I’m not gloating in any way, I’m just drawing attention to the problem. Therefore, if you don’t need extra puzzles, That.
mihamaster wrote: Vacuum the walls then the soil and tiles
I've never had anything flake off. Primer (by the way, you need to know how to do it) - acrylic waterproofing - tile adhesive. Not the cheap Knauf Fliesenkleber. Better, of course, is Flexkleber. But in the absence of it in stores - Eunice Plus or Eunice Granite.
Bruegel wrote: in damp rooms it is necessary to smear plaster walls with acrylic waterproofing of the Feydal Flechendicht type
least. because if moisture gets behind the tile, it will first swell and then fall off
Bruegel wrote: Nothing has ever peeled off for me.
But mine peeled off. Waterproofing. After that, I put the tiles directly on the plaster. Now nothing peels off. We all know how to do it correctly and “coolly”. However, practice makes its own adjustments. Let everyone interested know about all the options. The choice is still theirs.
San-San wrote: at least. because if moisture gets behind the tile, it will first swell and then fall off
I apologize, but “at a minimum,” you need to lay the tiles on a continuous layer without voids. At least in those places where water flows. Then grout them properly. Water should NOT get behind the tiles.
Introductory Notes
Often the walls in housing are plastered with various gypsum-based mixtures. Gypsum is a complex material with specific properties. Developers prefer such mixtures because they are easier to work with and it is easier to achieve leveling of the surface.
In frame or wooden houses, situations arise when it is necessary to lay tiles on plywood. The technological processes for installing tiles on gypsum plaster or plywood are similar.
the cladding of bathrooms and toilets looks especially exciting
- After all, they have a high level of humidity;
- The sponginess of gypsum plaster greatly increases the moisture absorption and receptivity of the glue;
- The porosity of gypsum plaster does not contribute to uniform fastening of finishing materials.
Leveling plastered walls Over time, mold and mildew creep under the glued tiles in toilets and bathrooms.
Gypsum plasters, compared to cement plasters, have less strength. Gypsum has an oxidizing effect on metal. That is why fasteners entering the wall must be made of stainless steel.
In order to lay tiles on gypsum plaster, you need to overcome its disadvantages. Therefore, the technological processes described below are followed.
Glue selection
Before purchasing tile adhesive, you should pay attention to its increased elasticity. And when choosing a method for laying tiles on foam blocks in the bathroom, pay attention to such a characteristic as resistance to high moisture. For the working wall in front of the kitchen stove, you should give preference to tiles, the operation of which is possible at elevated temperatures.
Suitable materials for finishing dry rooms (corridors, living rooms or offices) are compositions based on a conventional cement-sand mixture of type CM9. And among the special options for tile adhesive, mosaic adhesive stands out separately, intended for sticking mosaics on walls. Due to the presence of white cement in the composition, this material does not have its own shade and provides increased strength of the cladding.
Is it possible to lay tiles on gypsum plaster?
Gypsum and lime are widely used building materials, both in their pure form and as a base for leveling mixtures. Therefore, although gypsum is not a desirable base for ceramic cladding, laying tiles over gypsum plaster is now common.
Mixtures based on gypsum and lime, especially gypsum plaster “Rotband” from the manufacturer Knauf, are widely used in finishing residential premises with normal humidity levels. But rotband has a number of characteristics that make it unsuitable for finishing wet rooms.
Laying ceramic tiles on a rotband is quite possible
The porosity of the rotband causes a high coefficient of water absorption and reduces the adhesion strength to its surface. In addition, rotband is hygroscopic, that is, it has the ability to absorb and accumulate moisture from the environment, which makes it undesirable as a base for finishing tiles with adhesive. In conclusion, gypsum when in contact with metals accelerates their oxidation and has low impact resistance.
Lime plaster also has a number of positive characteristics: cost-effectiveness, ease of application and reliable adhesion to the wall surface. However, one cannot fail to mention the disadvantages: such plaster is not strong enough, is easily damaged, and is susceptible to dampness and low temperatures.
Preparing the base for laying tiles with adhesive in the bathroom or kitchen should not be done with gypsum or lime-based mixtures.
However, new residents of typical high-rise buildings often find walls finished with rotband in the kitchen and bathroom, where the surfaces are constantly in conditions of high humidity and contact with water. If such finishing has already been completed, or the walls are made of gypsum cement blocks, then the question arises whether this situation can be overcome and the physical characteristics of the existing base can be improved for further ceramic cladding. Let's consider technologies that make it possible to neutralize the negative characteristics of the rotband and lay tiles on it even in the bathroom.
Volma tongue-and-groove slabs (solid)
Volma solid slabs have the shape of rectangular parallelepipeds with a tongue-and-groove system, manufactured using injection molding technology. The main purpose is the construction of internal partitions in rooms with three types of humidity according to SNiP II-3-79. Moisture-resistant boards contain hydrophobic additives and special plasticizers. The moisture-resistant version has a characteristic green color.
The material of the stove does not support combustion and does not contain substances harmful to the human body. They have high sound insulation and do not have a specific odor.
installation of walls made of Volma tongue-and-groove slabs. Photo
Technical characteristics of Volma slabs
The surface of the slab and the geometric accuracy of the design eliminate plastering work when finishing the room. The solid slab is produced in one standard size - 667x500x80. The weight of one plate is 28 kg.
Analysis of the wall surface and its preparation for laying tiles
Installing tiles on a complex surface layer, gypsum plaster or plywood, requires certain knowledge and skills.
Before gluing tiles, four important tasks must be solved:
- Take care to eliminate mechanical surface defects;
- Strengthen the strength of wall material;
- Increase the adhesion of gypsum plaster, i.e. ability to adhere to dissimilar solid materials;
- Reduce the moisture permeability properties of the plaster.
First, the plastered surface is leveled. Irregularities are eliminated:
- The tubercles and protrusions are erased;
- Depressions and chips are filled with putty;
- If necessary, sand a section of the wall with sandpaper or go over problem areas with a grouting mesh;
- An additional layer of plaster is applied.
Work with the application of each layer is carried out after the previous one has completely dried.
Further work with leveled gypsum plaster is carried out after the surface has completely dried and dirt and dust have been removed.
The successful solution of other tasks is achieved through the use of a primer.
Bathroom and toilet renovation: choosing materials for finishing wet rooms
Bathroom and toilet renovation: choosing materials for finishing wet rooms
20.07.2019
Bathroom and bathroom renovations are often accompanied by the construction of new partitions, installation of screeds, and tiling of walls and floors. Each of these steps requires the use of suitable materials. After all, even minor mistakes can lead to unexpected and irreparable results. We’ll talk further about what subtleties to pay attention to and what materials to choose for bathroom renovation.
Alignment and construction of walls in the bathroom
There are two main ways to create smooth walls in a bathroom: leveling existing walls and installing new partitions. Partition structures can be constructed using masonry or frame structures can be erected using slabs. The methods differ not only in the characteristics of the materials, but also in the complexity of the installation technology, construction time and price.
Materials for laying partitions in the bathroom
Arranging partitions using the masonry method has significant advantages over the frame method. These include increased strength and reliability, improved insulating properties. At the same time, masonry is a complex process that requires increased material, time and labor costs.
The most suitable modern material for laying partitions in bathrooms is GGP tongue-and-groove slabs. They are made from aerated concrete, foam concrete and gypsum. For wet rooms, the best option would be to use special moisture-resistant PGP. They have a dense structure. Water-repellent additives have been introduced into the raw materials for production, reducing the hygroscopicity of the material.
Porous slabs of foam concrete and aerated concrete blocks can be used in damp rooms. However, they need enhanced water protection, which must be taken into account in subsequent finishing stages.
Is it worth it and is it possible to glue tiles onto gypsum plaster: features of the coating
Gypsum has been used in construction for a long time; this coating has proven itself to be the best, since the mass is quite pleasant to work with, does not contain rough impurities, is distinguished by the presence of a pleasant color and dries quickly.
To glue the tiles, you do not need to apply too thick a layer of gypsum plaster
In addition to a large number of advantages, this material also has several disadvantages that can affect the laying of tiles on top of it:
- When coated with gypsum as a plaster, it can form a porous structure, which can negatively affect the tiles laid on top.
- Due to its structure, gypsum also quickly absorbs the moisture that appears, as a result of which the coating softens and fungus and mold form.
- This coating is also not durable, especially when any blows are applied, dents remain and chips occur.
- When in contact with metal objects, gypsum is capable of destroying them, giving way to corrosion.
The most suitable gypsum base will be for painting or wallpapering, but with tiles you need to be more careful and attentive. An additional primer on top of the gypsum base has more pros than cons - the strong porosity of the surface is reduced, as a result of which it is strengthened, a dense water-repellent film is created, preventing fungi and mold from spreading. This also increases the strength of the coating and its adhesion to further decorative material.
Volma tongue-and-groove slabs (hollow)
For the construction of partitions that require reducing the load on the base of the floor, Volma hollow plasterboards are provided. Their main application is the installation of interior structures in modern panel houses. This is due to the maximum load that the floor slabs can withstand. Like their solid counterparts, the slabs can be standard and moisture-resistant. The standard size remains the same: 667X500X80 mm. Often a hollow slab is used for cladding the outside of a room. The weight of a standard hollow-core slab is 20 kg, and that of a moisture-resistant slab is 22 kg. The material properties of hollow slabs are similar to their solid counterparts.
Installation of partitions from Volma slabs
Installation of a partition made of Volma tongue-and-groove slabs is carried out by precise alignment of grooves and ridges on parallelepipeds, followed by gluing them. Any adhesive for gluing drywall, including the recommended one, is used as an adhesive mixture for Volma tongue-and-groove slabs. Installation of the partition structure is carried out in the following order:
Partition made of Volma tongue-and-groove slabs. Video instruction
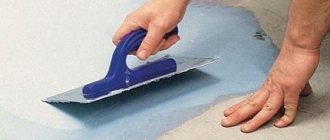
Priming the walls
More often, primers consisting of emulsions based on synthetic resins are applied to the gypsum surface. This composition reduces the porosity of the plastered surface, improves its adhesion, and forms a strong elastic film. Primers with increased performance are also used for reliable waterproofing.
To avoid doubts and worries about the final result, the primer mixture is applied in 2 layers and allowed to dry.
Instead of universal primers, “rough” primers are used, which contain quartz chips, strengthen the base, reduce its absorbency, and make the surface rough. The latter is important for increasing adhesion.
To improve waterproofing properties, water repellents - impregnations made from silicone compounds - are applied to a wall or plywood plastered with gypsum. Coating mastic waterproofing, which is applied to gypsum plaster and plywood, is suitable.
Be sure to treat the surfaces with an antifungal primer. The entire surface is thoroughly coated.
When planning to install heavy tiles, gypsum plaster and plywood are additionally reinforced - reinforced. Plastic mesh is used for plastering, and plywood can also be reinforced with metal mesh.
IMPORTANT! Laying should begin after treating the walls with primer mixtures and allowing them to dry completely.
Tips and tricks
Now here are a number of tips and recommendations given by professionals:
- Tile adhesive must be applied to a small area, which will be processed within 20 minutes. Otherwise the glue will harden.
- All excess glue that protrudes during installation must be removed immediately, otherwise it will be impossible to remove it later.
- When laying gypsum fiber boards, it is imperative to bandage between the sheets, which will provide greater resistance to loads.
- Before laying the tiles, the gypsum fiber board flooring must be left for at least 3 days, after which priming and installation begin.
- When purchasing an adhesive mixture, you need to make sure that it is suitable for gluing gypsum fiber sheets.
- Laying should be carried out only when the primer is completely dry, strictly following the technology presented above.
By following these recommendations, you can avoid a lot of problems and difficulties.
How to lay tiles
Laying tiles on the floor.
Laying tiles on gypsum plaster implies initial preparation of the walls for this process. Laying tiles on gypsum plaster is possible only after the latter has completely hardened. It is applied to the wall using special glue. It is worth remembering that the wall must first be treated with a primer.
If you plan to lay the tiles in a room where there is constant moisture, you should apply a moisture-resistant primer to the walls.
For application to a gypsum surface, primers made from synthetic resin emulsions are used. This material has a number of features, which include:
- reducing the porosity of the gypsum base structure;
- improving adhesion of cladding and base;
- formation of a strong elastic film;
- improving the water resistance of the gypsum base several times.
These are the advantages due to which this type of primer is applied to the gypsum surface.
And now it’s worth talking in more detail about how ceramic tiles are laid on a gypsum base. This is done quite simply. The main thing is to listen to the advice of experts, which will be given below.
Conclusion
In conclusion, I will list the maximum stages of work used for laying tiles on PGP walls.
- Cleaning walls from remnants of assembly adhesive and other contaminants;
- Checking walls for permissible deviations from the vertical and unevenness;
- Plastering with gypsum solutions (if necessary);
- Double, generous primer with deep penetration compounds;
- Waterproofing in two layers with polymer compounds. Sealing joints with the floor and corners with waterproofing tape;
- Laying tiles is carried out only on dry substrates, using C1T class adhesive for bathtubs or C2E class adhesive for open showers;
- Grouting joints with epoxy grout.
I repeat, these are the maximum stages of work, with significant reinsurance.
©gipsokart.ru
More articles
- Weight of tongue-and-groove slab PGP
- Moisture-resistant tongue-and-groove slabs (GGP)
- Gas silicate block, what is it?
- What is gypsum tongue-and-groove board?
- Dowels for GGP slabs and blocks
- Sound insulation of GGP slabs
- Adhesive for tongue-and-groove slabs
- Materials for tongue-and-groove partition PGP
- Is it necessary to plaster tongue-and-groove slabs?
- Features of tongue-and-groove slab installation: elastic and monolithic connection
Covering the wall with an adhesive mixture
It is recommended to follow the specified proportions for preparing mixtures. However, during the installation of tiles, sometimes it becomes necessary to apply a thin layer of the mixture. Then the solution is prepared more liquid. The thick mixture helps thicken the adhesive layer.
Covering the wall with an adhesive mixture
It is worth paying close attention to the existing varieties of mixtures. They are available for indoor and outdoor use (frost-resistant).
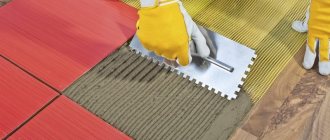
Apply the mixture to gypsum plaster or plywood with a comb spatula.
How to properly glue tiles onto gypsum plaster
In order to glue tiles onto gypsum plaster, certain conditions must be met.
- You should not use gypsum plaster in rooms with high humidity. If such finishing already takes place, then it is necessary either to completely clean the walls from material unsuitable for the given conditions, or after tiling, use epoxy grout to achieve complete isolation of the gypsum from dampness;
- When choosing tiles, give preference to thin material. Porcelain tiles are not suitable in any form due to their heavy weight;
- Before starting work, treat the gypsum base several times with antifungal agents, and after that with a primer. The primer will fill the voids and increase the adhesion of the surface, while it will additionally increase the antifungal protection of the surface and its strength characteristics. When processing with liquid compounds, each layer must be allowed to dry completely. It is in the process of prolonged impregnation and subsequent drying that the strength of the entire plaster layer will increase and most of its voids will be clogged;
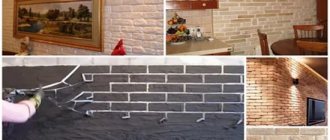
- Remove all irregularities from the surface using a plaster mesh and examine the structure of the wall to ensure it is sufficiently strong. If weak areas are detected or if you want to cover the wall with heavy material, it is recommended to install a galvanized metal plaster mesh with a small cell using double-nails. Such additional reinforcement will distribute the load on the surface and strengthen its structure;
- In order for the tiles to stick well, you need to use a gypsum-based or universal adhesive mixture. Cement-based compositions will be ineffective in this situation;
- During work, lay no more than three rows of facing material per day to prevent them from slipping;
- Grouting of joints should be done no less than 5-6 days after completion of all work. This is necessary to allow moisture to escape from the installation mixture.
KNAUF tongue-and-groove slabs
One of the most famous manufacturers of gypsum boards is the German concern KNAUF. The brand's products are available in three sizes: 667x500x80, 667x500x100 and 900x300x80.
Material of tongue-and-groove slabs
The basis for the production of KNAUF tongue-and-groove slabs is gypsum binder of two grades: G-4 or G-5. The material does not support combustion and does not contain toxic components, which allows its use in hospitals and kindergartens. It does not conduct electricity and is resistant to sudden changes in temperature. A high degree of vapor permeability is characteristic of all gypsum products. The material is easy to machine and has no specific odor.
installation of partitions from tongue-and-groove slabs. Photo
Technical description of KNAUF boards
The KNAUF tongue-and-groove plate has the form of a rectangular parallelepiped, the design of which provides for a special high-precision tongue-and-groove connection. The finished product has the following technical characteristics for all sizes:
- Density – no more than 1250 kg/m;
- Weight: 28, 37 and 24 kg, depending on size;
- Compressive strength – 5 MPa;
- Bending strength – 2.4 MPa;
- Thermal conductivity according to IA – 0.29 W/m°C;
- Thermal conductivity according to IA - 0.35 W/m°C;
- Humidity – no more than 12%;
- Flammability class - NG.
Installation of partitions using KNAUF slabs
Do-it-yourself partition made of tongue-and-groove slabs. Video instruction
Read the full instructions here
Partitions made from KNAUF tongue-and-groove slabs are constructed using the designer method, by precisely connecting a groove on the supporting side and a tongue on the joining side, with gluing of the joining surfaces. The adhesive mixture can be Perlfix , produced by the KNAUF concern. Installation of tongue-and-groove slabs is carried out with precise adherence to rows in vertical as well as horizontal planes.
Work on the construction of partitions should be carried out after the completion of the production of load-bearing elements of the room, but before laying the finishing floors. This period coincides with finishing work indoors, mainly during the cold season. room temperature Humidity should correspond to dry or normal conditions. Before use, the slabs must undergo acclimatization, that is, adapt to indoor conditions. To do this, they must lie inside for at least 4 hours.
The permissible length of the partition is 6 m, and the height is 3.6 m. If it is necessary to erect a longer or higher partition, it is made up of separate fragments, each of which has a separate attachment to the supporting structures using a special frame.
Installing tiles on a wall surface
In accordance with a certain layout scheme, the tiles are laid out in rows on a wall or partition:
- Markings are made horizontally and vertically. A horizontal line is drawn along the perimeter of the room at the height of one tile from the floor. The beginning and end of the horizontal markings must coincide. A distinct vertical line is obtained using a plumb line or building level.
Craftsmen recommend attaching a galvanized profile at the level of the horizontal line. The initial row of tiles (second from the floor) is laid out on it. Using wooden planks does not ensure accuracy.
Installing tiles on a wall surface
Types of partitions
Partitions made of tongue-and-groove slabs, depending on the material of manufacture, are divided into:
- Silicate ones are made on the basis of quicklime and water with the addition of quartz sand. The mixture is pressed and kept in an autoclave. They do not burn and have high sound insulation performance. Compared to gypsum types, such structures are more durable and resistant to moisture.
- Gypsum PGP partitions are made on the basis of gypsum with the addition of plasticizers. They are divided into moisture-resistant (green) and moisture-unresistant. The installation of such partitions can be done in any room, including children's rooms. Gypsum is environmentally friendly, non-flammable, and has good sound insulation.
Moisture-resistant tongue-and-groove blocks are produced in green color.
Partitions are made hollow and monolithic. Hollow material is lightweight, but it will not be possible to hang massive shelves, lamps, etc. on it. Solid ones can withstand heavy loads.
Installation of slabs for partitions is carried out after the construction of all load-bearing structures, but before laying the subfloor and before the start of finishing work.
Surface marking
Since the tile consists of fragments of a clear geometric shape and certain sizes, its correct location on the wall is of great importance. Preliminary marking of the surface with the installation of beacons and determination of control points will help to place the tile elements in the required order.
To begin with, it is recommended to draw up a rough sketch of the cladding, which will allow you to accurately install the cladding fragments in accordance with the selected pattern. Then the diagram is transferred from paper to the wall, taking into account a slight gap for the seams between the individual parts.
Using a level and plumb lines, a straight line is applied to the surface dividing the rows. It is advisable to maintain the integrity of the tiles in the top row, so it is recommended to start laying from the bottom.
After determining the starting line, a support strip is fixed along it, allowing you to adhere to the horizontal direction and keeping the tile from sliding under the influence of gravity.
Laying out the initial row of tiles
- To ensure uniform and symmetrical gluing of the tiles, the cladding should be laid from the center. The corners are covered with cut elements.
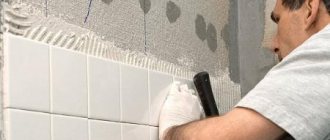
- Laying the tiles begins after covering the wall surface with the adhesive mixture. Do not immediately glue dry tiles to the wall. It is pre-coated with glue. This is how to improve the quality of adhesion of the tile to the surface on which it is attached. Then the tile is pressed against the wall and fixed in level.
- The subsequent rows of tiles should be laid on gypsum plaster or plywood in the same way. This is done carefully, without the use of effort. It happens that tiles break. Use a mallet with a rubber striker. Then the tile is securely fastened and remains intact.
- The installation of the trimmed parts is left to the final stage. If you need to make holes in the tile for a switch or socket, then this is done in advance, before installation. This protects gypsum plaster or plywood from unnecessary loads.
The process of tiling prepared walls
An optical level is installed on a tripod in the center of the room and adjusted so that it displays the projection of a horizontal beam on the wall surface. This horizontal beam is transferred to the very bottom of the wall and the highest point on the screed is found, in the area where the screed connects to the wall. At this point, a tile is applied to the wall, after which the horizontal projection of the beam is raised to the level of the upper edge of the applied tile. At this height, it is necessary to mount an edged board with a straight edge or an unnecessary flat metal profile to the wall strictly according to the projection of the beam.
Optical laser levels appeared not so long ago, and even today, not everyone has them in their household. Without a level, before laying the tiles on the wall, markings are done using a long bubble level - a spirit level. Using a spirit level, you need to walk along the perimeter of the floor in the room and determine the highest point where the transition of the wall to the floor is located. From the screed along the wall, either measure the height of 1 tile with a tape measure, or apply the tile directly to the wall and make a mark on the wall along the upper edge of the tile. Next, a level is leaned horizontally against the mark, set to a horizontal position, and a solid line is drawn along the level, along which in the future it will be necessary to mount the edged board to the wall with anchors. [ads-pc-2][ads-mob-2]
Before laying the tiles on the wall, a working adhesive composition is prepared. About 3-4 liters of water are poured into a container with high sides, for example a basin or wide bucket. Dry tile adhesive is slowly poured into the water so that it slightly covers the poured water. Next, all the contents in the bucket are mixed until homogeneous using a mixing attachment installed in the chuck of a powerful drill or hammer drill. Having obtained a homogeneous mass without lumps, it is left for about 5-10 minutes at rest, after which the tile adhesive is re-mixed with a mixing attachment.
After installing the stop in the form of a board and making the glue, they begin to directly glue the tiles to the wall. Initially, using a small spatula and a comb, tile adhesive is applied to the surface of the wall from the board. Using a comb allows you to remove excess glue from the plane, while the same thickness of the adhesive composition is formed everywhere. In a similar way, a uniform layer of glue is applied and formed on the back side of the tile.
Laying the tiles with glue begins from the corner on the wall opposite to the entrance to the room. The tiles attached to the glue are initially placed evenly on the nailed board, after which a level is applied vertically to the tiles and, by lightly pressing or tapping the tiles with a rubber mallet, it is placed in an even vertical position. After this, another 1-2 tiles are laid adjacent in a row, setting each one at a vertical level and forming seams of equal thickness between the tiles using PVC crosses. Having laid out 3-4 tiles in a row along the board on the wall with your own hands, a level is applied horizontally to the surface of the entire tile with an edge, and, if necessary, a certain tile is adjusted with gentle blows of a rubber mallet.
Having covered the entire wall to the top with whole tiles according to the above scheme, the last row of tiles is cut to size using a tile cutter or a small angle grinder, so that the tiles can be glued under the ceiling. At this stage, immediately remove the glue from the tile seams with a knife. After this, you need to pause for 1-2 days so that the glue between the tile and the wall sets. After waiting a couple of days, the lower thrust edged board is removed from the wall. Before gluing the tiles of the bottom row, you need to stock up on thin wood chips. [ads-pc-3][ads-mob-3]
The technology for laying tiles on the wall in the lowest horizontal row is the same as the previously produced cladding. The glue is applied and spread on the wall and the back side of the tile with a comb, after which the tile applied to the wall is leveled and leveled. Between adjacent tiles, PVC crosses are placed in the seam. To prevent the tiles from the bottom row from sliding down, wooden chips are inserted under the lower edge of the tile, and the upper edge of the lower tile is temporarily fixed to the surface above the tile laid on the wall with paper masking tape.
A few days later, all unnecessary tape, wood chips and PVC crosses are removed from the lined wall and all seams are finally cleaned with a stationery knife. Cleaned seams are filled with grout no earlier than 7-8 days after laying the tiles, so that for some time the empty seams serve as a drain for moist air evaporating from the tile adhesive.