How to lay tiles in the bathroom correctly, how to calculate, where to start laying? This question is faced by craftsmen who plan to lay tiles with their own hands; below we provide step-by-step instructions that will help any beginner to independently calculate and tiling the bathroom.
Heading:
- Toilet tiling
- Choosing which method of laying tiles in the bathroom suits you
- Laying tiles on the wall with your own hands (video)
- How to properly lay tiles in the bathroom - instructions
- Calculation of the number of tiles
- Preparing to lay tiles in the bathroom
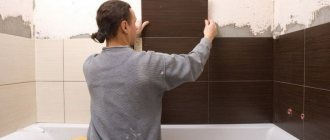
- Laying tiles on bathroom walls
- Laying tiles on walls video
- How to lay tiles in the bathroom video report
- Bathroom tile color scheme
- A little about bathroom style and design
- Modern bathroom design video
Not being a specialist, but wanting to gain experience in construction technologies, the best idea in terms of starting training is tiling a toilet. The reason for this is quite simple - the toilet room is usually small in size, so even if something goes wrong, you can always call a specialist who will fix everything, and your financial losses will be minimal. Therefore, the article below is about the main stages of laying tiles in a toilet. Let's begin.
Preparing walls for laying tiles
The old coating must be removed, since the base for the new tile must be smooth and prepared. Uneven walls are leveled using plaster or drywall; walls and corners must be checked for slope; a building level is used for this.
If the wall has blocked corners, this can lead to uneven and large gaps, problems with the installation of plumbing, and so on. The preparation stage can take much longer than the tile laying process itself.
- To remove the old coating, tools such as a hammer drill, drill, chisel and hammer are used.
- There should be no old paint or loose plaster left on the walls.
- After the dismantling is completed, no fragments of the old coating should remain on the walls.
When treating walls, you must use a liquid primer, which serves as additional protection and improves adhesion.
Make a preliminary layout
Before starting the process, figure out how best to arrange the tiles to achieve the most harmonious look and avoid undercuts. If there is no escape from narrow pieces, move them to the most inconspicuous places. For example, on the wall above the door.
Ideally, all trims should be larger than half the tile in size. This will slightly increase the material consumption, but will make the cladding more aesthetically pleasing. To do this calculation, do the following:
- Divide the width of the wall by the width of the tiles and count how many whole tiles fit.
- Remove the outermost row on either side.
- Slide the remaining tile toward the center of the wall.
- As a result, in the corners there will be one tile slightly larger in width than the whole.
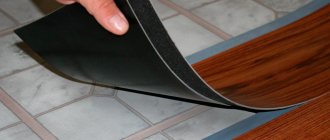
Waterproofing the floor before installation
When laying tiles on the floor, it is important to waterproof the base in advance. This procedure will help prevent flooding of neighbors below in the event of a water leak.
Waterproofing eliminates any possibility of leakage; the following are used as waterproofing materials:
- Bitumen
- Ruberoid
- Bulk polymer composition
The floor is treated with bitumen mastic, before which it must be treated with a liquid primer. The roofing material is rolled out overlapping, the joints are coated with a torch so that the canvas is complete and airtight.
If a self-leveling compound is used as waterproofing, it is poured according to the screed principle, in a thin layer.
Selecting the appropriate adhesive mixture
The choice of adhesive mixtures presented in stores is quite wide. Usually all the brands presented are of satisfactory and good quality.
A specialized solution will need to be prepared only for critical elements, for example, for the corner of a house. An “additive” or a special mixture is needed for cladding laid over “warm” floors.
The most important characteristic of a building mixture during masonry is the low flow rate of building raw materials.
Keep in mind that laying paving slabs with your own hands is done on regular concrete or a moistened mixture using a slightly different technology.
To impart specific properties, a “hydrophobizer” is added to it to protect it from water or basalt fiber for strength.
Tile laying options
You can start laying tiles from the floor or walls. If work begins with laying walls, it is necessary to make a small indentation, which is intended for the convenience of further laying floor tiles.
Layout options may vary.
- Direct method. The tiles are laid parallel to the walls; this is the simplest option, suitable for beginner tilers.
- Brickwork. The tiles are laid with a half offset, resulting in the appearance of brickwork. This method involves more pruning.
- Diagonal method. The tiles are laid at an angle of 45 degrees regarding the joints of the floor and walls. This is a rather complicated method that is best left to the professionals.
- Modular way. Laying tiles of different shapes and sizes.
Where to start
The first thing you need to think about is not how to arrange the decor of the tiles in the bathroom; first you need a floor plan with the location of the main interior details - plumbing fixtures and furniture
What you need to pay attention to when creating a diagram:
- When thinking over the drawing, observe all the proportions and scales of the bathroom, but do not make the drawing too small. The diagram should be large enough to place all the elements on it and clearly indicate the dimensions.
- To correctly lay out the tiles in the bathroom, you need to know the exact dimensions, so measure all the walls of the room, taking into account the doorway, ledges and niches. Label the obtained values on the diagram.
- Mark the location of plumbing fixtures and furniture on the drawing.
- Be sure to indicate the location of the ventilation shaft, sockets, switches, etc.
- Interior details that are attached on top of the trim do not need to be indicated on the diagram - they do not affect the layout in any way.
- Do a control check - compare the real bathroom with the resulting diagram, make sure everything is correct.
This is what a bathroom should look like with the correct tile layout
An accurate diagram is needed to correctly calculate the amount of material, the size of the tiles and the ornament itself. If you make even a small miscalculation, it may turn out that the most beautiful elements of the layout end up behind the plumbing fixtures or in the corners, otherwise the effect that was intended for such decor will be completely lost. Design examples that you can see for laying tiles in the bathroom are presented in the photo below.
Sketch of tile layout in the bathroom
Cross pads
To ensure that the seam sizes match and are perfectly even, special crosses are used.
- Cross pads can be of different widths, ranging from 1 mm to 5 mm.
- Crosses of 3-4 mm are used for wall tiles, and 5 mm for floor tiles.
The crosses must be of good quality and not break, otherwise they may get stuck in the seams and be difficult to get out. High-quality crosses are very elastic, but at the same time, they do not break.
"Dimensional nuance"
Another important characteristic is the caliber of the tile; it is often ignored. This parameter is due to the characteristics of ceramic production. One size can have several calibers, that is, slightly but apparently different thicknesses.
When receiving the packages, be sure to check the identity of this indicator. Some manufacturers introduce their own classification; then explanations of the calibers can usually be found on the counter or from the seller.
Step-by-step instructions for laying tiles in the bathroom
Before laying, you need to measure the height of the wall and divide it by the height of the tiles. The tiles that will be trimmed should be in the most inconspicuous places and corners.
When calculating the rows, it is necessary to take into account the width of the seams, which will be about 3-4 mm. It is advisable that the cut tiles be located at the bottom.
Instructions for laying tiles include the following steps:
- Preparation of the solution. The solution (tile adhesive) is mixed in a container using a drill or a construction mixer. The consistency should resemble thick sour cream, the glue should not flow, but at the same time it should be elastic. The quality of adhesion of the tile to the wall depends on the quality of the glue.
- Laying tiles on the wall. To apply the solution, a notched trowel is used, the mixture is applied to the tile, it must be evenly distributed over the surface. The tile is pressed against the surface with uniform force; you cannot put too much pressure on the tile, otherwise it may crack. Laying begins from the second row of the wall, so that the tiles do not slide down, a wooden strip is attached to the wall. A tile cutter is used for cutting.
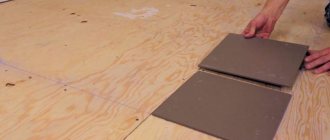
- When starting to lay tiles on the floor, you need to move from the far corner to the exit. A rubber hammer is used to press the tiles to the floor.
Gather materials and tools
They will be needed for measurements, preparation of the base and installation itself. Almost everything from this list is in every home or is sold in a hardware store at affordable prices:
- tiles, adhesive and grout;
- primer, tray and roller;
- crosses for seams, profiles and screws;
- mixer and kneading container;
- drill, hammer drill;
- serrated and soft spatulas;
- rubber mallet, tile nippers;
- angle grinder with a diamond disc or tile cutter;
- pencil, level, tape measure and square;
- bucket, sponge.
Instructions for grouting tiles
The seams between the tiles must be grouted. It protects walls and floors from moisture penetration and also adds aesthetics to the final appearance of the bathroom.
It is better not to skimp on grout; it must be of good quality; you can choose any shade of grout. The mixture is sold in powder or mastic form and is applied to the seams with small flexible spatulas.
Remaining grout must be removed from the tiles immediately; you can use a damp sponge to do this. When the grout has dried, you need to smooth the seams with sandpaper.
Prepare the glue
- Pour water into the container and add the required amount of adhesive in strict accordance with the instructions on the package.
- Stir well until smooth using a hammer drill or drill at low speed.
- After 10 minutes, stir the solution again for a more uniform consistency and complete saturation of the settled mixture.
- Do not prepare a large amount of solution at once. If you don’t have time to use it, it will dry out and lose its properties.
- You cannot add water to already prepared glue: this will impair the strength.
Useful recommendations from the master
Useful tips for laying tiles will help you achieve the best results.
- Laying tiles should begin from the second row from the floor.
- Professionals advise applying glue not to the tiles, but to the surface of the wall.
- Glue residues can be easily removed with a sponge, but this must be done immediately.
- The width between the seams should be completely the same.
- For convenient work, you can use a tile leveling system, which consists of a wedge and a clamp.
- When laying one row, it is recommended to take tiles from one box.
- When gluing the tile, you need to move it a little in different directions so that the glue fills the entire space and there are no voids.
Laying tiles may seem like a simple process, but it has many subtleties and nuances that must be taken into account during work.
Proper surface preparation and sequence of actions will help achieve a positive result.
Join the corners
When laying tiles in the inner corners, make sure that the tile with a cut edge is covered with a plate with a smooth factory edge on the other wall.
To form external corners, use special corner profiles made of plastic or aluminum. Install the corner and align the first tile with it, and insert the second into the profile coated with glue.