Repairing premises where ceramic coating was used requires experience and high qualifications from the craftsman. You need to know how to remove bathroom tiles from the wall without damaging them, how to replace 1 or several tiles in a kitchen splashback, how to remove tiles from the floor and walls. A competent approach to solving such issues facilitates, speeds up and reduces the cost of repair work.
Removing old tiles
Before starting work, you need to find out what materials were used to lay the tiles. If a mixture of cement and sand was used to fasten the product, then it is almost impossible to dismantle the old coating without damaging it.
In this case, you cannot do without a hammer drill. It copes well with a cement base, but experienced craftsmen also have the risk of damaging the tiles.
- If the tiles were attached with a special tile adhesive, then it is still possible to keep the surface intact and unharmed.
- Here you need to consider the following. If the tiles were laid on drywall, then removing them from the wall without spoiling them is an almost impossible task.
Sometimes during the work process it is not possible to preserve either the tile or the material intact. But if it is a brick or concrete wall, then dismantling work will be much simpler and easier.
Thus, the chance of saving at least 50% of the old tiles greatly increases.
How to remove mortar and glue residues from the surface?
After dismantling, you need to remove any remaining adhesive not only from the surface of the wall, but also from the back of the tile. To ensure that the glue comes away from the surface well, it is recommended to immerse the tiles in water for several hours.
If there are a lot of tiles, and cement mortar was used for installation, the easiest way is to use a grinder equipped with a special attachment.
The work will be dusty, so it is better to carry it out outdoors.
You can also remove mortar or glue from the wall with a grinder. An alternative to a grinder is a hammer drill or scraper.
In any case, cleaning cannot be carried out dry - the surface must be abundantly moistened with water. Final cleaning is carried out with a wire brush.
It is not necessary to peel off the thin adhesive layer - it will be enough to prime the wall and smooth out any unevenness with putty or a thin layer of plaster. And finally, one more piece of advice: you can remove tiles in the bathroom efficiently and accurately only if you are not in a hurry.
The more carefully all the work is planned, the higher the concentration of attention at key moments, the more successful the dismantling will be.
Tools and materials
When performing repair work, tools play an important role. In each case, a certain type of available kit is required.
Tools suitable for any occasion:
- A hammer drill and the necessary attachments for it,
- Chisel,
- Rubber and regular hammers,
- Spatula, chisel,
- Impact screwdriver,
- Dishes for diluting soap solution in it,
- foam sponges,
- Drill and drill bits approximately 6 mm in diameter,
- Tempered wire with a diameter of 4 mm,
- Pencil,
- Ruler,
- Ladder,
- Construction film,
- Old blankets.
Preparing for work
Before you start work, you should be well prepared. This stage is the initial one, and it is not recommended to skip it, otherwise the repair process will become more complicated, the work will be done poorly, and it will not be possible to keep the original tile intact.
Replacing multiple items
In some situations, only a few elements need to be replaced. With this method, it is important not only to remove the material, but also not to damage adjacent elements. You can do this in the following ways:
- Remove grout from the desired surface. Using a grinder, cut along the seams and make several holes;
- Use chisel, hammer;
- Break off into pieces.
We recommend: Weather protection for a country house made of timber
Whatever method of work you choose, it is important to approach it with extreme care and carefully protect all surfaces and plumbing around it. Properly followed technology will not only allow you to cope with the task perfectly, but also save the family budget.
Protecting floors and interiors from damage
You should take care in advance to protect the floor and furniture from possible damage that may occur during the process of dismantling the tiles.
Using construction film, old blankets and rugs, you should cover nearby furnishings with them, such as a toilet, sink, or bathtub. These actions will help avoid negative consequences if a piece of tile accidentally flies off.
Useful tips
- You can clean the seam using a grinder. Use a disk to cut the grout 2 mm deeper than the tile level, and remove the residue with a spatula.
- When working with hooks, the force must be applied strictly perpendicular to the surface of the tile, and not at an oblique angle.
- Taping the edges with masking tape will help protect adjacent elements from damage.
- When dismantling tiles on a wall, remove the top row first with a spatula. If areas with voids are found, removal begins with them.
- Tapping on the voids begins from the uppermost element on the right (for right-handers) or on the left (for left-handers).
A scraper or coarse sandpaper will help to clean the surface and the tile itself from residual glue and mortar. With the desire and due perseverance, the work will be argued, the main thing is not to rush and think through all the stages of dismantling in advance.
DO YOU HAVE ANY QUESTIONS?
Ask a specialist
Is it necessary to tap the tiles?
Tapping is an excellent method that is popular among experienced craftsmen. This technique makes it clear whether it will be possible to remove the old coating without damaging it.
- You need to take any tool, the main thing is that it has a rubber handle, and lightly tap each tile with it.
- This reveals the voids that are located under the tiles.
If a sufficient number of them are detected during the tapping process, then the chance of keeping the coating intact increases significantly.
Removing stitches
In order for the work of removing tiles to go faster, before starting repair work it is necessary to remove the seams. To do this you need to make a solution:
- Laundry soap should be rubbed.
- Dissolve it in warm water.
- Soak a sponge in the solution and apply it to the seams.
After treatment, you should leave the coating so that the solution is absorbed into the tile adhesive and it becomes soft. This action greatly facilitates the removal of old tiles.
Removing tiles from part of a wall
There are situations when it is necessary to remove tiles not from the entire wall, but from a certain area, for example, to replace some tile samples or to access pipes in the bathroom.
To carry out this work, you will need:
- Drills (thin).
- Drill.
- Putty knife.
- Hammer.
- Chisel.
Before work you need to make markings. To do this, you need to draw two lines diagonally along which you plan to drill the coating, and mark with dots the places where the holes will be.
- Next you need to remove the seams. When the holes are made, you should split the old tiles with a chisel.
- You should move from the central part to the sides.
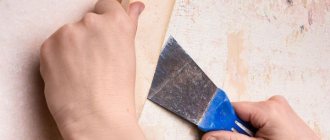
- Afterwards the material is carefully removed with a spatula.
- This method helps to leave the coating located next to the work area without damage.
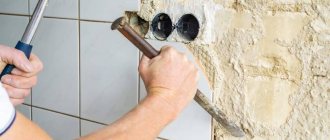
If the coating was held on by tile adhesive, then in order for it to easily come away from the wall, you need to hit it with a hammer with a rubber base and pry it from the side with a chisel. This method will help remove the coating without damage.
Safety precautions
How to carry out dismantling work safely:
- wear a protective suit, shoes with anti-slip soles, thick gloves, a respirator and construction glasses;
- de-energize the room, cover communication pipes with plywood;
- It is prohibited to use any power tools in areas with communications;
- make sure that power tools are in good working order and that the housing prevents electric shock;
- There should be no unauthorized persons in the bathroom without protective equipment;
- close the door to the room tightly - if there is no door, the opening can be covered with a wet cloth.
Neglecting safety precautions can be dangerous to health and even life!
Removing all tiles
Often the old tiles are removed completely to allow further work and installation of new tiles.
To work you will need:
- Sharp spatula.
- Drill.
- Hammer.
- Hammer (if necessary).
Before starting work, you need to perform a number of actions described above: remove the seams, soak the glue and tap the parts.
- If damaged samples are found, it is better to start working with them, as they will be easier to remove from the surface.
- But if there are none, then work should start from the top row. You need to insert the spatula between the wall and the tile at an angle of 50 degrees.
- Next you will need a hammer, they need to stick the spatula into the material on which the tile was attached.
- The work should be carried out carefully so as not to damage the wall.
- After this, you need to lightly press the handle and get rid of the material. This way you can remove all the old coating.
Particular care should be taken where electrical wiring, pipes, etc. are located. There is a risk of damaging them, and then a short circuit or sewer break will occur.
Therefore, if possible, it is better to work manually and only use a hammer drill as a last resort, even though it greatly facilitates the work and saves time.
All the recommendations given will be useful to anyone who wants to make repairs.
Particularly difficult cases
Particularly difficult cases include work:
- with drywall - the partition is very easy to damage even using gentle methods;
- in areas with poor access it is difficult to leave the tiles intact;
- to remove one or more tiles - high precision of manipulation is important.
For each case, it is necessary to apply an individual approach, test several methods in search of the optimal one.
You need to work very carefully in areas where communications pass through - pipes and electrical wiring.