The older generation of Russians associates foam ceiling tiles with the expression “cheap but cheerful,” which means: you can get acceptable quality for minimal money. They have no idea that everything is changing rapidly: some types of polystyrene boards are beyond the means of the middle class - only homeowners with high incomes can afford to buy them.
You can learn more about the pros and cons of ceiling tiles, their types, popular manufacturers and installation technology on the StroyGuru website.
Pros and cons of ceiling tiles
Plastic ceiling tiles (PVC, polystyrene) are a modern finishing material with its own strengths and weaknesses.
- small mass. Thanks to this, the material is easy to transport and lift into the apartment, and can be glued to weak (dilapidated) floors. And the glue consumption is minimal - 5-9 dots;
- long service life - from 15 years (budget options) to 100-150 years (expensive tiles);
- price variability. Can be purchased for 18 rubles/piece. - finishing as a whole will be cheaper than painting and wallpapering (with the exception of thin paper wallpaper), slightly inferior to whitewashing, and it can cost 529 rubles per piece, which not everyone can afford;
- good heat and sound insulation properties. The porous structure of the material perfectly dampens sound waves (especially important with noisy neighbors above) and conducts heat poorly - in multi-storey buildings there is no need to carry out additional work to insulate the ceiling space;
- simple installation - all work can be done with your own hands without help. In addition, complex, expensive tools are not needed;
- small thickness (4-14 mm) - the ceiling height will decrease by only 1-2 cm, which is important when finishing ceilings in old “Khrushchev” buildings and private houses with low ceilings;
- hides minor defects in floor slabs and rough wooden ceilings using finishing acrylic putty as an adhesive;
- easy care - can be washed with a damp cloth, rags or sponge with neutral detergents (care instructions below);
- the ability to update or change (if you get tired) the color scheme - just paint with water-based paint;
- fits into any interior design style in all rooms of a house or apartment: living room, bedroom, children's room, kitchen, corridor, etc.;
- wide choice according to: texture - you can buy smooth, rough, embossed, mirror or laminated tiles. Expensive types can imitate wood, leather, textiles, metal, and gold-plated inserts. As a result, it is easy to select ceiling plinths, corners, sockets; form - allows you to implement non-standard design solutions; color and pattern - the variability of colors and patterns simplifies the selection of tiles for the finished interior;
- resistance to fire - treatment with fire retardants transfers the material to the self-extinguishing class: it melts and smolders without maintaining an open flame;
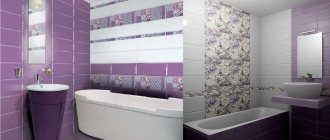
- resistance to high humidity. Can be used in the bathroom, kitchen;
- easy dismantling.
- fragility of material in the budget and mid-price range - special care is required during transportation and work (cutting and adjustment): cracks, chips, and dents may appear;
- Porous tiles require careful selection of adhesive. There are two problems here. The first is that the liquid composition comes through the micro-holes, spoiling the appearance (it cannot be removed unnoticed). The second is that polystyrene shrinks under drops of glue, which is also not good;
- when burning (smoldering), it releases substances hazardous to health;
- low vapor permeability (does not apply to porous materials), which is not significant for reinforced concrete floors, but is critical for wood - it rots intensively;
- deforms at elevated temperatures. Therefore, simple incandescent light bulbs should hang at least 30 cm, and powerful ones - 40 cm;
- Cheap types of tiles absorb odors, soot, and volatile fats, which are almost impossible to remove. In addition, the white color turns yellow over time. The problem is eliminated by painting;
- Not all manufacturers have calibrated tiles - difficulties arise in fitting due to different sizes in edge length and thickness.
What should you glue on?
The tiles are held on the ceiling using glue. The appearance of the ceiling covering, the complexity of installation, and health safety will depend on its characteristics.
Optimal properties of adhesive compositions:
- viscosity sufficient to secure the panels;
- surface setting time – 20-30 seconds;
- no toxic fumes;
- white or transparent color.
See also
Instructions on how to install lamps in a suspended ceiling with your own hands
The liquid consistency of the glue produces a thin film that is unable to support the weight of the coating. Thick adhesive will form an uneven and thick film, which will cause the panel to deform.
Holding tiles for a long time while gluing them to the ceiling quickly tires and reduces productivity.
Installation of ceiling decor, like wallpaper, should be done without drafts. Therefore, in residential areas it is necessary to use adhesives without components harmful to health. The dark substance will show through the seams, which will ruin the appearance of the ceiling.
Titanium
The glue brand Titan Professional Gallop Fix is used for gluing in rooms with high humidity. A layer thickness of 0.5 millimeters can withstand a weight of 240 kilograms per square meter. The final hardening of the film occurs after 3 hours. Modification Titan Professional 60 seconds gives adhesion without prior priming for 24 hours, which allows you to adjust the laying of panels.
On set
The adhesive is similar in composition and method of application to Titan. Forms good adhesion with all types of ceilings. Application feature: holding the tile pressed for 2-3 minutes.
Moment
The glue is available in 3 modifications:
- Moment Installation. One for everything. To improve the quality and slow down the adhesion, it is recommended to treat the ceiling with a 1x1 primer of wood glue and water. You can work in rooms with high air humidity.
- Moment Installation Express decor MV-45. Glued tiles retain adhesion at temperatures down to 0 degrees, with increased moisture evaporation. Hardening time – 2 days. The viscosity of the glue allows it to be used as a sealant to fill seams between panels and cracks in the ceiling up to 1 centimeter.
- Moment Universal. Has optimal viscosity and adhesion characteristics. The ceiling surface must have good hygroscopicity.
All varieties do not contain solvents that affect the properties of the products.
Liquid Nails
The adhesive for foam plastic is produced on a water basis, with the addition of organic solvents.
Features of application:
- high degree of adhesion (up to 80 kilograms per square centimeter);
- setting time – 20-40 seconds;
- complete hardening – 24 hours;
- resistance to low temperatures, humidity;
- Possibility of use as a sealant.
Liquid nails are applied pointwise or in the form of a grid. They are produced in the form of tubes, which require a mounting gun to work with.
Mastic for ceiling tiles
Polymer mastics have a sticky structure that does not require prolonged effort when installing panels. Use at temperatures not lower than +10 degrees. Drying time, on average, is about an hour, if the room is +20 degrees and air humidity is not more than 65%.
Gypsum putty
Gypsum putty is recommended for finishing ceiling skirting boards. Fast setting requires high speed and precision of gluing. Another disadvantage of the gypsum composition is instability in a humid environment. This type of finish should not be used in bathrooms, toilets and kitchens.
Pearlfix
Assembly adhesive is a type of gypsum putty and is intended for gluing drywall in dry rooms. When using it, it is necessary to pre-prime the dust-free surface. Can be used for installing ceiling plinths.
Acrylic putty
Putty is used for gluing thin polystyrene film. Positive traits:
- holds panels well;
- does not leak through the coating;
- withstands temperature changes;
- waterproof;
- plastic;
- environmentally friendly;
- durable.
An important quality is leveling the ceiling and sealing cracks.
Quart
The purpose of the glue is gluing linoleum, carpet, all types of tiles to concrete, plastered, wooden, and brick surfaces.
Kinds
Ceiling tiles have an unusual classification. The criteria are:
- mode of production;
- materials;
- form;
- type of edge;
- texture;
- dimensions;
- design;
- surface type;
- color.
Mode of production
Manufacturers use three fundamentally different tile manufacturing technologies:
- stamping (pressing);
- injection molding;
- extrusion (extrusion).
Pressing. In the process of making tiles using the stamping method, a mass of foamed polystyrene is compressed in a press to a thickness of 5-8 mm. The result is a square or rectangular sheet with a side length from 30 to 70 cm (the main size is 50x50 cm) and an extruded relief (pattern) on the surface. The slabs obtained using this technology have their pros and cons.
- simple manufacturing technology;
- light weight;
- budget price - the lowest in the class of ceiling tiles;
- Possibility of repeated painting with acrylic paints.
- fragility - when cutting with a knife or correcting the position on the ceiling, it cracks or breaks off in the corners;
- gets dirty quickly (dust, soot and grease get into the pores), but cannot be washed (painted ones can be wiped with a damp cloth);
- only sold in white;
- do not tolerate high humidity well. Therefore, it is not suitable for the bathroom. The toilet and kitchen must be painted;
- the relief pattern is fuzzy and blurry.
Injection casting. The injection production method is a combination of pressing and casting, during which plastic masses melt at high temperatures and then, under pressure of several atmospheres, are fed into molds where they take on the required dimensions and topography of the front part. The method has its strengths and weaknesses.
- the tiles have increased strength - they almost do not break during operation;
- the relief is expressive, clear;
- good sound insulation properties;
- low thermal conductivity coefficient. Thanks to its large thickness (10-14 mm), it perfectly insulates the ceiling space;
- hides minor floor defects;
- easy care - can be cleaned and washed;
- the surface can be white or painted, which increases the choice;
- have water-repellent properties - can be used in any room;
- Beautiful design;
- The joints, when carefully glued, are almost invisible.
- quite high price - it costs 3-4 times more than a pressed plate.
Extrusion. At first glance, it is impossible to produce ceiling tiles using the extrusion method. Those familiar with the technology know that this is a continuous extrusion of the melt (plastic or metal in a viscous state) through a head with the desired shape of holes. The classic version is “Rozhki” pasta. But if you extrude a continuous thin strip, and then apply a relief on it with a press or stick a decorative film, and then cut it into squares or rectangles, you get a ceiling finish. This complex technology makes it possible to obtain plastic with other performance characteristics:
- high strength with minimal thickness (about 3 mm);
- large operational resource;
- the ability to quickly return to its original shape after deformation.
- high density, as a result of which vaporous moisture is not absorbed;
- various textures - metal, wood, natural stone, etc. are imitated using decorative film;
- easy to clean and wash;
- repels dust, dirt, moisture. These properties allow the material to be used in places where hygiene must be maintained: hospitals, clinics, kindergartens, etc.;
- there is a choice between laminated tiles, paintable collections and white slabs that cannot be painted - paint does not stick to a dense, smooth surface;
- easy to glue.
- high price - due to complex technology;
- Translucent - you need white or colorless glue.
For information: colored products using this technology are obtained after adding coloring pigments to the melt.
To summarize: it is easier to glue and care for extruded tiles, but the price is high. Average in quality and price - injection plate. “Capricious” in care and gluing - pressed, but the shortcomings are compensated by the low cost.
Materials
For the manufacture of ceiling tiles use:
- expanded polystyrene (foam plastic). The most common finishing option. It is characterized by low weight, smooth or textured surface, resistance to temperature changes, and practicality. The texture resembles gypsum stucco;
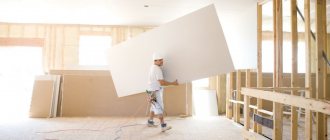
- mineral fiber is a modern material with its own performance characteristics, strengths and weaknesses. The classic representative is Armstrong-type tiles (only collections with Board edges can be glued);
- plastic - represented by polyvinyl chloride (PVC). Thin material, difficult to install, demanding to maintain.
Form
Classic ceiling tiles have a square shape with straight edges. There are many advantages here: it’s easier to create a layout sketch, lay it out, especially in the corners, and it’s easy to combine joints. In addition, you need to take into account the visual perception of the finish - symmetry always looks aesthetically pleasing, the ceiling seems even even with a slight distortion.
To diversify the design, manufacturers offered rectangular slabs and tiles with shaped sides: wavy, concave, convex. After gluing, tiles with complex edge geometry create an attractive pattern that gives the room charm and uniqueness.
Edge type
Based on the type of edge, tiles are divided into 3 types:
- with an edging that forms a clearly visible seam;
- chamfer - the edges of the tile are cut at approximately 45o. After gluing the boards, a beautiful seam is formed. The presence of a bevel allows you to diversify the design due to the layout;
- seamless - the edges of the decorative elements have a perfect cut along the edges, which allows them to be pressed together so tightly during the gluing process that the connecting joint is practically invisible. The ceiling looks like a solid surface. To help in adjusting the pattern or relief, laying direction indicators are applied to the back of the tile.
Texture
The surface of the tile can be:
- smooth;
- smooth with perforation;
- embossed.
Dimensions
The format of the slabs depends on the material of manufacture:
- polystyrene - edge length from 30 to 70 cm in different combinations;
- metal - 30x40, 30x60, 40x40, 50x50, 30x70 cm;
- wood - squares with edge lengths of 30, 50 and 60 cm and rectangles 20x60 and 30x70 cm.
When making ceilings according to individual orders, the length of the rib can reach 1.2 m and the width - 0.6 m.
Design
According to the method of surface design, tiles can be:
- relief - the front side after pressing has protruding elements that form geometric patterns, natural motifs or imitate plaster stucco. There are a huge number of embossing options;
- colored - decorative elements are painted during the production process (dye is added to the molten mass) or after injection;
- volumetric - using embossing and special coloring methods, 3D tiles with a three-dimensional effect are obtained;
- with decorative inserts, most often mirrored. This design technique allows you to get a light, sophisticated coating.
Surface type
The front side of the panels can be:
- glossy - option is possible only after painting;
- matte - gives the natural color of the material;
- mirror - a thin layer of reflective material is applied;
- laminated - a special protective film with a pattern is glued.
Mirror tiles are used in public buildings, matte, glossy and laminated are intended mainly for residential premises.
Blossom
There are more and more alternatives to the standard white color. On sale you can find collections in white-blue, light pink, delicate milk, cream, sand, coffee and gray colors. Golden, silver, copper, brownish, marsh tones look original.
Common Mistakes
A mistake often made is based on advertising the characteristics of tiles and adhesives, the opinion that gluing the panels to any surface will not be difficult. In order for the adhesion to the ceiling to be durable, it must be prepared. The complexity of the process depends on the type of ceiling: minimal for concrete, maximum for plastered.
Before installation, the panels must be kept in a dry room for several days to allow the moisture to evaporate. Once installed, wet tiles will shrink as they dry, resulting in gaps. It is necessary to work on the ceiling without power supply to the room. From the beginning of installation until complete drying, drafts must not be allowed in the room.
For any type of installation, it is necessary to mark the ceiling to avoid distortions in the rows.
When laying, it is necessary to tightly fit the panels to each other. Pressing the tiles against the ceiling with your hands can damage the polystyrene structure. A wooden block as a press will preserve the surface of the coating. Trimming tiles at the edge of the ceiling should not exceed 15 millimeters, otherwise it will not be covered by the baseboard. Panels for painting should be pre-primed. There must be at least 2 layers of paint.
Recommendations for selection
You can drown in the stream of recommendations for choosing tiles, there are so many tips. Some relate to technical characteristics, others to operational ones. When studying the technical parameters, you should pay attention to:
- on the integrity of the panel. Here they look at the back side - there should be no shells, depressions or swellings. If they exist, the technological process is disrupted; there may be hidden defects in the products that will appear during operation. Then the edges are inspected - they should be perfectly smooth, especially in seamless models. After all, the slightest chip will hurt your eyes;
- quality. The easiest way to check is to slowly lift it around the corner. A high-quality panel should rise, slightly bending, without a network of cracks;
- scope of application - the manufacturer indicates for which premises the tiles are intended;
- geometry - the diagonals of a square or rectangle must be the same in length. A millimeter discrepancy will lead to the formation of noticeable seams, which are difficult to hide;
- material safety. The marking shows flammability (G), flammability (V), smoke formation (D), toxicity (T). The class should be within 0 or 1. It is better to refuse a higher value. You can always find a good alternative;
- availability of certificates so as not to run into counterfeits or products that do not meet sanitary standards.
When it comes to performance characteristics, experts advise:
- for the bathroom and kitchen, choose moisture-resistant finishes;
- For modern style, metal and polystyrene with an original shape and seamless connection are better suited. In the classic interior design, only white polystyrene foam tiles with stucco relief or golden inserts do not disturb the harmony;
- suspended ceilings look good with relief tiles. Coffered - with wood, which has decorative recesses and perforations;
- with noisy neighbors above, tiles made using injection technology will help (you can tell by their thickness - more than 10 mm);
- a small room will be visually enlarged by finishing with a 3D effect;
- for frequent repairs, it is better to buy panels that can be painted repeatedly;
- thin slabs are translucent. There are two options here: buy transparent glue or thicker panels.
Popular manufacturers
On sale you can choose ceiling tiles to suit every taste according to design, shape and price. Therefore, it is difficult to create a single rating - consumer preferences are different. Nevertheless, we will try to provide a list of the most popular manufacturers.
"Armstrong". Armstrong-type suspended ceilings quickly gained popularity among Russian consumers. The secret of success is a huge assortment, high strength, moisture resistance, and most importantly, prices. The manufacturer offers not only economy-class materials, but also expensive, elite (designer) materials.
The traditional properties of ceiling tiles are complemented by an acoustic effect and reflective properties (creating the illusion of limitless space). A variety of textures, colors and patterns allow you to fit the ceiling into any design. The tiles can have a simple pattern or a structure and texture that accurately imitates wood, stone and other natural materials.
"Albes." The Russian tile manufacturer maintains its position in the building materials market thanks to high quality products, affordable prices and a huge selection of textures and colors, including mirror surfaces.
The high strength of the tiles allows installation without waste due to deformation, cracking and chipping. Excellent design is complemented by resistance to open fire, excellent sound absorption, and good thermal insulation properties.
The products of the Albes production association can be described in three words: durability, originality, aesthetics.
"Knauf". Products from German manufacturers attract buyers with their tile finish, low flammability, good sound absorption, resistance to high humidity, and low thermal conductivity.
Designed for recording studios, concert halls, cinemas and other premises requiring good acoustics. For this reason, it is practically not used in private construction (can be found in home cinemas and rooms for singing or playing musical instruments).
It differs from competitors in shape, types of edges, perforation (round, square, made in the form of a pattern). Plus - you can paint it repeatedly.
"Format". New technologies (American equipment from COMMODORE Plastics) allow the group to supply tiles with the following performance indicators to the retail chain:
- thickness - 4-7 mm;
- clear geometric contours;
- uniform tone of the entire part;
- high level of sound insulation;
- low thermal conductivity coefficient;
- beautiful design;
- Possibility of butt gluing.
The finishing is suitable for both office and residential premises: living room, bedroom, children's room, kitchen, etc.
AMF. The collaboration of the two produced excellent results. The tile has a number of qualities that distinguish it from its competitors:
- rigidity and strength;
- absolute environmental purity (biosoluble mineral fiber, perlite, clay and starch are used);
- high level of moisture resistance;
- purity of color;
- good heat and sound insulation;
- durability;
- simple installation.
"Antares" (Omsk). The company produces high-quality stamped, injection and extruded tiles of various textures, colors, shapes and sizes. Well-established quality control eliminates the supply of defective products to the retail chain.
"Laguna", "Mivi", "Miwe". Chinese enterprises Laguna, Mivi, Miwe supply imitation expensive tiles (Armstrong, Rockfon, etc.) to Russia at low prices. In appearance, the tiles are difficult to distinguish from the original. However, in functionality and performance characteristics it is significantly inferior to the prototype, which, however, is compensated by its low cost.
Despite this, the product finds its buyer. Consumers especially like the following collections: “Lotus”, “Matrix”, “Neva”.
Materials and tools
It is impossible to install a ceiling made of polystyrene foam tiles without some materials and a set of tools. You will need:
- foam ceiling tiles - the quantity is calculated based on the ceiling area and a margin of 10-15%;
- glue;
- primer - the type depends on the adhesive;
- plinth or molding - will close the joint between the wall and the ceiling;
- a stepladder or a strong table - you can only reach the ceiling with their help;
- tape measure (can be replaced by a large metal ruler) - needed for taking measurements;
- pencil - used to sketch the layout of the slabs on paper, transfer the sketch to the ceiling, mark the cutting lines of the tiles when fitting them to the wall;
- blank paper for a sketch of the tile fastening;
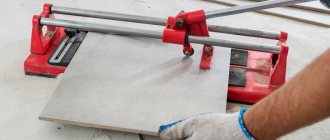
- a knife with replaceable blades (stationery) for cutting slabs to size;
- level - helps to control the flatness of the surface of the laid ceiling;
- spatula - for acrylic putty used as glue;
- construction gun for glue in tubes;
- beating cord or thin twine, greased with chalk or coal;
- a container for glue, a roller or a brush for applying it when packaging liquid glue in a bucket, canister or plastic bottle.
Glue selection
You can glue tiles to the ceiling using several types of glue:
- universal, based on various polymers;
- liquid nails;
- PVA, "Bustilat";
- finishing acrylic putty.
In practice, innovative compositions are also used: hot melt adhesive and compound adhesive.
More details about adhesive compositions are described in the material “Glue for ceiling tiles”.
Universal glue
This category of compounds includes several varieties:
- Eltitans
. This adhesive option is used for joining wooden, concrete and plaster surfaces. After application and drying, the glue forms a fairly strong and elastic layer. It takes quite a lot of time for such compositions to completely harden. - Titan
. The most popular option, which is used almost everywhere. It is advisable to use this glue for joining plastic, metal and glass products. The structure of the composition is quite viscous, and hardening occurs quickly. - Master
. A cheaper analogue of the previous option. Master adhesive for ceiling tiles differs from the previous version in its characteristic odor and long hardening period. - Moment
. Expensive, but very reliable glue. Moment adhesive for ceiling tiles dries quickly, does not emit odors and provides the strongest connection between parts. The disadvantage is that the glue consumption is too high, so it is recommended to use dispensing guns for application.
You can find other glue options on sale, but they will all have similar classifications and characteristics. Based on the parameters, you can choose a good analogue of the compositions described above and decide exactly what kind of glue to use for gluing the ceiling tiles.
Preparatory work
Gluing ceiling tiles begins with preparatory work. They are performed in several stages:
- removal of old finishes;
- surface leveling (carried out when height differences exceed 5 mm);
- primer;
- marking.
Removing trim
Before starting work, the lighting fixtures are removed. Electrical wires are de-energized or insulated. The second option is preferable, because One of the family members may accidentally turn on the electricity.
You can clean the ceiling from finishing using several technologies. It all depends on what is on the ceiling. The wallpaper is first soaked and then removed with a spatula. The tiles can also be removed with a spatula.
Whitewash and water-based paint are washed off with warm water in 2-3 steps. Oil paint can be removed using washes. Other removal methods used on the wall are not acceptable.
Attention: all technologies for getting rid of old finishes are described in detail here.
Leveling the surface
Small surface defects (1-2 mm) will be hidden by any glue. A difference in height of 3-5 mm can be leveled out using finishing acrylic putty as an adhesive. Large differences or blockages will require leveling the surface with plaster or putty solutions (instructions for performing these types of work are given in the material “How to prepare a ceiling for painting with water-based paint?”).
Primer
To increase the adhesive strength of the adhesive to the ceiling, it is primed. General purpose soil can be used. If desired, deep penetration. It’s better not to apply “Betonokontakt” - it’s extra money and the effect is worse than that of deep penetration soil.
The surface is primed twice with a roller. Joints with walls and difficult places are treated with a brush. The second layer is applied to the completely dry first one.
Marking
The most difficult stage in the preparatory work is marking. The visual perception of the ceiling depends on its quality.
When starting to sketch the location of the tiles on the ceiling, you need to solve several problems.
1. Choose a installation method. This determines where the first tile will be glued. The arrangement of elements on the ceiling can be:
- parallel. Sometimes they say: “in rows”;
- with shift;
- diagonal.
Many sites write about checkerboarding but don't explain what it is. And they won’t explain it, because it’s fantasy.
2. Decide how the chandelier will be installed. There are three options here:
- a hole is cut in the panel for electrical wiring;
- between two slabs;
- at the point of convergence of four tiles at once.
3. Find the conditional center, i.e. the place where work will begin. This could be the geometric center of the room, found using two strings stretched diagonally from the corners of the room, or the location of the chandelier if it does not hang in the geometric center of the room.
Once you have decided, you can act. Two lines are drawn from the conditional center, perpendicular to the walls and to each other.
Depending on the installation method and location of the first tile, auxiliary lines are drawn.
A. Diagonal laying. Through the center, using threads, a protractor or a laser level, two diagonals are drawn at an angle of 45° to the walls. The calculation can be done in another way. Measure to the millimeter the distance between the walls across the room. Divide the resulting segment in half and place it on long walls from the perpendicular line in both directions. Connect the resulting points. The result will be the same.
We emphasize that there may be a shift in the scheme to the side. This is not important and will not affect the visual perception of the ceiling.
It is more difficult if the center is shifted both horizontally and vertically. In this case, it will not be possible to get an angle of 45o with the walls. Then the right angles formed by perpendicular lines are divided in half and diagonals are drawn through them.
Laying is carried out according to the scheme given below: first the central tile. In this case, at least two angles must lie strictly on one of the perpendicular lines. Then the side panels are glued in a circle (ideally, all the corners of the first tile are on the lines).
B. Laying in rows. It is easier to mark and lay tiles if their corners meet in the center. The principle of tile placement is well illustrated by the diagram below.
It is much more difficult if you decide to lay the tiles exactly in the center. In this case, additional lines are drawn parallel to the center lines at a distance of ½ the length of the panel edge, and the tile itself is glued as shown in the figure.
Laying pattern with tiles exactly in the center.
C. Laying with shift. Here everything is the same as when laying in rows: the first row is glued along the long axis, and the second with a shift of ½ tile. Some experts limit themselves to two or four lines, and some draw the ceiling for each panel.
Ceiling markings
Having asked experienced craftsmen whether it is possible to glue squares without first drawing the contours, each person will hear an unequivocal answer - this approach cannot be called professional.
For the implementation of some schemes, it is important to clearly define the center of the room; for this, two threads are pulled from the corners, and the place of their connection will indicate the desired point. It is not forbidden to use a tape measure, but when working with it you should enlist the help of a partner.
Special upholstery cords will speed up the marking process. If you stretch the solution-colored rope and release it, a noticeable mark will remain on the septum; there is no need to use a marker.
Installation instructions
Gluing tiles correctly is not difficult. The work can be performed by any adult family member. To help, we provide complete instructions on how to glue tiles to the ceiling.
Step 1. The tiles are brought into the room where finishing work will be carried out and unpacked. Leave in this position for at least a day - it should warm up to room temperature. If this is not done, it may become deformed during installation.
Step 2. Glue is applied to the back side of the slab (read the recommendations carefully, since it is possible to apply the adhesive mass to both surfaces being glued) in the center and edges in a snake or drops. If necessary, the adhesive is rubbed with a spatula.
Step 3. Wait time for the glue to set (indicated on the package).
Step 4. The tile is pressed against the ceiling according to the selected pattern. The effort is small - the panel may break.
Step 5. The position of the panel is adjusted along the plane (a level is needed) and in relation to the first tile, after which it is kept pressed to the ceiling surface until the glue sets (the time is indicated in the instructions).
Step 6. All operations are repeated with the next tile. It needs to be glued close to the first panel so that the seams are invisible. The glue that appears between the seams is carefully removed with a sponge or rag.
Step 7. Cover the entire ceiling with entire panels.
Step 8. The panels near the walls are cut to size and attached with glue.
Step 9. The seams are sealed with sealant. It is better to use acrylic - it does not turn yellow like silicone.
Step 10. Moldings or plinth are installed - the joint with the wall is closed.
Preparing the ceiling for gluing
The quality of adhesion of the planes depends on the condition of the base; in order to properly glue the ceilings, it is necessary to remove the old cladding, we are talking about paint, plaster or wallpaper. It is better to eliminate bumps or dents to make the visual design attractive.
To organize decent adhesion of the elements to the floor, the surface should be primed; such actions will help strengthen the base and prevent the formation of cracks or premature collapse of the cladding.
If necessary, remove the chandelier or protective casing so that material can be inserted into this place without any problems.
Ceiling tiles as an interior element
There are many design solutions for using ceiling tiles. Let's give some.
- The tiles laid in the center of the ceiling with overhead lamps and baguette around the edges look stylish.
- Laminated panels together with a 3-arm chandelier give the room a festive look.
- The gilded decor, effectively integrated into the interior, will not leave anyone indifferent.
- The coffered ceiling requires no comment.
- A spectacular combination of green walls with a matte ceiling.
Recommendations for further finishing
Many experts recommend immediately painting unpainted ceiling tiles after gluing or covering them with decorative protective film (do-it-yourself lamination). This allows you to solve several problems:
- protect the foam from mechanical damage;
- strengthen the surface structure;
- increase operational life;
- make cleaning easier, especially in the kitchen, where large amounts of grease settle on the ceiling;
- change the ceiling design.
Painted tiles are repainted after a few years, when the owners get tired of the old color scheme or the ceiling is dirty and cannot be washed.
Grouting joints
You can seal the seams on the ceiling surface between the slabs using putty or construction foam. This is the most popular and fastest method that allows you to get rid of even deep cracks.
All gaps formed between the slabs can be masked using white sealant. But it will be appropriate only if you choose white briquettes.
Tips for use
Polystyrene boards accumulate static electricity, which attracts dust, volatile fats, small particles of tobacco smoke, and soot to the surface. If timely cleaning is not carried out, the ceiling quickly loses its original appearance. Regular cleaning helps restore bright colors or whiteness to tiles: dry cleaning or washing. For this you will need:
- vacuum cleaner with a soft brush;
- detergents that dissolve grease and remove other types of contaminants (“Myth”, “Fancy”, “Eared Nanny”, “Sorti” and similar);
- a basin or bucket with warm water;
- a small brush (you can use an old toothbrush) to remove dirt from hard-to-reach places;
- foam sponge or cotton rag;
- dry absorbent cloth;
- paper napkins or towels.
You can get the desired effect by following the following recommendations:
- Porous and matte tiles can only be cleaned with a vacuum cleaner or wiped with a dry cloth (sponge). In case of severe contamination, paint with acrylic water-based paints;
- remove stains that appear immediately: first try with a stationery eraser, then, if that doesn’t work, wash;
- Abrasive materials and all types of washing powder are unacceptable - they destroy the structure of the tile;
- avoid heavy contamination. To do this, clean the ceiling at least once a month with a vacuum cleaner with a soft fluffy brush attachment;
- wet cleaning is carried out 1-2 times a year with a well-wrung out cloth. After washing, wipe the tiles with a paper towel or napkins. Otherwise, divorces may remain;
- A specially impregnated sponge will help remove soot;
- Warm salted water removes slight yellowness;
- For white surfaces, you can use bleach.