During the construction of structures, when finishing and repairing premises, in most cases the walls and ceilings must be plastered. This is done so that with the help of a layer of plaster it is possible to level a certain surface for its subsequent decoration or finishing. This process is labor-intensive and time-consuming, so the need to facilitate it is well justified. Since ancient times, plasterers had special tools for these purposes, for example, spatulas and trowels - but they are effective only in small areas and where the layer of plaster should be thinner. To throw a large amount of plaster mass, more capacious tools are used - for example, an Ilyukhin scoop or a Shaulsky plaster ladle. If the first one is quite difficult to find today, the second one has never lost its relevance.
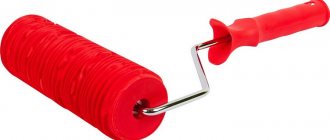
A Shaulsky ladle is essentially a bowl with thin metal walls (from 0.4 to 1 mm) with a volume of 0.75 to 1 liter. A plastic or wooden handle is also attached to it.
The shape of the bowl could vary:
- Truncated funnel;
- Hemisphere with a truncated bottom;
- Standard hemisphere;
- With the funnel mixed towards the handle.
Modern plaster ladles are not far removed from their ancestors and have several options for handle holders. They can be:
- Ergonomic;
- Oval;
- Cylindrical.
The process of applying plaster is quite simple, however, certain skills are required. Using a ladle, the mixture is scooped out of the container and splashed in a semicircular motion over the surface, which was moistened or primed before starting. In this case, the impact of the mixture on the surface should be light in order to ensure the best adhesion. Then, using a special rule or an elongated spatula, the plaster layer is leveled. However, any plasterer who performs large volumes of work on an ongoing basis is interested in mechanizing his activities. In this case, a pneumatic plastering ladle operating on a compressor will come to his aid. It can also be called a plaster shovel or hopper (from the English “hopper” - “jumper”). Thus, the plaster will automatically easily “jump” out of the container onto the desired surface.
Bucket Hopper Compressors
In the construction industry, a hopper is a special bucket used to apply plaster to various surfaces. The use of such a tool can significantly simplify the procedure for plastering walls and increase the productivity of the construction team. The equipment is characterized by ease of operation. The average pneumatic bucket is able to completely empty the mixture within 5 seconds. In one hour, a professional tool allows an experienced craftsman to cover up to 60 square meters with plaster. meters of surface. The “heart” of a standard pneumatic bucket is rightfully considered to be a compressor. The design also contains nozzles to which air flow is supplied.
Advantages of a hopper bucket
The universal design of the equipment provides it with a number of significant advantages. Experts note:
- speed of work on plastering surfaces;
- ease of control;
- reduction of time for finishing surfaces by 2-3 times on average;
- the ability to use ladles with any type of solution;
- increasing the adhesive properties of plaster mixtures;
- low cost of the tool;
- versatility: the technique is suitable for indoor and outdoor use.
Due to the strong impact of the mortar on the wall (if we compare the method with manual finishing), the quality of the mortar increases. The bucket itself can be easily cleaned after work by blowing it under air pressure and then washing the hopper.
How to increase productivity and quality of plastering work using a hopper
Plastering is a widespread method of finishing external and internal walls, ceilings, and slopes.
The popularity of this processing method is explained by its availability, low cost and versatility.
The essence of plastering is to apply a layer of special plaster mortar to the walls, which can be:
The mortar is applied in a layer of a certain thickness according to the design and taking into account the properties of the selected type of plaster mortar.
Plaster application, in turn, can be done manually or mechanized.
There are special plastering stations that allow you to plaster quickly and efficiently, but they are not available to everyone.
In private construction and renovation, plaster is usually applied by hand, spreading it with a trowel.
The manual method has a number of serious disadvantages:
- labor intensity of the process;
- low productivity;
- high influence of the human factor.
At the same time, purchasing a plastering station is not affordable for everyone, and for one-time work it is not advisable.
The optimal solution is to purchase a special hopper bucket for plaster, which is also called a plaster hopper, ladle, pneumatic bucket or plaster shovel.
How the bucket hopper and compressors for this tool function
Immediately after preparing the plaster mixture, it can be used for work. The distance from the hopper to the surface is selected by the master, taking into account the result to be obtained. Usually the ladle is kept at a distance of 5-7 cm from the wall or ceiling. Plastering looks like this:
- the construction mixture is loaded into the container (the ladle itself);
- a professional compressor for the hopper bucket begins to pump in the air mass;
- air is supplied under pressure into the container using an appropriate hose;
- the valve handle allows you to regulate the air supply to the nozzles;
- the solution is sprayed.
In some cases, additional accessories and attachments are used along with the equipment to perform complex tasks. For example, when plastering hard-to-reach places: niches, corners, etc.
Types of pneumatic buckets, what are there
The classification of pneumatic plastering buckets is based on design features. So, the wall one has a handle and nozzles located at right angles to the tank. For convenience, an additional handle is attached to the latter.
Sprayer for painting walls cement mortar sprayer paint sprayer sprayer hopper bucket gypsum…
Sprayer for painting walls cement mortar sprayer paint sprayer sprayer hopper bucket gypsum…
aliexpress.ru
Buy Now
New Cement Mortar Spray Gun with Hopper Bucket Wall Sprayer Plaster Plaster Cement Sprayer...
New Cement Mortar Spray Gun with Hopper Bucket Wall Sprayer Plaster Plaster Cement Sprayer...
aliexpress.ru
Buy Now
Spray gun for painting walls, cement mortar, spray gun, Hopper gun, spray gun, bucket...
Spray gun for painting walls, cement mortar, spray gun, Hopper gun, spray gun, bucket...
aliexpress.ru
Buy Now
The second type of bucket is intended for finishing the ceiling, the upper part of vertical structures. Here, the key elements are fixed at an angle relative to the container so that the solution does not fall out. The handle is thoughtfully elongated. This makes it easier and more convenient to carry out plastering without tables, scaffolding and stepladders.
The third option of a universal nature is considered separately. Its difference lies in the presence of seats for removable nozzles. Here you can work with different mixtures of relative solid filler fractions. It is also possible to adjust the position of the handle to finish either walls or ceilings.
What are the requirements for a compressor for a hopper bucket?
Depending on the principle of compressing the air mass, it is customary to distinguish between piston and screw compressors for hopper buckets . Piston devices can be household, semi-professional and professional. Screw-type ones are not used in everyday life due to their high cost and performance.
Receivers installed in the mechanism ensure continuous supply of air under pressure for a long time. This element serves to accumulate compressed air. They allow you to level out the pulsation of the air mixture to eliminate uneven application of plaster. Receivers guarantee favorable operation of the equipment. They are located between the compressor and the pneumatic tool. Here, the air is usually cooled to normal temperature, which is heated during the compression process. Cooling also promotes the precipitation of water vapor, a percentage of which is present in the air. Thanks to this, building mixtures are not “diluted” with excess moisture. The condensate accumulated in the compressor is subsequently drained through a valve installed in the bottom.
Receiver volume is an important parameter. The larger it is, the longer the period of continuous work with the hopper bucket can be carried out. The element prevents premature wear of the compressor head.
Technical parameters of the compressor unit
For the operation of three-piston compressors for hopper buckets and more, the equipment performance parameter is important. It is expressed in the volume of air that can be pumped into the receiver at zero pressure within a minute. Manufacturers usually indicate “inlet pressure” in the data sheet. The following coefficients allow you to calculate the outlet pressure:
- for coaxial equipment the value is multiplied by 0.75;
- for belt - by 0.65.
For example, if the manufacturer indicated in the passport a pressure of 320 l/minute, then the coaxial compressor will provide 320 x 0.75 = 240 l/minute at the output.
Another technical parameter that you should pay attention to is the air pressure indicated in bars or atm. The passport usually indicates what maximum air mixture pressure a specific compressor for a hopper bucket . A regulator installed on the housing will allow you to reduce this value during operation. Experts recommend using an installation with a working pressure that is on average 1/5 lower than the maximum value.
Other installation features
Depending on the type of lubricant, it is customary to distinguish:
- oil compressors for hopper bucket
- oil-free devices.
The latter have several undoubted advantages:
- the air they produce is not contaminated with oily secretions;
- the devices do not require constant oil changes;
- The equipment does not contaminate ready-made plaster mixtures.
It should be remembered that professional oil three-piston compressors for hopper buckets have a longer working life. They can be used for long-term loads. To prevent contamination of the plaster mixture, specialized oil purification filters are used in the installations.
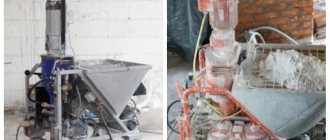
Types of devices for mechanical application of plaster
Today, craftsmen are offered a wide selection of equipment for machine application of finishing materials. This can be a hand tool with a minimal degree of mechanization (a hopper bucket, otherwise known as a pneumatic shovel or a pneumatic gun) or automated plastering stations. Let's consider each of the varieties of these devices in more detail.
Plastering station Grand 4 PHOTO: prostanki.com
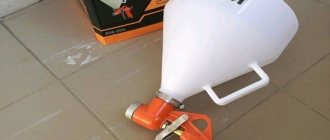
Hopper (pneumatic shovel)
The hopper bucket consists of a container (3-5 l) in the lower part of which there are 4 holes through which the plaster mixture is sold. Inside the bucket, opposite these holes, there are nozzles for supplying air. The package includes a telescopic handle with a compressed air supply control handle. The hose and compressor are purchased separately. The compressor should have a capacity of 35-45 m³/h and a pressure force of 4-6 atmospheres.
Hopper bucket, a compressor is required to use it PHOTO: encrypted-tbn0.gstatic.com
The plastering process is simple and does not require lengthy preliminary training. The pre-mixed plaster solution is scooped up with a ladle. The hopper is brought to the wall at a distance of 10-15 cm. After which the compressed air supply is turned on.
Advantages:
- ease of use;
- affordable price.
Flaws:
- it is necessary to purchase additional equipment;
- quite large losses of plaster mixture.
Hopper technology: video
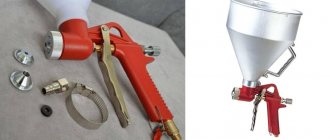
Pneumatic pistol (cartouche pistol)
It consists of one nozzle on a pistol grip, to the top of which a metal or plastic container (up to 9 l) for plaster is attached. The principle of operation is the same as that of the hopper. It has replaceable nozzle nozzles (diameter 3-8 mm), which allows the use of finishing mixtures of various consistencies. It can be used not only for rough plastering, but also for decorative finishing or applying textured spray.
Cartouche gun for applying textures WESTER KP-10 PHOTO: cdnmedia.220-volt.ru
Advantages:
- ease of use;
- affordable price.
Flaws:
- it is necessary to purchase additional equipment;
- relatively low speed of finishing application.
Plastering stations
They have a rather complex design. The main elements are:
- bunker for raw materials (dry plaster);
- container for mixing and storing the mixed mixture;
- screw primary feed system;
- compressor;
- Control block.
Basic design of a plastering station PHOTO: stroiformat.com
According to the manufacturers’ recommendations, it is rational to use such equipment in rooms with an area of at least 30 m². Immediately after finishing work, all containers and hoses for supplying the finished mixture must be thoroughly rinsed with clean water. As a rule, there are special cleaning modes, so this procedure is not too complicated or tedious.
Advantages:
- high speed of applying plaster;
- automation of the mixing process;
- high quality base processing.
Flaws:
- high price;
- appropriate qualifications are required.
Robot plasterer
This is an installation for applying plaster mixtures to smooth vertical walls. The distributing part of the device moves along guides that are fixed to the floor and ceiling of the room. The robot requires mixing the plaster separately, but you can use conventional mixtures for manual application. Installation productivity is up to 80 m²/hour. The robot plasterer cannot be used for finishing rooms higher than 7 m, staircases and facades.
Robot plasterer model RoboPlaster-1000, but in terms of functionality, it is rather a semi-automatic PHOTO: stroiformat.com
Advantages:
- high performance;
- the quality of finishing does not depend on the professionalism of the staff;
- Can use regular plaster mixtures.
Flaws:
- very high cost;
- cannot be used for finishing ceilings, staircases and facades.
The process of operation of a robotic plastering installation can be seen in the video:
Plastering and grouting equipment
Plastering and troweling disc machines are used for leveling plastered walls and ceilings using both manual and mechanized methods of applying the finish. Polystyrene foam or chipboard is used as grouting wheels.
Plastering and troweling machine Rokamat Nautilo PHOTO: vbt.by
The working nozzle is connected to the power drive using a flexible shaft. This reduces vibration, which further facilitates the grouting process. The power drive is an electric motor with a squirrel-cage rotor, operating on three-phase current with a voltage of 42 V and a frequency of 200 Hz. Such electrical parameters allow the operator not to be afraid of electric shock even when working on damp and wet surfaces.
There are two main types of plastering and troweling machines:
- Single-disc. For example, SO-112B, the circle rotates in one direction.
- Double disc. For example, SO-86B. It has two circles, an inner and an outer one (actually a ring), which rotate in different directions.
The process of grouting plaster is perfectly illustrated by the proposed video:
How to choose the right compressor for a hopper bucket
Manufacturers supplying pneumatic equipment must include information about incoming air flow in the labeling. This indicator demonstrates how much air the equipment will allow to pump into the capacitive receiver. If, for example, the marking is 490/100, it indicates the following:
- in one minute the installation allows you to order 490 liters of air mixture into the receiver;
- The volume of the receiver itself is 100 liters.
To ensure efficient operation of the hopper bucket, it is important for us to know how much air the compressor can supply directly to the bucket within a minute. This figure is approximately 25% lower than the “input” one. Those. from 490 liters you need to subtract 1/4 of the volume. It turns out that the air pressure at the outlet will be about 367 liters per minute.
High-quality work of the hopper bucket will be ensured by a compressor capable of delivering an output pressure of 350 l/minute and higher. If we are talking about the operation of texture equipment, this figure should be from 180 l/minute at the output. Paint guns will require an outlet pressure of 120-200 l/minute.
It should be remembered that the volume of the receiver itself does not affect the efficiency of the hopper. In fact, the capacity can be quite large, but if the power of the compressor equipment does not meet industrial requirements, it is not possible to guarantee adequate operation of the tool. It is important to understand that both weak and excessively high power will have a negative effect. In order for the bucket to work well, it is necessary to use a special pressure regulator that allows you to set the parameter within 5-6 atm.
Design and features of hoppers
The design includes the following elements:
- Handle for holding. It can have different designs. For example, sometimes the handle is parallel to the axis or at an angle of 45 degrees. There may also be a handle on the hopper itself for convenience.
- Spray nozzles. They give the composition the necessary speed.
- Pneumatic valve for control. In this regard, the working composition enters the nozzle on time.
- Fitting. They are equipped with an output confuser nozzle. The component is designed to provide the required output speed.
- Container for pouring the mixture. It may differ in its dimensions and shape.
Professional compressors for hopper buckets
Often, when carrying out plastering work, craftsmen are recommended to use two- or three-piston compressors for a hopper bucket . Simultaneous use of several compressors, each with a capacity of about 400-500 l/min at the inlet, is an ideal option.
In operation, belt-driven units are considered more comfortable because they are much quieter. This is especially important when carrying out work in apartment buildings and densely populated areas where there are increased requirements for noise comfort.
Ordering a compressor for a hopper bucket from our company is the best solution. Competent consultants will help you make the best choice of professional compressor unit. As a result, you get a technique that:
- Allows you to work without interruption for a long time without losing spraying power. At the same time, a good compressor complete with a hopper bucket will cost an order of magnitude cheaper to purchase than any plastering station.
- The stable power of the equipment presented in the catalog will eliminate the risk of losing the building mixture during the spraying process as a result of it getting on the floor. You will practically not waste time cleaning the room or yard area afterwards.
- All equipment available in the catalog is relatively light in weight. receiver for the hopper bucket is placed on a high-strength chassis that will allow you to easily move the equipment during operation without requiring additional outside help.
Remember that professional plastering and finishing work requires a compressor with a receiver volume of 100 liters or more. If necessary, you can buy two 50-70 liter units that can be used in parallel. If you intend to use the hopper in domestic conditions (such devices are often ordered by small private repair teams), you can limit yourself to equipment with a smaller receiver volume, but do not skimp on its performance.
Application technology
First of all, you need to choose a tool that is convenient for the job.
Bucket selection
The most common and convenient form of plaster ladle is the model invented by A. S. Shaulsky, which has the following elements:
- Cup made of thin durable steel with a capacity of 0.75 liters.
- A handle attached with rivets to the cup.
- A wooden handle mounted on a handle.
Drawing of Shaulsky's ladle
The price of such a product is not high, it fits perfectly in the hand and has an optimal volume, thanks to which it is possible to quickly process large surfaces and at the same time not overstrain the hand. Although, of course, if you are confident enough in your abilities, you can use large samples reaching a liter volume.
Preparatory work
It is quite easy to prepare a wall for pouring cement with your own hands:
- We clean the surface of all kinds of debris and construction dirt.
- Twenty centimeters from the corners we install beacons on pre-applied plaster cakes. It is thanks to them that it will be possible to easily level the plaster thrown with a ladle.
Installation of aluminum guides.
- Using a spirit level, we level the profiles vertically.
- If the wall is large, then we install intermediate beacons. Their position is adjusted using a stretched nylon thread between two corner products.
Plastering
Instructions for using a ladle look like this:
- Mix a solution of cement and sand in a ratio of one to three using a construction mixer with a special attachment until completely homogeneous. At the same time, add water so that the mass turns out mushy, but not too liquid or thick.
Mixing cement-sand mixture
- We scoop the plaster into a ladle and, with a smooth movement of a relaxed brush, throw the contents horizontally onto the wall so that it splashes like a fan across the surface without lingering in the container. You may not succeed the first time, but you should be patient and practice.
Applying the solution with the right hand
Tip: It is recommended that you learn to use a plaster ladle using water first rather than a cement mixture. Firstly, it is much cheaper, and secondly, mistakes made during the throw are more obvious.
- If your right hand gets tired while working, then switch to your left.
Applying the solution with your left hand
You should know: today the “two-handed” method, which involves working with both hands at the same time, has become very widespread. This allows you to increase productivity by approximately 30%.
- Using this method we fill all the space between the two beacons.
Filling the wall with plaster
- After the cement layer begins to extend beyond the guide profiles, we take a rule, rest it at the bottom against the beacons and lead it upward, removing excess plaster.
Leveling the finish using the rule
- If there is a depression somewhere, trim it carefully with a trowel.
- Clean the dried surface and apply the final finish.
Because throwing is much faster than applying mortar, the time spent using a ladle is much less than it would take using a trowel alone.
How the compressor unit is connected
To ensure a stable supply of air mixture directly from the device to the pneumatic bucket, a special hose is used. Its cross-section should be 9mm. For these purposes, you can use blue or black oxygen hoses. Under no circumstances should you purchase red hoses as consumables - they are not designed to work under significant pressure.
If you are using a hopper that has several plugged nozzles, you can purchase classic hoses equipped with standard quick-release elements. This device will be quite sufficient for working with moving plaster mixtures. However, it is not recommended to use quick-release elements when working with thicker mixtures.
Technology of applying finishing materials using a hopper
In general, the technology differs little from the manual method.
Step 1: Clean the base
It is necessary to thoroughly remove dust and clean the surface to be plastered.
Step 2: Primer
Surface primer in order to reduce water absorption from the mixture and increase the adhesion of the plaster to the base. Primers suitable for the selected surface are used, for example, PVA or concrete contact.
Step 3. Installation of beacons
Beacons are set according to levels and secured with gypsum plaster mixture or special fasteners.
Step 4. Mesh reinforcement
Labor-intensive mesh reinforcement can be avoided by adding polypropylene fiber to the solution.
Step 5. Mixing the solution.
A construction mixer or concrete mixer is used to mix the solution.
Step 6. Applying the solution
The solution is applied starting from the bottom of the walls. The hopper, unlike a trowel, applies the plaster straight away and evenly.
Step 7. Trimming
Until the solution has set, it is trimmed using the rule.
Advantages of modern hopper bucket compressors
A compressor station in combination with a hopper allows you to automate a number of processes during finishing work. The construction team (and the end customer) receive:
- significant savings on the purchase of dry construction mixtures;
- reducing the cost of attracting additional specialists to the site for plastering large areas;
- a significant increase in productivity and speed of work.
Supplying plaster mixtures under pressure using a hopper connected to a compressor station allows you to obtain an ideal finishing quality. There will be no formations or voids that could cause cracks in the finish coating in the future. Plastering with a hopper eliminates the need for additional work on lining and filling surfaces.
It is difficult to do without a mini-station for plastering when carrying out work in medium and large volumes. In our company you can buy a professional compressor for a hopper bucket with the necessary characteristics!
Why choose our store?
- All compressor units presented in the catalog are designed for professional performance of work by competent technical specialists.
- We provide delivery of equipment throughout Moscow and Moscow Region, as well as to other regions of the Russian Federation and CIS countries.
- We are ready to provide customers with several payment options - you choose the one that is most convenient for you.
We offer piston-type compressors with direct and belt drive. We provide assistance in choosing equipment with the required technical characteristics and power ratings. Contact us!