A window in an apartment, be it plastic or wooden, without such an element as a window sill, looks unattractive and bad. Therefore, architects provide this element in every house. When replacing a window, the board underneath is always replaced.
As a rule, the installation of a window sill is carried out by specialists, but you can do the work yourself. The main thing is to do everything according to the rules. Before installing a plastic window sill, you should read the instructions for the entire process.
Preparatory work
First you need to prepare the tool and material. Here's what you need to have:
- Hacksaw or electric jigsaw;
- Building level;
- Tape measure and pencil;
- Perforator with a set of drills and chisels;
- Polyurethane foam.
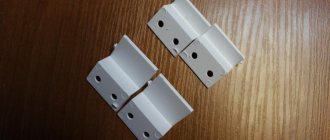
The pads ensure a tight fit of the window sill to the frame.
In addition, blocks of wood or special PVC pads, as well as a spray foam gun, may be useful. Based on the condition of the window opening, these elements may not be enough. In this case, you should provide perforated plates for fastening the window sill.
Care
In order for a window sill to last long enough, it must be properly cared for. The procedure depends on the material used in the manufacture of the structure.
PVC elements are practical and easy to maintain. However, during operation, the matte rough surface easily becomes clogged with dust, gradually acquiring a characteristic gray-beige tint. Glossy models are easily scratched. To prevent this, matte ones should be wiped once a week, and shiny ones should be protected from possible mechanical impact.
When exposed to high temperatures, plastic melts. Do not allow ash to accidentally fall on the surface or place hot utensils. For these purposes, you need to use special stands.
If contamination does appear on the surface, you should immediately stop using the abrasive. Mechanical inclusions will quickly scratch the base and, instead of the expected lightening, it will turn yellow. For cleaning plastic, a soap solution or other neutral products designed specifically for cleaning glass and plastic work well. The effectiveness of such compositions is not as great as that of cleaners with the addition of abrasive.
If stone was used to make the window sill, there will be no problems with maintenance. It can be natural or artificial. The order of impact directly depends on the expected result. A liquid detergent can be used to clean marble surfaces. It will help get rid of contaminants, but will not disturb the structure of the stone. Wax is ideal for polishing.
To clean granite, use ordinary water. To combat stubborn stains, you will need special alkaline-based products. Existing defects are sealed with putty based on acrylic resins or polyesters. But you should avoid using powder or gel with an abrasive. If these rules are not followed, it will fade very quickly.
If the window sill is made of wood, it is worth periodically treating the window sill. Special compositions will extend the service life of the surface. For cleaning, use a soft, slightly dampened soft cloth. You should avoid using a sponge with a hard surface, as it will easily scratch the base.
Whatever window sill is preferred, each element has its own advantages and disadvantages during use. By following the installation rules, you can install a high-quality window sill yourself. The following maintenance tips will help extend the life of the structure.
Fit to size
When all the tools and materials have been prepared, you can proceed to the next stage of work. It consists of taking measurements and transferring the markings onto a PVC board. To do this, you need to add 10 cm to the length of the opening. This measure is needed to create an attractive appearance for the entire window opening.
At the first stage, measurements of the window sill are taken
Once the markings are completed, you need to cut out the PVC window sill. This process is easily performed with a jigsaw, but if you don’t have one, you can use a regular hacksaw. But slopes require a lot of effort. Where the plastic window sill will be installed, it is necessary to make grooves. Their depth should be 5 mm greater than the length of the part being installed .
To insert window sill boards, grooves are made in the slopes
It is best to make grooves in the slopes with a chisel, which we install in a hammer drill. They should have an even shape that will not interfere with the entry of the window sills. After chiselling, the opening must be cleared of debris. And after that, proceed to the next stage.
Preparing the base
This step may take most of the time, but it is actually the most important in the entire process.
Let's see how the window is installed. It is important to assess whether there are any deviations from the horizontal plane. To do this, apply a level or run a projection from a laser level along the lower edge of the frame. In the future, the window sill will be aligned precisely along it, which can also lead to misalignment. If there are small deviations, then this is not a big deal; further on it will be described how they can be compensated.
Installing window sill boards level
The base and slopes are prepared, which means you can proceed to fitting. To do this you will need a building level. Before correctly installing a plastic window sill, pads should be placed on the base. For small windows, two supports will be enough, but for a balcony, at least three should be used. This operation is easy to perform yourself.
The plastic panel is installed on pads
The pads should lie strictly at the level of the window, which will allow you to properly align the plastic window sill before changing it. When everything is ready, you should try on the part in a new place. To do this, we insert a plastic board into the grooves of the slopes. Next, move it all the way. Nothing should interfere with this process.
Next, the installation of the window sill continues to set the optimal slope. This is necessary to remove condensation naturally. It should not accumulate at the base of plastic windows. To do this, you need to lower the edge of the slab, looking inside the room, a couple of degrees. The building level will show how much the slope has changed. To ensure that the opening remains level, you need to check the position at the edges and in the middle.
The slope of the front edge of the window sill is 2-3 mm
The level is adjusted using pads. Without them, installing a new window sill will be very problematic. It is recommended to purchase special plastic elements, but they can be replaced with wooden linings. For work you should use an ax or chisel.
You need to install a plastic window sill with your own hands so that there is no gap between it and the window frame. This is a very important point that should be given close attention. The gap is eliminated with wood chips placed under the product. It is recommended to fix the edges of the panel when the position corresponds to the desired one . Each change must be checked at the building level so that the PVC window sill does not change its position.
If there is a skew
The solution would be a little installation trick. Most often, this remains invisible to others, especially if the width of the product is more than 25 cm. To do this, we will need self-tapping screws or some other material with which we can make adjustable beacons. They are mounted in two lines. The first should be located almost flush against the window, and its level should exactly follow the slope of the window. The second is installed closer to the edge. It must be leveled exactly using a special tool. After installation, the far part of the window sill will fit snugly against the window frame, and the near part will be precisely level. This will deceive the eye and create the visual effect of correct placement.
Installation of a window sill can be combined with the installation of plastic covers on the corners near the window. Never rush the process, especially when marking. We are interested to know what nuances you noticed for yourself personally. Share your observations in the comments.
Fastening the structure in place
After fitting, when the correct position is achieved, proceed to the fastening stage. This action is carried out by polyurethane foam, which evenly fills the space. But before installing the window sill, the cylinder needs to be heated a little. Temperature allows the foam to become more effective, which better fills empty spaces.
Window sill installation diagram
The best way to heat the balloon is to place it in warm water. But you can also use the heating system if the installation of a plastic window sill takes place from autumn to spring. The heated container is shaken well, mixing its contents. Next, the space under the slab begins to be filled. There should be no voids left.
The space under the window sill is carefully filled with foam
The work doesn't end there. The fact is that polyurethane foam has enormous expansion. This circumstance has a negative impact on the position of the board between the slopes. In order not to spoil the work, it is necessary to strengthen the element. Many people use ordinary bricks for this purpose, which are installed on the surface of the slab.
There is no need to worry about the product, since there are stiffening ribs inside the product. They can withstand heavy loads, allowing an adult man to stand freely on the window opening.
Kinds
It is advisable to decide on the choice of window sill panel at the stage of ongoing repair work. This approach will allow you not only to select the size of the product that meets the customer’s needs, but also to find an option that will ideally fit into the interior and style of the room. To do this, it is worth studying the types and features of models.
Fortunately, the selection of much-needed window unit parts is huge. Below are descriptions with brief characteristics.
Plastic
The popular variety includes a wide group of models that differ in price, parameters and performance characteristics.
Differences in cost are based on the quality of the PVC pigment and coating. Cheap whites tend to turn yellow over time. When producing expensive ones, titanium oxide is added, which is responsible for the whiteness of the surface for more than 10 years. This also applies to color models - budget ones are prone to fading, but high-quality ones will delight you with their novelty.
Expensive segment panels are coated on top of plastic with a special compound that resists abrasion, scratches and temperature effects.
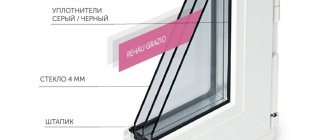
The dimensions of both lines are standard - thickness 20-33 millimeters, strip length 3-6 meters, width 100-800 millimeters.
The cost of a strip of minimum width varies from 50 rubles per linear meter to 350 rubles in expensive models.
Wooden
Installation of a wooden window sill for a plastic window is an acceptable solution. Such products are not only environmentally friendly, but will also last a long time without deformation or damage. The board is simply not suitable for this purpose; it is advisable to choose specially designed ones.
By design, such window sill boards are divided into two groups:
- entirely made from solid wood of expensive species;
- covered with decorative veneer with a pine or birch base.
Solid ones are made only to order - the cost of raw materials is high. Veneered models are widely sold.
The disadvantages of wooden panels include reduced moisture resistance and high cost - a linear meter of board will cost from 1,500 to 5,000 rubles, depending on the type of wood used.
Composite
An alternative to wooden boards made from composite materials. The basis is MDF or chipboard, laminated with vinyl film or veneer to match the texture of natural wood.
- Chipboard is based on chipboard, and exclusively polymer film is used as a coating. The advantages of this type include low cost, the disadvantages are low strength and not moisture resistance. It is advisable to install chipboard panels in dry rooms without access to moisture.
- MDF is a material denser and stronger than chipboard, but heavier and more expensive. Both film and natural wood veneer with protective varnish are used as coating. Moisture resistance is slightly above average. The surface will withstand accidental drops, but if it hits regularly, it will begin to deform.
Concrete
A concrete product is a solution for public buildings, reliable, durable and vandal-resistant. Externally they look like stone ones. The difference is in the manufacturing process - cement is used instead of resins. Available in natural colors and with the addition of coloring pigments and stone chips.
Stone
They represent two groups.
- Natural stone boards belong to the premium class and are made from marble, granite, quartz and onyx.
- Made of artificial stone based on mineral filler and binding resins. The resulting material is not inferior in characteristics to natural ones. The most popular ones are acrylic and quartz agglomerate.
Such products have many advantages, but the price is appropriate.
Installation of a window sill on a balcony
Modern loggias and balconies are now being actively glazed. This is not surprising, because the additional usable space will not be unnecessary for anyone. And everyone knows firsthand how much such pleasure costs. Therefore, a window sill on a balcony is no longer a curiosity.
(function(w, d, n, s, t) { w[n] = w[n] || []; w[n].push(function() { Ya.Context.AdvManager.render({ blockId: "RA-510923-1", renderTo: "yandex_rtb_R-A-510923-1", async: true }); }); t = d.getElementsByTagName("script")[0]; s = d.createElement(" script"); s.type = "text/javascript"; s.src = "//an.yandex.ru/system/context.js"; s.async = true; t.parentNode.insertBefore(s, t) ; })(this, this.document, "yandexContextAsyncCallbacks");
Basically, the installation of a plastic window sill on a balcony is carried out at the time of glazing. But if this has not been done, then you should install this interior element yourself.
Before replacing the window sill, you should prepare the metal brackets. This is necessary if it is not possible to install it under existing windows. In most cases, metal elements are required, which greatly simplifies the process. The brackets are attached to the parapet using anchors. They also allow you to strengthen the window sill, which helps to increase the payload on it .
Scheme for installing a window sill on a bracket
Fixed brackets should be located at a distance of no more than 1 meter from each other. The horizontal slope is checked using the building level. Before attaching the holders, you should tighten the thread. This will allow you to achieve levelness along the horizon and simplify the work.
When the brackets are completely secured, the installation of the PVC window sill with your own hands begins. It is secured using self-tapping screws, which are screwed into the bottom of the element. It is better to perform this operation with a screwdriver, because it significantly speeds up the process.
Fix the window sill using self-tapping screws
After installation, the window sill on the balcony must be treated with sealant. This measure is needed to get rid of a possible gap that is formed due to uneven edges. Unlike installation in a window opening, a balcony window sill does not need to be reinforced with polyurethane foam . All plastic elements quickly take their places, where they sit firmly, performing their assigned tasks.
Pollination methods
As I found out, there are 2 types of pollination of tomatoes indoors - natural and chemical. I will consider with you how to pollinate tomatoes on the windowsill, and decide which is the most effective method.
Natural pollination
Natural pollination is divided into natural and artificial.
Natural
The natural option is when the breeze sways the branches and pollen moves from one flower to another.
How I organize:
- I open the windows, creating a draft in warm weather.
- If it is below 15 degrees outside, then I place the fan at a distance of 50 cm from the bush.
- In both cases, the branches sway and scatter pollen over all the buds.
Replacing a window sill in a wooden house
The installation scheme for a plastic window sill in a wooden house is very similar to the process performed in an apartment. First, the old wooden window sill is dismantled and the base is prepared. The side slopes must be put in order so that the plastic part can freely take its place.
In order not to cut and freely attach the plastic window sill, it is better to cut the sides from wood. For this work you will need a chisel and a hammer. This creates grooves where the fastening will be made. It happens that they may already be ready and have a wooden window sill in them.
The window sill panel is installed in the grooves
Once the grooves are ready, pads are placed on the base of the opening. Do-it-yourself installation of a plastic window sill into the opening is done only on them. The position of the stands can be fixed so that they do not move under the mounted element. Before fixing the product, you need to check the position of the plate. Afterwards it is fixed and the voids under it are filled with polyurethane foam . Many people ask the question of how to install a window sill in a different way. But foam is the best and most effective option.
Restoration
During operation, a plastic window sill may lose its original appearance. This will negatively affect the presentation of the entire window unit. Restoring the element helps correct the situation. You can do it as follows:
- By gluing decorative film. Manufacturers offer material with different patterns. It is not necessary to choose white film. You can glue material with a pattern that imitates wood. Before gluing the film, the base is cleaned and degreased. Then the protective material is glued, evenly distributed over the base;
- By gluing mosaics. This is a good opportunity for emphasizing and zoning space. First, all glued elements are cut to size and applied to the base. Then the adhesive composition is applied to the previously cleaned base. The mosaic is applied to the base and carefully distributed over the surface. If necessary, the surface is coated with a composition to increase gloss;
- Painting with acrylic paint. The selected composition is applied to the surface and carefully distributed over the base;
- Using spray paint. In this case, the risk of painting over mating surfaces increases significantly;
- Application of liquid plastic;
If the above methods do not help, you can restore the former brightness by installing a repair pad. To do this, the surface is carefully prepared and then carefully fixed to the base using glue.