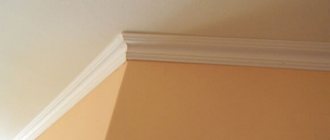
Ceiling plinth is an important element of finishing the ceiling surface, which gives a finished appearance to any room, regardless of the chosen design solution. In addition, the part hides defects in the line of joining walls and ceilings with different surface finishes. Installing a plinth on the ceiling is a separate type of work, which is carried out in compliance with a certain technological map, with a special set of tools and consumables.
Ceiling plinth in a typical room of a residential apartment
Advantages and disadvantages of foam plastic ceiling plinths
The installation of a foam plastic ceiling plinth provides the owner of the premises with a lot of undeniable advantages:
- The detail complements the interior of any room, makes it more expressive, and emphasizes the style chosen by the designer.
- Hides all defects at the junction of walls and ceiling.
Installation of ceiling plinth
- It has minimal weight and does not require a large amount of glue. There is no risk of it falling due to gravity.
- The cheapest product in this category, compared to ceiling skirting boards made from other materials.
- The element is easy to care for and can be easily cleaned from dust and dirt during use of the room.
- Easily cut with a simple construction knife with a retractable blade.
Trimming the foam part with a knife
- On sale are not only linear, but also corner elements, sawn and glued without flaws or defects.
In addition to the advantages, foam ceiling plinth also has some disadvantages:
- Polystyrene foam is a fragile material, breaks easily and has poor resistance to mechanical damage. Handling it requires extreme caution from the mother.
Foam baseboard
- When ignited, the material melts and releases toxic substances into the room.
- Low environmental friendliness - vapors of chemical elements can be harmful to health and cause an allergic reaction in people with weakened immune systems.
- It is not recommended to install volumetric elements in small rooms, as they eat up the space and height of the room.
If possible, salespeople at retail outlets recommend polyurethane foam products to property owners, as they have better performance, are more durable and do not break due to accidental deformation.
Recommendations for installing fillets
First of all, let’s decide on the tools needed for DIY installation. We will need:
- A hacksaw or stationery knife with replaceable blades.
- A miter box with which you can easily cut the baseboard at a certain angle.
- Rubber spatula.
- Mounting gun.
- Masking tape.
- Acrylic sealant, putty or glue.
The most difficult job is cutting the skirting boards in the corners. For this operation you will need a saw with small teeth or a stationery knife and a miter box. The plinth must be placed in the miter box as it will be installed on the wall
It is important not to confuse the top and bottom. Trimming should be done with light movements, excluding strong pressure on the blade or saw.
Trimming skirting boards in corners
It is more difficult if the corners of the walls are not even. In this case, marking and cutting must be done at the installation site without a miter box. Small gaps and inaccuracies will be hidden in the future using acrylic sealant.
When finishing a circle, the product should be cut into small pieces a few centimeters wide, and then adjust the joints. The joints are sealed with acrylic sealant or putty. When painting, these joints will be almost invisible.
Applying glue (acrylic sealant) to the fillet
It is necessary to start gluing the fillets from the most visible place to avoid unnecessary joints from trimming. As glue, you can use either special glue, putty or acrylic sealant. The last option is the most convenient in terms of installation.
Sealing cracks at joints
After complete installation of the ceiling plinth, problem areas are additionally hidden with putty or sealant. You can use a rubber spatula for this. It is also very convenient to fill voids with sealant using your finger or a specially made device.
Painting glued fillets
Once the glue or sealant has dried, you can begin painting the fillets. After the first coat of paint has dried, be sure to apply a second coat for better quality. It is recommended to paint with a spray bottle, but if you don’t have one, use a regular brush.
What characteristics should you pay attention to when choosing
When choosing and purchasing foam ceiling plinths, you should pay attention to the following distinctive features and technical characteristics of the products:
- Foam density - as a rule, sellers offer materials with a volumetric weight from 25 to 40 kg/m3. As the density increases, the price increases, but at the same time, the element has increased compressive and bending strength.
- Element profile shape - different manufacturers supply foam ceiling plinth to the market in 4 main types of profile shapes:
- Concave design is the classic type.
Concave part profile shape
- Convex shape - used mainly for modern interiors.
Convex part profile shape
- Figured dressing of complex configuration.
Figured finishing of the part profile
- Design of bas-relief in antique, Indian and other styles. The range of products is very large, and each owner of the premises can choose the decor to suit his taste.
Image of artistic bas-relief on the surface of the part
- Cross-sectional dimensions and length of parts. Products are supplied to the market from 2.5 to 3.5 - 4 meters in length, with profile dimensions from 15 - 25 mm to 200 - 400 mm, depending on the style.
- The plinth can be of symmetrical or arbitrary (asymmetrical) section.
Symmetrical profile section
- Composition and flammability class. The material should not contain formaldehyde or other toxic compounds, and the base should be self-extinguishing, which also guarantees its fire safety.
- Surface type – products are offered in both technical and finishing versions.
An element that does not require finishing
When choosing, it is also worth studying the main suppliers and the presence of positive reviews on forums on the Internet about their products, indicating the pros and cons.
How to choose adhesive for foam ceiling plinths
Foam ceiling plinth is mounted using adhesive compounds, without the use of mechanical fasteners. In order for the decor to last a long time, when choosing glue you should take into account some features and nuances:
- After drying, the composition should provide sufficient adhesion strength to dissimilar materials throughout the entire planned service life.
- The adhesive should be easily applied to the surface of the ceiling and baseboard in a uniform thin layer, free of lumps and foreign inclusions.
Assorted adhesive compositions
- The substance should not be too liquid so as not to spread over the entire surface of the material when applied.
- After application, the material should dry in no more than 30 - 40 minutes, reaching the strength specified by the supplier.
- The composition should not contain toxins that cause irritation of the respiratory tract or allergic reactions. In addition, the glue should not emit strong odors that persist during application, drying, and during use of the decor.
- When choosing an adhesive, you should also pay attention to its functional purpose - the best products are developed specifically for elements of a certain category, in this case, for PSB-S ceiling plinths.
When choosing an adhesive composition, it is recommended to pay attention to the following brands and their products:
- "Titanium". Universal adhesive composition based on environmentally friendly polymers. It is characterized by ease of use, ease of application, and durability during operation.
"Titanium"
- "Moment". A glue that has proven itself since Soviet times. The substance is based on synthetic viscous materials that lie evenly on the surface, dry quickly and can withstand tens of kilograms when a tearing load is applied.
"Moment"
- "Eco-naset". Special composition for fastening polystyrene ceiling structures. It has a viscous structure and a high degree of transparency. Thanks to this property, it remains invisible, even after smudges have formed. The glue manufacturer guarantees the absence of toxins, and when applied, the substance does not emit any odors.
"Eco-naset"
- Any quality clear or white silicone sealant. These products are available for sale in a wide range. They apply well, provide reliable adhesion, and after hardening, excess glue can be freely removed from any surface. The disadvantages of such materials include a strong vinegar smell when applied and the relatively expensive price of the cylinder.
Silicone sealant
- Also, the consumer can always choose classic liquid nails, which are supplied in cylinders and applied using a mounting gun. Such substances are produced on the basis of synthetic resins that are safe for human health, remain viscous for a long time and do not lose their adhesive properties.
Liquid Nails
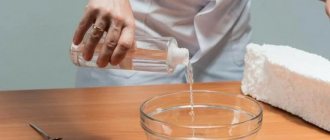
If it is not possible to purchase factory-made glue, a home craftsman can make the adhesive mixture for the ceiling plinth with his own hands. To do this, it is enough to dilute standard PVA glue with dry high-quality putty in a small container in a ratio of 1:5. After this, the materials are stirred until a homogeneous mass is achieved. This adhesive is highly environmentally friendly and reliably secures the fixation of decorative parts to building structures.
PVA glue mixed with putty
Before or after wallpapering
Professionals often differ in opinion regarding the technology and order of gluing ceiling plinths. There are 2 possible installation options for this decor:
- After wallpapering, this is the best option, which helps to hide all defects in the adhesion of wall finishing materials to the painted ceiling. The only disadvantage of this solution is the difficulty of choosing the right adhesive composition for reliable adhesion to the wallpaper.
Also, when installing foam plinth on top of wallpaper, extreme caution should be taken, as there is a high risk of glue getting on the wallpaper. In such situations, removing the composition without damaging the material is almost impossible. The same applies to finishing the baseboard - if the element is installed after finishing the walls, you need to choose a ready-made coating that does not need to be puttied and painted. Before installation, you should protect the wallpaper from possible contact with glue.
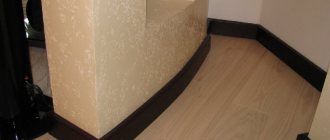
Installation of ceiling plinth after wallpapering
- Before wallpapering. It is considered the most practical option - the ceiling plinth can be glued without the risk of damaging the wallpaper. The part can be finished and painted without restrictions. The disadvantage of this type of plinth arrangement is the need to be careful when gluing wallpaper - the ends of each new row must carefully approach the lower edge of the ceiling decor. If the work is performed poorly, all defects in the adaptation of the rolled materials will be visible along the lower edge of the plinth.
Installation of ceiling plinth before wallpapering
Thus, to preserve the final finishing elements, the best solution would be to install a ceiling plinth before wallpapering. In this case, the standard order of finishing is also followed - “from top to bottom”, when experts advise first working on the ceilings, and then moving on to the walls and floors.
How to glue on suspended ceilings
If the room is equipped with tension fabrics, the frieze must be glued before the wallpaper. In this case, priority should be given to PVC skirting boards, which are lightweight. The plank should not be attached to the tension fabric, but only to the wall. To avoid contamination of the tension surface with glue, it is first protected with polyethylene. In general, the installation procedure, how to glue a corner to the ceiling, coincides with the technology described above, however, instead of putty, special glue is used here. Read also: “How to glue a plinth to a stretch ceiling - gluing instructions.”
Necessary tools for installing ceiling plinths
To install a foam ceiling plinth, you need to have a certain set of tools on hand, which can be easily purchased at any hardware store. These include the following mandatory names:
- Skirting markings:
- A tape measure, the length of the working surface of which is no less than the size of the longest decorative detail that needs to be glued.
Roulette
- A simple construction pencil with a soft lead.
Construction pencil
- Rulers or a school square to control cutting at an angle of 30 or 45 degrees, as well as the orthogonality of the cut.
Set of squares
- Construction angle and rule for controlling the straightness and orthogonality of the joints of floors with walls before starting work on installing the plinth.
Construction corner for marking
- Cutting out decorative elements:
- For convenient cutting at different standard angles, you will need a special portable plastic bench - a miter box. On the surface of the tool there are pre-made template cuts at 90 and 45 degrees.
Miter box
- The product is cut using a miter box hacksaw with a fine tooth and a wide working blade.
Hacksaw for miter box
- Given the softness of the foam, cutting can also be done with a standard construction knife with a retractable blade.
Construction knife
- Sandpaper with fine abrasive for cleaning the ends of the product after cutting.
Sandpaper
- Gluing the product to the ceiling and adjacent wall:
- For the convenience of carrying out work, you need a stable stepladder or special construction scaffolding, which is laid out next to the wall and allows the worker to move freely along their mounting plane.
Construction scaffolding
- Adhesive composition – any name from the adhesive materials described above.
- A rag to remove excess glue.
- If the work is done using liquid nails or silicone sealant, you will need a pressure-action mounting gun to apply the substance.
Mounting gun
- To control the straightness of installation of the product, you may need a construction cord or a regular bubble level with a length of at least 1 meter.
Bubble level
- Finishing the ceiling plinth.
- Dry or factory-prepared putty mixture in a bag or plastic bucket.
Dry putty mixture
- A small spatula with a narrow blade for applying putty.
Narrow spatula
- A tripod for attaching sandpaper and sanding previously applied putty.
Sandpaper holder
- Several paint brushes of different sizes for applying primer and paint.
Set of paint brushes
- Penetrating primer.
Penetrating primer
- Interior paint identical to the selected material for finishing the main surface of the ceiling.
Interior paint
All tools must be of high quality, in good working order and well sharpened, cleaned of dirt and ready for use.
Step-by-step instruction
We will need:
- fillet
- roulette
- Can you use a laser builder?
- miter box and hacksaw for metal (or miter saw, or sharp knife, or grinder)
The blanks are cut using a miter box and a hacksaw according to the markings.
If you haven't hung wallpaper yet
- PVA glue
- container for stirring the mixture
- putty knife
- putty (read about putty on drywall and ceilings)
- water-based paint and brush
- sandpaper
If wallpaper is glued or there is a baseboard in the bathroom between the tiles and the ceiling
- white acrylic sealant
- mounting adhesive Moment Montazh Express decor white
- mounting gun
- rags
Care of the ceiling plinth after installation
After installing and finishing the decorative element, it will serve for many years. However, in order for the part not to lose its impeccable appearance and performance qualities, it must be provided with simple periodic maintenance:
- From time to time, dust settles on the surface of the baseboard, which must be brushed off with a soft-bristled broom.
Cleaning the baseboard in the room
- If the finished coating of the ceiling and baseboard is highly resistant to the aggressive effects of water, it is allowed to carry out wet cleaning of the elements.
- If, after some time of operation of the room, certain sections of the plinth have moved away from the wall, forming a gap, they should be glued using transparent silicone, which will not leave visible marks on the wallpaper or ceiling.
With simple maintenance, the interior detail can last no less than the finishing of the main part of the ceiling structure. a correctly selected and correctly installed ceiling plinth ideally emphasizes the impeccable taste of the owner of the room and adds expressiveness to the interior.
How to cut a corner and make a blank?
First you need to understand which corners are in the room and mark out your blanks for each type (they are different!).
- External corner - in this case, the length of the base of the workpiece will be equal to the length of the span, and the cutting angle will be obtuse (that is, the top edge of the workpiece will be longer than the length of the bottom edge, 135 degrees).
- Internal corner - in this case, the length of the base of the workpiece will be equal to the length of the span, and the cutting angle will be acute (the upper edge of the workpiece is shorter than the lower edge, 45 degrees).
The saw must be used carefully and accurately to prevent chipping.
The blanks are cut using a miter box and a hacksaw according to the markings. To check the correctness of the cut blanks, you can dock “your creation” on the floor. If all the corners meet correctly, then you can start gluing and join them in place.
To check the correctness of the cut blanks, model “your creation” on the floor. If all the corners meet correctly, then you can start gluing.
If the corners do not meet, we make a new blank - this is why we bought fillets with a reserve.
Often the angles between the walls in rooms are not equal to 90 degrees. In such cases, you need to mark the workpieces “in place” and cut the corner without using a miter box. To do this, templates are made from paper and cardboard, and then a fillet is cut out using a sharp stationery or shoe knife.
Briefly about the main thing
Installing a ceiling plinth is an important stage in the finishing of any room. To perform this work flawlessly, you will need a certain set of tools and consumables, as well as unconditional adherence to the technological map when performing each stage of work. Particular attention should be paid to the composition and adhesive properties of the glue, with the help of which the foam plinth will be securely fixed to the ceiling.
The installation of a decorative element is carried out in several stages - preparation and marking, cutting of material, installation in the design position, as well as finishing. In order for the baseboard to serve for a long time, it is necessary to remove dust particles from it from time to time and glue individual areas in case the material peels off.
Expert advice
When considering tips on how to glue ceiling plinths correctly, it should be noted that repairmen do not have a common opinion. They argue that the installation composition must be selected in accordance with personal preferences. If the room is large and the work needs to be done quickly, it is better to choose instant-curing glue.
For medium, small areas it is better to purchase formulations that are safe for the body. Work will progress more slowly. But you don’t have to worry that the product will get on your skin or that the master won’t have time to level the baguette before the composition hardens.
Almost all polymer adhesives, when hardened, release substances harmful to the human body to a greater or lesser extent. Therefore, during the work process it is necessary to ensure good ventilation in the room. Otherwise, a person may feel a headache and weakness. In some cases, more serious consequences are possible. Therefore, working indoors when using polymer compounds is necessary with open windows.