Any plinth gives the flooring a finished, neat look, so installing it at the final stage of renovation is indispensable. Today, products made from different materials are widely available on sale - plastic, natural wood and MDF. Skirting boards made of MDF, just like those made of any other materials, can have different profiles in cross-section, dimensions, structure, and depending on this, the method of attaching them to the wall is selected. In particular, installation of MDF plinths can also be done in several ways.
Installing a plinth made of MDF, plastic, or wood with your own hands is not a difficult task at first glance. But if you don’t know all the nuances, how to fasten, how to join, how to design corners, etc., then this work can waste a lot of your time, effort and nerves.
First, it’s worth talking about the functionality of the plinth as an element of the interior.
Functionality of MDF plinth in the interior
This seemingly inconspicuous detail in the interior is quite important for its overall design. It is difficult to imagine the respectability of a room in which there is no baseboard framing of the floor covering. However, this element performs not only decorative functions, since previously it had a different purpose.
Initially, when arranging wooden floors, the baseboard was primarily intended for a kind of insulation. The fact is that there is always a gap left between the boards and the wall, which serves for thermal expansion of the wood. But such a remaining gap often became the reason for the unhindered flow of cold air from the underground. It was to avoid this that they began to fasten skirting boards along the walls.
Currently, this function of the plinth has practically lost its relevance. With the advent of modern construction technologies and materials, the problem of loose fit in the area of joints has practically exhausted itself. For example, laying MDF skirting boards does not serve the purpose of protecting against drafts or hiding flaws when installing the floor covering. The joints of MDF skirting boards fit very tightly to the wall and floor covering, so the installation of the floor covering must be done with the highest possible quality.
In modern apartments and private houses with concrete and other floors, the plinth serves to protect the edge of the flooring - laminate, linoleum or carpet, from damage and penetration under it, as well as into the gap between the flooring and the wall, dust, dirt and moisture. Installing MDF skirting boards is an excellent option for protection against contamination. In the manufacture of MDF skirting boards, a technology is used that turns the skirting board into a “repellent” of dirt. This means that dust and dirt do not eat into the surface of the baseboard, which is especially important, since white MDF baseboards are especially popular in the interior at present.
The presence of cable channels in the back wall of the plinth allows you to hide communications, for example, television cable, telephone or for connecting to the Internet. The design of the MDF plinth provides for the presence of grooves and cable channels for placing wires. The small thickness of the MDF plinth is not an obstacle to placing even several cable channels between the plinth and the wall.
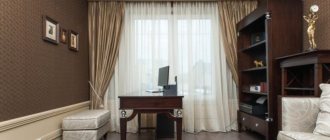
Modern products have a very aesthetic appearance, which allows the plinth to be used as a special decorative element of interior design. MDF plinths have excellent aesthetic characteristics, can be used in interiors of any style, and have a wide range of colors and models.
Dimensions
Today there are no strict rules regarding the size of skirting boards. The standard length of floor molding is 1.7 to 3.2 meters, with a maximum pitch of 10 centimeters. The most popular is 2.4 meters.
Its only drawback is excessive fragility, and, as they say.
Note! Some companies sell profiles in meters. There is no need to calculate the quantity individually. It is enough to indicate the total footage.
The ceiling molding has three sizes, calculated in meters: 1.3; 1.5; 2. The width has various parameters, ranging from small (17x30 millimeters) to large (72x90), in increments of one millimeter.
The colors of this type of skirting boards can be very different - from light, dim to those imitating the natural pattern of stone and wood.
MDF skirting boards - what is it?
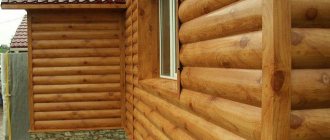
Everyone is familiar with MDF boards, used as a facing material and widely used in furniture production. They are produced in a wide range of thicknesses and shapes, most often decorated with a special polymer film with a pattern, usually imitating various wood textures. MDF skirting boards are their closest “relatives”. What are MDF skirting boards?
No matter how hard they try to freely decipher this abbreviation! Some argue that this is a designation for “fine fraction” or “modified fiberboard.” Interestingly, both options are quite close to the truth. Indeed, MDF is a step forward compared to the usual fiberboard. And in the production of this material, wood fibers are ground to very small sizes. But still, in fact, this is the Russified English abbreviation MDF: “Medium Density Fiberboard”, literally translated - “medium density fiberboard”.
MDF skirting boards are made from crushed wood fibers, which, when heated and pressed, release natural glue - lignin, which is an excellent binder for the created mass. Manufacturers position MDF as an environmentally friendly material, but in fact, to bind fibers, some companies sometimes use formaldehyde resins, which are not at all beneficial to human health. This factor must be taken into account when choosing this material for finishing - it is better to give preference to manufacturers with a consistently high reputation.
MDF skirting boards are made from boards that are not yet decorated with film. The blanks are cut and processed on special milling equipment, where they are given the intended shape and relief pattern. After this, the skirting boards are cleaned of dust, and their front surface is laminated with a self-adhesive polymer film.
Taking into account the manufacturing technology, MDF skirting boards most often have the form of a profiled smooth board, which is sometimes also decorated with simple reliefs, milling, without any special frills. Variants are produced with an insert-bar along the entire length of the plinth. This detail allows you to simplify installation as much as possible - it will perfectly hide all the heads of the fasteners after installing the plinth on the wall. In addition to lamination, natural veneer and painting are used to decorate the front side of MDF skirting boards.
Veneered plinths, instead of PVC film, are covered with veneer made from natural wood of expensive species. Therefore, in appearance they are almost impossible to distinguish from real wooden ones. Skirting boards can also be sold in painted form. For such decoration, special paints are used, which are designed to reliably protect the material from moisture, as well as from the effects of household chemicals. If you want to give the products individuality, that is, paint them yourself, you can purchase a baseboard primed with a neutral white or light gray color, prepared for painting. MDF skirting boards, like products made from other materials, have their own advantages and disadvantages, which you need to know about before purchasing and installing them.
Conclusion
Knowing how to fasten different skirting boards to a concrete wall in different ways - using self-tapping screws, glue and clips, you will be able to do this work yourself. The installation procedure of the panels is not difficult, but, as with any work, attention and skills are required.
Having different options for fastening panels, it will be easier to choose the most suitable option for the final stage of floor finishing. Only careful preparation and the correct method of fastening guarantee quick installation, and the purchase of additional material to redo the work is eliminated.
Advantages and disadvantages of MDF skirting boards
- The MDF plinth has an easy-to-install design, so even a novice craftsman who is inexperienced in construction can handle its installation. Read below to learn how the MDF plinth is attached to the wall, as well as its connection and docking.
- The products are very well fixed tightly to a flat wall surface. Thus, the walls and floor in the room must be very well leveled before installing MDF skirting boards. Read about how to level walls HERE.
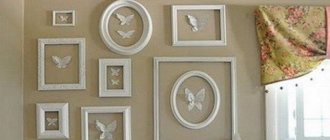
- The aesthetic appearance of plinths made from this material brings neatness and sometimes exclusivity to the interior design. Especially if the products are made to order or painted independently. MDF plinth can be attached to any wall. The main thing is that it is even. The most popular are white skirting boards, which can be used either ready-made or installed with subsequent painting and repainting.
- The fairly high moisture resistance of MDF allows the material to be used in rooms with slightly higher humidity levels. But direct ingress of water should still be excluded. Installation of MDF floor plinths should not be carried out in rooms with high humidity. It is not recommended to install MDF baseboards in bathrooms, bathrooms, laundries, and so on.
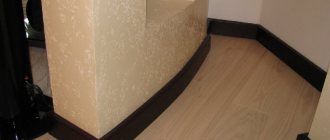
- The products have a certain flexibility, so they can be attached even to a slightly curved surface. However, we do not recommend attaching the plinth to a curved surface, since the disadvantage of products made from this material is their instability to fracture, that is, they can easily be broken by hand. Therefore, during installation you should act carefully, without applying excessive force.
- Although buyers are assured that MDF is an absolutely pure, harmless material, this statement should be treated with a certain degree of caution. In order to save money and speed up the manufacturing process of boards, some manufacturers (90% of the world production of this material comes from China) additionally use phenol-formaldehyde resins as a binder. And products may have a negative ability to emit toxic free phenol. We advise you to choose a reliable manufacturer of MDF skirting boards.
Additional Information
To cut MDF plinths at the desired angle, use a special tool - a miter box.
To install the plinth (regardless of the chosen method), slats of various lengths are used. It should be noted that MDF is made 2.6 m long. To install it, you will need to find out the parameters of the room. It is recommended to add 2-3% to the result obtained. This will compensate for the material when trimming.
Methods of fastening MDF plinths
There are three main methods for installing MDF skirting boards to the wall. When choosing one of them, you must immediately consider the possibility of dismantling. In some cases it is necessary, for example, in case of an emergency - when pipes leak and water penetrates under the floor covering.
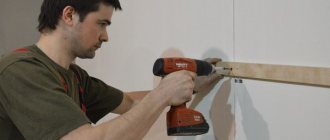
- So, the plinth can be installed on special fastenings for MDF plinths - plastic or metal clips. Clips come in different configurations, so they are selected for a specific baseboard model, so that they match the mounting channel on the back of the product. As a rule, such fasteners are included with the baseboard. By installing MDF plinths in this way, you can be sure that they can always be removed and then reinstalled without any problems.
- If the wall is perfectly flat, then you can glue the MDF plinth to liquid nails. However, in this case it will not be possible to freely dismantle the floor covering frame. And most likely, during dismantling, the baseboards will be damaged, which means you will have to buy and install new ones.
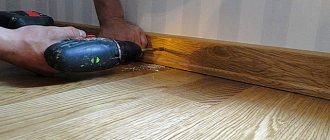
- Fastening the baseboard with self-tapping screws. In this case, the planks are screwed directly to the wall and can be dismantled if necessary. True, the dismantling process will take longer than in the first fixation option. However, it should be noted that if for a wooden plinth such a fastening turns out to be strong, then for MDF products it is still not reliable enough. Therefore, if this method is chosen, it is often combined with glue, which means that quick dismantling of the planks will be impossible.
In addition to the methods of fixing the MDF plinth to the wall, it is also necessary to consider additional elements with the help of which its individual parts can be connected to each other. If the corner joints of a wooden plinth need to be perfectly adjusted to each other so that the gap between them is minimal, then for MDF plinths special connecting elements are provided, both for corners, external and internal, and for splicing in straight sections.
Installation
Installing wooden skirting boards is a rather difficult task, since the planks are rigid, not flexible, and practically do not bend, so high-quality installation will require minimal woodworking skills and the ability to hold tools in your hands. It is better to start installation from a corner, and then mount the plinth in a straight line.
Important: You cannot attach the plinth to parquet or laminate; the planks are attached only to the wall using dowel-nails, which are buried into it by at least 30 mm. If the walls are made of plasterboard, then it is recommended to use butterfly dowels; conventional fastenings become loose over time and the baseboard moves away from the surface, forming gaps. . The biggest difficulty when installing skirting boards is the corners
If the walls are level and the angles are 90°, then the cut is done using a miter box. But level rooms are an almost unprecedented luxury, even with modern construction technologies, not only the walls are prone to defects, but also the corners, which, very approximately, can be called straight, they can be 87o and 91o (who knows, according to what “compass” » the builders were guided). This feature of the premises suggests a different way to cut corners
The biggest challenge when installing skirting boards is the corners. If the walls are level and the angles are 90°, then the cut is done using a miter box. But level rooms are an almost unprecedented luxury, even with modern construction technologies, not only the walls are prone to defects, but also the corners, which, very approximately, can be called straight, they can be 87o and 91o (who knows, according to what “compass” » the builders were guided). This feature of the premises suggests a different way to cut down the corners.
Attach the profile to the installation site, mark its dimensions on the wall and floor, draw parallel lines around the perimeter, one along the wall, the other on the floor. In the corner there will be points of intersection of the lines of the adjacent walls, the one on the wall is the top point of the cut, on the floor is the bottom. Attach the plinth, transfer the marks to it, connect them with a straight line and saw off the corner along it, do the same with the perpendicular strip.
A corner in a simple baseboard can be filed using a miter box. Tip: If the corner is filed incorrectly and a gap appears, then unpainted baseboards can be sealed with putty, then sanded and painted, and defects between the finishing strips can be sealed with colored wax.
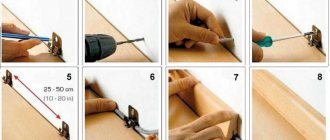
Next, starting 100 mm from the corner, holes are made for dowel-nails, the distance between them should be 200-500 mm. When the plastic elements are inserted, place the bar in place again and transfer the fastening points to it. Drill holes with a thin drill; if necessary (if installation is carried out along the front part), make a countersink to recess the fastener heads. Place the bar and secure it with self-tapping screws.
Photo diagram of mounting on clips Idea: If the wall is wooden, you can use parquet pins or nails to install a wooden plinth.
Along a straight wall, the wooden profile is also joined at an angle of 45°; this installation method allows you to make neat and almost invisible joints. When the entire perimeter is lined, the flaws are repaired and the baseboard is tinted.
A few words about installing the internal corner
If you need to install a wide and shaped plinth to neatly join it in the inner corner, then the first strip is cut at a right angle and fastened in place. Next, an evenly cut piece of plinth is taken and the end is applied to the front part of the adjacent plank, all contours are clearly outlined in pencil. Take a hacksaw with a fine blade and cut through all the bends exactly, clean the joint; if all operations are performed correctly, then the end of the plinth will exactly join the already installed profile in the corner.
Photo of how to make an internal corner, this technique is relevant when high and shaped wooden baseboards are installed for the floor
Modern installation methods
In addition to dowel nails, the wooden floor plinth can be attached to an anchor plate, which is fixed to the wall with a screw. This type of mount holds well laminated MDF plinths and veneered wooden models based on soft wood: pine, spruce and other conifers. The peculiarity is that the anchors must be located perpendicular to the fibers, and there should be no knots on the plinth at the place of fixation.
The clip is a modern device that allows you to reliably strengthen the profile without damaging the front part. The clip is attached to the wall, and the baseboard is placed on it using a special groove. Even if there is no cable channel on the whip, this installation allows you to lay the cable behind the bar.
How to join MDF plinth?
For internal corners, joining parts with smooth edges and the same color as the baseboard, as well as decorative connecting corners of non-standard shape and shade, can be used.
For external connections of plinth strips, external corner elements or special posts are used, on the sides of which there are grooves for inserting evenly cut edges of the plinth. However, this joining option is only possible if the products have the shape of an almost flat board, without pronounced complex shapes. Otherwise, the posts will unsightly protrude above the upper rounded part of the plinth.
For some types of MDF plinths, the joining parts used to connect PVC products are suitable. However, if desired, the joining can be done without corners by making cuts on the edges of the plinth at an angle of 45 degrees. But to successfully carry out such a connection, it is necessary to have perfectly straight corners of the walls, and in addition, some experience in fitting the parts to be connected is required. As a rule, with this joining method, all joints must be coated with special joint glue or “liquid nails.”
How is MDF plinth joined?
To accurately join skirting boards of any shape on a straight section of the wall, double clips are used. Mounting two elements on one common clip allows you to achieve perfect alignment and minimal gap between the two strips.
The right choice is a great outcome
The described methods for attaching the plinth will help you choose the appropriate option for completing the finishing touch. Provided the type of plinth matches the technology for its installation, you will not have to redo the work or spend money on purchasing the material again. The information will tell you how to navigate questions about the preferred surface for fixing the skirting boards, and how to choose strips that are in harmony with the floor covering. In conclusion, we invite you to familiarize yourself with another “unusual” installation method:
How to install MDF skirting board yourself
How much and with what margin should I buy MDF plinth? Before going to a hardware store, you need to calculate the required number of plinth strips and their length. In addition, it is necessary to immediately provide for the number of connecting additional parts, the calculation of which is especially necessary if the room has a non-standard shape, for example, with projections or niches, and also if the walls are quite thick. In the latter case, MDF plinth will have to be used to cover this thickness of the walls in the doorways.
To determine the length of the decorative board, you should make the following measurements:
- The first step is to measure the length of the walls around the entire perimeter of the room, including all projections (niches) and the thickness of the walls of the doorway. It is best to draw a plan of the room, and when measuring, immediately put down the dimensions on the drawing. Using this drawing it will also be easier to calculate the number of corner joining elements. Measurements are made using a tape measure.
- Next, the total length of the walls is calculated, from which the width of the doorway (or several, if any) is subtracted. Thus, the total length of the MDF plinth for the room is determined, to which a margin should be added, amounting to approximately 15% of the result obtained.
- Now, the resulting total length must be divided by 2500 mm - this is the most common standard length of MDF skirting boards. This action determines their number. Since the result is usually a fractional number, it is rounded up.
- Considering the length of one plinth, and knowing the length of the walls of the room, you can calculate how many joints will need to be made on flat sections of the walls. This parameter must be known to purchase the required number of connecting elements or double clips.
- The number of internal and external corners and connecting elements for them is determined. At the same time, do not forget about the areas in the doorways; if the walls are thick, then the plinth will be installed there too.
- In almost any case, the MDF baseboard ends at some point. For such areas it is necessary to calculate the number of end caps. It should be borne in mind that the plugs can be left or right, that is, they are not interchangeable.
Preparing for work
- When starting work, you should decide how much material you will need. It is necessary to prepare a work plan for high-quality installation of the floor cornice.
- By measuring the perimeter of the room, it is determined how many planks are needed to install for the length of the room. All connecting parts and plugs are selected to match the shape of the plinth.
- All sets of plastic strips come with additional parts necessary for attaching them to the wall.
- If you need to hide the cable, then it is better to take a plinth with a special channel.
- The plastic plinth is installed last, when the repair is completely completed.
- An awl and a hacksaw for metal will help to make holes in the plank. To attach to the floor, you will also need a drill with a set of drills, a screwdriver, a tape measure, a pencil, and a construction corner. A hammer drill will be needed if the wall in the room is concrete or brick.