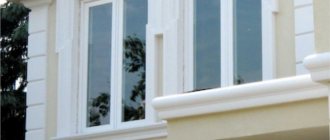
Protecting the window opening is a mandatory action after installing a plastic structure.
It is necessary to take a responsible approach to the choice of material.
This will increase the service life of the slopes and the performance characteristics of the entire block.
Let's take a closer look at metal slopes and their installation on PVC windows.
How can you seal window slopes from the outside?
From the outside, the structure can be sealed with a variety of different materials. Suitable:
- plaster mixtures;
- PVC panels;
- siding;
- metal;
- clinker tiles;
- drywall;
- sandwich panels;
- expanded polystyrene;
- wood;
- natural stone.
Slopes provide additional insulation of walls and windows.
Plaster
Decorating with plaster is a traditional, most economical, easy-to-use finishing method. Dry building mixtures are used for it, but the process takes longer than other options. As a finishing decoration, additional painting is done.
Plastering is the most economical way to finish slopes.
Plastic
Plastic slopes are perfectly combined with metal-plastic windows; they are easy and quick to install, including with your own hands. The material is distinguished by high heat-insulating properties, resistance to “cruel” natural phenomena - it is not afraid of high humidity, and does not deteriorate in severe frost. The product improves sound insulation, is compatible with all types of insulation, and does not require leveling before starting installation work. The use of foamed PVC panels additionally insulates the room; the material does not flake when exposed to high temperatures, and does not lose shape from cold and moisture.
The use of sheet plastic allows finishing work to be carried out as quickly and accurately as possible.
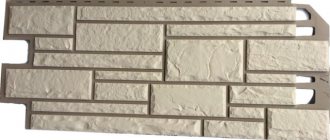
Siding
Decorating with siding is one of the budget, but not very durable options. The cellular structure of the material leads to the fact that the slopes gradually become deformed, turn yellow, and swell. Since the siding is hollow, it will provide little protection from the cold; an additional heat-insulating layer is required underneath it.
The material allows you to quickly create an aesthetic coating that has a certain level of thermal insulation and soundproofing.
Drywall
The main disadvantage of drywall is its ability to absorb moisture, therefore, when decorating external slopes with it, the surface is additionally puttied and painted. The material is recommended for finishing windows facing glazed balconies, verandas, loggias.
It is also quite suitable for cladding external slopes if the windows overlook a glazed loggia, balcony or terrace.
Sandwich panels
Such three-layer panels, consisting of two layers of plastic and a sheet of insulation (extruded polystyrene foam), are optimally suited for decorating the sides of a window opening. Thanks to them, the opening receives something like a “thermal coat” with high sound insulation. Sandwich panels are similar in appearance to plastic panels; they do not need additional decor. Installation of such slopes requires strict adherence to the instructions, and it is better to purchase the parts ready-made.
They have low thermal conductivity and do not require additional finishing.
Styrofoam
Insulation using polystyrene foam is a simple and cheap option. This material retains heat well, it is low-flammable, lightweight, and easy to cut into any shape. For work, a product with a thickness of two cm and high density is used. Expanded polystyrene is also often used - it is much stronger than polystyrene foam in bending (about five times), has better sound insulation characteristics, and practically does not absorb water.
Slopes covered with foam plastic will save heat in the house and protect from external noise.
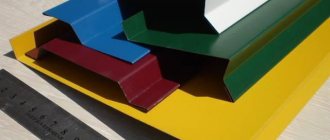
Metal
The option of finishing windows with metal slopes on the outside is one of the most popular. The metal here is covered with a polymer layer, performing an excellent heat-insulating function and protecting the walls from freezing and blowing by even the strongest wind. The cost of the product is high, but due to the polymer coating, the structure does not rust and lasts as long as possible.
Choosing metal as a finishing material for external window slopes is a reliable, aesthetic, and durable solution.
A natural stone
Decorating any window openings with natural stone is a labor-intensive, expensive method, but luxurious, strong, durable
It is important to consider that stone elements create additional load on the walls and foundation. It is also permissible to use artificial stone
Finishing from natural stone is an impeccable, stylish and sophisticated appearance of the slopes, unsurpassed durability and guaranteed strength.
Pros and cons of the material
Despite the fact that external metal slopes are more expensive than other types of finishing, their positive qualities more than make up for this drawback:
- they have a high degree of resistance to corrosion and rust;
Metal slopes are covered with a layer of galvanized steel - they do not lose their technical characteristics over the entire operational period, which is quite long;
- the existing paint layer is durable and does not require updating over time, although, if desired, the slopes for plastic windows can be painted in any color you like;
- resistant to mechanical stress;
- easy to install and maintain;
- have a pleasant external design and look decent on facades lined with different materials;
- not subject to temperature changes and precipitation
- metal slopes can be made in any color scheme.
It is recommended to install noise-absorbing tape along with the slopes. The
disadvantages include the high cost and the presence of sound effects arising from drops or hail falling on their surface . This can be dealt with if you use a special noise-absorbing sealing tape when installing metal slopes.
Another disadvantage of a metal slope is the impossibility of installing it in arched openings.
Instructions on how to install external structures with your own hands
Now we will tell you step by step how to install metal slopes on plastic or other windows, and what needs to be done for this. After all the preparatory work and measurements, the process is divided into several stages:
If the slopes are cut out yourself, then all measurements taken earlier are transferred to a sheet of metal, and the contours are cut out with special scissors.
Preparing the opening for installation work:
Trim off excess foam with a paint knife. Clean the opening from dust and dirt, treat it with an antiseptic to prevent the appearance of mold and mildew. If necessary, seal all cracks with plaster (find out how to seal seams and cracks when installing slopes with plaster and other methods here). Next, all seams are covered with sealant.
The most critical stage is the installation of ebb and corners. How to install and secure them:
The first step is to install the lower part - the ebb. It is leveled using a level gauge
To prevent the metal from making a strong noise when it rains, you should place noise-insulating material (noise-absorbing tape or a thin layer of polyurethane foam) under the part.
Important If the mounting foam, which is applied to the lower part of the flashing and slightly to the base of the window frame, begins to lift the structure, you must evenly press down the flashing with something heavy along its entire length. Afterwards the part is screwed to the window frame with self-tapping screws.
The side slopes are attached next
It should be remembered that the upper and lower parts have a slope from the inner edge to the outer, so the edges of the part are cut in accordance with the angle of contact with the ebb and the corners of the opening.
At the same time, competent measurements and careful cutting will prevent the formation of cracks, and all slopes will fall into place. After precise installation, the side parts are attached to the window frame with self-tapping screws and a press washer.
The last element to be installed is the external cladding element, which is also fastened with self-tapping screws. For better thermal insulation, all cracks are filled with polyurethane foam (find out in this article how to properly work with polyurethane foam when installing window slopes, and what to look for when choosing foam).
Careful inspection of all joints and cracks, which are additionally filled with sealant (how and with what to seal the seams after installing the slopes?).
We invite you to watch a video on how to install external metal slopes with your own hands:
Installing metal slopes with your own hands is not particularly difficult, the main thing is accuracy in measurements and careful installation of this facade element, which, despite its relatively high cost, can last for decades.
Manufacturing nuances
The production of metal protection has been actively developing in our country since Soviet times. The technology is being improved, so each such product is reliable and has a long service life. Today, you can mainly find galvanized slopes, which are made from steel of the same name, resistant to corrosion processes. The inner side of the steel is covered with a layer of soil. A special polymer coating is applied on top of the product to enhance its strength. The structure resembles a metal tile or corrugated sheet: a layer of zinc guarantees protection against rust, and polymer powder paint prevents mechanical damage to the zinc.
The production of slopes occurs only after the completion of the measuring stage, because the width and height of the product must correspond to the opening from the inside and outside. The side segments, as well as the upper and lower parts, are simply cut out from a sheet of metal prepared in advance, focusing on the collected dimensional data. The optimal thickness of the steel sheet is also determined by the parameters of the opening, but also by the required degree of rigidity. Thin metal is more often used - no thicker than 0.55 mm.
Wet finishing method
This cladding variation is the most traditional and economical option. The simplicity and simplicity of this method makes it possible to plaster and paint the slopes yourself. To finish the surface, you need to prepare a dry mixture based on cement or gypsum. It should be noted that this type of work differs in the duration of the manipulations performed. And also the “fur coat” needs to be dyed periodically.
Before plastering external walls, they should be prepared. Preparation consists of cleaning from dirt, defects, and excess foam. To protect the window, it is recommended to cover the structure with masking tape. Plastering slopes should be done in stages:
- The first step is to install the beacons at a distance of up to 5 cm from the window frame; fixation is done with nails.
- The thickness of the plaster layer should cover the window by 1 cm. The generally accepted thickening is 2 cm. The corners should be aligned with a square.
- After making sure that the opening is clean, it is possible to apply a primer. Priming is intended to improve the adhesion of the plaster to the base.
Puttying external slopes
- The cement-gypsum mortar should be applied over the beacons and smoothed with a spatula. Manipulations must be done from the bottom up.
- After the first layer has dried, the beacons should be removed, and the locations should be covered and leveled.
- 1 layer of plaster should not exceed 7 mm. It should be taken into account that it is correct to apply a new layer of plaster only on the dried previous layer. Also, don't forget about angular alignment.
- After the plaster has set, the wooden frame is removed, and the defects are covered and smoothed.
- You can slightly moisten the coating with a wet rag and remove any imperfections using a grater.
- After thorough drying, whitewash or paint is applied.
The window must be closed during work. Because if the mixture penetrates into the fittings, functionality may be impaired. An obvious negative property of the finishing method is the failure to combine the cement mortar with the PVC profile. This contributes to the appearance of a hole between the slope and the frame base. Therefore, the resulting gaps should be sealed with silicone-based sealant.
Low tide installation
The length of the ebb is greater than the width of the opening, this is done on purpose. The width of the window opening is transferred to the metal ebb panel with an allowance on the sides. Cut off, allowances are cut so that “ears” in the shape of a trapezoid and a triangle are formed at the edges, which will cover the corner of the opening. The trapezoids are bent upward.
After the casting is ready, it must be applied to the bottom of the opening. Before final fastening, a noise-absorbing tape is laid. It's easy to install. A piece of the required length is cut from the skein. Remove the protective paper from the adhesive side and apply the tape. The ends are brought to the side slopes. The tape has a high degree of adhesion to various surfaces (concrete, metal, etc.), the main thing is that there is no dust or debris on them. The tape cannot be painted or plastered, as it will lose its working properties.
Correct installation relative to the surface is checked by level. If the panel is warped, it is necessary to remove the warp with available materials. Any metal or wooden spacers are suitable for height adjustment.
Drill holes in the ebb, base. Fasten with self-tapping screws and dowels.
Tips and tricks
Metal slopes are not the only choice; if desired, the window opening can be decorated with decorative stone, stucco, or wooden panels
Installing slopes with your own hands is a commendable task, but long and thankless if a person has not done anything like that. There are special companies engaged in small construction work. These offices perform them very efficiently and care about their reputation. These are not window suppliers where everything gets done as quickly as possible.
Plastic, metal, drywall, siding, standard plaster - this is tested and reliable, and the choice of material is up to the owner. It is based on the personal preferences and financial capabilities of the owner, especially if events develop in a standard high-rise building.
If it comes to your own private home, lovingly built over decades, you can come up with something original, like handmade sculpting, natural stone or carved wooden panels. The simplest, cheapest and most functional are chosen by people who do not care about other people’s opinions or their own sense of the beauty of the home in which they live. There is no point in consoling yourself that this is only temporary. It’s better to make it high quality, durable and beautiful. It may take a little longer and be more expensive, but it will last a long time.
Photo gallery of finished works
Important! By choosing to finish the outside of windows with metal slopes, the work is easier, and the surface itself will last longer. Even if the paint peels off, the slope coating is easily restored.
The shape of the metal will allow you to create a three-dimensional window opening for any type of window. Difficulties when working with your own hands appear only when creating an arch.
Sources
- https://oknanagoda.com/okna/naruzhnye-metallicheskie-otkosy-na-okn.html
- https://otdelkagid.ru/vnutrennyaya/okna/naruzhnye-otkosy-iz-metalla.html
- https://balashiha.facade.ws/metallicheskie-otkosy.html
- https://ingener-pto.ru/2019/12/12/kak-otdelat-okno-snaruzhi-metallom/
- https://otdelkasam.ru/vnutrennyaya/okna/naruzhnye-metallicheskie-otkosy-na-oknah.html
- https://remoskop.ru/metallicheskie-otkosy-okna-ustanovka-svoimi-rukami.html
- https://mezhdveri.ru/29338-podrobnaya-instrukcziya-po-ustanovke-metallicheskih-otkosov-na-okna-ot-podgotovki-do-montazha-s-foto.html
- https://remoskop.ru/naruzhnyie-otkosyi-metall-ustanovka.html
- https://kvadratstroy.ru/metallicheskie-otkosy-naruzhnyie-otsinkovannye
- https://balkon4life.ru/osteklenie/okna/naruzhnue-otkosu-dlya-plastikovyx-okon/.html
- https://www.navesfasad.ru/remont/ustanovka-metalliceskih-otkosov-na-okna.html
- https://okcomfort.com/okna/otkosy/svoimi-rukami-naruzhnye.html
- https://okcomfort.com/okna/otkosy/metallicheskie-svoimi-rukami.html
Selecting the necessary tools and components
Before starting work, prepare the necessary fittings and tools. Since finishing window slopes from the outside involves cutting siding panels, you will need the appropriate tool (any of the proposed ones, convenient for you):
Siding around a window whose slope is less than 19 cm
- metal scissors for cutting the top of the panel; they are used to make shaped cutting of siding for finishing arched openings;
- a fine-tooth hacksaw or power saw for working on wood or metal;
- knife-cutter - it is used to draw a strip along the siding panel, and then the panel is bent/unbent.
During the installation process you will also need:
- screwdriver;
- hammer;
- a square that will be used to mark the correct mounting angle on slopes and around windows;
- construction (1.5 m) and water levels;
- twine and chalk to mark the assembly lines.
As for fittings and components, the use of siding for window slopes will require the required number of screws and certain fittings. It is better when all components and the siding itself are purchased from the same manufacturer - this guarantees the quality and durability of the structure. The fasteners must be original - this will make the cladding perfect. Since original components may seem too expensive to you, make a preliminary drawing - it will help you accurately carry out all the calculations.
Components and screws are purchased according to a pre-calculation - this will save you from problems with finding the right colors or sizes during the work process. Thus, the number of fastening strips is calculated according to a certain algorithm:
- The window opening is measured along the perimeter. The distance under the window is minus from the obtained value - if it is planned to install window sills or ebbs here.
- 10% is added to this value - they take into account trimming and various inaccuracies during the work process.
The main components required for framing windows with siding are:
- H- and J-profile;
- external and internal corners for decorating panel joints;
- low tides;
- chamfers;
- window and finishing strips.
Set of components for siding installation
Dimensions and design
Since slopes are made individually, measuring each window or doorway, the parameters of the product can be very different. The same applies to the level of complexity of the design. However, the metal slope is always solid and exactly fits the measurements, so high protection of the seams from water and sun is guaranteed.
The following types of slopes may have an unusual design:
- For ventilated facades or siding facades. In this case, the slopes will have protruding elements and shelves for fastening.
- For a brick facade. The slope will have a Z-shape.
Slopes for different facade windows, for example, can have a width of 2-60 cm. The length varies from 10 to 300 cm. Standard lengths are 125 cm, 200 cm and 300 cm. The thickness of the metal varies from 0.4 to 0.8 mm.
Slopes for ventilated facades
In ventilated facade systems using various types of cladding, a slope with several fastening shelves and protruding elements is generally installed.
| Rice. 1. General view | Rice. 2. Dimensions |
Using a mounting strip, the metal slope is attached to the guides of the subsystem, under the cladding. The frame is made in such a way that after installation the offset ranges from 2-4 cm.
Slope for a brick facade
The simplest version is the Z-shape. Fastening is done through a fastening shelf or special inserts to the window structure; the side areas are filled with insulation or foam.
| Rice. 3. Design | Rice. 4. Dimensions |
Metal slope for siding facade
For siding facades, it is possible to use the same metal slopes as for ventilated facades, or a specialized version with hidden fastening.
| Rice. 5. Design | Rice. 6. Dimensions |
Basic rules for carrying out work
Do-it-yourself window siding will be done slightly differently depending on the design of the window opening. As a rule, windows in our houses are made according to several standards:
- According to European standards, slopes are less than 19 cm. Then the size of the window strip will be standard - up to 22 cm. It is very easy to attach with your own hands, even by non-professionals - for this they use a finishing profile into which the strip is inserted. The finishing profile can even be replaced with a J-profile and bevel, which will help reduce overall costs.
- According to Russian standards, slopes are more than 19 cm. For such windows, you will need a J-profile placed near the frame. An outer corner is mounted around the perimeter of the window, into which the siding panels are inserted.
- Windows without a slope - a casing must be installed, and then siding is attached to it.
- An arched window requires the use of a flexible J-profile. A regular one will do, but it will need to be cut a little - in those places where the shape of the window bends.
To attach siding around window openings, it is recommended to use standard metal profiles.
The process of designing a window opening begins with installing a starting strip. After this, serial installation is carried out, with each row carefully adjusted to the grooves of the previously installed ones. If a standard size plank cannot be installed in the slope, the sheet is cut to the required dimensions.
Installation diagram of window profiles for siding finishing
After the entire area of the slopes has been sheathed, additional accessories are installed. However, these elements are completely optional - all their functions are performed by standard siding.
Work is being carried out in a special way to cover the arched window opening. Here you will need a special elastic profile. It is secured with nails or self-tapping screws around the perimeter of the window opening. Next, sheathing is carried out - always observing a 15-cm step. Where the siding touches the supporting profile, the strongest possible fastening is ensured - no gaps are left for expansion in arched windows.
If the emphasis is placed on window openings in the design of the facade, then the finishing is done with platbands 6.2 cm wide. If the design of the slopes implies “invisibility,” then preference is given to a narrow J-profile. However, you can independently choose the option that suits you best in terms of decor and price.
Why is it necessary to cover the polyurethane foam?
Despite the obvious advantages of installing external metal slopes, many homeowners delay this process for various reasons:
- Not enough time;
- On the advice of the craftsmen, paint over the foam;
- Insufficient financial resources;
- There is not enough experience to do it yourself, and inviting specialists is expensive.
But you need to know that polyurethane foam, if it is not protected, undergoes the following processes:
- Destruction due to exposure to sunlight.
- It loses its properties as a thermal and waterproofing material - saturation with moisture even by 5% reduces its ability to retain the internal heat of the house by half.
Therefore, mold and rot may appear on wooden windows, and metal-plastic structures will begin to freeze. The result of all this will be the replacement of windows and additional expenditure of money.
Finishing external slopes with metal with a polymer decorative layer has many positive aspects. The original color of the metal remains for several decades. Thanks to the existing protective polymer layer, the slope finishing elements do not rust and do not require periodic painting. They are easy to clean and also easy to install. Window-wall connections already sealed with mounting foam or sealing tape are reliably protected from external influences, as a result of which these materials retain their thermal insulation properties.
Types of external slopes for plastic windows
If you do not install external slopes immediately, but postpone the process for an indefinite period, then soon you will have to repair or replace windows.
Finishing external slopes is an important and final stage of window installation, and such a process is best trusted only to highly qualified specialists. Then the installed windows will delight you with their appearance for many years.
Plastic
The characteristics of the plastic material are transferred to products made from it. This means that plastic slopes have all the qualities that are inherent in the plastic itself. They are durable, wear-resistant, moisture-resistant, and are not afraid of temperature changes.
Few citizens have the equipment at home that “high-rise workers” use, so you will most likely have to hire a team of construction workers to complete the exterior finishing.
Installation of external slopes is carried out in stages:
Preparation of the surface and plastic plates:
- All dirt and dust are wiped away from the outside of the window. You should also cut off any foam protruding onto the frame. Places where there is no foam cannot be seen; on the contrary, they should be foamed.
- Preparatory work also includes the preparation of the slopes themselves. Plastic external slopes are cut to size from standard wide plates.
- Such plates can be found at a hardware store. They need to be cut to size, the end edges need to be cleaned a little so that there are no “torn” parts.
- Cut the plastic slowly. The material may be fragile. If you cut it intensively, small chips may fly off, which can injure you.
- Installation of the starting, U-shaped profile. It is screwed to the edges of the plastic frame on three sides. The end part of the slope will be embedded in this profile.
- Installation of an F-shaped profile around a window opening. It should be installed so that the profile groove is a mirror image of the U-shaped profile. The second part of the slope will be inserted into it.
- Now the next step is actually finishing the external slopes of the windows, that is, installing a plastic plate. It can be immediately mounted in the window opening.
But in order to provide additional insulation of the slope, a layer of insulation, for example, cotton wool, should be laid under the plastic.
Siding construction
How to make external slopes with siding? In fact, siding is the same plastic, only it has a corrugated shape. It consists of a set of different types of profiles and finishing plates.
- Before installing siding, all external surfaces of the building must be lathed.
- Then the siding ventilated facade and external slopes are attached to the sheathing. Siding plates have fastening holes in the upper part through which the material is secured to the sheathing.
- Each subsequent plate is superimposed on the previous one, hiding the fastening “seam”. As a result, it turns out that there is no trace of fastenings anywhere on the wall.
- External finishing of slopes of plastic windows with siding involves carrying out similar operations as when installing plastic slopes (the difference is in the form of the profiles themselves).
- Siding slopes have a special design; various bends and ebbs are used to secure them, allowing you to “assemble a system” of slopes.
Making plaster
Plastering external slopes is the simplest and most common type of finishing. For facade work you need to use facade putty. The operating procedure is as follows:
- First you need to cut off excess foam and remove debris. Then the surface should be primed in order to protect it from the formation of fungus and mold.
- Next, you should dilute the solution according to the instructions. Then the mixture is applied to the slope and leveled with a spatula.
- For work, it is convenient to use two spatulas: one for applying the solution to the wall, the second for puttying and leveling the surface.
- Then the surface must be given time to dry.
- It should be painted. For work, you can use any facade paint.
Helpful advice!
If necessary, the paint can be tinted with dye.
External slopes made of metal
They are used for finishing windows in buildings, the facade of which is decorated with a metal profile, or rather with metal profile sheets (the finish looks like the surface of a container).
Slopes are made of metal with a polymer coating (colored), or from galvanized sheets. The slopes are secured to the surface with screws or rivets. Color coating and galvanization protect the metal from corrosion; it does not need to be painted later.
https://youtube.com/watch?v=NNL6vQsSC18
Advantages and disadvantages of using metal slopes
Window areas are most often decorated with metal slopes, regardless of whether this is done for plastic windows or wooden structures. Therefore, you should carefully consider their advantages:
- The characteristics of the material are such that it can withstand all environmental influences. Any whims will not matter to him. It is also important to consider that the metal does not experience destruction due to mechanical stress. This is especially important in regions with harsh climates and frequent hail.
- Maintenance is not difficult. By choosing this option, you can be sure that the product will serve for many years. It only needs to be occasionally cleaned of accumulated dirt and wiped with a cloth.
Metal slopes do not require special care, you just need to wipe them occasionally
On a note! If you choose a plastic or putty option, you will have to make more efforts to preserve such coatings. PVC quickly loses its original appearance and becomes dirty. Putty (plaster) is subject to destruction, which leads to annual renewal of damaged areas. With metal it is much easier, even if the paint layer peels off, it is easy to restore (this makes it possible to change the appearance).
- The shape of the product creates an excellent three-dimensional frame. It is important to know that, if necessary, any option can be made. Difficulties can arise only with arched structures.
The material has practically no disadvantages. There is only a necessary condition - pasting with sealing tape. It plays the role of sound insulation. If you ignore this feature, then the first rain will make you think about remodeling.
Installation of metal slopes
Installing metal slopes on windows with your own hands is a simple procedure, but it requires care and attention. To work you will need a minimum set of tools:
- Screwdriver with a set of bits.
- Tape measure and square.
- Metal scissors.
- Hammer.
- Construction knife (stationery version).
- Spatula (if additional preparation is required).
- Construction pistol.
Tools required to install a metal slope
It must be taken into account that external work is carried out as quickly as possible. You cannot wait a long period of time after installing window frames. Many people mistakenly believe that work can be delayed during the summer. But the result of such inaction is destroyed polyurethane foam and microscopic cracks that have absorbed a lot of moisture.
Work on the installation of external slopes must be carried out immediately after installing window structures
Stage one - measurements
Carrying out careful measurements is a guarantee that every detail will take its place like a glove.
An important feature of such an event is that each site is measured individually. Some craftsmen mistakenly advise measuring the upper part of slopes by low tide
This position leads to problems with the size of the elements; they may be larger or smaller than the required indicator.
The work is carried out using a tape measure. The dimensions are immediately transferred to the prepared notebook. This is especially true if several windows are being finished at once.
Stage two - preparation
Careful preparation is necessary for window openings whose adjacent walls are made of brick or concrete slabs. Such structures are subject to numerous falls and are covered with cracks. The following manipulations are performed:
- The polyurethane foam is cut off. It is removed flush with the window frame. This is done using a construction knife.
- The general condition of all surfaces is assessed. If required, cracks and holes are covered with putty.
- The formation of voids between the installed elements and the base must not be allowed.
- The surface and seams are additionally treated with sealant. It is best to soak concrete and brick surfaces with an antiseptic, this will prevent the appearance of mold.
It is necessary to give some time for the applied materials to dry.
Before installing metal slopes, it is necessary to restore the integrity of the coating
Stage three - installation
The dimensions are transferred to metal strips that have the necessary bends. Each element is cut using metal scissors. The technology is as follows:
- Finishing the slopes begins at low tide. This part is cut to the size of the window frame or less by one centimeter. The outer part is cut to the specified size of the opening, taking into account the allowance for the wall. The side parts are made with an allowance of one centimeter - they will need to be folded. The structure should be tilted away from the window.
- The ebb is installed in its place. It turns out that it fits the surface well, with its side walls extending into the vertical areas. It is screwed to the frame using self-tapping screws.
- Next, the side racks are installed. They are placed vertically, they must cover the curved sections of the ebb. Attached with screws.
- The top part is inserted last. It is adjusted to the installed side strips and aligned with the outer corners. Secured with self-tapping screws.
- Now you can apply sealant, which should reliably cover all adjacent areas of this structure.
Installation of metal slopes begins with the installation of low tide
It must be remembered that the sealing tape is pre-glued.
Thus, a beautiful and reliable cladding appears on the windows, which will play not only a decorative role, but also protect the surface from destruction.
External slopes made of metal are becoming increasingly common not only when finishing new plastic windows, but also in protecting wooden frames that have been in the house for a long time.
The variety of materials used in modern construction makes it difficult to choose among the possible options for installing protective coatings on exterior windows.
The most common of them are cement mortar or standard plastic panels. These are proven, low-cost ways to improve and secure window openings from the outside, and protect your home from moisture and dust.
Preparing for installation
Installing modern metal slopes on windows with your own hands will require the preparation of special materials and tools for this type of work:
- metal sheets;
- level;
- fasteners;
- mounting foam and silicone sealant;
- screwdriver and bits;
- painting knife;
- metal scissors;
- roulette
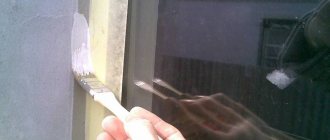
Excess polyurethane foam must be cut off.
Surface preparation consists of removing construction dust and contaminants from it. Excess polyurethane foam is cut off with a painting knife, and the seams and joints are treated with silicone sealant. Do-it-yourself installation of a metal slope on windows should be done after the seams have dried .
What is it and what function does it perform?
Attention Since the polyurethane foam used when installing a window cannot be used for a long time without protection - from environmental destruction, external slopes are made. Exposure to sunlight causes polyurethane foam to deteriorate over several months.
When the foam has lost its properties, energy efficiency is lost and the geometric position of the window in the window opening is disrupted, which will affect mechanical damage to the window control system
Exposure to sunlight causes polyurethane foam to deteriorate over several months. When the foam has lost its properties, energy efficiency is lost and the geometric position of the window in the window opening is disrupted, which will affect mechanical damage to the window control system.
Without external slopes, the foam is not only exposed to sunlight, but also exposed to moisture. For a short period of time, the foam is not susceptible to moisture penetration. But since the sun's rays harm it, it loses its properties, and there will be no obstacles to the penetration of moisture. Moisture penetrates the pores of the polyurethane foam and is destructive to it.
Since the foam has a porous base, moisture will penetrate into the room through it, albeit in small quantities. This will lead to the formation of fungus and mold on the walls due to condensation.
Based on all this, let’s say for sure that external slopes are necessary. The slopes will protect the walls from the effects of condensation; thanks to the slopes, the windows will be reliably protected from fogging. With slopes, heat and sound insulation increases, and the service life of the mechanical part of the window system is extended. Also, with their help, windows are given a neater appearance.
Slope function
Finishing windows on the outside with metal slopes performs decorative and protective functions. By installing slopes on windows with your own hands, you can close the installation seam and thereby protect it from exposure to precipitation and direct sunlight .
Metal slopes perform a protective and decorative role
Polyurethane foam, used to seal the joint between the frame and the window opening, is a porous, vapor-permeable substance that allows moisture from the room to pass through it. As a result, moisture and condensation settle on the surface of the window slopes, which leads to the formation of mold and destruction of the integrity of the structure. Moisture from the street can penetrate through the mounting seam and cause fogging and freezing of the window in winter.
By installing metal slopes on windows, you don’t have to worry about these troubles, since metal is a strong, durable and easy-to-maintain material with high performance indicators.
External slopes for PVC windows
In the last article, I talked about how to seal the gaps between a plastic window and the wall of a house on the street side. This stage has been completed, the foam is sealed and protected from fading in the sun.
The next step is plastic external slopes. They are beautiful and will also be additional protection for the window mount, which is a rather unreliable and drafty place in the entire structure.
Material:
- U-profiles (cost pennies) for panels (8 mm, in my opinion)
- Plastic panels (used surplus left over from finishing the loggia)
- Polyurethane foam
- Sealants
- Primer
Tools:
- Jigsaw
- Foam gun (if the can was taken without a spout)
- Caulking gun
- A clear head and relatively straight arms
- Tape measure/ruler/marker
Preparation
The slopes will cover the end part of the outer wall, so all three sides (top, right, left) must be carefully measured in order to cut a trapezoid from the panels.
Note!
You need to start from the top slope. It is the most fragile, due to the fact that it is forced to be suspended
The side ones will then hold it.
I got lazy, cut it anyhow, then smoothed the edges on the sharpening machine. It’s better to cut straight away, less waste, dirt and work. If you doubt the accuracy of your measurements, you can use cardboard.
After cutting all three parts, I packed them into U-profiles, which I put on the panels and cut them very evenly... with a grinder =). One touch - and the profile part is cut perfectly evenly, without chips or burrs.
In general, the method is not for everybody. Some people cut with a hacksaw, some with a knife, some with scissors. As I already said, I started the installation from the top of the slope, along the rough side of which I covered it with foam.
Installation
Next, with all the profiles attached to the panel, we firmly lean our slope against the previously primed and cleaned surface (plaster/slab/brick should not crumble). And so that it (the upper slope) does not fall, it needs to be thoroughly supported (I used old baseboards).
At this point, I removed the P-profile from the outer edge due to the foam that had come out (more precisely, I removed it myself and put it on later, after I had cleaned off the foam).
The tape pieces need to be prepared in advance. And just in case, some clear tape too. If the paint does not stick well to the wall, it can be reinforced with transparent (packaging). The foam dries very quickly, but I left it for a day, as recommended by the foam manufacturer.
You need to press the upper slope (and the rest too) against the wall (opening) very tightly. It’s the same problem with the side slopes: we pack them into profiles, glue them and press them hard. A lot depends on the condition of the opening. I came across a crooked one, the brick protrudes at the top, so gluing it was more difficult.
Note!
And let me remind you again: before installing external slopes on PVC windows, be sure to think about how you will fix the panels, and also prepare clean rags and acetone (cleaning liquid) in case of smeared foam.
The last flaws must be cleaned out immediately, before a yellow stain appears, which can be left on the plastic by polyurethane foam. And the gluing surface must be smooth, without holes, crumbs and protrusions.
I used glossy panels and they look very nice. But for internal slopes I recommend matte (or sandwich) ones. The tape must be peeled off the next day to prevent the glue from sticking in the sun.
Sealing of slopes
Sealing of slopes
No matter how tightly the slope with the U-profile is pressed against the window frame, there are still gaps. As I read, people seal them with whatever they can: liquid plastic, sealants and even putty.
My gaps turned out to be narrow, and I coated them with acrylic sealant. It is washable and can be painted with a small brush to ensure reliability.
In the last photo you can see that the upper slope is covered (on top of the gap between the slab and the slope) with polyurethane sealant.
He definitely doesn’t care about the frost, water and sun. It wasn't necessary to do this, but just in case.
Note
I did not use the F-profile due to the unevenness of the wall. I was afraid of water flowing under it and the growth of black mold.
Polyurethane and acrylic sealants, as well as liquid plastic and similar pastes must be applied very carefully: without proper experience, it is easy to ruin the working surface. So first practice on something less valuable than new plastic windows
Instructions for finishing with metal sheets
The process of installing metal slopes is not complicated, but it requires care and precision. To properly insulate a room from the street, it is practiced to place thermal insulation under the sheets.
The work is performed in the following sequence.
- The window opening is measured, and the sheets of metal are cut into strips. The strip for the lower part of the opening is cut with a small margin to form a water drain.
Measuring and adjusting the tide
This is what the edge of the low tide should look like
- The first part to be installed is the lower part - the ebb. It is screwed to the frame and has small overhangs on the side sections of the window opening. It is important that the ebb is diverted from the window.
- Side stripes are installed. They are pressed tightly against the surface of the opening and cover the curved parts of the ebb.
- At the final stage, the top strip is installed.
- To improve the insulating characteristics of the structure, sealant is applied to the joints of the strips.
Advantages over other materials
There are several types of finishing materials, using which you can give the window opening a complete appearance. These are plaster, drywall, plastic and paint. But in terms of its technical characteristics, none of these materials can compare with metal slopes. When deciding how to make slopes, you need to study the characteristics of finishing materials.
The polymer layer of the steel slope protects the product from rust
When using plaster, you must be prepared for the fact that the plaster layer will crack over time. Moisture getting into the gaps between the window frame and the plaster layer can cause mold to appear.
Drywall as a finishing material for slopes is only suitable for interior work. Even GVLV brand drywall is not able to withstand the direct effects of precipitation. In a short time it will swell, lose its appearance and collapse.
The use of plastic panels for finishing external slopes leads to the fact that in the sun the plastic fades and acquires an unpleasant yellowish tint. And with a sharp drop in air temperature, the plastic becomes brittle and may lose its integrity after minor mechanical stress. Therefore, it is better to use plastic for finishing internal slopes, especially in the kitchen.
Metal slopes are not exposed to weather conditions
The advantages of metal slopes are obvious, since the material for their production is galvanized steel, which is covered with a protective polymer decorative layer at the production stage. This protects products from corrosion and rust.
Purpose
Metal external slopes perform several important functions:
- The iron platband for windows gives the appearance of the opening an attractive, neat appearance. The steel slope is often made in the same color as the profile of the window structure - white or brown (for wood-laminated profiles). However, if the customer wishes, the panels can be painted in any color according to the RAL catalog.
The customer can choose any color of the slopes from the RAL catalog - Protection of the assembly seam from moisture and exposure to natural phenomena in the form of precipitation, wind and temperature changes.
- Protection of the slope surface from dampness, mold formation and destruction. External metal slopes reliably seal the wall surface and increase its heat-insulating qualities.
Metal window trim should be installed immediately after the windows are installed to prevent moisture from being absorbed by the foam . If this cannot be done in the near future due to work on finishing the facade, then the installation seams on the windows can be temporarily covered with polyethylene.
Stages of facing work when finishing window openings
Silicone sealant is needed not only for finishing seams. They additionally coat the slopes in those places where they come into contact with the window frames. This is necessary to protect the metal from water and protect the insulation from the destructive effects of moisture.
Further work is quite simple. If you have already had to do repairs yourself, lining window openings will not cause much trouble. Installation of metal slopes is carried out in several stages:
- The first step is always to install the lower part, which performs the functions of the ebb. The lower slope is leveled using a level gauge. To prevent the rain from disturbing you with its roar, it is necessary to place a noise-insulating substrate under the metal plate.
- If the installation is carried out on foam, then it is applied to the inner surface of the steel panel and to the opening area. Then the ebb is attached to the window frame with self-tapping screws. To avoid raising the lower slope due to the mounting foam, you need to place a load on it, distributing the weight evenly over the entire sheet.
- Next, the side slopes are lined. Since the top and bottom plates are inclined from the inside out, the top and bottom of the side plates must be cut exactly at the same angle. To avoid gaps between the steel sheets during installation, you need to accurately measure the angles of inclination of the upper and lower slopes and trim the side parts. Once the slopes on the sides are trimmed and installed, they are attached to the frame with self-tapping screws. If you have never done this kind of work, practice cutting the side parts on paper or cardboard. This way you will understand the principle of operation and will not waste the material in vain.
- The top piece is installed last, and the remaining empty space between the wall surface and the metal plate is filled with foam.
Finishing windows with metal slopes is a convenient and long-term option for cladding window openings. The installation process is simple enough to do everything yourself without the help of professionals.