The main purpose of the element is to drain water from window glass and prevent moisture from entering the window sill and window frame. If moisture gets into these places, then processes of accelerated destruction of building materials begin: the plaster of facade walls falls off, window structures become unusable. If the walls are sheathed, then there are even more problems. In addition to their protective function, ebbs serve as an additional element for decorating facades; they acquire a finished look, and the designs of window openings look organic.
Window sills
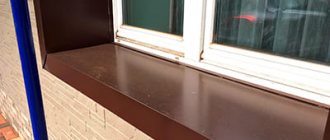
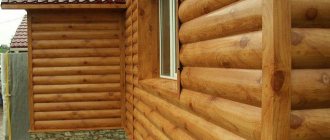
Polymer coated ebbs
Window with low tide
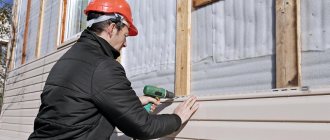
Flashings can be installed both during the construction of buildings before finishing the façade walls, and after the start of operation. The first option is better - it is possible to use a full range of special measures to seal all joints and seams and do this with minimal loss of money and time. In the second case, the technology becomes somewhat more complicated, but this does not have a noticeable impact on the quality and cost of the work.
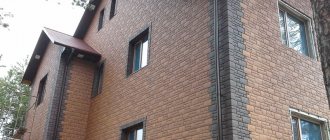
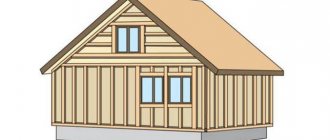
Low tide as a decorative window element
Types of tides for windows
Any windows from the outside are equipped with a flashing - this is a special board mounted at the bottom of the window opening. It needs to allow rain or melt water to flow down it. This is probably why this part is sometimes called drainage.
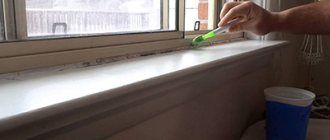
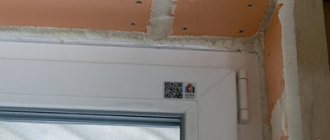
Installing window sills is the final stage of proper installation
Window sills can be:
- Plastic.
- Metal; galvanized steel, coated: polyester;
- plastisol;
- metal paint.
If you install the window sill correctly, the wall will not be damp.
Currently, external concrete sills are almost never made. Or rather, they are made, but they are still covered with either plastic or metal. Concrete slopes can, of course, be whitewashed, and this was once done. But today this type of window decoration is very rare.
If we talk about the exotic, we can recall stone tides. They are made from polished granite or marble. They certainly look great, they don’t make any noise, and you can only break them with a sledgehammer. But their cost is not for every wallet.
Stone tides - look gorgeous
There is another interesting type of external window sills - from facade tiles. It works great with any window - both wooden and plastic. If your basement or the whole house is decorated with similar tiles, it will look very “on theme” on the windows. At the same time, the house looks like a single ensemble. Such slopes are made extremely simply: the tiles are cut so that they protrude 1 cm beyond the walls, and the desired slope is formed using a cement-sand mortar. The seams can be sealed with cement laitance, or a hydrophobic impregnation can be used. It’s just better to install such slopes before finishing the exterior walls.
Flashings from facade tiles - easy to do with your own hands
Although window slopes come in different materials, the vast majority of homeowners settle on two: plastic or metal. Each of them has its own pros and cons, and we’ll talk about them in more detail, as well as how to install window sills.
General recommendations
To suit the overall design of the façade, window drains should not be provocative or massive. This is unlikely to be a problem, because the elements are made to order, taking into account the color.
When constructing a new building, installation of flashings is carried out at the stage of facade work, when there is a possibility of high-quality sealing of seams and joints. In a finished house, the low tide is installed when glazing the balcony or inserting a new window. When glazing a balcony, also install an upper external window sill, attached to the above balcony slab.
Plastic: good or bad?
Plastic window tints are considered the most “quiet”. When raindrops fall on them, there is almost no sound. And they are also considered inexpensive, which is important if the budget is limited. Only unpainted galvanization is cheaper, but its appearance, after several years of use, is not very attractive, the paint holds very poorly.
What are the disadvantages of plastic moldings? The fact is that plastic loses its elasticity under the influence of ultraviolet radiation, becomes brittle, and can crack under load. And, even if there are no serious cracks, there are always microcracks. They form over time and become filled with dust. After a couple of years, the once snow-white plastic becomes grayish or has a yellow tint. Nothing can wash it off. If installing window sills every five to ten years doesn’t bother you, you can use them too.
Plastic ebbs are two planes connected by jumpers. You have to step very carefully
The following disadvantages of plastic moldings are flammability and significant thermal expansion. Plastic melts at high temperatures. If a cigarette butt gets on it, a hole will be provided. It may not happen that often, but there is a possibility.
Thermal expansion manifests itself if the installation of window sills on windows is done rigidly - the strip is fixed with self-tapping screws. Then, in hot weather, it “goes in waves” and bends. Afterwards, it usually returns to normal. In order not to worry about thermal expansion, oblong rather than round holes should first be made in the edge of the ebb, to which it will be attached. When tightening the screws, do not press down the plastic too much. Then, when changing the size, the plastic casting will not “behave”.
Plastic drip installation
The second point is to leave a thermal gap on the sides, which is filled with silicone waterproof sealant (for outdoor use). In this case, thermal expansion will not cause a “wave”. The plastic will simply expand a little, compressing the sealant, then return to normal. So installing plastic drip sills has its own nuances.
Polyurethane
There are two types of polyurethane sealants.
The first of them, two-component, is used as the second sealing circuit of the double-glazed window. There is “household” packaging in small containers, although the accuracy of the dosage of the hardener limits the scope of application - the machine method gives consistently good results in industrial production conditions.
One-component polyurethane sealants (adhesive-sealant) vulcanizes under the influence of atmospheric moisture. It has almost the same properties as silicone sealants - high adhesion to concrete, brick, wood, metal and glass. Does not emit or evaporate toxic substances, can be painted.
The remaining parameters meet the operating conditions on the “street” - waterproofness, shrinkage and frost resistance.
Purpose: sealing the assembly seam and flashings.
Metal - types and features
Metal window tintings are durable and there are no problems with them during operation. Installing metal window sills usually does not cause problems. Their disadvantage is “noisiness”. Raindrops can “knock” quite loud sounds out of metal. The problem is partially solved during installation - all cavities must be carefully filled with polyurethane foam. Any emptiness will act like a drum. So here we try to do everything as best as possible.
Metal window sills will be even quieter if foam rubber or any other sheet sound-absorbing material (for example, linotherm) is glued underneath. But it must withstand significant temperature changes - outdoor operation. These two techniques together will make the metal cast not too noisy.
When installing, do not leave voids and use vibration-damping, frost-resistant materials
As already mentioned, metal castings can be made of galvanized steel coated with polyester or plastisol. Galvanization with polyester - metal tiles are made from this material, so the technology has been proven. Such flashings are not too expensive, and you need to look for them in companies that produce or sell metal tiles or similar roofing materials.
Plastisol coating is a more expensive option, but it is thicker, making the metal less boomy. It is also interesting because the surface can be not only smooth, but also “leather-like”, embossed, etc. If your budget allows, try galvanized metal casting with plastisol coating. There are no negative reviews yet.
Correct installation
Another option for a “quiet” metal window sill is powder-coated aluminum. This metal itself is not so “ringing”, due to which the noise level is reduced. Everyone knows the advantages of operation, as well as the fact that the cost is not low. Installing window sills on aluminum windows is a good idea, but it is not so easy to find. Aluminum casting is not particularly popular, so you will most likely have to order it online. Especially if you live in a small city.
Preparatory work
Usually, drip tides are installed together with new metal-plastic windows, then the installation is carried out by the same team, and this is already included in the cost of the contract. But the need for installation may be due to several factors, such as replacing an old, damaged sill, installing a metal window sill on a previously installed window (it can be either wooden or metal).
In any case, to independently install an external drip sill, the first thing you need to do is make or buy one. To purchase, you can contact specialized stores if your sizes are typical.
If you are unable to take measurements yourself or require a product of complex shape, then it is best to contact specialists who will competently take the necessary measurements and take into account all the nuances at the installation site.
Immediately before installation you will need:
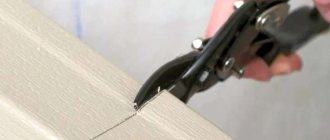
- ready-made and available low tide; hammer drill or impact drill; hammer and chisel, sharp construction knife; broom or soft brush; sandpaper and a hacksaw for metal; building level, plastic pads.
Deciding on the sizes
Metal castings can be sold in long strips - up to 6 meters long; you can find companies that will cut them into pieces of the length you need. The second option is good, since you don’t have to think about where to put the leftovers. The length of the window sill is determined by the width of the opening. The ebb board is usually made wider by 2-4 cm on each side. When preparing, the excess is cut off, leaving protrusions on both sides of the window opening. But you can cut it exactly to the width of the opening. It depends on the exterior wall finish and your desire/taste. In any case, if you order planks of a certain length, and do not cut them yourself, add a few centimeters - this way you can correct it if they are cut crooked.
The dimensions of the window tide are determined by the window opening
The depth of the tide on the window should be such that its edge protrudes a few centimeters. You don't need a protrusion that is too large - it can get in the way, but 4-5 cm is quite normal. In this case, the flowing water will not fall on the wall or under the foundation. With such a protrusion, moisture pours onto the blind area around the house, then goes into the storm drain.
Metal window sills have a larger range of sizes
When choosing a plastic casting, you may encounter difficulties. The narrowest ebb is 15 cm, and then the increase occurs in a certain step. Typically this step is 50 mm. So there may well be a situation - either too little or too much. You need to make a decision based on the situation - how critical is the ingress of water close to the foundation, how often do people walk along the windows. After evaluating these factors, you can choose a wider or narrower one.
Purpose
There are three types of systems that remove moisture from precipitation from the house: storm water, drainage, and roofing. Roof flashing is a drainage system with the help of which precipitation moisture is collected from the roof and its discharge is organized to designated places for receiving. It protects the roof, blind area, and foundation from premature wear and destruction.
Installation of ebb and flow on PVC profile windows
Regardless of the material - metal or plastic - the window sill is installed according to the same scheme. In the case of metal, gaskets are needed to reduce noise, but the general procedure remains the same.
There is a special protrusion in the frame profile for installing the ebb. The upper edge of the ebb goes under it. But this protrusion is only available if the PVC window was mounted on a stand (mounting) profile. Then installing the slope is a very simple matter. It must be cut to the width; if necessary, rubber or other material must be “planted” on the back side of the plank with universal glue for “silence”.
Correct installation of sills on PVC windows
Then all that remains is to insert the projection of the ebb into the groove, blow out the required amount of foam, and fix the ebb to the stand profile with three or more self-tapping screws. To prevent leaks from the sides, the areas where the ebb tide joins the window opening should be coated with silicone sealant. It’s better to take a transparent one - it will be less noticeable.
What if we play it safe?
To be on the safe side, before installing the ebb in the groove, you can apply the same silicone sealant. This will definitely prevent water from getting inside, even with a very strong wind directed at the window. The second “control shot” also concerns waterproofing. It is relevant for materials that are very susceptible to getting wet. For example, this is exactly what it is advisable to do when installing slopes on windows mounted in a frame house. In this case, before installing the window sill, a waterproofing tape is laid. It is advisable that the tape hangs over the wall - then even if some of the water gets on it, it will still end up outside the walls.
For those who like to play it safe
For waterproofing, you can use any rolled material that is suitable for outdoor use and can withstand frost and heat. Installing window sills in this way will prevent the area under the window from getting wet, even if the rain is very heavy.
If a plastic window is installed without a support profile
What to do if a plastic window is installed in violation of the technology and the groove is inaccessible? During installation, a plastic window is often leveled using triangular bars. After alignment, the window is attached to the opening, and the bars are left as is. If this is your case, you can secure the slope to these bars. If necessary, they can be trimmed. You just have to work carefully so as not to move them.
If everything is already installed and sealed, only the frame frame is available, you can screw the ebb to the frame. To seal, you can use a sealing gasket (rubber tape) and coat it with the best possible sealant. Additionally, you can screw some kind of flashing on top. Maybe he can save the situation a little.
Incorrectly attaching the sill to the window frame
But even with this approach, there is no certainty that water will not flow in. Maybe initially everything will be fine, but over time moisture will clearly get in. So, if possible, it is better to dismantle the incorrectly installed plastic window and install it again - according to the rules.
Design Tips
When choosing a design, you should decide on its color, configuration, the presence of sashes and the desired opening mechanism, the presence of a window sill and ebb and flow.
As for the color range, the standard color of PVC windows is white; laminated profiles in walnut, mahogany, cherry, and oak are common. It is possible to make them in other colors, but due to their limited use, the cost of such windows is much higher
It is important to take into account that all windows on the facade of the building must be made in the same style and color, otherwise its architectural appearance will be disrupted
The window configuration can be different: square, rectangular, round, triangular, polygonal, arched. Modern technologies for the production of plastic windows make it possible to realize any design ideas. In this case, the diameter of the arched structure should not be less than 50 cm.
The diameter of the arched window must be at least 50 cm
A plastic window can be blind or have sashes that are positioned vertically or in the form of a transom
When choosing the width of the sashes, it is important to consider that it may have a limit according to the catalog of window systems. Since perimeter fittings have limitations, the swing-and-turn sash cannot be made less than 40 cm wide
The opening mechanism can be rotary, tilt or turn-tilt. When installing windows in panel houses, casing is not installed, but the slopes are finished and drainage is installed.
In panel houses, when installing plastic windows, drainage systems are installed and slopes are finished
In private homes, cashing is used to mask the installation seam and protect it from the effects of precipitation. If a low tide is installed, then cashing is mounted on three sides; if there is no low tide, then on four.
Features of tides for wooden windows
A groove must also be made in the frame of a wooden window for installation. In this case, there are no problems and installing window sills is no different. To be on the safe side, you can also lay a strip of waterproofing under the tide, tucking it into the same groove. When using a sealant, you need to look for one that has good adhesion (adhesion) to wood and metal or plastic - depends on the type of casting chosen.
External tides on wooden windows
If there is no ebb groove in a wooden window, you can make one yourself. The groove is not made too deep and wide. This may be a narrow cut into which only thin metal can be inserted. To prevent wood destruction, treat the cut with protective agents before installation. As a last resort, you can apply paint.
Removing the old external window sill
Example of window sill sizes.
If it is not possible to get close to the window sill from the facade, the glass unit will have to be dismantled, this will allow the installation to be carried out efficiently and comfortably. At the top of the ebb you can find screws that secure it to the box. They have to be unscrewed using a screwdriver. Then the product must be rocked, first pressing on it and then lifting it. You can tap the underside of the window sill with a hammer.
If polyurethane foam was used as a cushion, you should get rid of it. If there are defects on the surface being worked on, it should be treated with putty. The surface of the window must be treated with an antiseptic composition.
Semicircular or figured windows
Not all windows are linear. But what are the best sills for semicircular windows? All the same metals can save you. But just this time, the ideal option is copper shimmer. Copper is a ductile material and a slight curvature can be simply achieved by tapping it with a hammer.
You can make shaped products from copper
If copper is too expensive, there are factories that make radius castings to your measurements. Since this is an individual order, the cost of such a low tide will also be calculated in each specific case.
Radius flashings for windows in bay windows must be ordered
If there is a need to save money, you can make ebbs for figured bay windows from ordinary galvanized ebbs with a polymer coating. In this case, they are cut into pieces, with which you can create the desired bend.
Semi-circular ebbs from standard materials
With this method, one piece should overlap the adjacent one (by 3-5 cm) - this will make leakage less likely. To further reduce the likelihood of water ingress, a layer of sealant is applied to the joint.
Average prices in the Russian Federation
Let's look at the prices in the country for products and their installation.
For the finished product
The pricing policy of manufacturers is quite extensive. The cost of the finished product depends on:
- supplier brand;
- the material from which the part is made;
- water coating;
- the presence of additional elements;
- delivery region;
- product colors.
Estimated prices vary from 480 rubles to 5,000 rubles for one product.
For installation
Approximate installation prices depend on the status of the locality.
For example, installing low tides in Moscow will be more expensive than in Voronezh. Also, the price varies depending on the list of services, the width of the casting and the material. If you need turnkey installation, it will cost from 900 rubles to 1500 rubles.
You can order a ready-made casting with installation. The minimum cost is from 2000 rubles.
Rules
The most important thing is to install the tray with the correct slope. The minimum slope is at least 3-5 mm per linear meter (according to SNiP, at least 1-2 mm per 1 rm).
To attach a gutter with the desired slope, use a simple method - first attach the outer brackets with the calculated excess of one of them. Then they stretch the fishing line or twine and attach the remaining brackets along it.
Typically, drainpipes are located near the corners of the building.
If the gutter is straight, and nothing interferes with its thermal elongation, and its length is up to 12 m, then it is enough to make one drainpipe.
If, under the same conditions, the elongation of the tray is limited, then a compensating funnel is installed at the end of its slope.
If the roof overhang has a length of 12 m or more, 2 funnels are installed, with a distance of no more than 24 m. And a compensator is also installed.
Provided that the roof gutter surrounds the perimeter, two compensators and two compensating funnels are installed in a paired position.
The design and shape of the tray is selected depending on the amount of precipitation.
The flashing should be installed immediately after covering the roof in order to protect the foundation of the house from rainwater as early as possible. After laying the waterproofing layer on the roof, access to the Mauerlat will also be closed. As a result, it will no longer be possible to attach fasteners directly to it.
How to make drains with your own hands
Zinc drain
Without inviting a specialist, drainage is easy to do yourself and quite inexpensive. In their manufacture, plastic, aluminum or galvanized sheet metal are most often used.
The simplest thing is to cut lengthwise a thin-walled metal pipe with a diameter of about 150 mm. The result will be: two gutters for collecting water. To prevent corrosion, it is recommended to coat these parts with special compounds or varnish of the desired color.
The last stage of work will be the direct installation of gutters using fastening material in places where moisture accumulates.
The production of ebb and flow from galvanized steel sheets is not particularly difficult. For this you will need: a sheet of galvanized metal seven millimeters thick, a machine for bending metal structures. This can be done without a machine with a hammer and mallet, using a corner or a piece of rail, but the appearance of the drain will be poor.
The galvanized sheet is cut into strips of the required width and corresponding sheet length. The strip is then placed in a machine where a cast is made from it. The finished elements are coated with a protective compound, dried and prepared for installation.
Design
The two main elements of low tide are:
- A gutter (tray) collecting water flowing from the roof.
- Gutters through which collected water is directed to the foundation of the house.
Gutters are channels open at the top, attached under the roof overhang. There are semicircular, rectangular, triangular shapes (rarely used). Contains straight and angular elements.
Drains (pipes) are also prefabricated structures of rectangular (rarely used) or cylindrical cross-section. Their elements can be straight or bent (knees).
The plugs prevent water from draining and leaking along the ends of the gutters. There are three modifications of the plugs for installation: universal, right- and left-handed.
Funnels are installed under the gutters; their purpose is to receive and redirect water into the pipes.
The leaf catcher grille protects the system from large debris entering the drainage system, preventing it from clogging.
Tees are parts required to separate the water flow.
The drain elbow is the final part of the drain that directs the flowing water away from the foundation (into the receiving cavity of the storm drain).
Couplings are parts for connection.
Clamps are used to secure the drain to the wall, preventing its vertical movement.
Brackets - fastenings.
Bypasses are used if the drainpipe needs to go around any obstacle.
Principles of calculations
- The cross-sectional area of the gutter is determined according to SP 17.13330.2011. The following principle is recommended: for 1 m2 of roof area, 1.5 cm2 of gutter cross-sectional area should be provided. For example, for a roof of 100 m2 you will need a rectangular gutter measuring 15 × 10 cm (150 cm2).
- The diameter of drainpipes is determined according to SP 32.13330.2012. The principle is the same as for the gutter. For a roof area of 100 m2, a pipe with a cross-section of 150 cm2 is needed, i.e. with a diameter of at least 138 mm.
- The number of drains is determined from the condition that the length of one gutter should not exceed 10 m. In practice, it is chosen within the range of 5–7 m.