For example, there is an increase in the cost of heating a room because the room is cold and damp.
There is condensation on the glass, mold on the slopes. You can cope with such phenomena with the help of high-quality insulation of slopes.
If you follow the technology correctly, you can make warm slopes from the inside of the room yourself.
Why do you need to implement it?
Insulation of slopes is one of the important final stages of installing a window structure. If additional protection is not provided, problems will begin to appear during the cold season :
- Cold bridges will appear through which air from the street will begin to flow. It is the slopes that are the main conductors of cold and moisture into the room. It will be difficult to maintain a comfortable temperature in the room, and the cost of heating the room will increase.
Condensation forms and settles on the walls, window sills and glass.
Over time, a fungal infection joins it and mold appears. The fastening elements are destroyed, the window sags.This has a bad effect not only on the performance of the product, but also on people’s health.
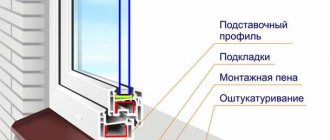
- If the window frame does not fit tightly enough to the wall, a seam is formed. It is filled with polyurethane foam. This material is very sensitive to temperature changes and ultraviolet radiation, so without shelter it quickly collapses. It needs to be decorated and insulated.
- Voids are formed due to profile shrinkage, through which moisture and cold penetrate. Warming will help remove these manifestations.
In addition, the insulated slope gives the window a beautiful finished look.
Important! If the insulation of external slopes is carried out correctly, it is not necessary to insulate the internal ones.
Only effective insulation on the side of the cold air intake will help to avoid dew. To do this, the outer element is mounted on a warm profile (about 5 mm) with an “overlap”, then it is decorated with reliable insulating material.
There is also no need for internal insulation of slopes if the walls in the house are well insulated and laid out in several rows. Warm walls make it possible to do without insulation of slopes.
Heat-saving film
Film for insulating plastic windows can significantly reduce heat loss in the house. However, in order for its application to have the desired effect, it is necessary to properly prepare the surface. In this case, you will need the following tools:
- stationery knife;
- hair dryer;
- scissors;
- scotch.
First, the surface must be cleaned of dust and dirt. Wipe the glass thoroughly (a layer of dirt and dust makes it difficult for sunlight to penetrate inside). To check the quality of cleaning, take the paper and press it across the glass; you should hear a distinct squeak.
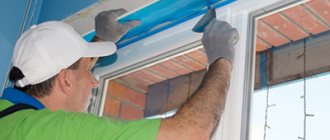
The perimeter of the box is covered with double-sided tape. The edges of the film are separated with a stationery knife. Cut it with scissors to the size of the window and stick it on the previously attached tape. Take a hairdryer and blow warm air over the film. Burst the resulting swellings with the tip of a knife. This is the easiest and most inexpensive way to insulate platinum windows.
Basic methods
There are several ways to insulate products. They differ depending on the chosen material and design option for the window design :
If the slope is made of plasterboard, then for thermal insulation it is better to use polystyrene foam, mineral wool or special foam.
The material absorbs moisture; only moisture-resistant drywall should be used.It is durable and well decorated. In rooms with high humidity, it is better to use other methods.
- A popular modern method of internal insulation of slopes is the installation of sandwich panels. Installation is carried out on profiles.
- When plastering surfaces, it is important to ensure that there are no gaps left.
Then you need to paint a layer of plaster. If you take decorative plaster, then the need for painting is completely eliminated. The method requires professionalism. This is a labor-intensive process that not every master can perform. In addition, the thermal insulation characteristics of plaster are not great. An alternative is warm plaster.
Exterior works
External work is carried out according to the same instructions as inside. But you must adhere to several additional rules:
- You cannot use building materials that do not withstand temperature changes, operating conditions with high humidity or other atmospheric influences. On the outside, products wear out faster, so it is better to give preference to the most durable raw materials, for example, sandwich panels.
- It is better to use those materials that are easy and quick to install. This will help minimize financial costs for specialists.
- Don't forget about safety precautions. It is not recommended to undertake outdoor work without insurance and experience. In this case, you should not focus on saving and turn to specialists.
In general, usually one insulation is selected, for example, penoplex. But the top finishing materials inside and outside the apartment/house may differ.
Regardless of what kind of work is being carried out - internal or external, it is recommended to select them to match the window profile. It is also important that the insulation materials are in harmony with the overall style concept.
Properly thought out and executed insulation has a positive effect on the formation of a comfortable microclimate, as well as on saving thermal resources. Heat loss after slope insulation is reduced by a third.
Safety precautions
During work, it is necessary to comply with safety rules and requirements. This will help avoid unpleasant consequences. The main attention should be paid to the properties of the insulating material :
- Mineral wool. You need to work with it in a well-ventilated area. The cutting tool must be well sharpened, gloves, a respirator and special glasses must be worn.
- Sandwich panel. If the material needs to be cut, the respiratory tract must be protected from dust. To do this, just wet the panel with water or put on a mask (respirator).
Important! Before starting work, be sure to familiarize yourself with the safety precautions for each type of insulating material.
Finishing options
After completing the insulation work on the slopes, if desired, they can be given an attractive and original look. There are several ways to do this.
- The most common method of finishing a slope is painting. There are several technologies for performing this type of work. The easiest way is to apply paint with a sponge. Imprints are made on the surface with a sponge pre-moistened in paint. You can make a combination of several colors. Another way is to apply paint using a stencil.
- An interesting solution would be to use balsa wood. This material has good thermal insulation qualities. Therefore, its use will solve not only a decorative problem, but also make the slopes even warmer. If desired, balsa wood panels can be coated with a layer of varnish.
- You can also put wallpaper on the slopes.
What materials can be used for insulation?
This is one of the important questions before starting work. There are several types of insulation used inside rooms. You can give preference to the best of them only after familiarizing yourself with the characteristics of each :
- Styrofoam .
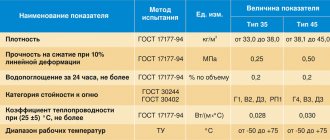
A very accessible and cheap option. Its advantages are non-flammability, the ability to make a workpiece of any shape, low weight, and good thermal insulation characteristics. For internal slopes, you should take sheets with a thickness of at least 20 mm and a density of 35. Polystyrene foam is produced in the form of slabs that are easy to cut. Disadvantages - not resistant to temperature changes, absorbs moisture, susceptible to destruction during long-term use. - Penoplex . Another name for insulation is extruded polystyrene foam. Good thermal insulation performance. In addition, it is much stronger and denser than polystyrene foam, resistant to dampness and moisture, and has excellent resistance to fungal pathogens and mechanical pressure. It is used less frequently for interior work, but is of high quality. The downside is the cost of the slabs.
Minvata .
Also not exactly a budget option, but considered affordable. Permitted by building codes for insulation of children's premises. Available in rolls and slabs.The advantages of the material are durability, thermal insulation characteristics, non-flammability, good air conductivity.
It can be used in wooden and frame houses where high-quality ventilation is needed.
Disadvantages - insulation is required due to strong hygroscopicity (membrane) and subsequent plastering. Also, rolled wool shrinks; tile wool has the worst thermal conductivity.
- Sandwich panel . It features a reliable structure consisting of PVC plates and a layer of foam between them. The foam is well protected from external factors and retains its heat-insulating properties for a long time. During installation, you need to seal the ends of the panels; no additional finishing is required. The downside is the cost.
- Warm plaster .
The material combines the properties of two insulation materials - foam and putty. In liquid form it reliably fills voids, and after drying it forms a frame for the entire window structure. If additives (ceramic and polymer) or foam balls are added to the composition, the insulating properties become higher. Refers to effective and cheap materials.
Important! You should choose the material according to your needs and room parameters.
Facade insulation with mineral wool in Izhevsk
Low prices. Since we cooperate only with PRIVATE performers
Our contractors carry out repairs on the same day as they live in your area.
In 90% of cases, the Contractor announces the final cost of his work over the phone
The price will not be inflated, because we will select 3 performers for you for free and you will choose the most suitable one
- Call a technician and diagnose for free (in case of repair)
- We serve all areas!
- Repair warranty up to 2 years!
- Same day repairs!
- home
- Services
- Facade works
- Insulation of the facade with mineral wool
How we are working:
*If the conditions of the 1st contractor are not satisfied, then wait for the 2nd or 3rd contractor to call and compare prices.
Insulation of the facade with mineral wool is an important stage of construction, without which it will not be possible to achieve efficient operation and durability of the building. On the MyGuru service website you can select a company or private master in Izhevsk, whose specialists will perform such work at a price below the city average. The selected aggregator will ensure a secure transaction and will help at all stages of communication between the client and the contractor.
Insulating facades with mineral wool - pros and cons
- Creating a favorable microclimate inside the house thanks to regular air exchange. Cotton wool, having the properties of insulation, also removes moisture from the walls.
- Fire resistance. An important parameter for owners of wooden houses.
- Excellent sound insulation. The slabs will protect the house from unwanted noise penetrating inside.
- Long service life. Mineral wool can withstand several dozen cycles of freezing and thawing with minimal loss of performance characteristics.
- Affordable price.
- Minimal shrinkage of the material during operation, as well as maintaining the same shape and thickness even after several years of use.
Among the disadvantages is the formation of dust, which appears during the insulation of the facade with mineral wool. You cannot install the slabs with your bare hands, otherwise this can cause a large number of splinters in the skin. Therefore, entrust the work to professionals. You will find masters from the nearest area of Izhevsk on MyGuru.
Stages of façade insulation with mineral wool
It includes 5 stages:
- Preparatory. At this stage, all unnecessary elements from the facade of the building are dismantled. Such elements include visors, antennas, and drainage system devices. The preparatory stage also involves cleaning the external walls from peeling paint or plaster.
- Installation of profiles. After cleaning and grouting the surface, the master attaches guide profiles to the external walls of the house, and also installs sags. Dowels are used for fastening.
- Installation of slabs. Installation is carried out using a special adhesive designed for mineral wool slabs. The master applies it along the edges and in the middle of the structure, then applies the insulation to the wall between the profiles.
- Reinforcement. Upon completion of installation, the insulation is reinforced for additional fixation with a special thermal mesh.
The final stage is finishing. It involves plastering the surface using facade mixtures.
Formation of service cost
The cost of façade insulation with mineral wool depends on the following indicators:
- total wall surface area;
- quantity of material;
- complexity of work;
- technologies.
The MyGuru website brings together various companies and individuals who are ready to provide mineral wool installation services.
Facade insulation works by MyGuru service specialists
Advantages of the website of private craftsmen:
- documentary confirmation of the transaction;
- the possibility of preliminary assessment of the quality of the installer’s work;
- selection of reliable contractors from Izhevsk.
Here you will find an inexpensive private master with experience. Have questions or are unable to complete your application? Contact a site consultant for help at the number listed on the site. Take advantage of the offer for insulating facades with cotton wool with the MyGuru service experts!
Prices for facade work in Izhevsk
| Name | Unit. | Price |
| Preparatory work | ||
| Calculation of the working area around the facade | 3000 rub | |
| Installation of metal scaffolding on a prepared, level base | m2 | 90 rub |
| Production and installation of wooden scaffolding | m2 | 180 rub. |
| Installation of wooden platforms over the roof of a porch or terrace | m2 | 250 rub. |
| Covering window/door openings with protective film, protecting roof parts from contamination | m2 | 50 rub |
| Cleaning the walls and base from dust and dirt | m2 | 100 rub |
| Preparing the roof for façade work | m/n | 200 rub |
| Facade dismantling | ||
| Cleaning the facade from mortar, dust and dirt | m2 | 180 rub. |
| Dismantling of the curtain façade | m2 | 200 rub |
| Removing tiles and adhesive | m2 | 250 rub. |
| Facade insulation | ||
| Installation of the base profile | m/n | 100 rub |
| Foam insulation | m2 | from 450 rub |
| Insulation with mineral wool | m2 | from 250 rub. |
| Insulation of a wet facade | m2 | from 700 rub |
| Facade plaster | ||
| Primer of walls | m2 | 50 rub |
| Priming walls with concrete contact | m2 | 150 rub. |
| Adhesion spray or application of reinforcing compound | m2 | 230 rub. |
| Aligning corners | m/n | 300 rub |
| Fastening the plaster mesh | m2 | 150 rub. |
| Facade plaster up to 30mm | m2 | 400 rub |
| Facade plaster over 30mm | m2 | 550 rub. |
| Primer of the plastered layer of the wall | m2 | 50 rub |
| Application of two-layer plaster with reinforcing alkali-resistant fiberglass mesh | m2 | 400 rub |
| Application of three-layer plaster with reinforcing alkali-resistant and armored fiberglass mesh | m2 | 550 rub. |
| Wall putty with sanding | m2 | 320 rub. |
| Application of decorative bark beetle or pebble plaster | m2 | 350 rub. |
| Facade painting | m2 | 150 rub. |
| Hydrophobization of the façade surface | m2 | 100 rub |
| Facade finishing | ||
| Primer of the plastered layer of the wall | m2 | 50 rub |
| Cutting stone at an angle of 45°, 90° and 135° | m/n | 500 rub |
| Installation of artificial stone using a seamless method | m2 | 1,200 rub. |
| Installation of artificial stone with filling of joints | m2 | RUB 1,400 |
| Cladding with natural stone using a seamless method | m2 | RUB 1,600 |
| Cladding with natural stone with filling of joints | m2 | RUB 1,800 |
| Filling the seams with a special solution with jointing | m2 | 300 rub |
| Filling curved seams | m2 | 350 rub. |
| Hydrophobization of the façade surface | m2 | 100 rub |
| Facade cladding | ||
| Laying facing bricks with jointing | m2 | RUB 1,500 |
| Grouting brickwork joints | m2 | 300 rub |
| Hydrophobization of the façade surface | m2 | 100 rub |
| Clinker tile finishing | ||
| Primer of the plastered layer of the wall | m2 | 50 rub |
| Wall decoration with clinker tiles | m2 | 1,200 rub. |
| Wall finishing with clinker tiles with grouting | m2 | RUB 1,400 |
| Filling the seams with a special solution with jointing | m2 | 300 rub |
| Hydrophobization of the façade surface | m2 | 100 rub |
| Facade finishing | ||
| Vapor-waterproofing device | m2 | 50 rub |
| Installation of wooden sheathing on a wooden wall with leveling | m2 | 100 rub |
| Installation of wooden sheathing on a brick or concrete wall with leveling | m2 | 200 rub |
| Installation of metal lathing on a wooden wall with alignment | m2 | 250 rub. |
| Installation of metal sheathing on a brick or concrete wall with alignment | m2 | 350 rub. |
| Siding finishing | m2 | 350 rub. |
| Facade installation | m2 | 350 rub. |
| Installation of lining | m2 | 350 rub. |
| Planken installation | m2 | 600 rub |
| Windows and slopes | ||
| Primer of uneven slopes | m/n | 50 rub |
| Insulation of slopes | m/n | 200 rub |
| Painting slopes | m/n | 150 rub. |
| Plastering slopes | m/n | 350 rub. |
| Facing slopes with tiles and grout | m/n | 550 rub. |
| Installation of artificial stone on slopes with filling of joints | m/n | 550 rub. |
| Installation of ebb tides | m/n | 300 rub |
| Decorative elements of the facade | ||
| Installation of decorative elements with polyurethane foam | m/n | 800 rub |
| Installation of solid-state decorative elements | m/n | 1,000 rub. |
| Painting decorative elements | m/n | 150 rub. |
*Diagnostics are free in case of repair
Tools and Supplies
To properly insulate a window slope, you need to stock up on the necessary equipment. Each type of material requires a corresponding set.
The general list of tools looks like this:
- roulette;
- perforator;
- hacksaw;
- level;
- marker;
- stationery knife;
- miter box;
- grater;
- putty knife;
- brush and container for primer;
- foam gun;
- putty knife;
- protective glasses;
- respirator;
- gloves.
Supplies are also needed:
- synthetic rubber glue;
- deep penetration primer;
- antiseptic;
- silicone sealant;
- polyurethane foam;
- mineral wool, polystyrene foam or sandwich panel.
Important! When calculating the amount of material, add 10-15% to cover possible losses.
Preparatory work
Regardless of what material the consumer chooses, a number of preparatory work will be required. You should not be careless about this process, since the quality of the final finishing and insulation directly depends on it.
Preparatory work includes:
- Visual assessment of the entire structure. In cases where double-glazed windows were installed relatively recently, you can skip this step. If they have been standing for a year or more, then you need to check the quality of the polyurethane foam and update it, if necessary. The easiest way to check is with a lighter. You need to release the flame and pass it around the perimeter (do not touch the window!), Observe whether the fire deflects. If yes, then there is a serious heat leak in specific places, accordingly, the foam needs to be updated there.
- Apply polyurethane foam and wait until it hardens.
- Remove protruding pieces of polyurethane foam using a regular knife. If you don’t have a special tool at hand, then an ordinary sharpened kitchen knife is quite suitable for performing this procedure.
Also, preparatory work should include the purchase of tools and fasteners. The required quantity is calculated in advance. It is recommended to buy with a reserve of 10-20%, so as not to run to the construction market again.
Then the instruments are prepared. This must be a tape measure, a level, a screwdriver. Also, if you have to work with foam plastic, you need to prepare a special painting knife. But again, you can get by with an ordinary knife, preferably with a thin blade. If you make the slopes yourself, you will need cement, sand and a spatula. But usually they work with ready-made window slopes.
Step-by-step description of the technology
When working with any material, the insulation process must begin with preparing the base. To do this, follow these steps :
It is good to clean the space between the window opening and the frame.- Level out any unevenness inside the opening.
- Remove dust and dirt using a spray bottle and brush.
- Seal all visible holes and cracks with sealant or cement mortar.
- Treat the work surface with an antiseptic, followed by deep penetration primer.
- Seal the joints.
After this, you need to give the base time to dry thoroughly. Algorithm for subsequent actions :
- Level the planes of the openings using gypsum mortar, polyurethane foam or plaster. They must acquire the correct geometric shape.
- Treat window openings with impregnation, antiseptic, or a product with hydrophobic properties.
- Take the insulation, cut strips of the required sizes from it.
- Attach it to the adhesive base and allow time to dry.
- Finish the slope with plasterboard, sandwich panels, plastic, and plaster.
Important! The mineral wool blank must be made taking into account the elasticity factor of the material, 2-3 cm larger than the planned size.
If you use drywall, you need to take moisture-resistant one. You will first need to form a frame from a metal profile, into which you then insert the material. Fasten with self-tapping screws, recessing the caps.
When covering with plastic, it is also necessary to make a frame base . The starting strip is stamped onto it, then the rest of the structure is assembled.
To install a sandwich panel you will need a starting profile and an F-profile. Attach a layer of insulation to the adhesive composition. Fix the starting profile in the corner near the window, at the bottom and top of the opening. Insert a sandwich panel of the required size into the groove. Complete the installation by installing the F-profile. In this option, excellent thermal insulation and beauty will be ensured without further finishing.
The most popular solutions for finishing insulated slopes:
- flat tile or decorative stone;
- plastic imitating timber;
- white plastic;
- plastering;
- modeling;
- coloring
You can choose other options that fit perfectly into the interior of the room.
Insulation of slopes inside with foam plastic or penoplex
Sheets of foam plastic or penoplex are the most common types of materials for insulating slopes. Work using them is carried out after installation of the double-glazed window in the following sequence:
- Slopes and areas between the frame and the wall, filled with polyurethane foam, must be plastered with cement mortar.
- After drying, treat the surface with an antibacterial compound.
- Cut the insulation to the required size. It is better to cut a larger piece - the excess can be easily trimmed after installation.
- Sand the surface with sandpaper. Coat with special glue for foam plastic. If you use foam, don't apply a lot of adhesive coating. This type of insulation expands when heated - in hot summer times, a thick layer of adhesive may crack and the coating will lose its thermal insulation properties. Apply the prepared insulation to the slope, partially covering the window frame.
- After the insulation has been glued, we fix it with plastic umbrellas.
- The next step will be mesh reinforcement.
- Then, we place the perforated corner on the putty and align it directly to the level.
- Apply a decorative coating to the front part of the insulation in accordance with the repair concept. This can be drywall followed by painting, plastic panels, colored plaster.
Possible difficulties and errors
In the process of work, errors occur that should be stopped. When insulating, the following actions should be avoided :
- Cut the foam product exactly to the measurements. During installation, the part may change shape, then you will have to prepare another one. This will increase the volume of waste and the amount of costs.
- Use mineral wool with an unsuitable density (less than 75 kg/1 m³). The material will not withstand the required load. The same requirement applies to foam plastic with a density less than 30 kg/1 m³.
It is very easy to avoid such mistakes. The result will be high-quality insulation of slopes from inside the room.
Useful tips
Knowledge of some of the subtleties that experts share will allow you to do the insulation of the slopes of plastic windows with your own hands more efficiently. As a result, the windows will not be damaged by the environment and will last a long time.
It is worth considering these recommendations:
- Polystyrene foam tends to expand in heat. When attaching it, it is not recommended to use a large amount of glue. Otherwise, it will quickly crack and lose its thermal insulation capabilities.
- To extend the service life of the insulation, outdoor work should be carried out only in dry times and in warm weather.
- The use of thermal liners will significantly improve heat retention in the room and protect against moisture penetration.
- When installing insulation on slopes, it is recommended to treat all wide cracks and joints with silicone sealant.
Dismantling
Insulation of window sills begins with removing them from under the window. The operation is carried out using one of two dismantling options.
First method
It is necessary to very carefully remove the layer of plaster located under the slab. When wallpaper is pasted on the surface, remove it after soaking it in water.
Algorithm:
- The material is knocked down to the base of the wall. This gives full access to the structure, and it becomes easy to find cracks and chips.
- Dismantling requires breaking off the plaster near the window sill and slope.
- To complete the process, you need to get rid of the foam remaining from the initial installation of the object.
Afterwards, just pull the window sill slightly towards you and down. Do not use great force when removing - damage to the “sensitive” plastic coating may occur.
Another dismantling method
It is possible to remove the window sill of a plastic window using a fine-toothed hacksaw with a long and stiff blade.
Instructions:
The hacksaw is inserted under the object, then the old foam is cut along the entire length of the window sill. On the sides of the slopes, the sealant is cut, which created reinforced fastening of the structure. Carefully and slowly, the window sill rises upward and then extends towards itself.
To complete the dismantling, you need to clean the base of the window. Any dust collector will remove debris and expose all existing chips and cracks in the space. They are first covered with new insulation.
Self-installation of sidewalk curbs
The sidewalk curb is easy to install, which is an undeniable advantage of this type of product. It is enough to follow this order of work:
The territory is marked taking into account the features of the landscape.
According to the markings made, pegs are driven in and the thread is pulled between them. This will be the level of the top of the curb.
Then a trench is formed along the entire length of the marked area. Depth is 1/3
from the top point of the stone, the width is
10 centimeters
greater than the size of the block.
The bottom of the trench is compacted to prevent soil subsidence.
Install the border at the level of the cord. The stones are leveled in height by placing mortar underneath.
The joints are also filled with mortar, the installed borders are left for 24 hours
so that the solution sets.
Then the free space of the trench is filled with soil, which must be thoroughly compacted. At the final stage, the sidewalk is installed.
How do you determine where it's blowing from?
Even if there is only one defect, there will be blowing from the window. You can determine where this is coming from in one of three ways:
- Run your hand along the perimeter of the window block;
- A lighter. Just like with a hand, in the place of a draft the light will change;
- Place a regular sheet of paper in the open window and close the sash. If, when you pull the tip of the sheet, it easily pulls out, this will indicate poor pressure on the seal.
We insulate the inside
Having decided how to insulate the slopes, we move on to practice. Sometimes it happens that when a plastic window is installed, despite good treatment with foam, the glass gets wet and there is a strong blow from the slopes. This is often the result of careless installation, as a result of which the structure will have to be put in order yourself.
- Remove any remaining foam.
- Treat the surface with a primer with an antibacterial effect to prevent the appearance of mold in the future.
- We plaster the window area, achieving a flat surface onto which foam plastic can then be easily glued.
- We thoroughly clean the plastered areas, apply primer and begin laying insulation.
- In the case of polystyrene foam, the surface must be scratched with an emery sheet to reduce the smoothness. After which the material can be safely glued to the slopes. When cutting out the required pieces of foam, measure out slightly larger sizes, which can always be trimmed instead of gluing the missing pieces.
Before gluing the foam, it is recommended to scratch its surface
. Let the structure dry and putty the corner. After laying the foam, we proceed to the finishing coating, chosen to our own taste. This can be plasterboard covering or decorative plastering.
Having figured out in practice how to insulate the slopes of plastic windows inside, we move on to external work.
Platbands
Platbands or casing for internal slopes for PVC windows can be made of different materials, but its functional purpose is the same - protecting the installation seam from destruction and giving the window opening an aesthetic appearance.
Types of platbands
Platbands differ in appearance and functionality:
| Flat platbands. This is the easiest and most inexpensive type of cash withdrawal. |
| Profiled platbands have a convex surface of different profiles, aimed at enhancing the decorative function of cashing. |
| Shaped platbands can have a complex relief and imitate natural wood. |
| Carved platband is the most expensive type of cash, made to order according to individual sizes. |
Materials for production
The most common material for making cash is sheet plastic. It is used for the manufacture of budget flat platbands, which can be used for finishing windows indoors and outdoors.
This material is not afraid of temperature changes, exposure to moisture or sunlight. Its surface can be laminated and take on any color or imitate various types of natural wood. Therefore, choosing cash to match the color of the window facade will not be difficult.
Plastic platbands are not prone to deformation due to temperature changes and exposure to moisture.
Profiled PVC trims have the same properties, but may have a shaped surface. They are also used for interior and exterior window decoration.
MDF trims can also be flat or profiled, but they are used exclusively indoors, since the properties of MDF do not allow them to be used outdoors under the influence of surrounding natural phenomena.
For external use, dense foam casing can be used. This material is easy to process and install. The most intricate and complex shapes can be cut from polystyrene foam. It can be decorated with any finishing materials. It has negligible weight, so it does not put any load on the wall.
Foam trim can be used for exterior window decoration
The most expensive window design option is the installation of wooden carved cash. Carving can be done manually or mechanized. Handmade is very expensive due to its individuality and exclusivity.
Profiled and shaped platbands made of natural wood, made on a machine, will cost less.
Wooden platbands require careful care, since wood, when used in conditions of exposure to the external environment, has some disadvantages:
- wood can become deformed when absorbing moisture or crack as a result of drying out;
- Such cashing looks harmonious on wooden windows or on timber facades. On modern facades such cashing will look ridiculous.
Fastening
Most often, when installing platbands on a plastic window, mounting elements are used that are fixed to the frame or wall.
Platband installation diagram
Adjusting the clamping mechanism
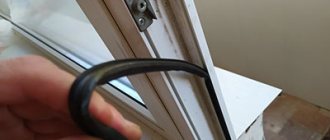
During operation, the window is exposed to mechanical and climatic factors. As a result, loss of sealing rubber volume may occur. What causes air to get inside the house. To solve this issue, it is not at all necessary to resort to replacing the gasket, unless, of course, it is completely in unusable condition. You just need to adjust the clamping mechanism.
To begin, find the protruding cylinder - the axle - in the cut places of the metal plug. Then move the hooks to the required position or adjust the trunnions. To change the position of the hooks, loosen the bolts. When moving to the street side, the pressure increases, and in the opposite direction decreases.
Protection for polyurethane foam
PSUL (abbreviation for self-expanding tape) is glued to the frame before installing it in the window opening. Within about half an hour (depending on the ambient temperature), it increases in volume, filling the space at the outer junction of the edge of the opening with the window frame.
PSUL tape serves as reliable protection for polyurethane foam from all possible destructive processes, because it:
- does not rot;
- moisture resistant;
- does not deteriorate from exposure to sunlight;
- has good vapor permeability;
- when expanded, it perfectly fills small protrusions and irregularities;
- retains its protective functions at temperatures from -50 to +90.
The service life of the self-expanding tape is 50 years and, in theory, its protection is sufficient for external slopes. But, unfortunately, there are no ideal finishing materials.
Therefore, the self-expanding tape also needs protection, and such finishing protection can be the installation of external slopes.
