Panels with decorative inserts look very elegant
The ceiling in the kitchen is a surface exposed to many unfriendly influences. Temperature changes, condensation, steam, fat deposits, dirt and food odors have a direct impact on its appearance and performance properties.
Therefore, the choice of finishing material should be approached responsibly, taking into account the operating conditions. A paneled ceiling in a kitchen is one of the most frequently made decisions. What is the advantage of this finishing material will be discussed in this article.
Basic requirements for the material on the kitchen ceiling
White paneling with wooden inserts visually makes the space larger
Day after day, the surface of the ceiling in the kitchen, especially above the work area, is exposed to negative consequences, leaving traces of grease, stains and dirt on it. This requires frequent wet cleaning and some mechanical effort.
To always have a clean and tidy kitchen, you need to choose high-quality finishing materials for all surfaces. A ceiling made of plastic panels in the kitchen will be an excellent solution, as it meets the requirements.
Paneled kitchen ceiling
So, the material should:
- Be moisture resistant and withstand repeated exposure to moisture during cleaning or when steam appears;
- It is easy to wash and does not absorb dirt and odors into its surface . It must be resistant to a large number of detergents, especially alkaline ones, which allow you to quickly remove grease stains;
Kitchen ceiling made of plastic panels
- Allow the manufacture of a ceiling structure in which it would be possible to hide utility lines , which are often found under the kitchen ceiling and spoil the appearance of the room;
Ceilings in the kitchen made of panels
- Be safe, non-toxic, non-flammable, and comply with the hygienic requirements that apply to food preparation premises;
- Being easy to process, install and repair will increase the speed of work and the profitability of using just such a finish;
- Have an aesthetic appearance.
The wear resistance of the material affects the preservation of its original appearance and service life.
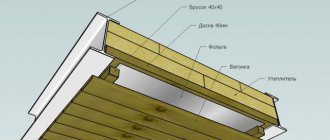
Frame installation method
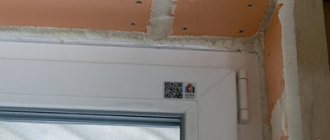
Before you begin installing the ceiling panels, it is necessary to carry out preparatory work and remove the excess layer of plaster. After this, a rigid frame should be installed around the entire perimeter. The location of the profile is marked with a marker. The height of the structure is selected taking into account the utilities that are planned to be hidden in the box. Then the crossbars are installed and the plastic is cut. To do this, you can use a jigsaw, hacksaw or sharp knife.
Ceiling panels are installed one after another, starting from the wall. The very first element is installed flush against the guide profile. All subsequent plastic fragments should be pressed firmly against each other and secured with self-tapping screws.
The most difficult part is installing the edge panel; it must be cut to size before installation.
The frame can be made of wood, plastic or metal. Suspended ceilings are well ventilated, making them ideal for rooms with high humidity levels. In addition, it is easy to install spotlights in the ceiling structure, allowing you to create lighting in the room that is as comfortable as possible for the eyes.
Plastic panels - description of material
Ceiling panels for kitchen
PVC boards are a polymer finishing material that won the hearts of many as soon as it appeared on the construction market. The material is based on light, hard and durable polyvinyl chloride, allowing it to be installed in a short time with your own hands, and its excellent performance qualities make it suitable for residential and public premises.
Ceiling panels for the kitchen with imitation of natural wood
The outer side of the PVC sheathing has a decorative pattern, which is applied using thermal printing, lamination or offset printing. A special protective varnish that covers the front side of the cladding allows you to obtain a matte or glossy surface.
Due to such processing, the material becomes more wear-resistant, is endowed with antistatic properties, and can adequately withstand sunlight and mechanical stress, such as scratches.
The surface with the shade and texture of natural wood gives the room coziness and warmth.
Manufacturing of plastic panels
Ceiling panels in the kitchen
Plastic elements are harmless to humans, since no toxic substances are used in their manufacturing process.
The process itself occurs in several stages:
- First, a special mass is made from polyvinyl chloride, which is based on polypropylene chips, solvents and plasticizers. Using an industrial mixer, the components are mixed in a large container until a dough-like mass is obtained;
- It is loaded into an extruder, and the strip coming out under pressure and a certain temperature through a special nozzle is cut using a guillotine into products of a given length and width;
- Then the surface of the products is inspected for defects;
- Then the cladding is painted or sprayed, which imitates the shade and texture of a certain material - metal or wood;
- At the final stage, a protective layer is applied to the surface.
Ceiling panels for the kitchen are lightweight with decent strength, which is ensured due to their internal structure.
Internal structure of products
A cross-section of the slab shows that its inner part consists of partitions that resemble honeycombs - these are stiffening ribs, due to which the very thin and light slab acquires strength.
The finished product must be decorated with the front layer using a pattern using one of the three methods described below. It is possible to create monochromatic fragments, with an abstract fantasy or thematic pattern, as well as with imitation of shades and textures of natural materials - natural wood, granite, marble.
Plain cladding
There are no micropores on the surface of the plastic, so the product is not afraid of bacteria and microbes. Plastic also has antistatic properties, so it does not accumulate household dust on its surface. One side of the slab is equipped with a tenon, and the opposite side is equipped with a groove to ensure reliable joining.
Structure of a plastic plate
The range of plastic products for the ceiling is quite diverse, and allows you to choose the finish for a room decorated in any color scheme.
Positive and negative qualities of the material
Kitchen ceiling panels
This finishing material is characterized by both strengths and weaknesses, which should be taken into account when choosing a method for finishing the ceiling in the kitchen:
| Positive traits | Negative qualities |
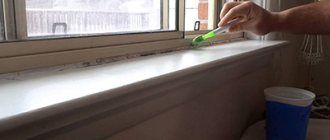
| The versatility of the material. Despite the fact that their original purpose is to decorate the ceiling or walls, the panels have also found other uses. They are used to line window and door slopes, make screens for shower cabins and bathtubs, and are used for the construction of formwork in the manufacture of steps; | Plastic products are not resistant to sunlight. Thus, white and light products of other shades may turn yellow over time and lose their aesthetic appeal; |
| The material is easy to install and does not require professional skills and tools; | They have low impact resistance and can become deformed and lose integrity as a result of significant load; |
| The method of installation on a metal or wooden frame allows you to hide defects in the base and not have to prepare it first, which significantly speeds up the work process and saves money; | New products have a specific odor that disappears after a few days, but may cause discomfort to people with a sensitive sense of smell; |
| When creating a suspended structure, it is possible to hide communications and electrical wiring. You can also install spotlights, which make kitchen lighting more practical and functional. It will allow you to highlight individual areas, for example: the work area, where the lighting should be bright and uniform; | The joints are the weakest point of the cladding, so when cleaning, it is necessary to especially carefully clean these areas of dirt; |
| They are easy to clean, do not get dirty and do not absorb odors, which is especially important for the kitchen; | In case of flooding from above, plastic, unlike tension fabric, will allow water to pass through the joints and at the points of attachment to the wall. |
| The biological passivity of the material allows us to provide the necessary sanitary and hygienic conditions in the kitchen; | |
| Safe from an environmental point of view, as they do not emit toxins; | |
| Due to the presence of stiffening ribs in the internal part, the products are quite durable despite their low weight; | |
| The insignificant weight of the products does not exert any load on the base to which they are attached; | |
| They have sound and heat insulation properties, and thereby increase the energy efficiency of the living space, retaining heat; | |
| A wide range of colors and a variety of patterns allows you to choose the material for a particular interior; | |
| Resistance to moisture allows frequent wet cleaning; | |
| Plastic products are resistant to temperature changes. The permissible temperature range for this material is from +50°C to -50°C; | |
| Using this material you can get a perfectly flat ceiling. And if you use light fragments with a glossy sheen, you can visually enlarge a small kitchen space; | |
| Plastic does not rot and is not afraid of corrosion, so it can be considered a durable material; | |
| They have a reasonable price. |
How to calculate the number of ceiling panels for a kitchen
To accurately calculate how much material is required for cladding, measurements of the ceiling are taken over the entire area. The laying method is also taken into account: diagonal, transverse, longitudinal, alternate. It is recommended to draw up a diagram and plan in advance, and only after that do calculations.
Another 15% must be added to the final figure obtained during the calculations. This is necessary because, as a rule, kitchen ceiling panels have to be cut, and therefore the amount of material may be insufficient. This is especially appropriate when using panels with a pattern or design.
Varieties of products according to the method of drawing
Plastic panels for the kitchen on the ceiling with imitation of natural wood
Methods of applying patterns in the manufacture of colored products deserve special attention:
| Method of drawing | Appearance |
With offset printing, a white base is covered with a pattern using a special roller. Then the drawing is varnished and dried under a UV lamp. Thanks to this method of applying the pattern, the cladding becomes glossy. As a rule, such slabs are used to decorate the ceiling rather than walls.
|
|
| When applying a design using thermal transfer printing, a white plastic base is coated with a composition that dissolves its top layer. Then, the surface is covered with a film with a pattern. In this case, the cladding turns out to be semi-glossy, and is more practical than previously described, since the film layer is characterized by higher resistance to mechanical influences. A distinctive feature is the wide selection of shades and patterns. Products have a standard length of 2.7 to 3 m. | Imitation of natural wood using thermal transfer printing |
| The initial color of the workpiece with this method of decorating it does not have to be white - the base is covered with thick PVC film, which gives it additional strength and decorative qualities. Laminated plastic boards are the most resistant to mechanical stress. However, if we talk about the variety of shades, then it is quite scarce and consists more of imitations of wood textures. The cost of such panels is much higher than those described earlier. | Laminated surface pattern |
We calculate the consumption of materials: panels, skirting boards, profiles and fasteners
The thickness of PVC panels is most often 5–10 mm, the width is 250-500 mm, and the length varies from 2.7 m (standard) to 3 m. Ceiling plinths are three meters long.
To calculate plastic panels, first determine the area of the ceiling, and then divide this number by the area of one panel (indicated on the packaging). Add to the resulting figure 15% of the margin for trims and round this data up.
Along the perimeter of the kitchen, it is necessary to install UD (hard) guide profiles, and the load-bearing transverse planks of the frame must be light, that is, CD.
Count the number of profiles for making the sheathing. To do this, draw a scale diagram of your ceiling on a checkered sheet of paper. Now mark the profiles that will be installed across the room parallel to each other. The distance between them should be about 60 cm. Calculate how many profiles will be needed, taking into account those that will be installed around the entire perimeter of the kitchen. Pos
Varieties of products depending on size
Rectangular PVC Ceiling Plate
One of the most important factors that must be taken into account when choosing plastic cladding is their size, which varies depending on the width of the slabs.
Plastic products presented on the modern market can be divided into three groups:
- Tiled type;
- Plastic lining;
- Sheet plastic.
Products included in one group or another differ in size, cost, level of rigidity and weight.
Important! The external perception of the interior design and the type of finishing work depend on the size and other parameters of the lamellas.
Plastic lining
The parameters of the standard thickness of products vary from 0.5 to 1 cm, which must be taken into account when purchasing molding in the form of a decorative overlay strip, which is the final element and decoration in the interior. As for the length of products, ceiling ones can reach 3 meters.
Standard sizes of PVC products
Structurally, PVC cladding is classified as follows:
- “European” or eurolining is characterized by a length of up to 3 m with a standard width of 10 cm and a wide locking system;
- “Polka” has the same parameters, but a narrow locking system;
Types of plastic lining
- Reinforced lining can be distinguished from others by its double profile and width of 12.5 cm;
- The tiled elements are square in shape without a locking system;
Tile type PVC wall panels
- Expanded panels include elements with a width from 15 to 50 cm and a length of 2.6/2.7/3 m;
- Sheet plastic products often have a mosaic design and are used for wall cladding. They are not equipped with a locking system and can be quite large – from 0.8 to 2.03 m in width and from 1.5 to 4.05 m in length.
Two- and three-section linings with metallized or colored inserts are highly decorative.
Slab in the form of a three-section lining
Types and properties of PVC panels
Externally, the standard panel consists of two sheets of plastic connected by stiffening ribs. Due to its “airiness” it is much lighter than most of its “brothers”.
PVC ceilings can be combined with any interior design.
There is a wide variety of PVC ceilings.
The variety of products on the market is off the charts – the color range alone includes hundreds of shades. However, they can be divided according to the following characteristics.
Connection types:
Seamless, where there is no connection of a certain type. The ends of the panels are adjusted to each other so that on a smooth, even surface the joints are almost invisible. Seamless plastic ceilings in the kitchen photo fit perfectly into any interior.
Suture. They are connected using grooves and tenons. The mounted panels have a visible joint, reminiscent of a “lining”.
Unlike other PVC designs, PVC ceilings are affordable.
Shape and dimensions:
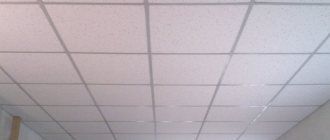
Tile panels are available in sizes from 300x300 mm to 100x100 mm, with a width of 1.5 mm. Indispensable for creating original ceiling compositions with alternating smooth and textured tiles imitating wood and stone. Convenient and easy to install.
Rack and pinion. Elements vary in length from 900 to 3000 mm, width from 100 to 300 mm, thickness from 4 to 8 mm. Mounted like a lining.
Sheet plastic. The large dimensions of the product cover a significant area of the ceiling. They are distinguished by flexibility and integrity of the structure. As a rule, they are mounted on a leveled surface without a frame. Standard sheet sizes range from 900 to 3000 mm in length and from 900 to 1500 mm in width.
Rack ceiling structures made of PVC panels.
Note! The optimal thickness of the panel ceiling in the kitchen should be at least 7-8 mm. A smaller size may result in deflections during installation or after
Texture:
Glossy or matte. The gloss is applied with a layer of varnish after extrusion. Matte surfaces are not further processed.
Smooth or structured. Today, panels are produced with the texture of natural materials - for example, wood or stone.
Glossy ceiling made of plastic panels.
Types of products depending on the type of connection
Ceiling panels for the kitchen
Wall and ceiling plastic cladding, presented by modern manufacturers, has different connection methods, based on which we can note seamless and chamfered (rusted) lamellas. For the ceiling, tiles with a seamless connection type are purchased so that, as a result of their tight fit to each other, you can get an almost smooth surface - the connecting lines will be barely noticeable.
Seamless fastening
From seamless lamellas, a chamfer-shaped connection is characterized by the presence of rust - a decorative recess, which is used when connecting PVC fragments into a single covering. Rustic cladding allows you to create an expressive ceiling surface.
Rustic cladding
How to prepare the surface for installation
Before starting the installation, you need to take care of installing the wiring and all devices. Then you need to pre-prep the surface. It is recommended to clean the ceiling from dust and eliminate unevenness using plaster. Take care to additionally protect the surface from fungus. Treat the surface with special mixtures that will disinfect and prevent the appearance and development of microorganisms.
Preparing to install plastic sheets on the ceiling
You also need to determine the height of the net attachment. It is recommended to install the panel at a distance of 7-9 centimeters from the base surface.
The principle of installing sheets on the ceiling
Before installing ceiling strips, it is necessary to eliminate defects in the base surface.
How to choose quality material
Panel ceiling in the kitchen
A guideline when choosing high-quality PVC products can be their cost - the more expensive, the better. However, there is a risk of running into an unscrupulous seller who passes off a low-quality product as a high-quality one, unreasonably raising the price.
To avoid making a mistake when choosing, you should consider some nuances:
- Please note that the thickness of the material is 10 mm; for the ceiling you can choose thinner products;
- The resistance of the material to mechanical stress depends on the thickness of the front surface. If the stiffening ribs are visible on the front surface, such cladding will not look beautiful on the ceiling;
- It should be remembered that the strength of the slab and its correct geometric parameters depend on the location, strength and number of stiffeners. The distance between adjacent ribs should not exceed 10 mm.
- You should not purchase products with clearly dented stiffeners, as it no longer meets the requirements for strength;
PVC cladding on the kitchen ceiling
- It is important to evaluate the uniformity of application of the decorative topcoat and its quality;
- When purchasing material, in the store you need to take any two lamellas of your choice and connect them together, checking the strength of the connection and its quality;
- To check the material for fragility - and such a defect is possible if the manufacturer added more than 20% chalk during manufacturing, it is necessary to bend the corner of the product to evaluate the ductility of the material. If no white stripe or crack appears, then the components are selected in the correct proportion and the material is of appropriate quality;
- As previously noted, PVC products emit a specific odor for the first few days after they are removed from the packaging, which then disappears. If the store contains demonstration samples that last for more than one day, but exude a specific aroma, then it is better to refuse such cladding;
- To avoid making mistakes and wasting money, it is better to purchase products from well-known brands.
Design selection
What panels will you be pleased to see on your ceiling? Here's what they can be:
- shiny glossy;
- rough matte;
- plain
- colored;
- with contrasting frame;
- with mirror stripes;
- with alternating stripes of different colors;
- marbled;
- under the tree;
- under the skin;
- with an image
- with ornament.
The color scheme and style of your kitchen will help you make the right choice.
For example, if the entire room is predominantly made in one color, PVC panels of a lighter shade will look harmonious. Or, thinner stripes on the ceiling will duplicate the color of the kitchen unit, and those that are thicker will match the color of the walls.
The creation of a holistic space is facilitated by PVC wall panels of the same color and texture. But for some, the same design of walls and ceiling may seem too monotonous and boring.
If your kitchen is located on the sunny side, you can “cool it down” slightly with cool shades of gray or metallic. Otherwise, you should give preference to warmer tones.
Gold or silver, alternating with white, mirror stripes will give your kitchen a sophisticated look and create a harmonious environment, moderately reflecting all interior items. Panels with a pattern can create excessive variegation, but they will look good as inclusions on a plain background.
The main accent on the ceiling can be a beautiful chandelier with stained glass windows. Square, round or a more funky shape, it will not only look great on a plain ceiling, but will also fill your kitchen with an unusual color palette.
What else can tell you the best colors for ceiling panels? The colors of the floor, table and chairs, household appliances, kitchen apron and, of course, your taste preferences.
In addition to the color, you need to choose the width of the panels.
It can vary from 12.5 to 50 cm. Although panels made of wide plastic help create a solid, monolithic space, they are not so convenient to work with, because they are usually less flexible.
The optimal width is 25 cm.
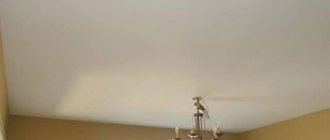
Ceilings in light colors are best suited for the kitchen, which will make it more spacious. The glossy surface creates additional depth and will serve as a pleasant bonus for low rooms.
Taking into account the characteristics of the kitchen, white panels will quickly lose their immaculateness and will require more frequent cleaning.
They might be worth it because... These ceilings look really very beautiful and modern. Panels in light gray, brown or warm yellow (vanilla) shades would be practical for this room.
If PVC panels hide all the curves of the ceiling, then uneven walls can be hidden with molding or ceiling plinth. Plain, in the form of a plank, or decorative, embossed, it will give the transition between the ceiling and the wall a more neat and comfortable look.
What about two-level designs using several types of panels that contrast in color? Contrary to popular belief, this is quite possible, as evidenced by the photos below.
Placed at an acute angle or perpendicular to each other, plastic panels will add volume to the ceiling, divide the kitchen into zones or act as an addition to the interior.
Installation
Installation of a plastic suspended structure
Before you begin installing plastic panels, the material must be acclimatized. The products must remain where they are to be installed for several days. This makes it possible for the plastic to acquire a size in accordance with the existing temperature conditions of the room, which will subsequently eliminate the appearance of gaps between individual fragments of the ceiling structure.
Plastic elements have a high coefficient of thermal expansion - a 9 m long rail increases by 9 mm when the air temperature fluctuates from -10 to +40°C. The width of the product will also undergo expansion.
Important! The ability of plastic parts to change their linear dimensions under conditions of temperature changes should be taken into account when installing them in a kitchen, bathroom or loggia. The cracks form when the air cools and disappear after the temperature normalizes, returning to its normal values.
Thus, installation should take place in conditions where the air temperature is slightly lower than normal for a particular room. If these conditions are met, after acclimatization, the plastic elements will increase in size and clog the cracks, creating the impression of a monolithic coating.
What to look for in the store
When you have decided on the design, you need to move on to the issue of purchasing material
It is important that you purchase high-quality plastic panels, and for this you need to consider the following recommendations:
- Sheets of plastic and their edges must be smooth - even the slightest roughness in the joint area will lead to the integrity of the suspended structure being damaged;
- Each of the PVC panels must be evenly painted, without inclusions. If the design involves color transitions within one canvas, then it should be uniform and smooth;
- The panels should also not be too thin or soft.
- To check the quality of the plastic, squeeze the panel with two fingers and bend its corner several times - a high-quality panel should not crack, much less break, only a barely noticeable deformation is acceptable.
PVC ceiling panels are lighter and more fragile than wall panels, and therefore transportation and installation must be carried out with great care
Mounting options
Mounting on a wooden frame
There are several ways to attach panels:
- The panels can be attached directly to the base ceiling surface using two-component MDF KIT adhesive, provided that the base is level. The glue must be applied in a zigzag motion along the entire side to be glued. Due to the fact that the composition is elastic, it does not prevent the panels from expanding and returning to their original state under conditions of temperature changes;
- The panels can be glued to the leveling sheathing. In this case, glue is applied exclusively in places where the tiles are connected to the sheathing beams. Additionally, it is recommended to fasten it using fasteners for structural reliability;
- With mechanical fastening, when plastic panels are fixed to the sheathing using nails, staplers, and self-tapping screws, the result is a reliable and easy-to-use design, but it has a significant drawback - this method of fastening rigidly fixes the panels and does not allow them to react to temperature changes. This method of fastening is recommended for rooms with relatively stable air temperatures;
- You can secure the panels to metal, plastic or wooden sheathing using clamps. A clamp is a metal plate (clip) that has a different throat height, depending on the thickness of the panel. The clamp is fixed to a metal profile or a wooden block.
The clamp is inserted into the groove of the panel
The clamps can be attached to a plastic sheathing, which will not interfere with the thermal expansion of the panels. Installation occurs quickly and with a minimum of effort - the cladding is simply fastened to the sheathing. This method allows you to unfasten individual elements for replacement if necessary.
Preparatory work
The process of installing panels begins with preparing the base
Before proceeding with the installation of plastic panels, it is necessary to carry out minimal preparatory work. When attaching the panels to the sheathing, it is necessary to repair large cracks in the ceiling.
In the case of installing panels using glue directly on the existing ceiling, the old paint is removed from it - but only from those places where it no longer holds firmly.
Advice! The strength of the supporting base to which the panels are planned to be glued is checked using a piece of wide tape, which is applied with the sticky side to the ceiling, and then, with a sharp tug, is torn off. If at the same time the old paint layer remains in the same form in its place, then it will withstand the panels, but if the paint comes off along with the adhesive tape, then a complete cleaning of the ceiling or installation of a frame will be required.
The base is treated with antiseptic compounds to prevent the formation of mold. If the fastening occurs on a wooden sheathing, then the wood must be processed. If built-in lamps are used, it is advisable to increase the fire resistance of the wooden frame by treating it with anti-feathers.
Installation of sheathing
Frame options
When creating a frame, you must consider the following recommendations:
- Markings are applied to the prepared base using a tape measure and pencil. Where the fastening will be made, the base is drilled, sometimes using a Pobedit drill. The holes are marked based on the direction of the profiles;
- Panels located along the longest wall look better than across. The latter method is easier for one person to do the job;
- For the manufacture of sheathing, a metal (galvanized) profile or wooden beams are used. The frame is mounted in the same way as for a plasterboard ceiling, but the difference is that the pitch between the guides (CD profile) is larger due to the low weight of the PVC panels. The step can be from 70 cm to 1 m.
- A load-bearing profile (UD) is fixed around the perimeter of the room, and a starting PVC or baguette profile is attached to it. After this, a set of panels is produced, screwing them to the profiles using self-tapping screws (seed) at the very edge of the lock (panel groove);
Metal carcass
- In the case of using wood for lathing, it is recommended to use dry bars 40 X 25 mm;
- The most convenient way is when the sheathing is mounted from ready-made plastic J-profile and H-profile, which allows you to use a clip-on panel fastening system;
Fastening panels to a wooden ceiling with self-tapping screws
- To give the ceiling a complete appearance, a special ceiling plinth or universal corners are installed at the junction of the ceiling covering and the walls.
Calculation of finishing material
Preliminary calculation of building materials will help save time and money. The amount of panel masonry is determined taking into account the total surface area. To calculate it, you need to multiply the width of the kitchen by its length. To the result obtained, you need to add approximately 10-15% of the resulting footage to adjust the products.
To install a metal frame, it is recommended to purchase two types of profiles: guide and ceiling. The rigid profile will serve as the basis of the entire structure; it is installed around the perimeter of the room. Transverse strips are attached to it at a distance of 50-60 cm using self-tapping screws. For ease of calculation, you can draw a drawing of the future structure.
Self-tapping screws are purchased with the same calculation: for every half meter of panel length. As a rule, they do not skimp on fasteners; it is better to buy them with a reserve.
Upon completion of all installation work, it is necessary to install the ceiling plinth. The decorative element is attached to liquid nails and allows you to disguise the joint and make the ceiling design complete.
It should be taken into account that the suspended structure reduces the height of the room by 10-15 cm. If the base base has a perfectly flat surface, then the plastic panels can be installed directly on the ceiling.
Lighting
You need to think about this issue before purchasing panels and installing the ceiling. We recommend that you consider the following:
- The height of the frame profile or sheathing to which the PVC panels will be attached depends on the type of lighting. For built-in lamps, this distance is 10 cm. In the case of pendant lamps or a chandelier, this distance is practically absent. The combination of two types of lighting also threatens a loss of height;
- Each lighting fixture must be wired. To install a spotlight, you will need to cut a hole in the panel, and for a chandelier, you will need to attach a mounting;
- The thickness of the panels can range from 5 to 12 mm. For pendant chandeliers with rotating lamps, this indicator is not significant. But when installing spotlights, thin panels less than 8 mm thick can be translucent, revealing the profile structure, wires, pipes and other communications;
- Don't forget about its mirror-like ability on glossy surfaces, which will almost double the amount of light. The main thing is that the light reflected in the ceiling panels does not hit your eyes. Rotating lamps will help make this task easier;
- It is convenient and economical to divide the ceiling lighting into 2-3 switches according to intensity. To illuminate work areas, add side (wall) lighting or, for example, lamps built into the kitchen unit.