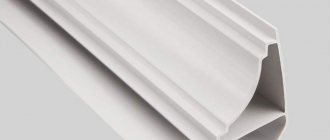
Skirting board for plastic sheathing
When installing a ceiling made of plastic panels, it becomes necessary to mask the gap between the plastic ceiling itself and the wall adjacent to it. Most often, a plinth for plastic panels is used for this. Of course, you can simply seal the joint with a foam molding - but the baseboard still has a number of advantages, which we will discuss in this article.
Installation of plastic elements
Before installing decorative elements around the perimeter of the ceiling, you should take all the necessary measurements and create a drawing.
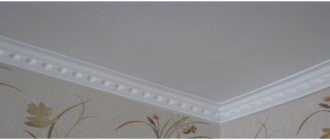
After this, you can apply markings to the walls and cut the plastic ceiling plinth into pieces of the required sizes. The edges of the plinths are cut at an angle of 45 degrees, the next plinth is cut in the same way, but in the mirror direction of the angle. This cutting method will allow you to connect all the elements of the decorative structure joint to joint, avoiding the appearance of cracks and gaps between them. Visually it will look like a solid structure between the ceiling and the wall.
If, when gluing the skirting boards to the wall, gaps appear under the ceiling, you can insulate them with silicone sealant and putty. Painting of decorative elements should be carried out before installation, as well as cutting.
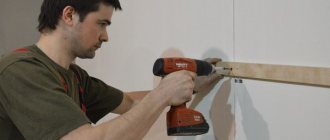
To install plastic parts, you can use liquid nails or other adhesives. The plinth should be glued to the wall and not the ceiling, so it will not only stick better, but will also not damage the surface of the ceiling.
Application
To create and decorate a beautiful and original ceiling, polystyrene foam baguettes are often used. These light stripes ensure that the ceiling smoothly flows into the walls and at the same time all flaws are made invisible.
This material is also used when finishing multi-level plasterboard ceilings.
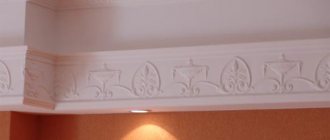
Foam baguettes are often used in bathrooms. If you glue foam friezes along the perimeter of the wall on top, this gives the bathroom a more aesthetic appearance.
This material does not get wet, serves as additional thermal insulation, can withstand many paintings and looks fresh.
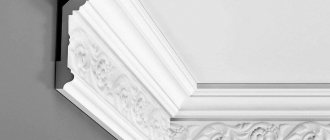
Stucco molding on the facades has always given the building grandeur. Its disadvantage is that it requires meticulous care every year and, under the influence of weather conditions, it quickly loses its visual appeal. Therefore, when finishing facades, they began to use ceiling foam friezes.
They are resistant to rain, snow and wind, and can withstand frost. After careful processing and fastening, such skirting boards serve for a long time and reliably.
Installation and features of polyurethane skirting boards
Polyurethane is a foamed substance that has certain properties. Thanks to them, polyurethane plinth has a number of advantages over the plastic prototype.
Before attaching a polyurethane ceiling plinth to the ceiling, you should make calculations and make a drawing. As with its plastic counterpart, it should be cut and painted on the floor before installation. Cutting can be done with a regular knife and secured with any adhesive.
You should glue the polyurethane skirting board to the wall and not to the PVC ceiling, so it will stick better and will not damage the surface of the ceiling. To decorate the corners between the ceiling and walls, you can use a special decorative corner.
Flaws
Unfortunately, scientists have not yet come up with a material that will be free of disadvantages. The plinth on the plastic ceiling also has some flaws.
If you compare foam and PVC profiles, you can understand that products of the first type have a wider base. Due to the fact that the vinyl profile has a narrow base, it cannot cope with hiding wide cracks. And this is not just a matter of installation errors.
PVC has a fairly high coefficient of thermal expansion. And the larger the volume of the room, the greater the distance between adjacent baguettes and the wall should be. And this in no way contributes to improving the aesthetic appearance of the room.
Installation of PVC skirting boards complicates the procedure a little
installation of ceiling panels
. For example, it is not easy to fasten the last panel in a row so that nails or screws are not visible.
What are PVC panels
Plastic panels are an inexpensive decorative finishing material made of PVC (polyvinyl chloride) for interior decoration. PVC characteristics:
- tensile strength: 3.46MPa;
- resistance to alkalis and acids;
- ignites only when the temperature exceeds +391°C
- in the presence of flame;
- water absorption: <0.01%;
- weight of 1 panel = 0.66 kg.
Conclusion
Installing a PVC ceiling plinth with your own hands, as you can see, is not an exorbitantly difficult task. To make it easier for you to understand, the video in this article shows one of the options for such installation. If you have any questions, ask them in the comments, our specialists will answer them.
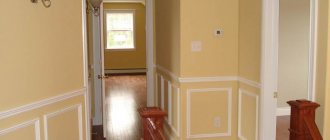
Decorating the room with plastic.
PVC skirting boards are perfect for finishing the perimeter of rooms such as a toilet, bathroom or corridor. In part, such skirting boards can be used in the kitchen. But the walls must be smooth. Installing a plastic ceiling plinth in the living room or bedroom is not advisable. In such rooms it is much better to use polystyrene foam baguettes.
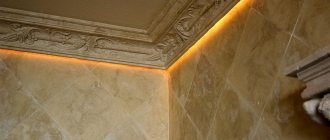
Instead of baguettes, you can use wide molding. In addition, the market offers ceiling skirting boards for plastic panels with hidden lighting. They are installed 10 cm below the surface, while a diode strip is laid on their upper edge. It is the play of light that allows not only to change the appearance of the room, but also to hide some surface imperfections.
Read more: Decorating the toilet with plastic panels with your own hands
What are borders, plinths or baguettes made of polyvinyl chloride?
When finishing ceilings, it is rarely necessary to do without installing cornices or borders in the upper part of the room. You can move away from the usual technology, using your own plastering and putty skills for these purposes. However, when working with plastic panels, such measures are no longer limited. Ceiling plinth for PVC panels is a real lifesaver.
In other words, unlike other types of plinth elements, these consumables, first of all, perform a technological function and only then can we talk about their decorative purpose. Due to the peculiarities of its shape, such a product can be called part of a suspended structure, which is used for fastening plastic panels. Individual fragments of the canvas are inserted into a special groove, firmly fixed in it. According to their design features, ceiling plinths made of polyvinyl chloride are divided into two types:
- plinths (cornices, baguettes, borders, moldings);
- profiles.
Both options differ in the appearance of the front surface. Profiles can be of a simple, even shape or, conversely, with a complex relief, with one recess or with a recess. Here we are talking about multifunctional products for working with ceilings.
Main features of plastic products for ceilings
It is believed that the closest relative and competitor of such products is the foam fillet. In reality, this is not entirely true, both of these materials are good, but each of them is intended for its own purposes.
Types of PVC fillets
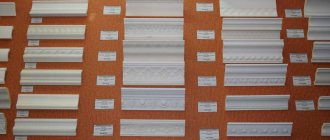
The ornaments, shapes and colors of such products have a fairly wide range; there are dozens of models on the market.
But manufacturers don’t spoil us with a variety of designs; there are only two types:
- The most popular, one might say traditional type is a fillet made in the shape of a triangle, one of the sides of which is equipped with a mounting end groove into which plastic panels are inserted. This design is considered more common, since its price is slightly lower;
Monolithic plastic fillet.
- A direct competitor to a monolithic corner profile is a detachable fillet with a latch. In essence, this is the same thing, only here a straight starting profile with hooks is first mounted, and upon completion of work, a decorative triangular plinth is attached to it with latches. It is more convenient to work with this design, but it costs a little more.
One of the varieties of plinth with a latch.
- This corner is made of the same material as the wall or ceiling covering. Therefore, the fillet will form a single whole with it, while foam or polyurethane may differ noticeably;
A combination of plastic and tiles.
- Since the end mounting groove is made precisely according to the thickness of the panel itself, the fillet will adhere to the ceiling without gaps, as a result, there is no need to additionally cover the cracks or use glue;
- Plastic is indifferent to moisture, this allows not only to install ceiling plinths for PVC panels in rooms with high humidity, but also to wash surfaces with mild detergents. No abrasives are used here;
- Modern polyvinyl chloride is not susceptible to ultraviolet radiation. Simply put, these fillets do not fade or turn yellow in the sun;
Mounting accessories.
- Fillets from reputable manufacturers are considered completely environmentally neutral;
- Plastic is a universal material; both the panels themselves and the baseboards for them can imitate most existing types of coatings, and in any color;
- The installation instructions are extremely simple. If you have the professionalism to install the sheathing and panels yourself, then fixing the baseboard yourself will not be difficult for you.
Standard design dimensions.
But everything is not as elegant as it might seem.
Plastic fillets also have several very unpleasant features.
- Polyvinyl chloride is not a heat-resistant material, so such skirting boards are afraid of rising temperatures and can be deformed from proximity to a regular incandescent lamp;
- The width of such a corner rarely exceeds 40 mm. Because of this feature, they are practically not used in rooms with high ceilings. Narrow molding does not look good in large spaces;
- It is quite problematic to insert the outermost ceiling or wall panel into the groove of monolithic corners. However, this does not apply to designs with a latch.
Coloring of skirting boards and panels.
The first thing to remember is that in this case we are dealing with a detachable design of the product. Ceiling plinth for plastic panels can be sold separately. The base part of the product is separate from the decorative insert. You can always choose the insert that is most suitable for a particular design option. Upon completion of installation of the entire structure, the decorative insert is connected to the base part of the molding by snapping.
To have a complete understanding of what we are dealing with, we should dwell on the main advantages that are typical for PVC baguettes and their disadvantages. The most distinctive features of PVC curtain rods are as follows:
- plastic feels great in rooms with high humidity;
- plastic cornices are convenient and practical to use;
- PVC fillets are durable and do not turn yellow over time;
- the products are harmoniously combined with suspended ceilings made of PVC panels;
- Quite simple and convenient installation.
Read more: Is it possible to transport a refrigerator lying down - there is an answer!
Despite the obvious advantages, PVC curtain rods also have disadvantages. This includes the fact that these products are very difficult to bend. If the walls are uneven, such baguettes will not be able to reliably close technological gaps and cracks.
The next aspect that is important to consider when working with PVC consumables is the small width of the finished products. In other words, if you have serious miscalculations when installing a suspended structure, PVC baguette will not be able to solve the problem and hide visible flaws.
In terms of subsequent use, it is worth noting the fact that plastic is almost impossible to paint well. Installation of products is focused on the use of mechanical fasteners. To install PVC profiles you will need screws or self-tapping screws.
Unlike other types of curtain rods, PVC curtain rods are produced in 3-meter pieces, so for normal operation, it is better to calculate in advance the required amount of consumables.
Preparatory work
- Use a metal brush to remove all particles from the surface of the ceiling that do not adhere well, including old whitewash, paint, plaster (how to wash whitewash from the ceiling?).
- After mechanical cleaning, wiping with a damp cloth and removing any remaining dust and debris is required.
- If small cracks or chips are visible, they need to be filled with putty so that they do not increase over time and do not cause stains to fall off.
- After this work, the surface must be dried and treated with an antiseptic primer. Since a closed space will form between the ceiling and PVC plates, this will become an attractive environment for mold and mildew in damp rooms. Applying a primer will prevent the development of harmful microflora.
- In order not to be distracted during installation by searching for missing tools, available materials and materials, it is recommended to calculate the required quantity and assortment and purchase everything in advance.
Advice If you plan to lay insulating material, then it is necessary to make adjustments to the quantity calculations and to the ceiling markings, taking into account this layer.
Calculation of the quantity of materials
installation of ceilings made of plastic panels
- Determine the area of the ceiling: in rectangular rooms it is calculated as the multiplication of adjacent walls, in rooms with complex geometry - as the sum of different areas of simpler elements.
- A material of suitable length is selected: if the length of the room is 4.2 m, then a 6 m slab will be required, since the trimmings will look unaesthetic.
- To calculate the number of slabs, it is best to use graph paper or a checkered piece of paper, on which to plot the area of the room to scale, and then draw the appropriate number of panels in width along the long side.
- To determine the number of profiles for the frame, a more complex calculation will be required: on the same sheet as in the previous paragraph, corners are drawn parallel to each other in increments of 0.6 m. Then the length of all lines is summed up and divided by the standard length of the element.
- The number of dowels and self-tapping screws is calculated by the number of profiles and a pitch of 0.6 or 0.3 m.
- The ceiling plinth is applied along the perimeter of the room, which is calculated by twice the sum of the adjacent sides of the room.
All materials must be purchased approximately 10–15% more
Required materials and tools
- impact drill with medium and low speeds or screwdriver;
- construction level on alcohol capsules or laser;
- miter box;
- metal scissors;
- angle grinder;
- hacksaw;
- metal screws, dowels;
- metal clips, screws with a press washer, “liquid nails”;
- rag.
The materials you will need:
- the slabs themselves have a reserve;
- ceiling and wall frame profile;
- stringers with or without spokes, depending on the height of the ceiling covering from the ceilings;
- acrylic sealant for sealing joints between slabs.
Tip: To work at height, you will need a stepladder. You need to stock up on a rag to clean off traces of sealant, protective clothing, including goggles and a respirator.
Plastic ceiling plinth - installation
How to attach a plastic ceiling plinth?
The simplest method is used for small rooms. In this case, the panels must be attached to the sheathing (read: “
How to attach PVC panels to the ceiling
"). The plinth is simply placed with the protrusion on the edge of the panel. After the installation is ready, it is enough to coat the joint with the wall with sealant.
In addition, the plinth can be hemmed to the UD profile, which encircles the room. For
installation of ceiling plinths
use glue and screws. It is better to pre-drill holes at the points where the skirting boards are attached with self-tapping screws. This will protect the plastic from cracking.
In small rooms you can do without lathing. This method is also suitable for spacious rooms with smooth walls. The baseboard is simply attached to the wall with screws. In this case, holes are pre-drilled in the wall or plasterboard box.
Special corners are installed in the corners of the room. An alternative method is to cut the baseboard yourself using a miter box.
Gaps at the joints are masked with sealant, which is matched to the tone of the baseboards.
Installation of fillets
As we have already said, installing PVC ceiling plinth is a completely doable task even for a novice master. In most cases, such cladding is attached to a pre-assembled sheathing made of CD and UD profiles or wooden blocks. At its core, the plinth is a starting profile.
Scheme of installation of the structure.
Some sources say that profiles can be attached to perfectly flat walls or ceilings without lathing. This is true, but it makes sense to do such work on a base made of wood or plasterboard. It will take you a lot of effort, time and several Pobedit drills to fix the starting profile on the concrete floor slab every 150 mm. It is much easier to fill the crate here.
When it is ready, you can begin installing the baseboard itself. On both monolithic and split fillets, one of the sides of the end starting groove is several millimeters wider than the main structure. This allowance is made for attaching the baseboard to the base.
Fastening with a self-tapping screw to a metal profile.
The plastic fillet is attached to the sheathing of metal profiles using small metal screws. If the base is made of wood, then it is more convenient to use a construction stapler for fixation. Although, in the absence of one, you can use wood screws.
Beginning craftsmen often have difficulty cutting skirting boards in internal and external corners. To create a right angle, both adjacent plinth strips are cut using a miter box at an angle of 45º. Of course, plastic can be cut with a knife, but to ensure everything is accurate and neat, it is better to use a hacksaw.
Miter box for cutting corners.
But now there is simply no point in bothering with cutting corners on plastic PVC fillets. For these purposes, special fittings are produced, and the bar itself is cut at an angle of 90º and inserted into the groove of the adapter. This is incomparably faster than measuring and cutting profiles, plus such connections are guaranteed to have no distortions or cracks.
Connecting fittings.
Step-by-step instruction
When installing a ceiling plinth, first of all you need to prepare the surface before gluing the plinth; it must be cleaned of small irregularities, after which you need to prime the gluing areas to create maximum adhesion between the glue and the wall or ceiling. The primer is the same as that used for gluing wallpaper or ceiling tiles.
Before gluing, it is recommended to take a small piece of baguette and practice cutting out corner joints so as not to spoil too much.
Now that you've got everything ready, it's time to start the process of cutting out the corners. To create an internal corner, the first of the methods described above is perfect for you. If you have smooth walls, then you can cut equal pieces from the baguettes, and cut out corner joints from them, then simply carefully glue the long planks point-blank to them. These manipulations will make your work easier when trimming and eliminate the possibility of the baguette being bent or broken.
When cutting out the outer corner, you must remember that the inner corner abuts the wall, and the outer, on the contrary, protrudes above it. Similar to the method described in the first method, you can try. The only difference will be that the baseboard extends beyond the wall to the width of your baguette strip. Once you've cut the planks at the right angle and joined them together, you may need to adjust the angle manually since the corners in our homes are often nowhere near 90 degrees. The rest of the methods we described will allow you to make an outer corner more easily. Just like when cutting out an internal corner, it is better to practice first - this will make your job easier and reduce the waste of the baseboard.
Before gluing the skirting boards, you need to make sure that the joints fit exactly. Modern assembly adhesives set very quickly, so you will have practically no time to correct a mistake, and tearing off the baseboard is both an opportunity to break it and the need to re-clean the surface of the baseboard and the wall from the glue. It is better to immediately remove excess glue with a small clean rag or sponge so that no traces remain.