The plinth is a small but very significant element. It is necessary to complete the overall picture when renovating a room, since it is thanks to the plinth that you can beautifully design the joint between the wall and the floor. Also, in this small element you can hide various wires, both electrical and telephony and Internet cables. However, not everyone knows how to attach a plinth.
How to fix the baseboard
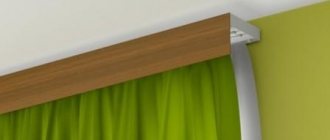
Floor plinth
Types of skirting boards
Depending on the material of manufacture, there are several types of skirting boards:
- wooden;
- plastic;
- made from MDF;
- metal.
About the types of floor skirting boards
In apartments, as a rule, skirting boards are made of either wood or plastic. MDF is used much less frequently. Metal skirting boards are usually purchased for installation in industrial or office premises. Depending on the type of plinth, there are different ways to install this element.
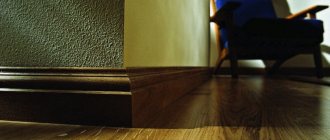
Wooden plinth can be made from any type of wood, but it is quite expensive - after all, it is a natural and environmentally friendly material. Typically, alder, oak, and larch wood are used for production. It is most often used for edging floors made of parquet boards, parquet, and natural wood floors. It can have either a simple triangular or curly shape. This material also has its own difficulties in working. For example, to cut a piece of a certain size, you will have to use a sawing tool.
Wooden plinth
MDF skirting boards are made from wood fibers and have a decorative veneer layer on top. This material looks quite presentable and from the outside is indistinguishable from natural wood plinths. But it costs much less, which attracts many. However, MDF requires special working skills - it is quite fragile.
MDF plinth with cable duct
Plastic plinth is the best option for modern apartment renovation. It is not afraid of moisture or sunlight, has a lot of color variations and is suitable for any floor covering. And the presence of plugs and corners will help to decorate the baseboard beautifully and neatly.
Plastic floor skirting boards
On a note! Plastic skirting boards often have special grooves for fixing carpet or linoleum, which will facilitate the task of laying the finishing coating for this type of floor.
The baseboard should be in harmony with the rest of the interior details
How to choose a plinth
The interior dictates its own rules. The more expensive and exclusive the covering, the better its framing should be. To decorate the room with decorative details, designers recommend:
- The color can either match the shade of the flooring, walls, doors, or be a contrasting element. Computer programs with 3D visualization will help you choose the most appropriate design option.
- Wooden skirting boards are perfect for solid wood and laminate floors. Linoleum and carpet are combined with PVC planks. Ceramic products complement tile floors. Veneered and MDF skirting boards are universal and can be used with various types of floor coverings.
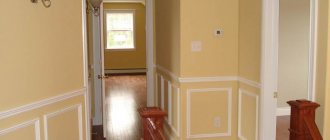
In order for the color of the baseboards to accurately “fit” into the color scheme of the room, painting is sometimes required. A fashionable option is white molding. It looks impressive, but requires support in the design with other details - platbands, fireplace portal, ceiling fillets.
Methods for attaching skirting boards
There are three main ways to attach skirting boards. The task of each of them is to secure this element as securely as possible in its intended place.
Table. What are the different ways to attach skirting boards to the floor?
| Way | Description |
| Adhesive | The technique is not suitable for all rooms. It is used only if the walls are perfectly smooth. Otherwise, there is a risk that the plinth will eventually fall behind the wall or fall off altogether. It is also recommended to use this method only in rooms with 90 degree angles between the walls. The method is simple and allows you to carry out work very quickly. Liquid nails can be used to secure the baseboard. The method is irrational, since it will not allow the plinth to be reused, and there will also be problems with dismantling in the future. It is recommended to use this method for MDF products. |
| For screws or nails (straight) | In this case, any type of plinth is simply screwed or nailed to the walls using screws or nails. The recesses that appear due to this type of work can be closed with special decorative plugs or choppers - just match them by color. This is not a quick, but the cheapest way to attach a skirting board. And plastic products have a special gutter, which is then closed with a plug - it is in the gutter that the procedure for fastening the product with self-tapping screws is carried out. |
| On brackets or latches | Used for mounting MDF or plastic skirting boards and is suitable for use in any room, even with uneven walls. However, despite the manufacturers' statements, such fasteners are quite fragile and, most likely, it will hardly be possible to re-attach the baseboard to it. However, such brackets themselves are reliable. |
Technology for fastening skirting boards with self-tapping screws
How best to mount - to the floor or wall
Some home craftsmen, when starting to install a decorative strip at the bottom of the wall, begin to think about where it is correctly attached - to the wall or the floor. If you follow Dahl's dictionary, you cannot attach the baseboard to the floor. This will be a fillet. Nowadays, they don’t pay attention to Dahl’s definitions - they attach them in different ways. And they rarely, but greatly regret it.
The fact is that modern building materials change their linear dimensions when the temperature rises: they expand. This applies to all types of laminate, parquet boards, block parquet, wooden floors, as well as cement-sand screed. If the plinth is attached to the floor with glue or through the floor covering with screws to the screed, then when the floor expands, the plank will be pressed forcefully into the wall. There is a gap for the screed, but not for the baseboard - the wall will simply squeeze it out of the adhesive layer or tear it off the screws.
Therefore, it is better not to consider the option of attaching the plinth to the floor at all, especially since manufacturers offer a set of related fastening elements only to the wall.
Features of fastening different types of skirting boards
In general, all existing methods for attaching skirting boards can be divided into two categories - installation by fastening to the floor and installation to walls. You will have to choose depending on the type of baseboard and the design features of the living space.
Features of installing skirting boards made of MDF and wood
Installation of wooden baseboards begins with treating the products themselves with varnish or other means that will protect them from rotting as a result of moisture getting on them. Skirting boards can also be painted after installation. Due to the fact that such a plinth practically does not bend, it is recommended that the bases, that is, both floors and walls, be well leveled with putty before installing it. Wooden plinths are usually attached using self-tapping screws or nails and can be installed either to the wall or to the floor. If necessary, it will be quite difficult to dismantle them without damaging them.
Wooden plinth
MDF plinths are usually mounted using special brackets (brackets), which are fixed to the walls. And if wooden plinths are simply sawed down for joining in the corners, then special plugs are sold for MDF material. If dismantling is necessary, such skirting boards can be easily removed and then put back in place.
On a note! It is recommended to start installing a plinth made of wood or MDF from the doorway, moving into the depths of the room from left to right.
MDF skirting boards
When forming the corners of such skirting boards, all cuts must be thoroughly sanded and treated with an agent that prevents rot and mold. Without certain skills, working with this type of material is quite difficult.
Features of plastic skirting boards
Plastic skirting boards can have a cable channel, or they can be produced without it. If the product has a place for laying wires, it will be covered with a plug. Thanks to this, all communications can be easily removed and repaired if necessary - you just need to remove this very plug. Once the work is completed, the bar is simply put in place and snaps into place.
Plastic skirting board
On a note! The solid plastic plinth also has special grooves on the reverse side where wires can be laid, but work in this case will be somewhat difficult. There will be no direct access to communications.
Installation of plastic plinth
The standard length of plastic skirting boards is 2.5 m, which ensures ease of transportation and installation. The cross-section of the plinth varies from 15 to 25 mm, and its height can vary - from 30 to 150 mm. Most often, products with a profile height of about 50-60 mm are used for installation in an apartment - they are called universal.
Advice! If the ceilings in the room are quite low, then you should not purchase a high baseboard. It will look ugly.
Table. Recommended baseboard height.
| Ceiling height, m | Height of plinth, mm |
| Up to 2.5 | Up to 70 |
| Until 3 | 70-90 |
| More than 3 | More than 90 |
Tools and supplies needed to install plastic skirting boards
Self-installation
In interior decoration, PVC and MDF profiles occupy leading positions. Installing skirting boards with your own hands from these materials does not require careful adjustment of joints or skill in working with metal, unlike polyurethane or aluminum products. All operations are quite simple and easy to perform independently.
General operating principles
All types of skirting boards require fastening to the wall, and not to the floor covering, since the connection ensures the mobility of the material during temperature fluctuations. In any case, the connection should be tight enough, but not pinched, to prevent debris from getting under the bar, but allow the coating to move freely.
Installation of baseboards is carried out after completion of finishing work - painting or wallpapering walls, laying laminate, linoleum or parquet. Installation must be carried out carefully, without damaging or staining the finish.
Calculation of the length of the plinth for the room
Skirting boards are installed around the perimeter of the room. To find how many planks are needed, the length and width are measured in a room with standard geometry. By multiplying the sum of the sides by 2 we get the perimeter. A 10% reserve for cutting waste is added to the result.
The standard length of profiles is usually 2500-2700 mm. To determine the number of slats, you need to divide the perimeter by the length of one element and round up.
If the room has a complex shape, the length of each wall is measured, and the perimeter is found by adding all the values. Doorways, built-in wardrobes, protruding fireplaces and other interior elements where installation of baseboards is not needed are taken from the calculation.
It is better to lay a whole strip in visible places, and place joints at less noticeable points. Therefore, it doesn’t hurt to do the layout on a small drawing. It will also help you correctly calculate the required number of connecting parts.
Mounting accessories
Accessories for installing skirting boards will help hide the joints and neatly arrange the corners. For PVC moldings it is produced in the following types:
- plugs - cover the ends, can be right or left;
- connectors - mask the joint between the planks along the length;
- corners - depending on the configuration of the corner, there are external and internal.
To join wooden and MDF skirting boards, you can purchase columns of suitable thickness. They are installed in the corners, with plugs of the corresponding color glued on top.
If the necessary fittings are not available, the corner elements are cut at 45° using a miter box or a circular saw. Along the length of the planks, they are glued together with silicone glue with a pigment of a suitable color.
Workplace organization
Since installing skirting boards on the floor is the final stage of finishing, it is advisable to protect all surfaces that may be damaged or dirty with paper or film. The workplace should be clean and bright. If you are going to use glue, you need to ensure good ventilation.
To work with a miter box or circular saw, create a flat, open area on the floor or cutting table. All power sources for power tools should be located at a safe distance from people, and wires should be kept away from moving devices and mechanisms.
Moldings are stored in the room. Waste is removed in a timely manner. Work is carried out only at positive temperatures, since most materials do not tolerate a lack of heating.
Methods for attaching skirting boards to the wall
The fastening of skirting boards should ensure strength and be as inconspicuous as possible. The following are used as fasteners:
- Self-tapping screws for drywall. Designed for walls made of plywood or plasterboard, screwed with a regular screwdriver through the mounting holes.
- Dowel-nails. A hole is drilled in concrete or brick walls, where a dowel is driven in, and a self-tapping screw is screwed into it;
- Plastic or metal clips. The fastener in the form of special brackets is screwed to the wall, and a profile made of MDF or wood is mounted on it.
- Guides. Using narrow slats, wide wooden or MDF baseboards are installed.
- "Liquid Nails". The glue does not contain toxic substances and forms an elastic, moisture-resistant compound. It retains a viscous consistency for a long time, which allows you to work with it for a long time.
According to the observations of many installers, the best results are obtained by the combined use of two options, for example, clips and glue. In the event of an impact, such a connection is more reliable than a one-component one.
Types of plastic skirting boards
If you go to a good hardware store, you might be surprised at the variety of plastic skirting boards manufacturers offer. They differ not only in size, but also in shape, texture, etc.
Wide PVC plinth
For example, skirting boards can be divided into those that are used for installation together with carpet, and those that are universal. The latter can be used with any floor covering, while the former have special grooves. This type of plinth usually has the shape of the letter “L”.
Also, plastic skirting boards can be divided into categories according to the material of manufacture:
- made of PVC foam - a hard, elastic, but rather fragile option, does not have voids inside;
- made of hard PVC - hollow, durable, but quite simple, rarely used in luxury premises;
- made of semi-rigid PVC - resembles a foam baseboard, very flexible, sold in rolls. Looks nice, quite narrow.
Plastic snap-on skirting board
What is a plinth
In the middle of the 19th century (according to Dahl), a shelf at the base of a column was called a plinth. Later, a small-height plank covering the junction of the wall and the floor along the entire perimeter of the room received the same name. But there is one nuance here: a strip is called a plinth only if it is attached to the wall. If the fastening is made to the floor, then it is a fillet. By the way, the same interpretation of the word applies to the ceiling strip: attached to the wall - a ceiling plinth, to the ceiling - a fillet.
According to the site’s editors, a couple of centuries ago they had a better understanding of terminology: everything was clear and unambiguous, no confusion.
According to its intended purpose, the plinth can be:
- ordinary. The main task is to hide the junction of the floor covering with the wall. Made from wood, plastic, aluminum, MDF, ceramics, etc.;
- for carpet. The special shape of the plastic plinth allows you to glue the floor covering inside the decorative panel, creating the appearance of integrity of the floor with the plinth;
- fluted. A decorative strip of a special shape that makes it possible to install linoleum on the wall. Used in places with increased requirements for cleanliness: hospitals, clinics, sanatoriums, etc.
- tape. Flexible PVC tape is used to finish the joint between a floor and a wall of complex geometric shapes: columns, convex or concave surfaces, semicircular corners;
- cable channel. A decorative strip with a cavity inside or a groove that allows you to hide wires and cables. The latest fashion is special sockets that are attached to the baseboard.
Euro plinth with Euro socket.
What is it needed for
Installing a skirting board on the floor solves several problems at once. Firstly, it closes the technological gap between the wall and the floor covering from dust and dirt getting there. Secondly, it protects the edge of the floor from mechanical damage. Thirdly, it serves as a channel for laying wires and cables. Fourthly, and this is the most important thing, it is an important finishing element when decorating the interior of a private house or apartment.
Advantages of plastic skirting boards
It is not for nothing that plastic skirting boards occupy a leading position in the building materials market. They have a lot of advantages:
- light and quite flexible;
- can be installed using almost any method;
- do not require pre-treatment before installation;
- have a long service life;
- are not afraid of water and ultraviolet radiation;
- do not rot;
- easy to install;
- do not require special care;
- They can have any color and a lot of variations in size.
Installation of plastic plinth with cable channel
Disadvantages of plastic products
- Use of auxiliary elements: plugs, corners, fasteners and connections. It is impossible to see all this in the finished design. In addition, after installation with your own hands, these parts often fall off during operation. The problem is small, but it makes its contribution.
- Imitation of natural materials. Appearing to be something you are not is always not very good, even if you are a baseboard. Not always worthy, not always high quality. Although this very drawback can serve as an advantage for someone: it’s like wood, but you pay less.
- Often cable channels do not contain all the wires that need to be hidden. But this is a drawback not only of plastic strips.
USEFUL INFORMATION: 3D floors in the bathroom and toilet: 9 photos, price, technology
Installation accessories
Plastic skirting boards are convenient because manufacturers sell a large number of components for them. These are internal and external corners, as well as connectors and plugs. Depending on the color and size of the plinth, they are easy to choose.
Accessories for plastic skirting boards
Corners allow you to make beautiful joints between skirting boards in the corners, and connectors allow you to harmoniously join two separate planks. Plugs are used to cover the edges of the plinth after installation is completed. Corners are internal and external, and caps are left and right. This is important to consider when purchasing material.
How to attach the corners of a plastic floor plinth
Attention! All components for products are purchased separately.
Accessories for joining rails
Plastic plinth is also good because it has special fittings, thanks to which high precision is not required when cutting. Therefore, installing a plinth can be done by a home craftsman, even if he has no experience in this matter. The beautiful appearance of the result of the work is ensured by the design of the plinth.
The plastic plinth fittings kit includes five elements: right and left plugs, a connecting element for the plinth slats, internal and external corners. They exactly match the baseboard in color and texture and are sold separately.
The photo shows the external and internal views of the right plug. The left plug is exactly the same, but made in a mirror image. Therefore, when calculating the number of fittings, this fact must be taken into account. The plug has a tab with a hole for fastening it to the wall with a self-tapping screw. This element of fittings is usually installed on the end of the plinth strip near the door frames.
The connecting element is used to close the gap between the skirting board slats when the length of the wall exceeds the length of one plinth rail, usually equal to 2.5 m.
The photo shows a connecting element installed on the slats; on the nearest rail, the decorative plug for the cable channel has not yet been inserted.
In this photo you can see the inner corner. It is held in place without screws, by pressing the baseboard with slats. When installing the plinth, you need to ensure that the corner is pressed equally, otherwise it may be installed crookedly and will look careless.
And this is how the outer corner is arranged from the inside. It has two legs for attaching to the wall. I rarely have to use the outer corners, but I was “lucky”. When installing the plinth, it was necessary to install eight such corners.
Calculation of the required amount of material
Before you begin installation, you need to make a series of calculations to find out how much skirting board you will need to decorate the room. But it is quite easy to calculate its quantity. The perimeter of the room being renovated is measured without taking into account the width of the doors. Next, the resulting value is divided by the length of one baseboard. Thus, we get the required number of parts. However, it is important to remember that you need to purchase skirting boards with a margin of at least 0.5 meters. This is necessary to compensate for possible errors.
We make calculations
The number of external and internal corners, as well as plugs, is also easy to calculate. The external and internal corners in the room are calculated, and materials are purchased in accordance with the obtained values. There will be enough plugs at the rate of 2 pieces per doorway.
The fasteners are calculated as follows: the perimeter of the room is divided by 50 cm. And the same number of dowels or screws will be needed, but it is better to purchase 10 more pieces in stock.
Calculation of the number of plinths
Advice! In order not to make mistakes when calculating the amount of materials, it is recommended to carry them out (calculations) 2-3 times.
Installation of skirting boards
Installation of a floor plinth is the final stage of renovation of a room in an apartment and is performed when the ceiling and walls are repaired and the floors are laid.
Cut out the baseboards
Start installing the plinth from the inner or outer corner or from the door. To do this, install the two required fittings in the required places, insert the end of the plinth strip into one of them, and make a mark on the plinth near the second element, taking into account that the plinth strip should extend 5 mm inside the corner or plug.
First, it is advisable to install the baseboard slats, which will not need to be cut. In this case, it is advisable to ensure that the connecting elements are located in places that will later be covered by furniture.
If the plinth strip cannot be placed at the installation site due to its greater length, then the distance between the fittings elements is measured with a ruler and 10 mm is added to the result. Then a mark for sawing is applied to the baseboard strip. When marking with a ruler, it is better to add a couple of millimeters of length than to make the baseboard shorter. The excess can always be cut off.
Sawing the baseboard
Sawing plastic skirting boards is much easier than fillets, since there is no need to withstand sharp corners. All ends have a right angle. But nevertheless, if the end of the rail is crooked, then the internal corners, since they are not secured, may be installed skewed. Therefore, it is still necessary to ensure that the end of the plinth is at a right angle when cutting.
More precisely, it is more convenient and quick to cut the baseboard with a hacksaw for metal, in a device called a miter box. If the miter box is not available, then I advise you to definitely purchase it. You can make a miter box yourself in a couple of hours from scrap material; it will be even better than a cheap store-bought one made from plastic.
Sawing in a miter box guarantees not only right angles of the plinth slats, but also makes it possible to saw off sections just one millimeter long.
After trying the slats in place, you need to use a knife to remove the burrs formed during sawing from the ends.
Drilling mounting holes in walls to install skirting boards
Perhaps the most important operation when installing a floor plinth is drilling holes for mounting it on the wall. The result of the work ultimately depends on the accuracy of the height of the drilled holes.
The simplest device-conductor, made in five minutes from scrap material, and a drill with a hammer drill function allows you to drill even in a brick or concrete wall, without difficulty, even for inexperienced craftsmen, with high accuracy of the resulting holes. You can learn how to make your own jig for precision drilling, choosing a drill and a drill bit from the website page “Drilling holes in walls.”
For smooth walls, holes are drilled at a distance of 50 cm from each other. From the floor level at a height equal to the distance from the floor level to the middle of the cable channel of the installed baseboard. Since more force is not required to securely hold the plinth, it is enough to use a dowel with an outer diameter of 6 mm, a length of 30 mm and a self-tapping screw 3.5 × 25.
After drilling the holes, be sure to remove all the dirt that appears. A vacuum cleaner is convenient for this. But you can simply sweep the dirt onto a dustpan with a brush.
Installing skirting boards on a plasterboard wall
If the walls in the room are made of plasterboard mounted on a metal frame made of profiles, then the line of attachment of the plinth may fall on the profile, which usually has a width of 30 to 50 mm. In this case, the plinth is fastened without using dowels by directly screwing the self-tapping screw into the profile wall.
It is enough just to first drill a hole in the profile with a metal drill with a diameter a couple of millimeters smaller than the outer diameter of the self-tapping screw. Here it is highly advisable to use the jig mentioned above, since the drill can easily move away from the drilling site. You can do without drilling if you use special self-tapping screws with a drill at the end. To check the possibility of fastening to the profile, it is enough to pierce the drywall with an awl at the level of the baseboard fastening. If the awl rests against the metal, then dowels will not be needed.
One of the walls in my hallway was made of plasterboard on a frame. But I was unlucky, because for the linoleum flooring the floor was leveled with plywood and its level rose by several centimeters. Therefore, the line of attachment of the plinth was higher than the profile of the frame. I had to use dowels specially designed for mounting on plasterboard walls, called “Butterfly”.
For your information, one “Butterfly” dowel installed in a plasterboard wall can withstand a load of up to 10 kilograms. Therefore, with its help, you can securely mount not only baseboards, but also a TV, shelves, paintings, mirrors and other household items on the wall.
To install a Butterfly dowel into a plasterboard wall, you must first drill a hole in it to ensure a tight fit of the dowel in the wall. You can drill with any drill using a jig. Next, you need to press the protruding parts of the dowel rod against each other, so it can be easily inserted into the wall hole. All that remains is to apply a few light blows with a hammer to the dowel head and you can begin attaching the plinth.
It should be noted that the diameter of the self-tapping screw should be slightly smaller than the diameter of the hole in the dowel head, the length of the self-tapping screw should be no less than the length of the compressed dowel, since the self-tapping screw is not screwed into the head of the dowel, but into its movable end.
Attaching the skirting board to the wall
Some craftsmen suggest first drilling holes in the baseboard slats and then drilling into the wall using them, using dowels with caps. But this method cannot guarantee the accuracy of installation of the plinth and in any case, even with diligence, gaps will appear in some places.
If necessary, for example, when laying a cable behind a plinth or replacing linoleum, dismantling a plinth fixed in this way will be very difficult. In addition, dust and crumbs from drilling will remain behind the baseboard, which I consider unacceptable. Therefore, I use, as you already understood, a different fastening method that guarantees high quality work.
It is best not to drill holes for self-tapping screws in the baseboard, but to pierce them with an awl. As an awl, I use an old screwdriver, the blade of which is sharpened to a triangular point. When rotating, the edges of the awl push the material apart, which makes the edges of the hole tighter. In Soviet times, the tool was made from tool steel, which had high hardness and at the same time was not brittle. That’s why the screwdriver awl serves me for many years, it doesn’t get dull or break. And thanks to the presence of edges, a hole with such an awl can be made without a drill, even in plywood.
To get a hole in the right place on the baseboard, you need to attach it to the wall at the installation site. Apply a mark in the center of the cable channel, move the baseboard away from the wall a little so that the dowel is visible, and pierce a hole according to the mark strictly along the line where the dowel is located. Now all that remains is to screw the self-tapping screw threaded through the hole made into the dowel, and the plinth will be securely and accurately fixed to the wall.
Installing the outer corners of the baseboard
The outer corners of the baseboard are often in an area of heavy traffic and are more likely to get caught. Therefore, the fastening of external corners must be approached with full responsibility. Since the corners are attached to the wall only two centimeters from the corner, drilling a hole for the dowel can chip the corner. Therefore, even at the repair stage, when leveling the outer corners of the walls, it is necessary to provide for the possibility of securely fastening the outer corners of the plinth. If the profile is not used when leveling the corners of the walls, then you can only lay a section of at least 20 cm long from the floor in the area of future fastening of the plinth corner.
If the perforated corner profile is laid in advance, then all that remains is to pierce the baseboard and tin of the profile with an awl and screw in a short self-tapping screw with a thread that reaches all the way to the cap. To securely hold the corner, it is advisable to place a washer under the screw. The self-tapping screw is easier to tighten if you hold it with tweezers with bent ends.
Fastening the outer corners of the plinth to plasterboard walls is done using the same technology, since usually plasterboard sheets are attached to a metal profile, and, as a rule, self-tapping screws can be screwed into it.
All that remains is to install the decorative plugs for the cable channel. To do this, the plug is bent, its ends are inserted behind the fittings, after which it is straightened and tucked into the cable channel.
Required Tools
To install a plastic plinth you will need a small set of tools:
- perforator or drill - to create holes in the walls for fasteners;
- screwdriver - for quickly tightening screws (you can get by with a screwdriver);
- tape measure - for taking measurements from walls and measuring plinth cuts;
- marker – for marking;
- metal hacksaw - for cutting baseboards;
- awl – for forming holes in the baseboard for self-tapping screws;
- miter box - convenient for forming corners when cutting;
- sandpaper - for sanding cuts.
What is needed to install the skirting board?
Preparatory work
Work begins with the calculation and purchase of the required baseboard footage, selection of components, preparation of surfaces and tools. You can use online calculators to calculate the amount of materials. The initial data for the calculation is the total perimeter of the walls (measure at least twice with a tape measure), the length of the baseboard itself, the number, dimensions of doorways, turns, niches. The resulting figure is rounded up to a multiple of 2.5 m (or another value for a non-standard plinth length).
Types of components for floor plinths
Simultaneously with the footage of the floor plinth, other components are calculated:
- Connecting profile installed when the length of the room exceeds 2.5 m.
- End caps in areas of doorways (left, right).
- External and internal corners. These elements are often supplied in pairs; in non-standard premises their quantity is checked several times.
- Fastening materials are divided depending on the installation method (clips, screws, dowels, liquid nails).
All additional elements must match the size, shape, and color of the baseboard. Connecting couplings must be calculated with a small margin; complete coincidence of the dimensions of the walls in the room with the length of the profile is rare. The number and type of fastenings depend on the wall material and the width of the profile; the recommended position of the screws is within 25-40 cm.
Working tools are also selected taking into account the material of the walls and the method of attaching the planks. Installation on concrete walls is carried out with an impact drill or hammer drill; for mounting on drywall or wood, a screwdriver or a regular drill is enough.
Additionally you will need:
- Measuring and marking tools - tape measure, pencil, square, level.
Measuring and marking tools - A carpenter's miter box or machine to simplify the process of cutting at an angle.
Carpenter's miter box - A hacksaw or grinder (circular saw) with a thin disc. A hacksaw makes neater edges (and is necessary for minor adjustments to the dimensions of components); a grinder can be used to carry out sawing work quickly, but with little loss of material.
A circular saw - Short knife for removing plastic deburrs.
- Construction vacuum cleaner for removing dust and debris after drilling holes in walls.
Construction vacuum cleaner - Heterogeneity detector for identifying hidden voids in walls.
Installation of plastic plinth
Step 1. Installation begins with taking the necessary measurements and marking the plinth for future cutting. The plinth is cut in accordance with the measurements taken.
Measurements are being taken
Marking the plinth
Step 2. To make it possible to install the baseboard, the protective strip is removed, under which a place for screwing in self-tapping screws and a cable channel is revealed.
The protective strip is removed
Step 3. A piece of plinth is applied to the place where it will be attached.
A piece of plinth is applied to the installation site
Step 4. The inner corners of the plinth are installed. An inner corner is placed on one of the sections of the plank.
Installing the inner corner
Step 5. A piece of plinth with a corner attached is applied to the wall at the attachment point.
A piece of plinth is applied to the wall
Step 6. Holes for dowels are drilled. You can drill directly through the baseboard.
Drilling holes
Step 7. Dowels are inserted into the resulting holes. Next, the plinth is attached using self-tapping screws.
Dowels are inserted into the holes
Fixing the baseboard with self-tapping screws
Step 8. The next part of the plinth is inserted into the previously installed inner corner. The procedure of drilling holes and fastening the plinth with self-tapping screws is repeated.
Installing the next part of the baseboard
Step 9. The cable, if any will be laid inside the baseboard, can be laid step by step already at this step.
Cable being laid
Step 10. An outer corner is fixed to the edge of the plinth piece, and the next piece of plinth is inserted. It is being secured.
Installing the outer corner
Step 11. After installing the baseboards and laying the wires, the cable channels are closed with a decorative plug.
The channel is closed with a decorative plug
Step 12. Individual products are connected to each other using special connectors. Plugs are placed on the edges of the plinth in the required places.
Example of connecting two elements
Video - Installing a plastic skirting board
Video - Installing solid baseboards
Prices for plastic floor skirting boards
plastic floor plinth
Laying cables under the baseboard
The plinth with a channel for wires is laid on the floor according to the same principle as the rest. The only difference is the laying of the wires inside the strip. The wires can be laid in a channel located above the screws or after installing the structure. The wires are laid into the resulting channel, and the bar is installed in its original place. Additional holes for wires are made at the connection points.
Some types of skirting boards come with a convenient special channel for placing wires. It has a special cover according to the color and design of the floor plinth. Thanks to this cover, you can quickly and easily repair or replace wires with others.
The plastic plinth has a small channel for the cable, so wires that will serve for a long time should be attached under the plinth, and all the rest in the outer channel.
When deciding how to mount the baseboards, you should decide how the wires will be laid in the room, what method and what the floor cornice will be mounted to. By performing the installation carefully, taking into account all the tips, the floor covering will turn out beautiful and neat.
Technology for fastening skirting boards with liquid nails
Installing skirting boards using liquid nails is quite simple - this is one of the easiest methods for installing this type of product. You just need to level the walls and you can start working. This installation method is best suited for plasterboard walls. Installation of the plinth is carried out starting from one corner. Liquid nails are applied dropwise to the wall at a distance of about 3-5 cm from each other. It is desirable that the step be the same. Next, the plinth simply adapts to the walls. The glue can also be applied to the product itself. The plinth is pressed against the wall very tightly and is kept pressed for about 60 seconds.
Installing MDF plinth (white enamel) on liquid nails
Installing skirting boards is a job that even a beginner in the field of repairs and construction can do. The main thing is to understand the principles of working with these products, and problems will not arise. And it is also important to choose high-quality material – both fastening and base.
How to properly screw a plinth with self-tapping screws
The method is reliable, but requires careful monitoring of the correspondence of the markings of holes on the walls and the profile itself.
It is recommended to prepare the holes using the through method (the plank is pressed tightly against the wall and drilled together with it).
Drilling together with a strip
With clamps, the fastening step also increases on long straight sections up to 50 cm and is reduced on corners and complex sections to 10 cm.
Fastening pitch measurement
Then the dowel heads are hammered into the holes.
Dowel installation
The plastic panel is fixed with self-tapping screws.
Fixing the baseboard with self-tapping screws
The edges of the plank are also covered with connecting or corner elements before installing the next section.
Installation of corner joint
Measuring the length of the plinth
Installation of external corner
The main difficulty is correct fastening. When fixing plasterboard wall sheathing, concrete or similar stable bases to the floor profile, no problems arise; the profile is simply screwed on with self-tapping screws. When installing on regular plaster sheets, porous ceramics or similar walls with voids, it is worth using butterfly or “Molly” dowels.
The fineness is due to the drilling of the holes. It is not recommended to use large-diameter drills when preparing preliminary holes (the dowel head will not hold well).
After preparing all the holes, the walls are cleaned of dust (with a construction vacuum cleaner, or if one is not available, with a broom, brush or rag).
Cleaning the premises
Sequence of work
First of all, markings should be applied to the wall to place the fasteners. Using the markings, holes are drilled in the wall to match the dimensions of the dowels, and then they are installed. The clip is screwed to the wall using a screw.
All subsequent fastenings are screwed in the same way. This method is optimal when working with brick and concrete walls. If the wall is wooden, then self-tapping screws are suitable for fixing the clips.
The distance between fasteners can be 50 cm, provided the surfaces are smooth, or 20-40 cm if the walls have uneven surfaces.
You can mount the baseboard itself into the installed fasteners, having previously cut it to the length of the wall.
In this case, no special knowledge is required on how to install floor plinths with clips. All you need to do is lean the baseboard against the latches and press until it clicks. Between adjacent sections, connections are put on the ends of the plinth for ease of joining. Each subsequent panel is attached to clips in the same way.
At the end of the work, the open ends must be closed with plugs, and the joints in the corners with special corners. To keep them more secure, you can place these elements on liquid nails.
For carpeting, specially shaped skirting boards are produced with recesses for the edges of the coverings. These skirting boards do not need to be removed if you decide to replace the floor covering.
What types of floor skirting boards are there?
Not so long ago, the range of skirting boards offered by trade was quite meager. On sale it was possible to find only wooden products of rather rough processing, not distinguished by the variety of relief. Everything more original was made exclusively to order from good craftsmen, and cost accordingly... Today, a very wide assortment is presented, with variety in the material of manufacture, in the design and installation features, in the presence of additional functions, in their external decorativeness.
- First, let's look at the varieties by area of application. For convenience, in an illustrated table:
| Illustration | Scope of application of skirting boards |
| Universal skirting boards remain the most popular, as they are used everywhere in both residential premises and public buildings. Most often you have to deal with them. | |
| Flexible plinth strips are designed for rooms with non-standard curved walls. Such products are also suitable for framing round columns. | |
| Fluted skirting boards, used for decorative flexible coverings, allow for a neat, smooth approach of the canvases to the wall. | |
| Carpet or frame skirting boards are used to form a framing strip on a wall of decorative flooring. | |
| Special skirting boards, resistant to serious mechanical stress, are used in residential and public premises with high intensity of movement of people and/or carts with loads. |
- According to the configuration of the relief of the “facade” side of the product, it can be divided into traditional ones - with one smooth internal and external curve, curly ones - with a complex relief, and modern straight versions, on which no relief is provided at all.
Three main types of skirting boards based on relief patterns
- According to their size parameters they are divided into:
— Skirting boards with a height of up to 40 mm (small).
— Planks with a height of 40 to 70 mm are the most common standard.
— High skirting boards from 70 to 150 mm, and sometimes even higher, most often used in rooms with high ceiling heights, and when implementing some special design ideas.
— The thickness of the products (in the widest part, of course) can be small, about 10-15 mm, or quite solid 30÷40 mm, depending on the configuration of the relief;
— The length is usually standard, from 1500 to 3000 mm, depending on the material of manufacture.
- According to the method of decorative cladding, skirting boards can be:
— Wooden products, processed and primed, prepared for painting.
— Painted with moisture-resistant compounds, or painted in the mass (for polymer products).
— Skirting boards with a decorative coating that imitates the texture of wood, stone and other materials.
- Based on the material used to make the plinths, they are divided into:
— Wood products.
— Planks made of wood-based composites (for example, plywood, MDF).
— Polymer skirting boards (polyurethane, vinyl, etc.)
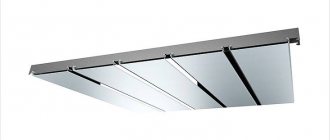
- Metal.
It makes sense to continue the conversation by considering the properties of skirting boards, which are determined precisely by the material of their manufacture. It is this criterion that most often turns out to be decisive when choosing products.
Which is better - plastic or wooden baseboard?
Skirting boards made of wood are more environmentally friendly, however, their service life is somewhat shorter. But products made from synthetic plastic, although unnatural, can last up to 100 years.
Plastic skirting boards successfully compete with wooden and other varieties of these products.
The following advantages of plastic skirting boards can be mentioned:
- Can be used in a wide variety of rooms - kitchens, bedrooms, children's and living rooms, bathrooms. A wide range of colors of plastic skirting boards allows you to choose a harmonious combination with the coating and the overall interior.
- Plastic skirting boards are convenient to install because they are stronger, more flexible, and easier to cut.
- They are characterized by fire safety, that is, non-flammable.
- They lend themselves well to wet cleaning and are not afraid of water.
- Available at a price for every buyer.
In addition, plastic skirting boards are often equipped with special gutters through which wiring or other communication cables can be laid.
Thus, we believe that plastic skirting boards in many respects, as a rule, turn out to be much better than wooden ones. The only exceptions can be cases when the interior of the room requires only wooden baseboards.
Advantages and disadvantages of skirting boards
The advantages of baseboard floor framing are that wires are hidden behind them and heating elements are installed. If you make skirting boards on the floor with fasteners, they are disassembled for cable inspection and repair. There are options with an external channel for wires with a snap-on longitudinal panel. Elastic seals are provided on both edges of the strip so that the nervousness of the wall is not noticeable.
Disadvantages of materials may manifest themselves in the fact that budget types of skirting boards are not suitable for expensive coatings, as they reduce the cost of a stylish interior solution. Caring for the strips is simple; they are washed with a damp cloth, but this cleaning method is not suitable for MDF skirting boards, as it accelerates their destruction.
Components
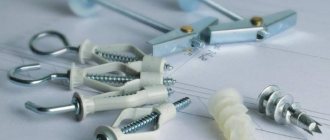
Fasteners and screws for installing skirting boards
Connecting or transition elements are designed to create a continuous contour and connect the planks in straight sections. If there is wiring, it goes through them easily.
Other details to achieve a harmonious floor frame:
- external and internal corners to insert lamellas at right angles at the junction of walls; the corner can be assembled at an angle of 45 or 135°; corresponding elements are produced for this;
- plugs can be installed in the area where curbs adjoin the door casing or in other blind places.
Mounting brackets can be placed on the wall to allow the baseboard floor frame to be dismantled if necessary.