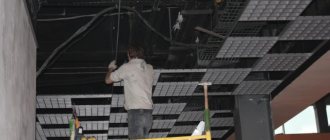
High humidity and constant temperature changes are the eternal companions of kitchens and bathrooms. High performance characteristics, presentable appearance and ease of installation are just some of the positive properties that speak in favor of aluminum slatted ceilings. We invite you to familiarize yourself with the features of this design and the technology of its installation. In this article we will tell you how to properly make an aluminum ceiling with your own hands, show photos and video instructions.
Characteristics
Slatted ceilings are one of the types of suspended ceilings. The suspension system allows you to attach slats made of different materials, including aluminum. They are made from plastic, aluminum or steel tape having a thickness of 0.4–0.7 mm, a length of up to 6 m and a width of 50–300 mm.
If you order blanks for a slatted ceiling according to individual dimensions, then you will be given the length of the slats with an accuracy of up to 1 mm.
Installation of the aluminum slatted ceiling is carried out only after completion of plastering and subsequent complete drying of the walls and floor finishing.
Selection of aluminum ceiling panels
To minimize the cost of purchasing material for installing an aluminum system and to have confidence in the quality of the purchased structure, you need to pay special attention to the selection of aluminum strips. It is worth considering the following factors:
- length - on sale, as a rule, there are planks 3-4 m long; if these dimensions are not suitable, then you can seek the services of a construction company that cuts the material;
- width - unfortunately, the choice is small and the width of the panels varies from 9 to 20 cm, the best option is to choose a material with a width of 10 cm;
- thickness - this indicator directly affects the reliability of the entire structure; the ideal thickness of the slats for aluminum systems is considered to be 0.5 mm.
You can find several types of slats on sale:
- closed slats - in appearance they resemble wooden lining;
- open slats - when installing them, a small gap is required; they are recommended to be installed in rooms where the ceiling height exceeds 5 m;
- with open inserts - they resemble open slats, only during the installation process the gaps left are masked with aluminum strips.
When choosing an aluminum ceiling, you should pay attention to the presence of a protective film and absence of damage. The quality of the ceiling depends entirely on the thickness of the purchased slats.
Advice! The color of the aluminum ceiling must match the design of the room. If necessary, the ceiling can be painted using enamel for this purpose.
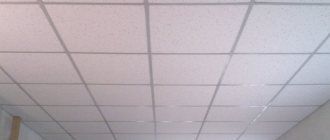
Types of slats
If you decide to install a ceiling made of aluminum panels in your bathroom or kitchen, then you will not regret it one bit, as it is not only reliable and durable, but also fits into almost any design. A large assortment of slats is able to satisfy the needs of even the most demanding customers. The slats come in smooth and perforated, matte and glossy. They imitate the texture of wood and even leather. As for the shape of the slats, they are rounded and rectangular. The huge number of colors and shades is simply amazing. The slats are installed lengthwise, across the ceiling and even diagonally. Thus, you can visually reduce or increase the space.
Such ceilings also differ in their inter-river joints. With open installation, small gaps of 15 mm remain between the rails. A decorative profile is attached to them. With a closed joint, the aluminum panels overlap each other. There are also slats that are joined closely, resulting in a blind joint, that is, without gaps.
Advantages and disadvantages
Perforated stretch ceilings are not only beautiful, but also practical. Speaking about the positive aspects of this type of design, the following should be highlighted:
- due to perforation, you can create almost any pattern or design;
- it is easy to hide communications, including the ventilation system;
- There are practically no restrictions in terms of color - the color of the ceiling, like the lighting, is chosen based on the wishes of the customer.
However, along with the advantages, there are also several disadvantages:
- such ceilings are difficult to install in small rooms - installing a ceiling “takes away” about 12 centimeters of the room;
- Caring for a perforated stretch ceiling is more difficult, since it has holes and lighting.
It should be said that such disadvantages are rather the design features of this type of coating. Therefore, before ordering a perforated ceiling, you should make sure that it is suitable for the room.
What is a suspension system?
A comb or universal support rail, an angular profile, as well as an adjustable suspension are the main components of the suspension system. The comb is a galvanized strip with special clamps into which the slats are mounted and secured.
As for the suspension, it consists of a rod and a bracket. In this case, the rod is attached to the main ceiling, and the bracket is attached to the supporting comb. The suspended ceiling is installed at a distance of 5–12 cm from the main one. This distance is determined individually, depending on the communications located on the ceiling and personal preferences.
Briefly about the main thing
A slatted ceiling is a great way to make your ceiling stylish, unique and practical. Depending on the purpose of the room, interior and budget, you can easily decide on the type of future ceiling from the four most popular materials (aluminum, wood, MDF and plastic) and create your own classic or unique version. Installation work does not require special construction skills or special tools. If you have doubts about your own abilities, then it is not difficult to find professionals who can make your dreams come true.
Ratings 0
Calculation and purchase of materials
If you have already decided on the color and type of ceiling, then you need to calculate the amount of materials:
- Measure the perimeter of the ceiling. This measurement will indicate the required quantity of purchase of a U-shaped profile fixed to the walls, which will help to neatly adjoin the ceiling to the walls.
- Calculate the length of the combs. To do this, mark the ceiling perpendicular to the direction of the decorative panels, in increments of up to 1 m.
- Determine the area of the ceiling covering. To do this, calculate the total area of the room.
After this, you can buy the necessary set of materials for arranging an aluminum ceiling, according to the calculations you made.
Installation of slatted ceilings from PVC, MFD and WPC panels
One of the most affordable and practical options is ceilings made of PVC panels. Plastic is easy to clean and is not afraid of moisture, so it is very common in bathrooms, loggias and other rooms.
MDF and WPC panels imitate wood well. Widely used in office spaces. Unlike MDF, WPC is not afraid of moisture, and as a result is used for finishing gazebos, verandas and other outdoor spaces.
Assembly of a slatted ceiling made from PVC, MFD and WPC panels is simpler compared to a ceiling made from aluminum panels. The ceiling frame is made from gypsum plasterboard profile. After marking is completed along the perimeter of the wall, the starting flow profile is attached. Instead of stringers, a ceiling profile is used, which is inserted into a starting profile fixed to the wall and leveled using gypsum board hangers.
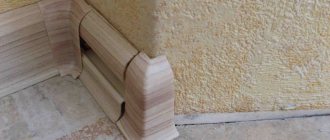
To connect the ceiling to the wall, a special ceiling molding is used, which is glued to the wall using liquid nails.
The process of installing a slatted ceiling made of PVC panels Source ytimg.com
Trimming the edges at an angle of 45° is carried out in the same way as for U-shaped aluminum ceiling profiles. The molding performs two functions: decorative (the role of a ceiling plinth) and a load-bearing one (for attaching the first panel from the wall to the wall). The second edge is secured to the ceiling profile using a press washer at the junction of the panels (the head of the press washer is hidden under the panel lock).
MDF and WPC panels are mounted in the same way, with the only difference being that special fasteners are used to attach them to the ceiling profile.
Tools
Before you begin installing an aluminum slatted ceiling, you will need to collect the following tools and materials:
- Ceiling kit with profiles, panels and stringers.
- Hammer.
- Dowel-nails and self-tapping screws.
- Suspension elements.
- Construction level, tape measure, marker and ruler.
- Screwdriver.
- Pliers.
- Drill.
- Knife and scissors for metal.
Release form and prices
Slatted ceilings for interior decoration are available in two forms - in sets or individual components. The kits are designed for installing ceilings in rooms of certain sizes, and the kit includes all the necessary parts. The only caveat is that the set may not include pendants, since the ceiling height varies. Also, such kits have one drawback - a small selection of colors.
If you want to purchase a specific ceiling tone, then you will have to assemble the components separately.
The cost of the slats is influenced by the width, type of profile, thickness of the material, length of the lamellas and their shade. The cheapest option is white flat strips 10 mm wide. Their price will be approximately 50 rubles per meter of length. Slats that imitate natural wood in color will cost twice as much with the same width. The most expensive type is chrome-plated strips. They will cost from 260 rubles per meter with a width of 10 cm.
Other items are much cheaper:
- profile – up to 180 rubles per 4 meters of length;
- decorative cap - from 60 to 370 rubles per 4 meters.
Marking
If you mark the ceiling correctly, the installation will proceed without any difficulties. So, first of all, mark the perimeter. This is necessary for attaching the U-shaped profile. If you are dealing with a perfect ceiling, then you are extremely lucky. In this case, you simply need to draw a line at the desired height from the ceiling.
In the process of marking the perimeter along a ceiling that has different levels, you will have to make more complex calculations. The distance from the edge of the wall in this case will depend entirely on the filling of the inter-ceiling space.
If no communications are hidden in the ceiling, then the distance from the rough ceiling should be minimal, namely 5 cm. But, before making the markings, decide whether you want to install lighting devices in the ceiling. If so, a 5 cm indentation will not be enough.
First stage of installation
Initially, you should prepare a frame on which the panels will be attached. To do this, install starting corners along the perimeter of the planned floor. It is important to control the entire process using a level and pay attention to the main recommendations. An additional control tool can be a tapping cord, which is used to mark installation lines.
Attention! It must be remembered that the corners are thin. Therefore they can bend easily. When installing yourself, you should carefully ensure that this does not happen. Rope loops installed in those places where the corners will fit will help with this. It is almost impossible to return the original shape of the starting profiles.
Once the starter rail is in place, the stringer mounting lines should be marked. They are installed perpendicular to the panels themselves at a distance of 5-6 cm from each other. Suspensions for these elements should be located at a distance of 6-12 cm. A correctly executed frame will ensure parallel installation of the panels themselves.
It is preferable to check the flatness. To do this, use an ordinary level or pull the control cord. If sagging areas are observed, they are tightened.
Fastening load-bearing elements
Using dowels, secure the U-shaped profile. Make indentations from the edges of 5 cm, and then make holes using a drill. The step between them for fasteners should be approximately 0.5 m.
Holes should be drilled from the outside of the profile. This measure will allow you to avoid the formation of burrs that will subsequently prevent the profile from adhering to the wall. Prepare places for hangers in accordance with the existing markings. Adjustable hangers make it possible to level the ceiling. The extreme points should be located from the end walls at a distance of 30–40 cm. Make intermediate points in increments of 1.2–1.5 m. Fix the stringers to which the aluminum slats will subsequently be attached. There should be a small gap of approximately 1 cm between the profile attached to the wall and the stringers. This condition is important to comply with so that the finished ceiling does not deform during temperature changes.
Installation technology step by step
Before you start installing a stacked ceiling made of aluminum panels, you need to determine its level relative to the floor and ceiling. The design of the slatted ceiling does not allow a deviation from the ceiling of less than 3 cm or 4 cm. This is the thickness of the stringer from different companies, which can be pressed to the slab with self-tapping screws, provided that its area is perfectly flat at the horizontal level.
In practice, this level is usually dictated by the size of the spotlight - 65 mm minimum with socket and wires. Tools you will need are metal scissors, a screwdriver and a hammer drill.
Mounting the corner to the wall
The end profile is installed on all side walls/partitions in stages:
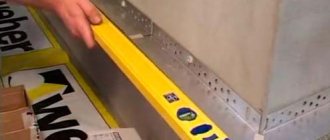
- marking reference points using a bubble, hydraulic, or laser level;
- drawing a horizontal level on the walls with a painter's cord or pencil according to the rule/level;
- fastening the profile along the lines with self-tapping screws or dowel nails, depending on the wall material.
Fastening the end profile for a slatted ceiling.
The edges of the elements can overlap each other, as in the photo below:
The junction of the end profile is overlapped.
Or cut at 45° each to improve the design of the structure
Junction unit with 45 degree trim.
The profile is fixed to concrete and brick walls with dowel nails. Fastening to the profile under the gypsum board sheathing and wooden partitions is carried out using self-tapping screws.
Installation of stringers
The supporting iron profile with slots in the form of locks (stringer, “comb”) must be in the same horizontal plane with the previously installed side corners. It should be taken into account that the metal element has a high coefficient of linear expansion.
Therefore, its length should be 10 mm shorter than the distance between opposite walls - 5 mm on each side to compensate for axial elongation when heating the air inside the bathroom.
Then you need to decide on the location of the decorative slats in the bathroom space:
- the stringer is located across the slats;
- the outermost “combs” are spaced from the walls at a distance of 15–30 cm, the interval between them is 120 cm;
- the distance from the hangers to the walls is 20 - 40 cm, between these fasteners 120 cm.
Stringer fastening diagram.
Depending on the lighting fixtures used and the required distance of the slatted ceiling from the floor slab, different options for attaching stringers can be used (see diagram below).
Methods for fixing the load-bearing profile to the ceiling.
Manufacturers produce 3D slatted ceilings with curved slats. The level of the horizontal position of the “combs” for them is indicated in the instructions without fail.
However, in the limited space of small bathrooms in typical apartments, they are used very rarely. Since they significantly reduce the level of the room and the comfort of taking water procedures.
Assembly of slats
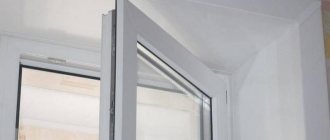
It is most convenient to start installing a suspended ceiling system from the wall. However, depending on the stringer locks, the first rail can be located either against the wall or at some distance from it. In the first case, one edge fits into the end profile.
Installation of the first rail close to the wall.
In the second option, a gap remains, so the stringer is cut to length before attaching it inside the structure.
The gap between the first batten and the wall.
Or the first plank is cut to width using metal scissors. One edge of it snaps into the “comb” lock, the other lies on the end profile.
Trimming the slats to width.
Later it will be tightened with a narrow strip - a layout at the final stage of installation.
Rigid fixation of the cut panel after snapping the layout.
All subsequent slats are snapped into the stringer in a similar manner. Slatted ceilings with gaps between the slats are considered standard. Therefore, at this stage the assembly looks like this:
Laying wide planks in a comb.
However, in some collections of domestic and foreign (narrow elements between wide slats) it is not used. Here the edges of the slats are curved in a special way; when snapped onto the stringer, they stand up without gaps and press against each other (see photo below).
In any case, the length of the rail exceeds the dimension between the outer edges of the end profile. Therefore, they are wound into place or diagonally.
Installing the planks in place with a diagonal offset.
Or they bend down in the middle, but only if the metal elements are long enough for this.
Installation of panels with a bend in the middle.
In a small room, it is impossible to bend a short plank, and when installing the last elements, the distance does not allow it to be placed in its place diagonally. In this case, another method is used:
- the slats are cut exactly to size;
- is pushed all the way inside one end profile;
- then moves slightly in the opposite direction.
Installation method with cutting to length.
When working, a home craftsman does not need assistants; the cordless, corded and hand tools usually available in his arsenal are sufficient.
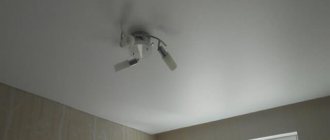
Installation of lamps
It is recommended to install light sources in a slatted ceiling at the same time as installing wide or gapless strips. Depending on the lighting devices used at this stage, the following options are possible:
- LED strips are glued to the edge of the slats and connected to a 12 V network at the assembly stage;
Installation of LED strips between ceiling slats. - if the panel width is sufficient, the spotlights are cut into the rail, the hole for this is drilled with a crown, or less often cut out with scissors;
Installation of a spotlight in a suspended structure. - for large-sized light sources, an opening is made locally in already assembled slats, its edges are reinforced with pieces of stringer, which do not need to be additionally attached to the ceiling.
Installation of a large luminaire in the plane of a slatted ceiling.
In any of these options, as necessary, you can disassemble the slats to replace or repair the light source or electrical wiring.
Fixing decorative inserts
At the last stage, you should install a “layout” - narrow strips of the same color as the wide panels or decorated with gilding or a mirror finish. Thanks to the special shape of the long sides, this is easy to do - the slats snap into the supporting comb profile between the wide panels.
PVC panels do not belong to a slatted suspended ceiling, but fall into the category of suspended structures, by analogy with lining. One of their edges snaps into the lock towards each other, the second is fixed to the frame with a nail, self-tapping screw, or clamp.
Thus, a prefabricated slatted ceiling can be installed by one craftsman without the assistance of an assistant within a few hours. You don’t need to buy a special tool; you can easily calculate the required amount of materials yourself.
Advice! If you need bathroom renovation specialists, there is a very convenient service for selecting specialists from PROFI.RU. Just fill out the order details, the experts will respond and you can choose who to collaborate with. Each specialist in the system has a rating, reviews and examples of work, which will help with the choice. Looks like a mini tender. Placing an application is FREE and does not oblige you to anything. Works in almost all cities of Russia.
If you are a master, follow this link, register in the system and be able to accept orders.
Assembly
Before installing the ceiling structure, cut the panels to the specified length. It is important to make them 3-5 mm shorter than the distance between the profiles into which the end sides of the panels will subsequently be inserted. Now it's time to assemble the ceiling surface. Insert the panels into the stringers until there is a characteristic click, indicating that the slats are fixed to the comb.
If the last panel does not fit, then there is nothing left to do but cut it. Mark the cutting locations, then make perpendicular cuts on the side of the panel to be removed. Panel sections formed by cuts should be broken off by bending/unbending the aluminum. Tuck the rail into the profile screwed to the wall with the cut side off, and fix the other edge to the stringers.
To make this process faster, install the cut panel next to last, and shorten the last panel by 14 mm.
When installing slats in series, you must insert them diagonally into profiles screwed to the wall. In contrast, the last panel must first be moved to the side, bringing its first edge into the profile as much as possible. This way, both ends of the panel will be evenly positioned in relation to the wall. Now you can fix the panel on the support rail.
Additional recommendations
Spotlights harmonize better with slatted ceilings. To do this, holes for them are made in advance. Draw a circle of the required diameter at the location where the lamp will be installed. From the center of the circle to the outer line, make cuts along the radius. To do this you will need metal scissors. Bend the resulting petals into the inner side of the ceiling. The installation of the lamp will be of better quality if you make narrow petals.
When installing an aluminum slatted ceiling, make sure that the integrity of the finishing layer of the panels is not compromised during the process. Scuffs, scratches and other mechanical damage will only worsen the appearance of the finished ceiling.
Anodizing panels provides the most stable and durable coating, as opposed to other types of decorative finishes.
No. 5. What else to consider when choosing?
When purchasing aluminum slats directly, pay attention to the following nuances:
- high-quality slats are supplied in a protective film , which significantly reduces the risk of deformation and damage during transportation;
- if you want to create the most durable and strong structure, then it is better to take slats with a specified thickness;
- poor sound insulation qualities can greatly spoil the impression of the entire slatted ceiling system. If the structure will be mounted in a living room, then it is better to take the so-called. acoustic ceilings, i.e. slats with soundproofing material glued to the back side.
Please note that the metal ceiling does not allow air to pass through. If the rest of the finishing materials in the room also do not “breathe”, or powerful ventilation is needed, then an exhaust duct can be installed in the ceiling space, and several perforated slats can be used to allow air to reach it. An alternative option to ensure proper ventilation is to use an open-type design without decorative inserts.
Now as for the manufacturers of slatted ceilings . If you need a solid guarantee of quality, then it is better to take products from foreign companies. We can recommend the American manufacturer Ceiling Group USA Corporation, the German Geipel and the Dutch Luxalon. Domestic manufacturers have recently also been offering products of good quality, and they are also somewhat cheaper. It is worth noting the slatted ceilings, “Albes” and “Lumsvet”.
Features of operation
Aluminum ceilings get dirty faster in the kitchen. However, they are quite easy to care for. They are not afraid of water. This means that the surfaces of such ceilings can be washed with a sponge in a soapy solution.
Slatted aluminum ceilings are environmentally friendly, so they can even be used in the bedroom and children's room.
When choosing aluminum ceilings, it is better to purchase high-quality ceiling coverings with a protective film. It will protect the ceiling from temperature changes, pollution, moisture and dirt. If installed correctly, your ceiling will retain its appearance for a long time. Installing a slatted ceiling resembles assembling a construction set. If you already have experience in this matter, we invite you to share it in the comments to the article. Have questions? In this case, ask them to a specialist on our website.
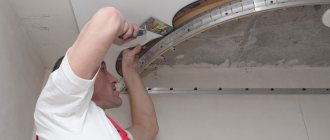
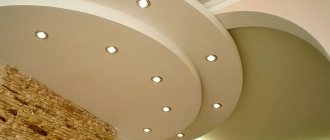
How to prepare for installation?
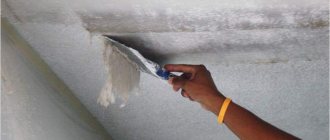
Installation diagram of a slatted ceiling
Before installation, which is simple, preparation is carried out. Initially, clean the rough ceiling surface. To do this, remove dust and dirt. After this, they begin to putty. This will get rid of cracks and cavities.
If you plan to install open panels, the structure is painted. To do this, select your preferred color. It may be slightly darker than the main slats or lighter than them. It depends solely on the desired result, the lighting that is planned to be installed.
After this, they begin preparing the electrical parts. For this cable, the connections are laid in bundles and securely fastened. The leashes should have a twisted appearance, and the bare ends should be properly insulated. The final stage is preparation of ventilation. It involves the installation of plastic pipelines underneath. They are mounted in inter-ceiling niches. After this, the sockets and grilles are installed, and after that the fan is connected and checked.
Ready-made frame for slatted aluminum panels
At this point, the preparatory work is considered completed. Now we begin to install the aluminum panels on the suspended slatted structure.