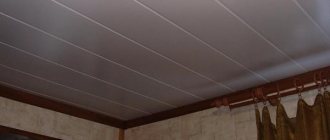
Due to their design, such hanging systems are installed both in offices and residential premises. Installation of this system is simple and quick, so even a beginner can handle it, and without outside help.
Before starting work, it is worth preparing the ceiling space: securely fasten all communications running under the ceiling to prevent them from resting on the frame of the ceiling system.
Advantages and disadvantages
Most often, Armstrong ceilings are installed in public institutions, when decorating offices, retail establishments, cafes, and they also fit well into the decor of apartments.
Among the advantages of these ceiling structures are:
- low cost;
- no need for preliminary preparation of the base;
- sufficient degree of sound and heat insulation;
- a wide variety of slabs allows you to implement any design solution;
- simple installation of Armstrong suspended ceiling, which does not require the participation of professionals;
- the ability to make communications and ventilation systems invisible;
- providing easy access to the ceiling space for inspection and repair;
- trouble-free installation of lighting devices;
- it is possible to dismantle and reuse elements of the system, since it is completely dismountable.
Armstrong has few disadvantages:
- it lowers the height of the room by no less than 20 centimeters, so using it in apartments is not always possible;
- the ceiling cannot be installed in a room with a non-standard configuration;
- the design will not protect furnishings in the event of a leak from above;
- it does not tolerate high moisture, from which organic slabs begin to get wet and undergo deformation.
The popularity of such ceiling systems, due to their numerous advantages, does not decrease. It is quite simple to install the Armstrong ceiling yourself, both in the office and in a residential area.
What kind of rooms is Armstrong suitable for?
In general, Armstrong can be installed even in a Khrushchev-era building, contrary to popular belief about the “officiality” of this type of ceiling. Only then there is no need to use spring-pin suspensions, and the inter-ceiling space will have to be significantly reduced (up to 120 or even 80 mm).
How will such a ceiling hang in an apartment? On tin or galvanized corners, secured with self-tapping screws. And the role of suspensions will be copper wire bundles (0.6-0.8 mm thick) made of several turns. And their length should be slightly greater than the height of the space between the ceiling and the structure being mounted. And despite the fact that there will be a little more fuss with the wire, the total installation time will not increase significantly.
Features of the structural device
Armstrong ceilings consist of a frame made of metal slats assembled in the form of cells measuring 60x60 centimeters. Soft or hard tiles of a certain size are laid on them.
Rigid elements are made from the following materials:
- whole or perforated sheets of metal;
- tree;
- plastic;
- mirror;
- glass.
Soft slabs are made from organic or mineral materials. Recently, due to the fact that preference is given to environmentally friendly finishing materials, mineral products have begun to be used very rarely, since they contain mineral wool, the smallest particles of which, upon penetration into the respiratory system, cause serious harm to human health.
To install an Armstrong-type suspended ceiling, soft organic tile elements are often used. They contain recycled cellulose raw materials, so they are completely safe, weigh little and are easy to cut if necessary.
To build the frame and finish it you will need:
- Ceiling tiles with dimensions of 60x60 centimeters.
- The supporting profile is T-shaped, 370 centimeters long. It is installed parallel to the short side of the room and, if necessary, extended using standard fasteners or the excess part is cut off.
- The transverse T-shaped profile is 60 centimeters long.
- Longitudinal T-shaped profile 120 centimeters long. It is attached to the supporting profile with an interval of 60 centimeters.
- Ceiling suspension with hook and rod. The rod is attached to the ceiling with dowels or anchors, and the hook is attached to the supporting profile. The length of the suspension is adjusted with a clamp and thereby ensures a horizontal position of the frame.
- L-shaped wall profile 300 centimeters long. It is installed along the perimeter of the room using a level.
- Dowel or anchor. When the Armstrong ceiling is attached, these products serve to fix the suspension to the rough base.
- A cut ceiling slab designed to fit the parameters of the room.
The profile for assembling the frame can be metal-plastic or metal, coated with a powder coloring composition. The standard width of its shelves is 15 or 24 millimeters. In the first case, the profile is used for the construction of lightweight structures using organic tiles.
The second option is used in the construction of metal, glass, mirror ceiling structures with a large number of built-in elements. To fasten Armstrong to the ceiling, if it is heavy, reinforced suspensions are used.
The frame is fixed using standard fasteners; as a rule, it requires minimal adjustment, since it is assembled in the same way as a designer, quickly and simply.
By the way, if you wish, you can make tiles for Armstrong yourself from MDF or wood panels. Their design gives the interior a unique style.
Laying Armstrong slabs
Once the entire profile structure is ready, you can begin assembling the ceiling. We lift the slabs and, one by one, carefully, without additional physical effort, place them in the cells. If the slab does not fit into the cell well, do not put pressure on it from above, otherwise it will break. It is necessary to carefully correct it from below.
First, install the necessary equipment on the ceiling and connect the communications. Connect the wiring to the lamps, and only then lay the panels. We lay the last slab as follows: hold it face down on our palms, carefully place it into the opening and smoothly lower it. It happens that the slab lies askew, then in this case we correct the lower corner with our finger and that’s it - your Armstrong suspended ceiling is ready!
Calculation of components
Before installing the Armstrong ceiling, you should calculate the materials that will be required for the work, for which you measure the length and width of the room. Taking these parameters into account, their number is determined.
Preliminary calculation of the Armstrong ceiling is carried out in stages:
- Find out the required number of tiles. First, calculate the area of the room by multiplying its length by its width. Then the result is divided by the area of one slab. Since its dimensions are standard 60x60 centimeters, then Sp = 0.36 m2. The result is then rounded to the nearest whole number. For example: the area of the room Sk is 3.5 x 6 = 21 sq.m. You will need Np = 21 tiles: 0.36 = 58.3 or 59 pieces.
- Determine the number of wall profiles. To do this, by adding the lengths of the sides, they find out the perimeter of the room 3.5+ 6+3.5+6 = 19 and divide by the length of the profile, which is usually 3 meters and then Nsp = 19: 3 = 6, 33 or 7 pieces.
- Calculate the supporting profile. It is placed along a short wall at a distance of 60 centimeters from it and with an interval of 120 centimeters between profiles. Their number in a row is determined by dividing the width of the room by the standard value of 3.7 meters, namely 3.5: 3.7 = 1 profile. The number of rows is determined by dividing the length of the room by the step of fixing the supporting profile, and then rounded to a larger integer value 6: 1.2 = 5. Next, the number of profiles is multiplied by the number of rows: 1x5. The result is 5 load-bearing profiles.
- In order to calculate the longitudinal profile, the length of the room is divided by the length of the product (1.2 meters) and rounded up, and the width is divided by the installation step equal to 0.6 meters and rounded down. The results need to be multiplied. In the example given: 6: 1.2 = 5 and 3.5: 0.6 = 5.83 or 5. Total required: 5x5 = 25 pieces.
- Calculate the number of transverse profiles. They find out this way: the length of the room is divided by 1.2 meters and rounded down, and then its width is divided by the length of the profile, which is 0.6 meters, and rounded up. For example: 6: 1.2 = 5 and 3.5: 0.6 = 5.83 or 6. The result is: 5x6 = 30 pieces.
- Determined by the number of hangers. To do this, the sides of the room are divided into 1.2 meters (installation pitch). Then both results need to be rounded up and multiplied. Example 6: 1.2 = 5 and 3.5: 1.2 = 2.9 or 3. Then 5x3 = 15 pieces.
After completing the preliminary calculations, you should draw a diagram of the Armstrong suspended ceiling to scale, noting on it the location of profiles, suspensions and built-in lighting fixtures, and also depict the location of the utility lines.
Construction: main elements
Armstrong is a type of suspended ceiling. It differs from standard plasterboard structures in that it consists of many different profiles. When they are connected, a cellular structure is formed. It consists of rectangles or squares, which are covered with separate slabs of the appropriate size. The structure is secured with hangers. The base in this case is the rough ceiling. The system consists of several types of profiles. The basis of the frame is:
- transverse;
- carrier;
- longitudinal;
- perimeter - the one that is located near the wall, it is he who fixes the entire structure around the perimeter, hence the name.
Armstrong suspended ceiling design
Each of them performs its own function. However, the main thing is the supporting profile. It takes on the main load created by the entire structure. There are not so many of them; transverse and longitudinal profiles are used to strengthen the ceiling. They contribute to the formation of cells of the correct shape (rectangular, square). The entire system is supported by fastening units that are installed on the sub-ceiling.
Suspended ceiling design
The length of the hangers determines how low/high the ceiling will be. On one side they have hooks. This means that the suspended ceiling simply needs to be fixed to them. Use options with cell sizes:
INTERESTING: Design and principle of operation of a water heated floor system
- 600x600 mm;
- 1200x1200 mm;
- 1200x600 mm.
However, recently the second option has ceased to be used often. This is due to the insufficient reliability of the system. Moreover, the exact dimensions of the cells differ somewhat. Thus, the minimum slab is characterized by dimensions: 598x598 mm. The structure is assembled like a construction set: sequentially from ready-made elements. At the last stage, the structure is equipped with light sources. Built-in spotlights are more often used, but it is permissible to use overhead and pendant varieties.
Using this design, they can create a ceiling of any configuration (square, rectangular), regardless of the area of the room or its purpose. This property has a specific name - modularity. Because of this, however, difficulties may arise: there are no standard solutions, there is no opportunity to purchase a ready-made ceiling.
Profiles
Profile for suspended ceiling
The structural elements are products of medium and long length. They are made from lightweight aluminum alloy, and each has holes for easy mounting. Fixation methods:
- using fasteners;
- with each other - using the docking method.
Pay attention to the appearance of the ceiling - it is divided by stripes. These are profiles. They can be white or silver in color; gold and black products are much less common. In addition, you can paint the profiles on the underside yourself using paint of the desired color. Products of different lengths are available for sale:
- 600 mm;
- 1200 mm;
- 3600 mm.
The choice is made taking into account the intended purpose of the Armstrong ceiling: where the room is located, how much area needs to be covered. After measurements are taken, the number and length of profiles in a given area are determined and cutting is performed.
Transverse varieties are short, their number is determined by the established parameters of the room. It is necessary to determine the width of the shelves: 15-24 mm. The size of the “back” of the profiles also differs from the final one: 15-29 mm. The choice is made when determining the parameters of the slabs. They may be different. Knowing the type of all fasteners, it is proposed to independently make calculations to determine the appropriate dimensions. But it will not be possible to change the dimensions of the slabs, since they have protrusions along the perimeter.
INTERESTING: Semi-dry screed: do-it-yourself manufacturing and installation technology
Plates
Perform several functions:
- allow you to level the ceiling;
- hide cables, ventilation duct;
- provide sound insulation.
The last of the properties is considered one of the most important, because it allows you to reduce the intensity of noise effects occurring on the floor above. To ensure protection from loud sounds, pay attention to the thickness. Possible options: from 6 to 19 mm. The best, but at the same time the most expensive option is a product of maximum thickness. In addition, soundproofing and decorative qualities are determined by the type of material from which Armstrong ceiling slabs are made.
Based on the type of material, products are divided into types: soft and hard. The first group includes:
- mineral: contain mineral wool, but such products easily change shape in a humid environment, are lightweight and easy to install (the size can be adjusted with a stationery knife);
Mineral suspended ceiling slab
- organic: made from paper waste, this is one of the most common options, the boards are made from natural materials, which means they do not harm the environment, they are lightweight, installation can be carried out even by a person without experience.
Organic slabs
Rigid products are found in several versions:
- metal: with perforation, made from a single sheet (cassette);
Metal plates with perforation
- glass;
Glass panels for false ceiling
- plastic.
Plastic ceiling tiles Armstrong
They can be with a mirror surface or a pattern. The main disadvantage of rigid slabs is their significant weight. To secure them to the ceiling, it is necessary to use reinforced profiles. They are more expensive than standard ones, so this option is usually chosen less often.
The slabs are divided into groups taking into account the price category, taking into account the type of material, its properties, and the thickness of the products. Based on these criteria, the Armstrong ceiling installation material is classified into one category or another:
- economy class : the products are hygroscopic, they should not be installed in a room with a high level of humidity; if such slabs absorb a lot of water, they become deformed (sag, lose their original shape), however, the cost of the products is the lowest; an economy option should be sought among the brands Bajkal, Oasis and , Oasis+, Cortega, Tatra;
- prime class : expensive panels, they are durable, resistant to moisture, have an attractive design, such products will last a long time; this group includes products from the brands Adria, Casa, Cirrus, Plain, Duna+.
INTERESTING: Self-leveling flooring tools, technology and varieties
Plates are divided into groups according to other properties:
- acoustic : with improved properties, they prevent the propagation of sound waves, often installed in facilities with high noise levels (shopping malls, etc.), these products should be looked for in the range of products from manufacturers Neeva, Frequence;
- moisture resistant : contain water-repellent impregnations, in addition, the structure of the material is such that it does not allow moisture to pass through or accumulate it, such products are offered by manufacturers Mylar, Newtone Residence;
- hygienic : products are intended for rooms in which even surfaces must be cleaned of contamination (food industry facilities, medical institutions), an example of products is presented in the Bioguard brand assortment.
In addition, there are designer slabs. They are not used for finishing private housing or offices. The main difference is the bright, original and luxurious appearance. You should look for similar products in the range of products from manufacturers: Visual, Cellio, Cirrus Image, Graphis Linear.
Suspensions: design, replacement options
Suspensions for a suspended ceiling
Suspensions are the fastening elements that connect the suspended (on the frame) and the rough ceiling. They are studs with a hook on one side (where the profiles will be fixed) and a hole for fastening using screws, dowels or other elements. The most common option is with a double pin and a spring that allows you to adjust the height of the suspended ceiling (see figure). The length of the pins is 25 cm. The pendants are not suitable for home use, so it is permissible to change their size.
An alternative option is to use self-tapping screws with a hook. However, in this case, the distance from the suspended ceiling to the rough ceiling will be minimal, so loops made from wire are additionally used. It is recommended to leave at least 50 mm, but even in this case it will not be possible to install built-in light sources.
Lighting
The standard distance from the rough to the suspended ceiling allows you to install any lamps. In offices, preference is often given to standard light sources that are built into the frame and occupy 1 cell entirely. At home, spotlights or pendant lighting should be installed. In this case, standard lamps with fluorescent lamps will not be suitable in design and power.
Preparing the base
As with the installation of other types of ceiling structures, before installing the Armstrong ceiling, a number of preparatory measures are carried out. This suspension system makes the condition of the rough foundation completely invisible.
The preparatory stage consists of removing the old finishing material that has become unusable. When paint or whitewash adheres firmly to the surface of the ceiling, it is permissible not to remove it.
If areas of the finish peel off or a layer of plaster falls off, they can damage the installed tiles. For this reason, they must be removed and the cracks filled with putty. Before installing Armstrong ceilings in a room where there is a high probability of leaks, the rough base should be waterproofed.
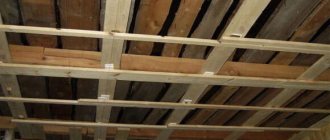
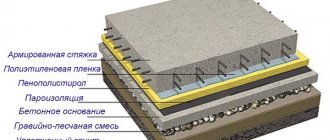
Since there will be a gap of 20 to 25 centimeters between the ceiling and the surface of the structure being installed, heat and sound insulation materials can be placed in it. Before placing them, first of all, for the fiber boards of the heat insulator, a sheathing is assembled from wooden blocks, positioning it in such a way that it is slightly offset in relation to the suspended frame.
The insulation is laid in place and covered with a vapor-permeable film with a moisture-proofing effect. When polystyrene foam is used as thermal insulation, it is attached directly to the subfloor with glue and dowels with fungi. When installing insulation, it is important to remove the wiring for the lighting device and ventilation ducts.
General information
The suspension system is designed for a distributed load - 4.5 ... 15.0 kg/m2, depending on the model. It is necessary to take into account the load of the layer of insulating materials applied on top (if necessary). . The minimum distance of the frame from the base—the height of the suspension—must be at least 120 mm to ensure that the slabs can be dismantled during operation.
Step-by-step assembly of the Armstrong ceiling
When starting work, you need to use the instructions for installing the Armstrong ceiling.
Installation is carried out in several stages:
- Marking the level of the structure
. The successful outcome of the entire work largely depends on the correct execution of this stage. To carry out markings, use a laser level. It starts from the lowest of the four corners of the room. In it, the average length of the suspension is set aside from the ceiling so that it can be adjusted in the direction - both up and down. Level from this point, lines are drawn along both walls, the corners adjacent to them are marked, and then the lines are continued on all other walls. At the last corner the lines should meet. - Fastening wall profiles
. When installing L-shaped elements, dowels and screws or anchor bolts are used at intervals of 50 centimeters down the shelf and aligned according to the previously marked line. The profile is bent at the corners, first cutting the shelf.
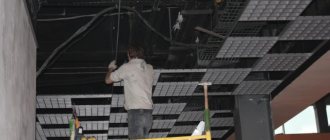
- Installation of ceiling suspensions
. These frame elements serve to attach the supporting profile. To place ceiling hangers in the required location, you should map out the location of the slats in advance. They are installed parallel to the short wall of the room in increments of 120 centimeters. For convenient installation, you can draw corresponding lines on the ceiling or use a chalk cord for marking. Next, according to the diagram, they mark the places where the suspensions are attached. In accordance with the installation instructions for Armstrong suspended ceilings, these components should be located at a distance of no more than 120 centimeters from one another and 60 centimeters from any wall. They are secured with anchor bolts or dowels. To do this, drill holes according to the markings and fix the suspension to the eye of the rod. - Installation of suspensions for lighting fixtures
. The places where the installation of lamps and split system units is planned must be additionally reinforced with suspensions, placing them with a slight offset relative to the main components of the frame. The hanger hook often interferes with the installation of elements, so it is advisable to place the hanger with an offset of 5 - 10 centimeters. - Installation of load-bearing profiles
. They are placed according to pre-applied markings and secured using hanger hooks to the holes in the profile. It is necessary that the ends of the support rails rest against the L-shaped shelf. When the length is not enough, it needs to be increased by using a standard lock located at one of the ends of the rail. If necessary, the profile can be trimmed.
Ceiling frame installation
Installation of Armstrong ceilings begins with the installation of the perimeter. SNiP recommend using a laser or bubble level of at least 1 m in length to mark the height of the perimeter, but in practice the height of the perimeter is often marked off from the opposite: they check the horizontality of the floor (hack workers often do without this, and nothing, they hand over the work), make height marks in the corners and the three of them beat off the outline with a chalked cord. Fast, simple and angry.
Armstrong ceiling assembly diagram (click to enlarge)
Next, the wall profile is cut to size and attached to brick and concrete walls with self-tapping screws and dowels. If the walls are lined with wood, there will be no special weights in the ceiling, and raster lamps should not exceed 1 per 5 square meters. m, then the perimeter can be secured with nails: the main load is carried by the suspensions. It is strongly not recommended to mess around with hangers: use propylene dowels or use metal collets instead of dowels.
After marking and drilling holes in the ceiling, the supporting profiles are cut to size, connected to the floor into strips of the required length and laid in the perimeter. Then they are moved apart along the length, hangers are installed and each supporting bar is aligned according to the sag along a tightly stretched cord.
The next stage is the installation of longitudinal and transverse connections. Basically, two installation schemes are used: parallel and cross, see figure; longitudinal connections are highlighted in green. In terms of material consumption, they are equivalent. The cross pattern is somewhat more labor-intensive, but stronger, so it is used for places where communications will be laid or for additionally insulated ceilings. Of course, before installing the frame, partial profiles are cut to size.
The nuances of installing a ceiling structure in an apartment
The task of installing Armstrong in apartments with a standard layout is not always possible to cope with. If the ceiling height exceeds 275 centimeters, installation is carried out using standard technology. In this case, the surface of the structure must be located at a height of at least 250 centimeters - this value is provided for by SNiP.
When the ceilings are lower, then Armstrong can be installed in rooms where people stay periodically, for example, it could be a corridor.
Since such a ceiling has a low price, does not emit substances harmful to health, and is easy to install and maintain, the main thing is to choose high-quality material and an appropriate design for it.
Photos of Armtsrong ceilings in the interior
These are slabs from the designer series
Mirror surfaces on the ceiling in the bathroom
Illuminated milk glass behind the ceiling provides soft diffused light
Even a long corridor looks boring
Large slabs of monolithic polycarbonate with photo printing
Dynamic, light
Diagonal execution is more difficult
Combination of gray metal plates and plain white
Option for a cafe, but the same or similar one will look good in a modern interior
This is already a very complex option - the author's