If you want to start renovating the floor in your apartment, we will tell you what to look for and what stages you have to go through.
Installing, replacing or removing flooring will require you to have some floor repair skills. If you are laying linoleum or carpet, this may seem like a simple task, but if you are planning to change the screed yourself or lay laminate flooring, then more professional skills are needed, and most importantly, good instructions. After all, a beautiful hand-made floor is the best decoration for your apartment!
Reasons why you need to change gender
The reason for repairing the floor covering may be:
- the need to install heat and sound insulation;
- making a decision regarding the installation of a “warm floor”;
- the appearance of creaking sounds when moving on the surface;
- deformation of the wooden floor;
- increasing the level of humidity in the air coming from the basement;
- desire to change the interior of the apartment.
The list of work to be performed largely depends on the material of the old coating and the choice of a new type of floor surface. For example, removing tiles from the floor will not be so easy. In addition, it will be necessary to plan activities related to protecting the premises from dampness and improving heat and sound insulation.
Information on how to change the floor in an apartment with your own hands will help you plan in advance all the stages of implementing your plans.
Final cost calculation for floor screed: which is cheaper?
Installation of a dry screed will cost at least 900 rubles per square meter, this is due to the relatively high cost of materials, and repairs can be continued immediately after laying the floor.
A traditional wet screed will cost you about 800 rubles per square meter or more. This is an inexpensive way to level the floor, but the process is quite complex, “dirty” and takes time - you will not be able to begin subsequent finishing work until the screed is completely dry.
A semi-dry screed costs from 350 rubles per square meter and, in comparison with the wet method, today is the best option both in cost and in terms of the strength and practicality of the coating.
Floor on the ground
In houses without basements, the floor of the first floor can be made according to two schemes:
Which of the two options will be better and easier?
In houses without a basement, floors on the ground are a popular solution for all rooms on the first floor. Floors on the ground are cheap, simple and easy to implement, and are also beneficial to install in the basement, garage, bathhouse and other utility rooms. A simple design, the use of modern materials, and the placement of a heating circuit in the floor (warm floor) make such floors comfortable and attractive in price.
In winter, the backfill under the floor always has a positive temperature. For this reason, the soil at the base of the foundation freezes less - the risk of frost heaving of the soil is reduced. In addition, the thickness of the thermal insulation of a floor on the ground may be less than that of a floor above a ventilated underground.
It is better to abandon the floor on the ground if backfilling with soil is required to a too high height, more than 0.6-1 m. The costs of backfilling and compacting the soil in this case may be too high.
A ground floor is not suitable for buildings on a pile or columnar foundation with a grillage located above the ground surface.
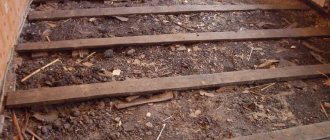
Removing outdated wood flooring
This process is the most labor-intensive and unpleasant, but it is impossible to do without it.
When the old floor covering is wooden, you will need to prepare the following tools for dismantling:
- hammer with nail puller;
- hatchet;
- mount;
- screwdriver;
- electric saw or jigsaw (they will be needed for cutting old boards);
- shovel;
- garbage bags.
Dismantling begins with removing the baseboards along the perimeter of the room.
If you plan to re-lay floorboards or old boards will be used for the construction of joists, then they should be dismantled very carefully, trying to minimize damage. Use a nail puller to remove previously driven nails, and use a screwdriver to remove self-tapping screws.
When the removed wooden elements are no longer needed, they should be removed from the apartment. After freeing up the space, they begin to dismantle the logs. Very often they are securely attached to the rough base, so they must be removed carefully so as not to damage the base. Otherwise, you will have to waste time sealing the resulting holes.
When the old covering is removed from the room, it needs to be thoroughly cleaned. Upon completion of this procedure, you can begin preparing the floor for installation.
Concrete floor cleaning process
Old concrete pavement is removed only as a last resort, since it can usually be repaired. Major repairs of such a floor are done on the condition that it cannot be preserved. For example, when the concrete base was regularly exposed to water and was not dried. During this time, fungi and other microorganisms harmful to human health began to multiply in the concrete structure. The coating in this condition must be dismantled.
Also, sometimes the concrete floor is removed if the apartment has low ceilings, and it is planned to install a floor with thermal insulation, as a result of which it will be raised by some distance. The old coating is removed and thereby frees up space for installing the insulating structure.
When deciding to remove the screed, you must remember that it was installed on the interfloor ceiling, and therefore it should be removed with extreme caution. The concrete layer is removed using a hammer drill, splitting it into separate fragments. Typically the height of the screed is 50–120 millimeters. After its dismantling, construction waste is removed.
Adviсe
If your building does not have a freight elevator or does not have one at all, then take care of a person who will help deliver boards to your apartment. Of course, you can hire movers.
If you are not experienced in installing floors and do not have an assistant, entrust the work to professionals. However, remember that here you will not need to spend money on purchasing tools and removing construction waste. It’s up to you to purchase the necessary building materials and control the work. This method will help you if floor repairs need to be completed as soon as possible.
Time it right. An inexperienced person, usually the owner of an apartment, spends a full day's work renovating the floors in one room with an average area of 12 square meters. If the repair cannot last a long time for some objective reasons, think about hiring at least a few workers who can help you.
If you want to save on purchasing floor coverings, choose linoleum. It will serve you for a long time. Linoleum corresponds to the price-quality ratio.
In general, replacing floors is a difficult and expensive job. If you decide to do it yourself, then take your time. Spare no expense in purchasing quality materials. It is better to pay a little more initially than to later contribute huge sums of money to a future major floor renovation. If you decide to hire a team of workers, be sure to pay attention to the portfolio of work completed by the company. Also listen to reviews. Don't overpay for poor quality work. If you have any questions regarding replacing floors, you can consult with specialists in hardware stores when purchasing working material.
If you have any questions, or we have not covered any topic, write to us in the comments and our specialists will prepare the appropriate material.
Tags:
- Home renovation
Rate the material:
Carrying out preparatory activities
Before laying a new floor covering, the base, cleared of old material, must be brought into proper shape:
- Dust is removed from the surface to see if there are any defects in the base, such as cracks or crevices, or areas with loose or crumbled pieces. Also pay attention to the presence of traces of mold and dampness.
- If the above defects are detected, they must be eliminated - otherwise the effect of thermal and sound insulation will be less. To do this, use cement mortar, sealant or foam. The choice of material depends on the extent of damage to the base. If fungus or mold is detected, the concrete is treated with impregnating antiseptics.
- After the subfloor has dried, the list of further measures depends on the type of new floor surface.
It should be noted: before changing the floors in an apartment from cement-sand screed to wooden floorboards, you will still need to install a new thin concrete layer.
Creating a new screed
There are several ways to make a new screed. When there are slight differences in height on the rough base and you plan to lay wooden floors in an apartment on it yourself, then its surface can be made ideal using a self-leveling coating such as in the photo. It is able to level out minor defects and flaws existing on the base.
The technology for using dry mixture for self-leveling floors is as follows:
- The solution is made according to the instructions on the package.
- The finished mixture is poured and then leveled over the surface using a wide spatula or squeegee. In order to remove air bubbles from the solution, the coating material is pierced using a needle roller.
- The leveled floor surface is left for a while to dry and gain strength.
All materials have their own maturation period, which depends on the components included in the dry building mixture.
Then on a flat floor you can:
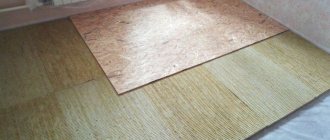
- lay a thin layer of insulation and lay the finish on top of it;
- lay sheets of plywood and install infrared heated floors;
- fix the wooden covering on the joists.
Conclusion…
Here you go. Now, finally, we have gone through all the possible options for updating the hallway. What do we understand?
First. The most suitable floor coverings in the hallway:
- laminate (23 - 31 wear resistance classes, preferably prefabricated or waterproof),
- artificial carpet (needle-punched or tufted with nylon thread and/or high density),
- polyvinyl coating (semi-commercial or household with improved properties),
- ceramic tiles (Spanish or Italian, highly wear-resistant, matte or embossed),
- Korean “golden” tiles.
Second. Ceramic and Korean “gold” tiles are designed for a service life of more than 10 years; for other types of coatings, the warranty period is shorter - from 5 to 10 years.
For several weeks now, a happy friend has been walking on the beautiful floor in the hallway. What did she end up choosing? The decision was unexpected for all of us: She left her good old parquet on the floor. How so? And so. She plucked up courage and went to the “bros” who flooded her apartment. It turned out that they were quite sane, I would say, responsive guys: they found a good craftsman, he removed the swollen parquet flooring, dried it and laid it again, and then covered it with several layers of German varnish. He says: this kind of parquet will outlive us. If, of course, you take proper care of it. But that is another story…
Screed plus expanded clay insulation
A completely different version of the screed is used when it is poured onto expanded clay - a good heat and sound insulating bulk material (for more details: “How to make expanded clay floors with your own hands”). In addition, it is lightweight and therefore its use will not put a strong load on the interfloor floors.
This is a very important point when arranging such screeds in an apartment, which are performed as follows:
- When installing a concrete layer on the lower floor, located above a cold basement, waterproofing is first done. It can be mounted in different ways, for example, cast, glued, plastered, etc. Waterproofing material must be placed both on the floor and on the lower part of the walls, which have been previously treated with a primer.
- A thick polyethylene film is placed on the already prepared surface so that it extends 15-20 centimeters onto the walls. The pieces of material are fastened with special tape.
- A damper tape is glued on top of the film along the perimeter of the room, which helps keep the screed intact in the event of temperature changes.
Filling without subsequent insulation
This work is complex and painstaking. It is performed according to the following principle:
- Flooring film for waterproofing. It should be placed directly on the base.
- Putting up damper tape.
- Placing reinforcement on the material to protect it from water.
- Installation of beacons on top of the grid. Beacons are located at the appropriate level of the plane.
- Pour concrete solution. It needs to be positioned 1.5 - 2 cm higher than the landmark on the far wall. This is the distance by which the fill will sag. When laying the mixture, you need to move only along the guidelines.
- After leveling the entire floor surface, the screed must be left to dry. This takes from 3.5 to 4 weeks. It all depends on the substances used to make the screed. Temperature and humidity levels are also important.
- Laying lags.
- Placement of insulation.
- Laying floorboards.
Installation of dry screed
Another way to level the base before changing the floor in the apartment is the so-called dry screed. This base reduction option is excellent for multi-story buildings. Its advantage is that there is no need to mix a solution containing water.
Lay out the floor using dry screed in stages:
- A polyethylene film is laid on the surface of the base so that it covers the wall to the thickness of the future floor covering with a 5-10 cm margin. A board is placed in the doorway to prevent the dry mixture from spilling out.
- Beacons made of wooden beams or metal profiles are mounted on top of the film. The landmarks are leveled using a building level until a horizontal plane is obtained.
- Filler is poured onto the film, the layer of which should be several centimeters thicker than the level of the mounted beacons.
- The dry material is leveled according to the guidelines.
- At the end of the process, GVP (gypsum fiber boards) with interlocking joints are laid. The mating areas are treated with adhesive and the next panel is applied so that the locking elements fit smoothly. The plates are additionally fastened with self-tapping screws.
- A decorative coating is installed on top of the prepared surface depending on personal preference.
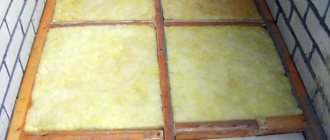
Wooden floor structures
The wooden floor in the apartment is being replaced with a pre-equipped screed. The flooring is made either on logs or directly on a concrete base.
Typically, property owners choose the first option because it has many advantages. The fact is that heat-insulating and noise-absorbing materials can be laid between the joists. In addition, the floor structure raised above the concrete enhances the insulating effect. The logs also give the flooring additional rigidity.
The lags in the apartment are replaced in several stages:
- After dismantling the old logs as described above and arranging the screed, the installation of new bars begins.
- First they mark out the room. To draw lines, use stretched twine, painted blue. Installation is done by maintaining the gap between the joists, which should correspond to the width of the insulation.
- Then they begin cutting the bars to the required length. At the same time, we must not forget that they should be installed from the wall at a distance no less than the thickness of the insulation. Most often, mineral wool is used for these purposes. As for the use of expanded polystyrene in living rooms, low-quality products can negatively affect the health of residents.
- During the next stage, the logs are fixed to the base. They can be fixed either on a concrete floor, or raised above it to a certain height, using special pins or metal holders.
- Between the racks of joists attached to the concrete floor, a distance of 40 to 50 centimeters must be maintained. By adjusting the height of the racks, the level of the mounted floor surface is brought to a horizontal plane.
- Then the insulation is laid. First of all, this procedure is performed between the joists and the wall along the perimeter of the room and then between the bars.
- At the next stage, the entire assembled structure is covered with a vapor barrier film, fixing it to the joists with a stapler.
- Creating plank flooring is one of the most important processes. The first floorboards are laid at a distance of 5-7 millimeters from the wall, thereby creating a ventilation and compensation gap in case of linear expansion as a result of increased humidity or temperature changes in the room.
- When the plank floor is laid, a plinth is attached on top of it. Fix it directly to the wall, and not to the wooden floorboards.
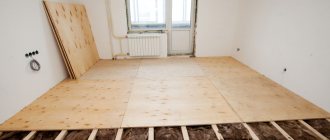
- If plywood was mounted on top of the joists, the joint of the two sheets should be positioned so that it falls in the middle of the joist. In order to impart additional rigidity to the surface, plywood sheets are fixed in a similar way to bricklaying, shifting the subsequent element by half of the product.
- After completing the laying of the material, you need to seal the gaps between the sheets with putty, and after it has completely dried, the surface should be sanded.
- You can install different floor coverings on plywood, completing the design of the floor by installing skirting boards.
Often, a wooden floor is replaced with a concrete one in an apartment as a result of a decision to lay flooring such as tiles, laminate, etc.
Dismantling and installing the floor structure yourself will help you save a significant amount, since such services from professionals are expensive.
Three basic diagrams for installing floors on the ground
In the first version, a concrete monolithic reinforced floor slab rests on load-bearing walls, Fig. 1.
After the concrete hardens, the entire load is transferred to the walls. In this option, a monolithic reinforced concrete floor slab plays the role of a floor slab and must be designed for the standard load of the floors, have the appropriate strength and reinforcement.
The soil is actually used here only as temporary formwork when constructing a reinforced concrete floor slab. This type of floor is often called a “suspended floor on the ground”.
A suspended floor on the ground has to be made if there is a high risk of shrinkage of the soil under the floor. For example, when building a house on peat bogs or when the height of bulk soil is more than 600 mm. The thicker the backfill layer, the higher the risk of significant subsidence of the fill soil over time.
The second option is a floor on a foundation - a slab, when a reinforced concrete monolithic slab, poured onto the ground over the entire area of the building, serves as a support for the walls and a base for the floor, Fig. 2.
The third option involves installing a monolithic concrete slab or laying wooden logs in the spaces between load-bearing walls supported on bulk soil.
Here the slab or floor joists are not connected to the walls. The load of the floor is completely transferred to the bulk soil, Fig. 3.
It is the latter option that is correctly called a floor on the ground, which is what our story will be about.