Methods for finishing slopes
You can trim slopes in different ways:
- Cement and carefully putty;
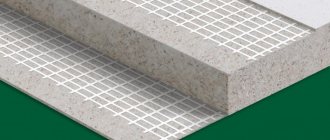
- Install slopes from a sandwich panel. This is an inexpensive type of finishing. But sandwich panels are fragile and short-lived.
- Install MDF slopes. This is a more expensive and at the same time reliable method of finishing. MDF slopes are more durable. In addition, they can be matched to the color of the door. Torex produces slopes that fully match the selected door model in color and texture.
You can perform any of these options either independently or with the help of professionals. You can order the installation of MDF slopes from a certified Torex team. In this case, we guarantee high quality of work performed. Since installing MDF slopes is the most complex and time-consuming, you need to know a number of nuances. If you decide to do this yourself, use our instructions.
How to decorate the slopes of the entrance door inside the apartment: finishing options
The building materials market offers different options for designing slopes. Therefore, you can choose the most suitable finishing method in terms of price and performance characteristics. Each method has its pros and cons. They differ in strength, degree of decorativeness, cost and complexity of implementation.
Options for finishing the doorway in the apartment, jambs:
- plastering;
- coloring;
- registration of additions;
- wallpapering;
- installation of sandwich panels;
- parquet finishing;
- laminate cladding;
- fastening plasterboard panels;
- decoration with natural wood;
- finishing with MDF panels;
- cladding with PVC panels;
- finishing with natural or artificial stone;
- use of stucco;
- use of lining;
- tile finishing.
Each option for finishing slopes has its own characteristics. You need to familiarize yourself with them before finishing the doorway of the front door after installing the block, in order to correctly select the option that is optimal in all respects.
Plastering the doorway
Plastering a doorway in a brick house is the best option in terms of price and decorativeness. Such finishing of slopes always looks attractive and impressive. It is resistant to various types of damage. Apply plaster in two layers. The first is rough, and the second is finishing and is done with decorative plaster. There are compositions that are a mixture of plaster and stone chips. This plaster on the end of the wall looks quite impressive. But it doesn't come cheap. You also need to understand that plastering slopes belongs to the category of dirty and labor-intensive work, which requires certain knowledge, skills and experience. Therefore, plastering should be trusted to professionals. It is important to consider that the plaster coating must be properly cared for so that its decorative qualities do not deteriorate.
Using paint
Painting is the simplest and cheapest option for finishing door slopes after installing the door. Also suitable for decorating arches. Water-based paint should be used. With its help you can create a durable and easy-to-maintain coating. Before painting, carefully level the doorway and seal all cracks. This work is simple and not particularly time-consuming. Therefore, you can do it yourself. Depending on the surface material and the characteristics of the paint, it may be necessary to apply the composition in 2-3 layers.
Decoration with additions
The extensions are planks made of wood or MDF. They completely cover the end part of the doorway. The additions look presentable. They are simply installed. You can do the installation yourself, spending a little effort and time. The extensions last quite a long time. This material is sold in construction stores. You can also make accessories yourself. The slats are telescopic, regular, or with an edge at the end. It's better to use the first option. Telescopic products have special grooves. Therefore, they are mounted very simply without screws and nails. The seam is almost invisible.
Wallpapering
An inexpensive and simple option for finishing slopes is to decorate them with wallpaper. This material is used to decorate not only the opening, but also the door leaf. It is better to use thick, washable wallpaper. Then there will be no problems removing contaminants from the slopes. A good option would be to cover the opening with the same wallpaper as the walls. To attach the canvases, use special adhesive compounds or prepare your own glue based on flour.
Using sandwich panels
Sandwich panels are an excellent option for finishing door slopes. They consist of three words: polymer plastic, polystyrene insulation and decorative coating. They are moisture resistant and durable due to their multi-layer nature. Provide good sound and heat insulation. This material is offered in different colors. There are products that perfectly imitate leather, stone or wood. Sandwich panels are inexpensive.
Parquet cladding
Parquet boards are an excellent option for framing entrance door slopes. The products are easy to install. Therefore, you can attach them with your own hands, without having any special skills in carrying out repair and construction work. Parquet is offered in different shades. Therefore, the material is selected to match the interior tone. The parquet cladding looks presentable.
Laminate coating
Laminate is often used to finish door slopes. This is due to its versatility, affordable cost and good performance. Laminate is suitable for doorways of any depth. When connecting laminate panels, almost invisible seams are formed. Laminate slopes are quite cheap. But they don't look particularly attractive.
Plasterboard finishing
Cladding slopes with plasterboard is a rather labor-intensive process. But this material is one of the most in demand. It is important to understand that simply installing plasterboard strips is not enough. They need to be puttied and then painted or wallpapered. Plasterboard sheets allow you to get a flat and smooth surface. Therefore, they are ideal for uneven doorways. But it must be taken into account that the coating is not particularly durable and must be periodically restored or replaced.
Decoration with wood
Finishing slopes with wood is an expensive method. But this option for decorating the opening looks expensive and solid. Goes great with wooden doors.
Wood is an environmentally friendly material. Slopes made from it are easy to attach and last a long time. But they need additional processing to protect them from moisture and insect damage. As a rule, wood is varnished. The coating needs to be updated periodically to maintain an attractive appearance and extend its service life.
Installation of MDF panels
MDF slopes are easy to manufacture. They go well with iron doors. They look very attractive. To trim slopes with MDF panels, you do not need special tools. But they are not suitable for lining shallow slopes.
PVC panel finishing
Plastic panels are an ideal option for those who want an attractive finish without spending a lot of money and effort. But plastic cladding does not last long. All because it is unreliable. True, PVC panels also have their advantages. They are not afraid of moisture and are very easy to care for. To remove dirt, simply wipe the surface with a damp cloth. You can wash PVC panels with household chemicals. It is not difficult to secure the plastic strips to the end of the wall yourself. Such work can be performed even by a person without experience and skills in its implementation.
Finishing with natural or artificial stone
Natural or artificial stone is ideal for finishing wide or narrow door slopes and the end part of a non-standard shaped wall. This is a non-standard, but very beautiful option. Any stone is very hard and highly resistant to impacts and other mechanical damage. But this material is expensive. And to finish the slopes with them you will have to turn to professionals. After all, such work is complex and requires taking into account a number of points. To save money, it is better to use decorative stone.
Application of stucco
Stucco can hardly be called a popular material. It has high performance qualities and excellent aesthetics. Polyurethane stucco molding is especially often used for finishing slopes. It is simply attached with glue and looks luxurious. The stucco molding is offered exclusively in white. But the product can be painted in the required colors.
Cladding
Beautiful slopes are obtained using lining. This material is inexpensive and is an excellent alternative to natural wood. It is often used to decorate doorways. But installation is difficult. It is especially difficult to attach such material in small corners. Therefore, it is better not to decorate the doorway of the front door with your own hands, because when decorating it yourself, you can make serious mistakes. You should trust the work to professionals. But when choosing such a product, it is worth considering that the lining swells from moisture and can be affected by pests. Therefore, its surface is additionally treated with special compounds with protective properties.
Tile framing
An interesting option for decorating the entrance doorway inside with your own hands is to decorate it with tiles or mosaics. Clinker tiles are often used for these purposes. There are options that perfectly imitate brick, granite, marble or other natural, expensive and beautiful material. But to decorate the end part of the wall with tiles, it is necessary to carefully prepare the slopes. Products should be glued onto a flat surface. You also need certain knowledge and experience to perform high-quality finishing.
What will be needed to install slopes?
To install MDF slopes you will need the following tools:
Photo 1. Set of tools for installing slopes
- 1 – miter saw;
- 2 – roulette;
- 3 – pencil;
- 4 – angle;
- 5 – knife;
- 6 – hammer;
- 7 – masking tape;
- 8 – fastening elements;
- 9 – screwdriver;
- 10 – polyurethane foam;
- 11 – drill.
Drywall slopes
If working with a hammer drill is not intimidating and you don’t want to bother with cement screed, you can decorate the doorway with sheets of plasterboard. This is especially true for houses with thick walls, where the slopes are very wide.
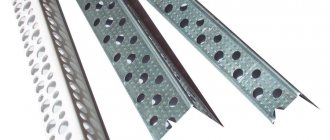
Frame for slopes made of plasterboard
In order for the plasterboard sheets to be securely fixed and able to withstand even finishing with artificial stone or tiles, you will need a wooden or metal frame:
- A starting rail is fixed along pre-marked lines on the floor and ceiling - vertical posts will be attached to it.
- Corner posts are installed and frame-reinforcing lintels are attached. You can first fix the top sheet of drywall, and then proceed to the side walls of the slopes.
- It is important to remember that the joint of the sheets should be in the middle of the crossbars.
- After the frame is sewn up, the voids are filled with polyurethane foam. If the slope area is large, this is done in several stages - when the first layer of foam stops expanding.
- The joints of the sheets are glued with sickle tape and puttied. After this, you can begin decorative finishing - wallpapering, painting or laying tiles.
For the slopes of the front door, especially if it faces the street, it is better to use moisture-resistant plasterboard. It is also important to remember that there is always a small gap between the floor and the gypsum board to prevent the drywall from getting wet. With decorative finishing, this gap will still be hidden.
Drywall slope on plaster
Instead of a frame, gypsum boards can be secured with mounting foam and plaster. Is it not strong enough? But if the load on the sheets is small, then the safety margin should be enough. The technology itself is simple, even a non-specialist can handle it:
- The size of the upper edge of the slope is measured and marked on the sheet. You can cut drywall with a construction knife, breaking off the sheet at the cut point.
- In order not to level the slopes, making the angle between them and the door 90 degrees, you can fix the gypsum board with an outward bevel. To do this, a layer of foam is applied to the edge of the sheet adjacent to the door frame, foam of a suitable thickness is placed on it and foam is also foamed on top. The front edge of the sheet is attached to the slope using a thick putty solution. The surface of the slopes must be primed.
- In order not to hold the gypsum board until the plaster and foam are completely dry, it can be supported with a spacer.
- The side slopes are designed in the same way. To prevent the gypsum boards from reaching the floor, you can place narrow 1x1 cm bars under them.
- For reliability, after the plaster has hardened, the sheets are additionally fixed with 6x40 dowel nails along the outer edge.
Looks decent
Stage 1. Control measurement of the opening after door installation
We make accurate measurements of the actual dimensions after installing the door - even if we know the exact factory dimensions. It is necessary to measure the width, height of the vertical and length of the horizontal extension.
Door trims are decorative strips that cover the walls of a doorway. They are installed if the opening is wider than the door frame. Most often, MDF panels are used for this.
Photo 2. Measuring the width of the extension
It is necessary to measure at three points vertically on each side and at two points horizontally (from above).
Photo 3. Measuring the length of the horizontal extension
The additional element must necessarily be adjacent to the door frame, so we measure the length along the width of the door.
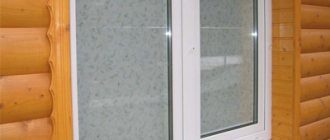
Wallpaper
When finishing slopes with vinyl wallpaper, the work should be carried out in conjunction with the interior design of the entire space. Wallpaper is glued after surface preparation - plaster, putty and application of adhesive.
After finishing, you should make sure that there are no air cavities, and, if there are any, remove defects by piercing the bubble with a needle and then smoothing the material.
Wallpapering slopes
When operating such slopes, special attention should be paid to the outer corners, since it is in these places that scuffing from mechanical stress can appear. As a rule, all corners are equipped with plastic overlay corners.
Stage 2. Setting aside and marking the required dimensions of the extensions
Photo 4. Preliminary markings
After we have measured the required dimensions of the additions, we set them aside on the blanks of the additional elements. We make preliminary markings directly on the panel.
Photo 5. Gluing future cutting areas with masking tape
Using masking tape, mark future cutting lines.
On one blank for additional elements, you can put two parts - the threshold and the upper part of the additional elements.
In the same way, we set aside the dimensions of the second part, make preliminary markings on the workpiece and glue it with masking tape.
Photo 6. Re-mark
We re-mark the length of the extension directly on the masking tape.
If you do not glue the edge of the additional element with masking tape, chips may appear on it during sawing.
Photo 7. Checking dimensions
Once again we check the correctness of the markings.
Photo 8. Postponing the cutting angle
Use a miter angle to mark a cutting line perpendicular to the edge of the panel.
Painting
Painting slopes is highly complex and involves a large number of wet processes. At the same time, this finish goes well with the main covering of the hallway walls, giving the room harmony and eliminating contrasts. Performed according to the following algorithm:
- Before installing the door, the slope is prepared for finishing.
- A layer of plaster is applied to the surface of the end of the opening in the wall until the plane is completely leveled.
- The installation team carries out the necessary production operations to install the front door.
Plastering the slope
- Upon completion of the installation of the structural element, the door leaf and frame are protected with film or masking tape from splashes of paint on the door.
- The master applies finishing putty to ensure a smooth surface of the slope.
- Before painting, the end of the wall is treated with a penetrating primer, which significantly improves adhesion.
- At the final stage, paint is applied, which is evenly distributed over the slope area with a roller.
Painting the slope with a roller
- If it is necessary to refine an element in hard-to-reach places, brushes with different working widths are used.
After applying the paint, you should wait for the standard period indicated on the packaging with the finishing material, and then check the quality of the application of the composition. Considering the risk of frequent mechanical contact of clothing or parts of the human body with the painted slope. When choosing a material, increased attention is paid to its wear resistance.
Stage 3. Trimming the extensions to the required sizes
Photo 9. Sawing blanks
Using a miter saw, we cut blanks for additional elements exactly along the marks.
Photo 10. Sawing the second workpiece
We saw off the first and then the second horizontal parts of the extension.
We repeat the procedure for the vertical parts.
Preparatory work
For any method of forming a slope, the preparatory stage is the same. Before any work, the door leaf and door frame should be covered with film and masking tape to avoid damage. First of all, all particularly protruding parts are combed off, which may interfere with the installation of the frame of the future slope or will protrude above the plastering level. Then the entire surface is swept and primed. It is better to use a deep penetration primer. Only if the wall is made of foam concrete or similar loose material, a surface primer is used.
At the preparation stage, you can also lay a power cable to connect a switch that will light the lamps in the hallway. If you plan to use the option with a frame fastening of the slope, then it is better to postpone laying the wire until the frame has already been installed.
Tip: For clarity, display the outline of the future slope on the floor. Subsequently, it will be easier to navigate using these marks.
Stage 4. Assembling the accessory box
Before installation, we assemble the extensions into a solid, rigid box.
Photo 11. Drilling holes for self-tapping screws
Using a drill, we drill holes for self-tapping screws - for fastening from the inside. This is a mandatory step so that when screwing in the screw does not split the MDF panel.
Photo 12. Drilling holes for self-tapping screws
We make several holes at a distance of 10–15 cm from each other.
Elimination of defects
- If you decide to fasten the trim with self-tapping screws, then the head of the hardware will ruin the entire appearance. It must be slightly recessed in the wood, and covered on top with a wax collector or sealant of the desired color;
- If the walls are uneven, then the front door trim will come apart at the joints. To prevent this from happening, it is better to glue them from the inside during installation. You can use finishing nails;
- But if the defects around the door are not minor, then it is necessary to purchase cashing elements with a width of 100 to 120 mm. They will help hide these shortcomings from view.
And at the end we’ll tell you how to connect the floor plinth with the platband. The latter always reaches the floor. If it rests against the baseboard, the appearance of the door will be ruined.
The plastic part fits together beautifully and naturally. Thanks to the presence of a special side plug. It looks good next to the vertical trim. But if the baseboard is wooden, then it will have to be cut at an angle of 45 degrees. This will align the side that meets the trim with its thickness.
Stage 5. Installation of the extension box
Photo 13. Installation of extensions
We install the extension box in the opening. We set it relative to the door so that the gaps between the door and the frame are the same on all sides.
Photo 14. Preparation of spacer elements
Spacer elements are needed to fix the extension box in the opening. We cut them out of a wooden block. The thickness of the spacer element is selected according to the size of the gap.
Photo 15. Preparation of spacer elements
A total of 10–12 spacer elements are required. 3-4 pieces for each vertical extension. Top and bottom – 2 pieces each.
Photo 16. Hammering spacers
Since in the future we will need to install platbands and close the gap, it is important that the spacer element does not protrude beyond the trim and the wall.
Photo 17. Installation of spacers
In the same way we hammer in all the spacer elements.
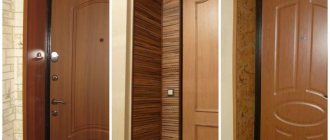
Materials
The standard solution in such cases is to use plaster and level the surfaces adjacent to the doors. However, this method is only suitable for those who have experience in such operations and are not afraid of “wet” processes. In addition, the plaster does not dry too quickly and it will take quite a lot of time to bring the space into proper condition. Therefore, the design of door openings is now increasingly done in other ways:
- MDF panels. You can buy a wide sheet of MDF and cut blanks of the desired size from it. This is not cheap, but it will take significantly less time than plastering and, moreover, it will not require any special skills from you - everything is quite simple.
- Using standard extras. You will have to look for parts of a suitable width, but if your opening is less than fifty centimeters, finding suitable extensions will not be too much of a problem. In addition, you can combine several parts that are smaller in width into one sheet and obtain elements of the required dimensions.
- Plastic. Using this material, finishing a wide door slope is possible without additional additions. The main thing is to find plastic sandwich panels of suitable sizes. They are easy to cut and the operation as a whole will be even easier than with a standard panel or MDF sheet.
Having selected an option that is suitable in terms of cost and labor intensity, you can move on to studying the design technology. There will be nothing particularly complicated here and even a not very experienced master will be able to cope with all the operations. Accuracy and accuracy of all measurements are important.
Stage 6. Installation of platbands
Photo 18. Measuring the length of the casing
We attach the casing and mark the required length. The size is set according to the angle of the internal intersection of the horizontal and vertical extensions.
Photo 19. Measuring the length of the casing
Similarly, we set aside the length of the second casher.
Photo 20. Measuring the length of the casing
We mark the length along the inner corner of the extensions.
Photo 21. Trimming the platband
We cut the trim using a miter saw at an angle of 45 degrees.
Photo 22. Filling the gap with foam
Polyurethane foam is used to fix the extension box. Gives the structure rigidity and additional sound and heat insulation.
Photo 23. Filling the gap with foam
It is important not to overdo it with the volume of foam, so as not to deform the extension.
At the same time, if there is too little foam, the opening will be leaky and not rigid enough.
To remove excess foam, you need to wait for it to cool and cut it off with a knife.
Try to avoid getting polyurethane foam on the boards, walls and flooring.
Photo 24. Installation of vertical trims
First we install vertical extensions, then horizontal ones.
We attach the casing to the trim using decorative nails.
Photo 25. Installation of vertical trims
To install the trim you will need about 20 decorative nails. They are clogged at a distance of 20–30 cm from each other.
On average, each vertical trim will require 7 decorative nails, and each horizontal trim will require 3–4.
Photo 26. Installation of horizontal trim
We measure the size of the horizontal platband.
Starting from the larger size, we cut at 45 degrees to reduce it.
The horizontal casing is fixed to the extension box and the vertical casing.
Photo 27. The final stage of installing slopes
We press the structure against the door frame and fix it with masking tape until the mounting foam hardens - for 1–2 hours. The exact time depends on the drying time of the foam, which can be found on the packaging.
After this, you can remove the masking tape. Your front door is ready!
Rules and nuances of forming door slopes
So, let’s move on directly to analyzing how to make door slopes for the front door from different materials. Let's start with traditional plaster. Let’s immediately make a reservation that if a new door structure has been installed, then first of all it is necessary to remove the smudges of polyurethane foam sticking out in all directions, which are simply cut off with a knife at the level of the door frame. If the old door is replaced with a new one, then the same thing is done, only the old slopes are additionally knocked down to the brickwork.
Then the surfaces are primed. After which the plaster solution is applied. Typically, a plaster slope is finished with paint, so its surface should be as smooth as possible. How to do it:
- dried plaster is treated with a primer;
- after drying, apply finishing fine putty;
- after it dries, sand with zero-grade sandpaper;
- Next they paint or wallpaper.
As for other types of finishing, plastering must also be carried out under them. You just don’t need to achieve maximum smoothness and evenness of the plastered surface, because the slope will be covered with another material that will give the door element not only decorative, but also evenness.
For example, drywall on slopes is “set” on putty, which is applied to the finishing material in slides or, as the masters do, with slaps. It is thanks to them that you can level the drywall by pressing it on the skewed side.
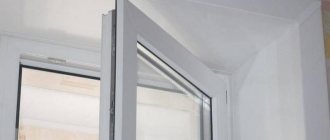
Types of installation
Installation of wooden slopes on windows in a wooden house can be done in several ways, so you need to decide and think through the nuances in advance. Wooden slopes can be installed 12 hours after installing the window frame . The construction foam has time to dry out during this time, forming the strength of the form. Since polyurethane foam is subject to rapid destruction, window finishing should not be delayed for long. Thanks to prompt work, the installation of wooden slopes will show the highest quality results.
You can install slopes on windows yourself in the following ways:
- In the first method, foam is used to fill the voids. First, all panels are measured and adjusted to the required dimensions using trimming. Pay attention to the corners: it is important that they are perfectly even. Next, the panels are secured with self-tapping screws in the area of the corner joint. The slopes must be laid in the frame grooves, after which the free spaces are filled with polyurethane foam. Foam, taking into account that the sealant will increase its volume by 3 times by the time it dries completely.
Polyurethane foam can be used as a material for fastening - The second method uses mineral wool. We adjust the panels to the required dimensions in the same way. We attach mineral wool insulation to them, cutting the material into strips of the required sizes. After fixing, cover with a layer of polyethylene glued with tape. We fasten the panels to each other with self-tapping screws. The finished frame structure can now be installed in the grooves.