For several decades now, wooden windows have been replaced by metal-plastic double-glazed windows.
This solution is advantageous due to its availability, tightness, as well as speed of installation and durability. When the installation process is completed, the window opening needs to be brought to its final form, so finishing of the slopes is required. Often, ready-made wooden slopes are used for this.
To find out about the relevance of such a solution, it is recommended to familiarize yourself with the requirements for wooden slopes, the types of wood for this, as well as possible difficulties in the work.
Is it possible to install wooden parts on a PVC structure?
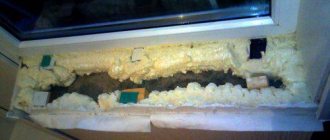
Slopes on plastic windows perform 2 functions: they decoratively mask construction irregularities and communications, and also additionally insulate the window. Since after installation there remains a small gap between the window and the wall, builders usually fill it with foam. Protruding pieces of material always do not look very nice, so the decision is made to use slopes.
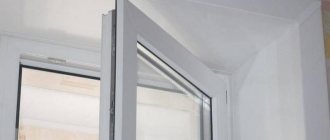
For PVC windows, they choose plastering or installing plastic slopes, but today wooden materials are also often used.
On a note. When answering the question whether it is possible to install wood parts on a PVC frame, it should be noted that the appearance of the structure will only improve, and the protective properties of wood can additionally preserve all corners and surfaces intact.
Wood products can be used both externally and internally:
If you decide to install wood outside the window, it is important to choose the right material and the type of wood from which it is made.
It must be a moisture-resistant material that is also resistant to temperature changes.- For internal products, there will be fewer requirements, since there will be no interaction with precipitation.
Today, construction stores have a large selection of wooden materials, among which you can choose exactly the option for slopes that will be relevant.
If the house is old
When repairing an old wooden house, the window sill is part of the window opening, therefore, if it is not deformed or rotten, then there is no need to dismantle it. A new plastic window sill is placed on the old one. The length of the window sill and the angle of rotation are measured. Dimensions are marked on plastic. Cut out the part with a jigsaw. The workpiece is mounted on silicone or polyurethane foam. They place the load.
A day later the slopes are installed. The starting profile is screwed into the frame. Remove excess foam from the window opening. PVC slopes are placed on the foam and the panels are secured with masking tape. The final profile is glued along their perimeter.
Requirements
There are some requirements that should be taken into account when independently selecting and installing products:
- the installed materials should improve the performance characteristics of the window;
- the slope must withstand mechanical stress;
- the service life of the product should not be less than the service life of the window itself;
- the decoration must correspond to the general style of the room;
- wooden slopes must be well secured with self-tapping screws or adhesives or sealants that are designed specifically for this purpose;
- The temperature and humidity conditions in the room where the slope will be installed must be observed;
- joints should not have gaps, corners should be installed at transitions.
Important! Parts for outdoor installation should not be made of material that is not resistant to moisture. During the winter and fall, the product will be exposed to snow and rain, so it must withstand harsh weather conditions.
What types of wood are suitable?
It is not enough to simply choose a wooden slope in a store and install it on a plastic window; you also need to know what type of wood such products are most preferable from. It is recommended to consider the main breeds that are used today:
Larch. It has a beautiful red-brown tint and good performance indicators.
Does not require the use of antiseptics, durable and fire-resistant. Resistant to moisture and frost, tolerates temperature fluctuations well.The downside is that it is not thermally conductive, takes a long time to heat up, and may crack over time.
- Oak. This is a durable material that exhibits unique hardness characteristics.
Oak can withstand high loads. It is dense and dry, so it is well suited for finishing. Oak is resistant to moisture and biological influences. Insects do not like it and fungus rarely forms on it. The downside is the high cost of the material. - Pine. Easy to process, resistant to moisture and environmentally friendly.
This material is the most affordable and has many color options. The disadvantages include the possible release of resin and the appearance of dark spots during prolonged use. - Linden. It is easy to process, has a low cost, but requires careful drying and is not a dense material.
From the point of view of installation outside the window, it is important to choose those species that are resistant to bad weather and different temperatures. Larch and oak are suitable, pine will also be relevant, but if not properly processed over time, this species may become covered with dark spots. For indoor installation, both linden and oak, pine and larch are suitable.
Classification of slopes
Slopes are classified by size, material of manufacture, shape, location.
Based on material they are divided into:
- metal, powder coated. Suitable for finishing exterior windows on facades covered with metal cladding or vinyl siding.
- plasterboard. This is an excellent option for leveling slopes. But plasterboard does not withstand exposure to precipitation, so it is used for interior cladding. In order for drywall to withstand weather conditions, frost and heat, it is important that it be moisture resistant. It is not the final covering. Ceramic tiles or painting can be used as cladding;
- plastic. Plastic is the best finishing for slopes. It meets all the criteria for choosing cladding: practicality, low price, high installation speed, attractive appearance. Sandwich panels are considered one of its varieties. In them, the outer and inner panels are connected by insulation: foamed polyurethane foam;
- MDF. The material is highly resistant to mechanical stress, is inexpensive, but can absorb moisture. Therefore, it is not suitable for external slopes;
- wooden. To improve the quality of wood and extend its useful life, it is treated with antiseptic agents before installation. Coating with several layers of varnish will help protect the wood from external influences.
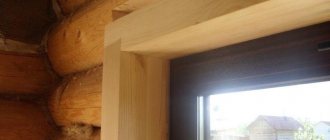
When the window is placed as far outward as possible, the frames in the house are made of profiled timber
By size
Depending on the size, slopes can be narrow or wide. The latter have a width of more than 200 mm. They are installed in log houses. The width of narrow ones varies from 50 to 200 mm. The choice of type of slope depends on the size of the window and its location relative to the central axis of the facade.
If the window is small, then narrow slopes visually reduce its dimensions. If the window block is pressed inward, but not deeply, then a wide slope is installed.
For a window flush with the wall, a narrow slope is used.
Internal slope made of furniture board - 18 mm thick pine
By location
Internal slopes give the room a beautiful look and protect from drafts. They are made from any materials.
In order for external slopes to be durable and protect windows from environmental influences, it is important that they are strong and wear-resistant. They are made of plastic, wooden lining or planed boards.
By shape
The shape of slopes can be straight or oblique. Direct ones are mounted to windows with standard double-glazed windows. Oblique ones are necessary for roof windows. They protect glass from freezing and condensation.
Sloping slopes on a dormer window made of lining
Tools and consumables for installation
You can install wooden slopes on PVC windows yourself. To do this, you need to prepare all the tools and consumables. Tools you will need:
- manual jigsaw - for trimming panels;
- level - to check the accuracy of installation;
- sandpaper - for smoothing edges;
- a circular saw;
- drill - for fastening;
- screwdriver - if there is no network connection;
- spatula - for finishing work.
From consumables:
The strip of wood itself will come in handy, from which pieces will be cut to the required length.- Corners are also needed. If necessary, you can purchase a metal corner or profile for more reliable corner protection.
- You also need polyurethane foam or mineral wool to eliminate gaps and seal the structure.
- A primer will be useful for treating the wall, self-tapping screws for fastening, or silicone sealant if the fixation will take place on it.
- For finishing work, before installing the slopes, it is necessary to putty the walls. To do this, you need to purchase ready-made putty or buy powdered putty and then dilute it.
- If the wooden planks are not treated, then you need to stock up on varnish to preserve the appearance of the wood.
Note! For external finishing work, special sandwich panels are often used, which already contain insulation.
Wooden window sill
Good day!
I am replacing the windows with PVC, but I would like to keep the existing new window sills made of pine plywood 50 mm thick. Why:
- The battery niche under the window is deep, and the window sills now overhang it by 250-270 mm (they do not cover the battery). Will plastic ones with such a stem be rigid?
- The existing boards are new, smooth, and I don’t want to overpay for plastic ones. Despite the fact that the overpayment is significant - 3 window sills with a width of 600 mm and a length from 1200 to 1600 mm.
How to make a part with your own hands?
Wooden slopes can be purchased ready-made, but it is cheaper to make them yourself. They can be made from wooden boards, and then the material is processed. Step by step it looks like this:
- Leveling the surface of the board. For work, a jointing machine is used - it rids the plane of the wood of roughness and irregularities.
- Adjust the board to the desired thickness. Here you can use a special machine that symmetrically levels the plane of the raw material and brings the entire segment to the same thickness.
- Wane one rib. Use a circular saw to cut a 90 degree angle.
- Then the board is cut to the required width, transverse sections are made so that the slope itself comes out slightly inclined. One edge should be rounded and the corner should be smooth.
Installation Features
There are several ways to install it on a plastic window, and one of them is using polyurethane foam.
The peculiarity of this process is that the size of the parts should be 1 cm larger than they actually are. This is due to the placement of construction foam in the gap.
All panels must be cleaned, trimmed, and sanded if necessary. They must have the appropriate dimensions. The corners must be symmetrical; if necessary, they are decorated with plastic, wooden or metal corners.
Advice. It is not recommended to carry out work without a preliminary plan. It is better to draw out all the dimensions in advance, cut them according to the drawing and only then install them.
If there is a desire to insulate a slope, then first the insulation itself is attached to the surface of the putty wall. This can be polystyrene foam or soft building material. Then the wooden panels are secured using a screwdriver and self-tapping screws. To avoid visible places where the fastener heads will be located, you can purchase special stickers to match the wood.
Possible difficulties and errors
One of the main mistakes that over time leads to damage to the integrity of a wooden slope is the choice of the wrong material. Any wooden slope must be made of well-dried wood. In addition, if the material is untreated, it should be coated with special impregnations and varnish , wait until it dries completely, and only then install it.
Another difficulty is the immediate installation of slopes. It is better to wait 1 day after installing the double-glazed window, then begin fixing the slopes. They must be mounted on a flat, pre-prepared surface. If you prepare the wall in advance, this will help in the future to avoid the appearance of fungus, mold and other problems in the thickness between the wall and the slope.
Getting ready for finishing
Before you begin installing window slopes, you need to check that the window blocks are installed correctly. If there are deviations horizontally or vertically, or if there is a curvature of the profile, the errors must be reduced as much as possible so that the subsequent finishing of the windows does not highlight the shortcomings. To do this, you can use plumb lines, placing them in the next order above the vertical profile of the window frame. Then you need to measure the sides with a tape measure and, if the indicators match each other, you can move on.
Check that there are no scratches or chips on the profiles. The window block must have a smooth surface that is free of bubbles and cracks. The slopes are installed after complete dismantling of the previous parts. Necessary:
- remove old slopes;
- remove excess foam;
- remove the protective film;
- seal through holes.
Pros and cons of use
The main positive aspects of this solution:
environmental friendliness;- noble appearance;
- functionality;
- variability of patterns and colors;
- ability to choose the type of wood;
- durability;
- wear resistance;
- safety;
- maintainability.
Along with a lot of advantages, there are also a few disadvantages:
- For example, a high price, which is determined by the type of wood.
- It is also worth highlighting careful care of the wooden product, without which the wood will become more susceptible to various negative influences.