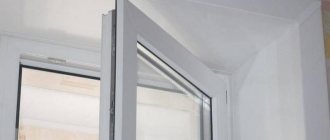
The window opening after installing plastic windows looks unpresentable. Pieces of plaster and polyurethane foam stick out, and the material of the walls is visible in places. To close all this, various methods are used. The most affordable and practical is the use of plastic slopes. It is better to equip them with sandwich panels, when foamed polypropylene is laid between two layers of plastic. They are durable, dense, made of high quality material.
How to make slopes on plastic windows? In total, there are two key methods: with and without the use of a starting profile. Both of these methods are effective and give good results.
Advantages of plastic
To cover the slopes of a house, the plaster method was previously used, then plasterboard, which was widely used for cladding. But with the advent of PVC windows, plaster and drywall faded into the background. Since finishing slopes using the plaster method has significant disadvantages. The main disadvantages include:
- If you plaster the slopes yourself, it takes a lot of time.
- This type of finishing creates a lot of construction waste.
- Due to shrinkage and temperature changes, cracks may occur on the surface.
- The component elements do not form the required adhesion to the plastic, as a result of which the slopes peel off from the window.
Internal window slopes made of plastic
To properly plaster the window opening, you should use a perforated corner and beacons. The perforated corner is installed on the outer corners of the slope. To do this, you need to cut off a corner of the required size, apply putty to the slopes and press the perforated corner. The plaster beacon is installed vertically along the window frame. To do this, cut the beacon to the required size, apply putty along the box and attach the prepared parts. After 40 minutes, you can plaster the slopes.
A finishing material such as drywall provides the opportunity to make slopes faster and warmer. But even the moisture-resistant version of this material cannot withstand temperature changes and the influence of condensation. PVC window slopes have a more interesting appearance.
Advantages of plastic slopes
But beauty is not their only advantage; positive characteristics include:
- The panels are made of the same material as the window frame, therefore, the space around the window takes on a monolithic structure.
- It is enough to simply install the insulation. It should be noted that with proper insulation, condensation is impossible.
- Installation of plastic panels creates virtually no debris or noise.
- This kind of building material can be used externally and internally, since polyvinyl chloride does not emit harmful substances.
- Insensitive to moisture.
- Duration of use.
- Tolerates temperature changes perfectly.
- Easy to use.
- The building material has an excellent pricing policy, therefore, it is available to anyone who wants to install plastic window slopes with their own hands.
The disadvantages of plastic include the impracticability of fragmentary restoration.
Do-it-yourself plastic slopes for windows (video)
Photo report 2: installing plastic slopes with a starting profile
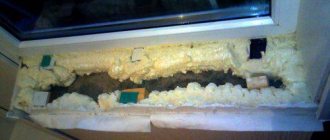
The installation of plastic slopes using this technology begins with the preparation of the window opening. We cut off the foam evenly, remove everything that does not adhere well, clean off the dust, and if necessary, go over the opening with a primer that improves adhesion.
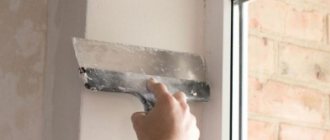
Preparing the window opening
A wooden block is attached along the perimeter of the opening, but already near the frame. Choose the thickness depending on the distance: it should almost fit the frame. One side of the block must be worked with a plane, making an inclination. The angle of inclination of this face is equal to the installation angle of the slope. You can saw it off, but it’s more difficult to make it straight unless you have a circular saw with an adjustable angle.
We make a slope on one of the faces of the block
We screw the treated block to the walls around the perimeter of the opening. The mounting method depends on the wall material. If the wall is brick, you can try using self-tapping screws; in a concrete wall, you need to install dowels.
Screwing the block
You buy a starting profile in the store, install it with the long side to the block, and fasten it. It is more convenient and faster to fix it to the bar with staples from a construction stapler; if you don’t have one, you can use small nails or self-tapping screws with flat heads.
We attach the starting profile
When choosing a starting profile, choose a dense one. It’s more expensive, but you only need three meters per window, maybe a little more. A dense profile will hold the plastic well, a soft one will bend and the appearance will be ugly. Another point - when installing the profile, press it as tightly as possible to the frame so that there are either no gaps at all or they are minimal.
At the top, when joining vertical and horizontal profiles, you need to be especially careful and cut them exactly at an angle of 45°. If there are small gaps, they can be sealed with acrylic.
Installed starting profile
Using this technology, it is more convenient to start installing reservoir slopes from the sidewalls. Insert the panel into the fixed starting profile. It is also better to take them from expensive and dense ones, with a thick layer of plastic. If you install cheap ones (ceiling), then the front wall is thin, and in bright light the jumpers will be visible. In addition, such plastic can be pressed even with your finger.
We insert a plastic panel into the profile
The width of the plastic panel should be larger than the slope. If the width of one is not enough, two are joined. But then at the junction you will need an additional vertical strip to which the first strip will be attached.
The panel inserted into the profile is usually longer than the opening. Holding it with your hand, mark the line of the opening. After removing, cut along the marked line.
Cut to size
We install the panel again, move it a little away from the wall and fill it with foam, trying to fill it without gaps, but without excess. To make this happen, we start from the far bottom corner - draw from bottom to top near the nailed bar. By the time we reached the top, the foam below had expanded a little. Draw a line with foam again, but closer to the edge. The closer to the outer edge, the less foam is required - after all, the panel is installed under a slope, so make the paths thinner. Having reached the middle, make a snake on the rest of the surface and press the panel the way it should stand. Align and check. Secure to the wall with masking tape. The second part and then the upper part are installed in the same way. It can also be cut out using a paper template, and the edges can be adjusted to a perfect (or almost) match using sandpaper.
Installed plastic window slopes
Having installed all parts of the slope and secured with masking tape, leave until complete polymerization. Then, in order not to putty the gaps between the slope and the wall, a white plastic corner is glued onto liquid nails. The main task is to cut exactly in the corners. It is easy to glue: apply a thin strip of glue to both shelves of the corner, press it, moving your hand along it, hold it for a couple of minutes. This is how they are installed around the entire perimeter, then, before the glue dries, they are also glued with masking tape and left.
Installed corners along the perimeter of the slope
After a day, we remove the tape, the plastic slopes are ready.
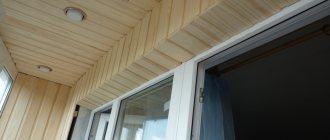
This is what a window with installed plastic slopes looks like
If there are gaps somewhere, they are sealed with acrylic, as described above. Don't use silicone. In the light it quickly turns yellow. In a year or two your windows will look terrible. Look for white acrylic sealant and mask it with it.
Read how to adjust plastic windows here.
Selection of building materials
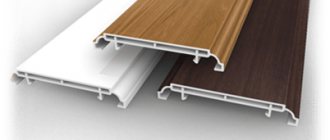
Before you think about how to make plastic slopes yourself, you need to consider possible variations in materials. There are 2 types of plastic panels:
- Decorative.
- Sandwich panels.
Decorative slopes can be used:
- For the formation of partitions.
- As a facing building material for balconies.
Necessary tools for finishing window slopes
For all other purposes, preference should be given to sandwich panels. This kind of material differs in that it has 2 protective layers and a facing layer of insulation. This structure allows you to avoid additional insulation. Key points for selecting panels:
- Preference should be given to building materials made from virgin plastic. Since the correct material is chosen, it will not change color, and the composition will not cause harm to health.
- It is better to choose a material with a significant plastic cover. Panels with thin PVC sheet covering are not durable. Over time, the plastic peels off the surface.
Finishing window slopes with plastic requires the following materials:
- Profile.
- Self-tapping screws.
- Dowels.
- Wooden slats.
- Gypsum insulation wool.
- Liquid Nails.
Consumables, tools and equipment for installation
Before starting work, you need to familiarize yourself with the installation technology of a certain material. Then the purchase of tools will be limited to the list of kits for this product.
To avoid stops and interruptions in work, you should familiarize yourself with the general list:
- drill;
- roulette;
- knife-cutter (sharp);
- screwdriver;
- construction marker;
- screws for plastic panels;
- screwdriver;
- hammer;
- construction level;
- rule;
- construction stapler.
Materials required for installation:
silicone (white);- self-tapping screws;
- dowel-nails (small);
- polyurethane foam;
- wooden slats;
- plastic corners;
- profiles - starting, J-profile, F-profile;
- construction staples;
- U-shaped bar;
- the material from which the profile will be mounted.
The installation process is divided into stages. Each stage will require its own set of tools and materials.
Preparatory moments
Removing the remnants of polyurethane foam
To finish the inside of the window slopes with plastic in a high-quality manner with your own hands, you need to clean the walls and prepare all the necessary fixtures and building materials. To form slopes, the thickness of the plastic strip should be 8 mm. The width and duration of the plastic must correspond to the size of the opening. You should prepare and clean the walls step by step:
- Remove excess foam.
- The shipping tape must be removed from the window profile.
- Seal the internal seams.
- The upper reaches and side sections of the hole must be freed from whitewash and leveled with putty.
- It is recommended to wipe the prepared area and apply 1-2 layers of primer.
Difficulties and errors in the process
The list of errors depends on the selected material and installation method. But there are common ones for all cases. For example, lack of high-quality surface preparation or preparation was done incorrectly.
In addition, it should be noted:
- Poor and insufficient filling of voids with polyurethane foam. This will lead to the window blowing out and cold entering the room.
- Plastering slopes without insulation. The material does not protect well from cold air, so condensation will form on the windows.
- The seams between the frame and the opening are poorly insulated. In this case, the drywall will begin to get wet.
- Error in choice of material. There are products that are used only for external (metal) or internal (plasterboard) slopes. If this is not taken into account, the slopes will quickly collapse.
- Installation of internal slopes only. The lack of external design leads to rapid destruction of the polyurethane foam.
In any case, the result will be the same - poor-quality sealing, penetration of cold, condensation, reduced service life of the window.
Formation and installation technology
After preparing the opening around the circumference, a vapor barrier film should be glued. At the combination points, sections of the film should be laid with an excess of 5-7 cm and glued along the seam. The tape must be glued so that the edges do not extend beyond the window frame. After this, you can proceed to the formation of slopes using the following instructions:
We fasten the bars with dowels
- Fastening timber material. For these purposes, wooden slats with a thickness of 15 mm and a width of 40 mm are taken. The slats should be trimmed to the width and height of the outer edge of the opening. The slats need to be secured with dowels around the circumference of the opening. If the walls of the hole are wavy, then it is recommended to place wedges under the planks.
- Take the necessary measurements carefully. It should be understood that all measurements must be taken from the frame, and not from the edge of the special profile.
- Open the slopes. The length and width of the walls of the hole should be correctly measured, and attention should also be paid to the angle of inclination on each side. You should mark the cutting points on the slab and cut out the workpieces. The resulting elements should be attached to the wall and their location and angular fit should be checked.
- Special profile fastening. A special profile should be attached along the outer edge of the opening with short screws. When joining the bars together, the special profile should be secured in the corners so that no gaps are formed. Installation of slopes begins with the manufacture of edging. This structural component is made from an F-shaped profile. All manipulations should begin from the top element. The profile must be cut to the size of the external opening and the corners must be filed at 45 degrees. The prepared special profile should be attached to the block so that it can be covered with plastic, but without blocking the groove for fixing the slope.
Installation of plastic slopes
- The profile is fixed to the beam with staples. The remaining sections are mounted in a similar way. The prepared slope element must be placed in a special profile, pre-coated with sealant. The resulting gap between the plastic and the wall must be sealed with insulation. It should be noted that the layer of insulation material should not be excessively massive or have vacuums. The outer edge of the slope must be inserted into the groove of the special profile and pressed to align the panel. Next, you should sew up the side slopes, while carefully distributing the thermal insulation. If the external walls are insulated, then such manipulations with the slopes do not need to be performed. In such a situation, the gaps between the panels and the base of the slopes should be sealed with polyurethane foam.
- The final period involves attaching decorative corners, which should be glued with glue. The contact points between the panels must be degreased and all cracks must be sealed with acrylic sealant. Acrylic should be squeezed directly into the gap, rubbed and leveled, and any excess should be removed with a damp cloth. All manipulations should be done in small areas and wiped carefully clean. Because while the acrylic has not hardened, it can be removed quite easily. The area of the opening under the window sill is being plastered.
Installation of plastic slopes in panel and brick houses
After installing the window, you can begin finishing after 24 hours, during which time the foam will completely harden.
In this case, installation is the simplest due to the fact that the thickness of the concrete wall, compared to a brick wall, is small. The standard width of PVC slopes of 250 mm is sufficient here. But insulation here must be done very carefully; concrete walls are the coldest.
- The wall is cleared of foam and the starting profile is attached to it with self-tapping screws.
- Now we cut out the panels. Installation starts from the top, and then the sides are attached
- The space under the sandwich panels is foamed. To avoid deformation, secure them with tape and there should be no excess foam!
- All joints are sealed
- The installation is completed with a finishing F-profile. At the joints it must be cut at an angle of 45 degrees.
- Brick has high thermal conductivity. Additional insulation is not required here. Typically, in brick houses, the wall masonry is thick, and heat loss is avoided by simply recessing the window inside the wall.
The price and complexity of installation will be affected by the thickness of the wall. After all, the standard width of PVC slopes may not be enough here, and wider sandwich panels are more expensive than narrow ones, which is quite logical. Otherwise, the installation follows the same pattern.
PVC slope cladding
Advice! You can veneer window slopes in another way, which differs significantly from the previous one. This method allows you to cover a window slope using any PVC material. It should be noted that this option is used when the installation seam has a small interval, that is, the distance from the frame to the wall is minimal.
The initial stage should be carried out in stages:
- Cleaning.
- Elimination of defects.
- Applying primer.
Sheathing slopes should adhere to the following rules:
- Remove excess foam, making sure that the cut is placed flush with the surface of the frame.
- Facing slopes with plastic plates involves treating the surface with a primer. Preference should be given to penetrating formulations with the addition of antiseptic components.
- Fixing slats.
- An important point is trimming the polyurethane foam. The cutting is done in such a way that a groove is formed for fixing the plastic. Trimming is done in close proximity to the frame to ensure maximum adherence of the material.
- Reveal the details.
Window slopes lined with PVC
After the manipulations have been performed, a number of actions should be performed:
- Using a jigsaw you need to cut plastic. As a rule, burrs may remain along the edges, which can be removed with sandpaper.
- Performing preliminary installation. This manipulation will allow you to determine the presence of defects. If double-sided plastic is used for cladding slopes, then one side needs to be sanded a little, thereby indicating the wrong side of the material. Carrying out such manipulation promotes better adhesion. Since PVC panels are fixed using polyurethane foam.
- The prepared elements are placed in the right place. They need to be installed in the prepared groove. Using a level, the structure is leveled.
- The outer edge of the part is moved back and foam is poured into spots.
- All structural parts are attached to each other using masking tape. Fixation is carried out along the circumference of the structure and at the joining points.
Important! Beginning craftsmen have a question: how long will it take for complete drying? As a rule, it will take a day for thorough drying. After which additional finishing activities are carried out. It should be remembered that external slopes also require attention.
Quite often, siding is used for such purposes. Working with building materials does not cause any particular difficulties due to the characteristics of the material. But if difficulties arise, then on the RuNet there are many videos and photos with detailed instructions regarding the installation of siding. The simplicity of installation work will allow you to do the cladding yourself.
Results
If you come to the conclusion that this is what you need, feel free to get down to business. Recently, plasterboard has become popular, since a large number of structures can be made from it, including slopes. During installation you may encounter difficulties, but there are far fewer of them than in the version with plaster. I would like to note in advance the fact that installation of slopes is not a type of service for which the cost is so high that it is better to save money. For this reason, many people try to hire specialists who will save you time and materials. All you have to do is enjoy the beautiful view with cleanliness and minimal costs. But since you still need to follow the masters, all the knowledge from the article will definitely be useful to you.
Photo gallery of finished works
Installing window slopes with your own hands - choosing panels
After windows have been installed in your home, the main and main problem remains the slopes. And no matter how carefully and efficiently the installation team works, chips and cracking on the slopes will always happen. In addition, a plastic window is much thinner in size than an old wooden one. For this reason, after installation there remains a strip of unplastered wall, which in any case must be sealed. For these purposes, it is best to arrange plastic slopes.
It should be immediately noted that installing panels is a very labor-intensive process. If you have very little idea about this, it is best to turn to professionals for help. But if you have made a firm decision to do everything yourself, we will tell you about it in detail.
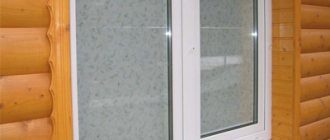
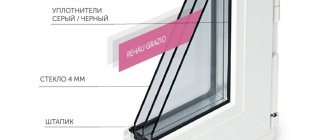
It is important to know that high-quality PVC slopes are quite thick. 8–10 millimeters of thickness is enough so that the slope does not sag and has a rigid fixation near the window frames. In addition, PVC slopes of this thickness have high thermal insulation properties, and if you use mineral wool during installation, your home will not be afraid of the most severe frosts.
Plastic slopes are easy to wipe, for this reason they are recommended to be installed in rooms with high humidity, for example, in kitchens, loggias, balconies, etc. Plastic products do not “collect” either mold or dampness. This is their undeniable advantage.
Plastic panels have other advantages:
- Perfect look. Plastic slopes have a smooth, uniform surface.
- When using these products, no streaks or stains are formed. And you can clean them with water and any detergent.
- Plastic panels have a long service life.
- Installation is quick, after installation there is a minimum of dust and debris, they do not require puttying or painting.
- Excellent moisture resistance of the material used.
- High vapor permeability.
Functional significance of slopes
Installation of slopes is necessary for the beauty of the interior and the convenience of washing windows.
Every owner strives to ensure that his home is functional and beautiful. Harmony is achieved by the fact that each element of the interior is in its place, organically combined with other objects and surfaces.
The functional significance of slopes is as follows:
- Aesthetic component. With the right choice of surface design (color, texture, texture), they can become a real decoration of the room.
- Place for placing insulation. After installation, a large opening remains, which it is advisable to use for business purposes, and not to seal it with mortar or leave it empty.
- Beautiful transition between wall and frame. These two objects must be connected as efficiently as possible in all respects. The planes should look good, have sufficient strength, and be easy to clean. Resistance to mechanical stress, moisture and ultraviolet radiation is of no small importance.
As a rule, slopes are made under the surface of the frame or window sill. Sometimes they are adapted for wall cladding.
Standard plastering and painting
Such slopes are characterized by low cost, since the work uses a dry mixture with a gypsum or cement base, diluted with ordinary water.
To begin with, the entire surface where the work will be carried out is thoroughly cleaned of gnawing and dust and leveled. The seams of the walls of the corners and slopes widen slightly (10 mm), this will provide good geodesy for plastering on the brick wall. It is important to know that the walls are plastered first, then this action proceeds to the slopes. The slope angles are leveled using plaster. Before applying each new layer of plaster, you need to make sure that the previous one is completely dry, which is why the process takes several days.
The gaps that have arisen between the double-glazed windows also need to be sealed, but for this purpose foam is used, but in private houses, in order to get warm slopes, tow or antiseptic felt is used for this. In this case, the material used is impregnated with a gypsum solution and laid around the entire perimeter. At this stage of work, it is very important to leave a small recess (20-30 mm) to the end of the window frame for pouring the solution. The use of foam fillers to seal gaps provides sound insulation. You must wait until the foam dries before moving on to the next step.
You need to apply a small amount of solution into the groove of the slope, which should be evenly leveled with smooth movements, waiting for the treated area to dry a little. After this, a small amount of plaster is applied to the working area, which is leveled in the same way until the slope sinuses are completely filled. So in one step a layer of 5-7 mm is obtained. The layer is leveled from the bottom up, and the hand with the spatula should move in different directions, and a trowel is used to level the lines.
Plastering also involves preserving the slopes of the slopes; for this you need to maintain a small angle between the frame and the wall, it is very important that this angle is the same everywhere.
The upper part of the slope must be fixed before plastering; for this, a flat wooden lath is suitable, which can be secured with plaster or nails. It is very important that the lath is level, for this you should use a level. The slats are also installed on the sides of the slope, but their accuracy of location is checked with a regular plumb line.
As for leveling the plaster, it is best to use a wooden screed with a round handle, and the length of the screed directly depends on the width of your slope. For ease of use, it is necessary to make a small cutout at one end, so the tool can easily move along the box; in addition, one of its ends is installed on a wooden rail, and the other on the box.
The edge of the corner is leveled only after the mortar has set well, after which the slopes are covered with a covering layer of plaster and rubbed down thoroughly. In order for the scaffold to be preserved, it is necessary to use rounded or flat fixings in the work. Only after the plaster has completely dried can the slats be removed. The work will be considered ideal if the corner is ground in without rubbing with the surface of the walls, but the thickness of the covering layer (22 mm) will be the same on all slopes.