Once upon a time, finishing work was limited to the most ordinary whitewash and wallpaper, which was glued to even the most uneven slabs. Sometimes large cracks were sealed with putty and that was all. As a result, many probably remember not the most even walls and air bubbles under the wallpaper, which could turn into unsightly tears with any careless movement.
Today, perfectly smooth surfaces are in fashion. In addition, walls are often painted or finishing material (for example, siding) is laid on them. All this requires preparatory work, which includes applying finishing putty. Thanks to this, it is possible not only to level the walls for painting or wallpaper, but also to improve the sound insulation and strength characteristics of the surface. However, before starting work, it is worth choosing the best composition and studying the types of mixtures offered on the market.
How to properly putty walls for painting
There are rules that will allow you to get the perfect result:
- The putty is applied in layers until the surface is smooth.
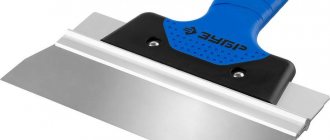
- You need to work with a wide spatula. A narrow tool is necessary to reach hard-to-reach places.
- You need to dry the walls naturally after each layer. Do not use air guns or a hair dryer.
- For perfect painting, painter's fiberglass or gossamer is applied to the final layer of putty. It will prevent the paint from cracking in the future.
Anyone can cope with puttying walls, but if you don’t have confidence in your abilities, it’s better to entrust the job to professionals.
Advantages
- Thixotropy. This is the name given to the ability of thick compounds to soften under mechanical stress. Thickened polymer putty becomes plastic again simply by stirring.
- High degree of plasticity. Such putties are easy to apply to the surface, give in gently to a spatula and create perfectly smooth, uniform surfaces.
- It does not dry out or crack when drying, and also does not shrink. An exception may be difficult places, such as joints of drywall sheets.
- No toxins in the composition. This is an environmentally friendly and safe material.
- Good adhesion with most building and finishing materials.
Which putty should I choose for painting?
There is a large selection of putties in stores. Depending on the degree of readiness of the material, the following are distinguished:
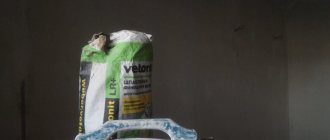
- Dry mixes. The advantage is low price. But you will have to cook it yourself, observe the proportions, follow the instructions.
- Ready-made compositions. They have the right consistency. They don't need to be mixed. They do not take time to prepare and do not require the use of additional tools.
If the goal is not to save money, it is better to take ready-made material with the ideal consistency. This putty is immediately ready for use.
Putty for painting differs in the type of binder that is included in the composition. The possibilities of their use depend on it:
- Cement. Designed for rooms with high humidity. Great for kitchens, bathrooms, bathrooms. Such mixtures are frost-resistant, so they are suitable for facade work and finishing balconies. Has a low price.
- Plaster. They are used in heated rooms where the humidity level is always within normal limits. You can putty the walls of the bedroom, living room, office, nursery. This material is inexpensive, does not shrink, and is easy to apply. There are many varieties. Even a beginner can handle it.
- Polymer. Dry mixtures are suitable for rooms with different humidity levels. Ready-made material is ideal only for dry rooms. Well suited for plasterboard walls. It lays on them in a thin layer, which reduces consumption.
The most expensive mixtures are polymer ones. But they guarantee a higher quality of the finished surface.
The cement option has disadvantages. This putty takes a long time to dry, it is not easy to apply, there is a risk of shrinkage. Therefore, in most cases, people prefer a different type.
Flaws
- High price. Polymer putties are the most expensive among all varieties of this material.
- Suitable for interior work only.
- Vulnerability to high humidity.
Most often, polymer putty is used as a finishing putty. It is with the help of this variety that painted walls are obtained with a perfectly smooth coating without flaws or color changes.
Features of puttying walls for painting yourself
Before you begin, you need to prepare thoroughly. It is important to collect the necessary tools and containers. If necessary, you need to buy what is missing, otherwise it will take a lot of time later.
Main stages and nuances of work, instructions for beginners
Puttying for painting begins with careful preparation of the surface for applying the mixture:
- Cleaning of old coatings, screws, hangers, nails.
- Large holes must be plastered with gypsum mortar.
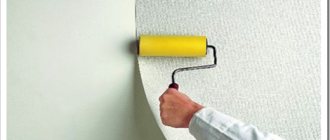
- Treating walls with primer. The impregnation layer must dry completely before puttying or painting. This will take about 6 hours.
The level of adhesion of the material to the wall and how durable and even the coating will be depends on the preparation of the walls for puttying. Therefore, you need to approach this stage responsibly.
Depending on the surface material, there are specific features of puttying walls for painting:
| Material | Peculiarities |
| Drywall | It is necessary to putty.· Pay attention to sealing the seams. |
| Balconies and loggias | Requires the use of materials resistant to external influences (cement mixtures). |
| Plastered walls | Before work, you need to clean it with a spatula to remove all sagging. · If there are crumbling areas, they are cleaned and leveled using plaster. Primer treatment is required.· Puttying plastered walls involves 3 layers of leveling (one removes cracks, dents, chips; the second completely levels the surface; the third allows you to remove all remaining defects). All applications must be thin (up to 1 mm). |
| Coloring | It is not advisable to immediately putty the painted surface. · Before work, the wall is treated with a special primer. |
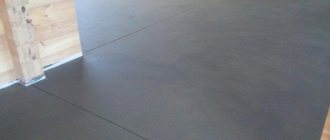
| Concrete | Before the main leveling, a layer of plaster is applied to the concrete wall. Next, the surface is treated with a primer. You will need to apply 3 layers of the mixture |
How many layers of putty are needed before painting?
There is a division of putty depending on its purpose. How many layers will need to be applied to obtain a perfectly flat surface depends on which option is used in the repair.
Highlight:
- Starting It is used as a base to remove large defects. It can be applied in a thick layer. As a rule, it is dry and made on a cement base. The base cannot be painted. This layer is rough and has a gray tint. It dries within a day.
- Finish. With a homogeneous structure. Apply a thin layer. Very plastic and pliable to work with. Therefore, a novice master can easily cope with its application.
- Universal. It combines the qualities of starting and finishing materials. One application is enough to remove all unevenness. True, you will have to scrub the surface for a long time and painstakingly.
The best manufacturers
To decide which putty is best for leveling walls, you should familiarize yourself with the manufacturers.
- Danogips is a domestic brand. The first plant began operating in 2006 with the production of SuperFinish putty. Today the company's product range includes a series of 10 items of polymer mixtures. According to user reviews, their main advantages are the smoothness of the coatings, reduced shrinkage, and the versatility of the compositions, which are suitable for processing concrete, gypsum boards, and brickwork.
- Volma is a company that produces finishing materials mainly based on gypsum. It was organized in 1999. Most of the line of finishing putty materials are dry mixtures, although there are also liquid mixtures. The manufacturer adds mineral fillers to their composition, as well as modifying additives, which increase the resistance of the coating to cracking and improve adhesive properties. According to reviews, this is a good putty for walls.
- "Osnovit" is a brand that produces products for construction and repair. The range includes cement, gypsum, polymer and putty mixtures in the form of liquid and powder. According to reviews, their advantages are ease of application, durability, economical consumption, and long service life.
- Knauf is a fairly large manufacturer that produces materials for finishing ceilings, walls and floors. The product has proven itself well due to the excellent texture of the mixtures, high coating strength, and beautiful color. The mixtures can be combined with concrete, plasterboard, and brickwork. Dry putties mix easily with water and, due to their optimal density, are consumed quite slowly.
- "Tex" is a brand owned by the Finnish company Tikkurila. Registered in 1995. The main range of the brand is liquid putties, ready for use. Their advantages are a smooth surface, high quality of filling cracks and leveling concrete and brick walls. There are compositions for outdoor use.
So, we looked at which putty is best for leveling walls.
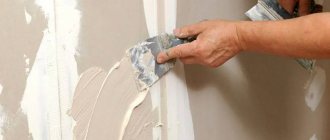
Applying starting putty
The first stage is applying the initial layer. It will be quite thick, because... designed to remove all serious irregularities. At the joints of plasterboard sheets, in deep places from under self-tapping screws and nails, fiberglass is additionally laid on top of the putty. Now you can leave it to dry.
The mixture must be diluted in small portions. This will allow you to get used to work. The lifespan of putty is short. You need to use it all before it dries out.
The puttying procedure is very simple:
- First apply a thick layer. The work is done using a large spatula.
- In just a couple of minutes you need to run the tool over the treated surface again. This will remove excess.
It is better to collect the mixture from the bucket with a small tool and transfer it to a working spatula. The inclination to the surface should be about 45 degrees. Every time a new batch of putty is required, it is recommended to wash all tools and containers. This way the work will be much more accurate.
Pros and cons of using mineral wool for external thermal insulation of a house
The popularity of insulation is primarily due to:
- low thermal conductivity of the material, and therefore high thermal insulation characteristics;
- excellent sound insulation;
- good level of fire safety (after all, mineral wool does not support combustion);
- vapor permeability (provides “breathing” of the house, which is especially important if the house is not wooden, but stone);
- resistance to fungi and rodents;
- relative environmental friendliness and safety of the material (harmful substances are released only when heated to more than 300 ° C);
- simplicity of installation technology.
Thermal insulation of the facade using mineral wool can be done independently
As disadvantages it is worth noting:
- change in the volume of insulation and the appearance of cracks in it (occurs only when there is no reinforcing layer);
- If mineral wool is not treated with a hydrophobic solution, all its thermal insulation characteristics will come to naught, because it almost instantly absorbs moisture.
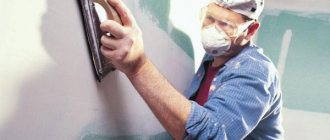
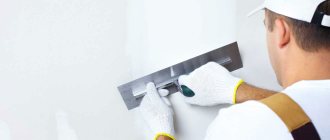
Finishing with finishing putty
The next stage is final finishing. You will need the same wide tool. The step-by-step instructions are no different from applying the starting coating. Only the layer will be no more than 3 mm (very thin). To do this, hold the spatula straight, 90 degrees to the wall. During operation, there is a lot of pressure on the tool. Then you will get a thin and as even layer as possible. We wait until it dries. After this, the surface will be ready to apply paint.
Putties
Mineral moisture-resistant lightweight plaster for exterior and interior use.
Mineral powder putty from the Capalith Fassaden-Renovierungssystem of façade repair products.
Powdery fine putty mass for facades. Maximum layer thickness: when filling the surface 0-5 mm.
Universal mineral dry mixture for creating a reinforcing layer and gluing polystyrene foam and mineral wool boards.
Matte filling dispersion plastic mass for structural facade and interior coatings.
Dispersive plastic mass for decorative structural coatings and thin putty indoors.
Modified mineral putty for repair and restoration of surfaces, processed using the felting method.