Types of putties
Putties are divided into types according to several criteria.
By purpose
Universal
Replace starting and finishing putties. They are easily applied to drywall and dry quickly without shrinkage. They speed up the finishing process because they reduce the number of technological operations. But they have a high cost.
Basic
Designed for initial rough leveling of walls. They are also classified as starting putties. The materials are made from chalk, gypsum and perlite or pumice. They are applied in a thick layer and dry quickly, which speeds up the finishing process.
Basic putties are sold dry . They are diluted in the required amount of clean water strictly according to the manufacturer’s instructions. If necessary, the material is reinforced with sections or fiber. This approach is especially relevant in the presence of strong defects near the walls or a weak foundation.
Finish
Designed for surface finishing. They work on already dried starting putty, forming a thin layer of up to 3 mm. After hardening, the putty forms a dense, hard surface without cracks or chips.
Finishing putties are sold in two forms: dry and ready-to-use. The former are diluted in water, similar to the starter ones, and the latter are suitable for use immediately after opening the package.
Denis Mosin
Master finisher. 17 years of experience. Decorative plaster expert
Ask a Question
Any type of putty in finished form is not suitable for long-term storage. When exposed to open air, they dry out. It is best to dilute the dry mixture in small quantities.
When ready
As already noted, putties are sold dry and ready-made. The first requires dilution with water, and the finished product is suitable for application after opening the package.
By composition
Moisture resistant cement
Created on the basis of cement. Therefore, they have properties such as moisture resistance, immunity to temperature changes, and suitability for interior and exterior wall treatment. They are a good choice for covering surfaces in the kitchen, bathroom and other rooms where there is high humidity and steam formation.
The disadvantage of cement putties is their rough structure. After drying, the layer is difficult to process and sand.
Plaster
Made from gypsum. They are white and flexible, creating a favorable microclimate in the room by creating proper moisture circulation. Available in both starting and finishing versions.
Polymer
This is a modern and popular elastic putty. It is used, perhaps, even more often than gypsum and cement. It is easy to use and durable in use. Polymer materials are divided into the following types:
- Acrylic. They can be starting, finishing or universal. Contains acrylic.
- Polymer-cement. Mainly used for leveling cement-concrete, lime and brick bases. Created on the basis of cement and polymer additives. They have a plastic consistency and can be used both as a starting material for leveling and as a finishing compound for final processing.
- Latex. They are made from styrene, which is a specific type of acrylic-based latex. Excellent for finishing plasterboard, brick, wood, concrete and other types of walls.
Polymer putties are applied in a thin layer. Even a beginner can level the surface.
Packaging forms
Putties are packaged in the following types of containers:
Bag
Dry putty is sold in bags and requires dilution with water. Often packaged in 25 kg packs. Conveniently stored. But it is not intended for storage in damp, poorly ventilated areas. Otherwise, the shelf life will be reduced several times.
Plastic bucket
It is considered the most convenient packaging, since in this case the putty is used carefully and evenly. The tightly sealed building mixture is protected from external negative influences, so it is stored for a long time.
Tight package
It is not recommended to buy putty in a tight bag in large quantities. It is better to correctly calculate the material consumption and buy as much as you need. Otherwise it will spoil.
Selection of finishing putty
For wet areas
PETROMIX FP-04 and FP-05 putty on a cement binder has increased strength and is suitable for rooms with high humidity.
On a polymer binder
Polymer modifiers in the composition of the PETROMIX FP-07 polymer putty provide increased plasticity and rapid drying of the solution, reducing the period of work.
Polymer putty FP-07 Polymer putty ShF Gray putty 5 kg FP-05 Polymer putty FP-07
1
/4
For decorative coating
To avoid spoiling the color of light paint or thin wallpaper, it is recommended to use a white mixture.
Can finishing putty be used under tiles? No. Do not use putties under the tiles. The glue is applied directly to the plaster or drywall. This provides better adhesion to the tile adhesive.
White putty FP-04 White putty ШТ White putty 5 kg FP-04
1
/3
For minor repairs
Usually putty is sold in bags of 20-25 kg, but PETROMIX also has a small package of 5 kg in case there is just a little bit missing or you need to smooth out several seams.
White putty 5 kg FP-04 Gray putty 5 kg FP-05
1
/2
Which putty to choose for gypsum boards: review of popular brands
On the construction market there are putties for drywall from the following companies:
Knauf Rotbant
This is a dry gypsum putty containing polymer additives. Packaged in thick paper bags weighing from 20 to 25 kg, or in buckets. Specifications:
- minimum and maximum layer thickness - 0.2 mm and 5 mm;
- the strength of a layer of 1 mm in bending and compression is 1.3 MPa and 4.2 MPa;
- average consumption - from 0.9 to 1.1 kg/sq. m.
Rotband putty is sold in pink, gray and white. The product has gained popularity due to the following advantages:
- has good adhesive properties;
- just lays on the walls;
- does not crumble;
- has an affordable price;
- refers to environmentally friendly compounds;
- used by both professionals and beginners.
The disadvantages include the inability to use in wet areas.
Knauf Fugen
This is a classic gypsum putty that guarantees success regardless of labor costs. But this is only possible if you follow the instructions unconditionally:
- compliance with temperature and air humidity - no more than +10 degrees and 70-80%;
- pre-treatment of the base with a primer, cleaning and drying is required;
- Only clean tools are used.
Knauf Fugen is not suitable for large-scale projects. To ensure that this putty applies evenly, it is applied in a thin layer of up to 3 mm.
Knauf Fugen is presented in three types:
- Knauf Fugen. Designed for processing the joint edges of plasterboard sheets. Does not crack after drying. Made from gypsum - an environmentally friendly, clean natural material.
- G.F. Designed specifically for continuous puttying of plasterboard sheets, sealing joints and Knauf floor elements. Advantages: high strength and elasticity, uniform and high-quality finished surface. The putty contains gypsum and polymer additives.
- Hydro. Used for processing gypsum board joints and mounting plasterboard boards. Does not crack, gives minimal shrinkage, shows maximum resistance to moisture. The composition contains polymer and hydrophobic additives.
The disadvantages include quick drying in a mixing container, inconvenient sanding, and application only in a thin layer.
Axton
Axton putty is designed to create perfectly smooth surfaces for painting. It is based on gypsum and calcium carbonate, and is intended only for interior work. Presented in dry and ready-made form for basic and final leveling of walls.
Advantages:
- easy application due to the presence of plasticizers and modifiers in the composition;
- high adhesive properties;
- light sanding;
- resistance to the formation of bubbles and cracks on finished substrates;
- fast and uniform drying, which makes it possible to begin the next work within 12 hours.
The layer thickness varies from 0.2 to 2 mm, the average consumption is 1 kg/sq.m. m with a layer thickness of 1 mm. Consumers note that when applied, the composition turns into lumps. But this can be solved by polishing.
ABS
This is a finishing gypsum putty designed for final finishing of all types of surfaces. Fills all cavities on the bases, eliminates heterogeneity of structure and unevenness. It is elastic and provides a perfectly smooth white surface that is resistant to mechanical stress.
The composition hardens within two hours and is consumed in an amount of 1 kg/sq. m with a layer thickness of 1 cm. The product has no flaws or negative reviews.
Bolars
This is a professional mixture for repair and construction work. However, the company produces a wide range of compositions for interior work, dry and wet rooms, basic and final leveling of walls and ceilings.
Bolars putty meets the requirements of GOST ISO 9001-2015 and international ISO 9000. It has the following advantages:
- environmental friendliness - contains white cement and imported polymer additives;
- water resistance, thanks to which the finished coating becomes durable;
- long operating time - is in working condition for at least three hours;
- dries quickly - within a day you can start painting;
- makes it possible to adjust the thickness of the application layer - from 1 to 10 mm, it all depends on the quality of the base.
However, this putty is consumed very quickly: per 1 sq. m will require 1.3 dry mixture, and a bag weighing 25 kg is enough for only 18 square meters. m with a layer thickness of 1 mm.
Vetonit
A popular, modern and environmentally friendly putty manufactured by Weber. The product has many advantages:
- created on the basis of safe components, therefore does not emit toxic substances;
- suitable for use in damp rooms, as it shows a high level of moisture resistance;
- provides a perfectly smooth surface due to its special powder composition;
- intended not only for internal processing, but also for external processing - as evidenced by the snowflake on the packaging;
- It can be stored for a long time in diluted form - about 24 hours.
The manufacturer produces several types of putty: LR, LR+silk, TT, KR. But all of them are suitable for final finishing work and preparing walls for painting.
Volma
Putty on a natural gypsum base with additional chemical and mineral trace elements that are responsible for wear resistance and adhesion. Among the advantages are:
- elasticity and plasticity due to the light and airy composition;
- environmental friendliness and safety;
- no shrinkage;
- presence of thermoregulation properties;
- convenient use and high quality;
- obtaining effective alignment and reliable sealing of seams;
- a sufficient layer of material, the maximum is 6 cm.
Volma Aquastandard putty is suitable for treating drywall for painting. Developed based on Portland cement and reinforced fibers. The latter provide the finished coating with reliability, strength and wear resistance.
Prospectors
For puttingtying drywall, the best finishing putty is Starateli. It is made on the basis of gypsum and polymer additives. Characterized by the following properties:
- plasticity - easy to apply and level, does not flow down or form roughness, fills unevenness and increases the strength of the finished coating;
- high adhesion - quickly and reliably adheres to drywall;
- waterproof - the film is dense and moisture-resistant, without large pores;
- environmental friendliness - does not emit harmful substances during heating and combustion;
- resistance to negative factors - resistant to ultraviolet radiation and chemicals.
After drying, the putty can be easily sanded. The hardening process lasts about 24 hours, then a decorative layer is applied. Consumed in the amount of 1.1 kg per 1 m2.
Ceresit
It is a polymer putty for finishing leveling surfaces and filling small defects on plasterboard walls. Sold in the form of a dry and ready-made mixture. Among the main properties are high adhesion to substrates, plasticity, ease of use, and environmental friendliness.
The manufacturer assures that its products do not require mandatory coloring. Application of paint and wallpapering occurs at the request of the master.
Ceresit putty dries in 72 hours. It is not recommended to begin subsequent work earlier than the specified period. Otherwise, the results will only be disappointing.
Litox
To prepare plasterboard sheets for painting, the manufacturer Litox created the SatenLux MT-60 putty. It is a dry putty mixture based on gypsum with polymer additives. It is easy to apply and spreads in a thin layer with a thickness of 0.2 to 3 mm. It does not dry out in finished form for about 90 minutes, which makes it easy to use.
The mixture is sold in bags and buckets weighing 25 kg. This is quite enough to treat a room of 18-20 square meters. m. The product has a large number of positive reviews. No negative opinions from consumers were found.
Unis
The putty is presented in two versions: gypsum-based finishing and universal “Blik”. They share unique properties, such as ideal adhesion of layers, flexibility to grinding, resistance to shrinkage, and the creation of a flat and smooth surface. Consumption is 1 kg/sq. m with a layer thickness of 1 mm. The viability of the solution is about two hours. In this case, one millimeter of the applied layer dries in about six hours.
They are not suitable for repair work in conditions of high humidity, this is the main disadvantage of the product.
Habez
This is a dry gypsum mixture, which in addition to gypsum contains mineral fillers and special additives. They are designed to increase the strength of the base and the resistance of the finished layer to cracking. The putty is quickly prepared, applied conveniently and evenly, sets and dries quickly.
Khabez putty has the following characteristics:
- consumption kg/sq. m with a layer thickness of 1 mm - 1;
- layer thickness - from 0.2 to 3 mm;
- viability - 60 minutes;
- Drying time: 24 hours.
However, many consumers claim that this putty dissolves when applying primer, and turns into lumps during mixing.
Bergauf
Universal putty on a gypsum basis. Made using a gypsum base, mineral fillers and modifying polymer additives. It is characterized by plasticity, quick application of a layer with a thickness of 0.5 to 15 mm, easy processing, short drying time (no more than 24 hours).
The following advantages have been identified with this putty:
- simple preparation of the solution;
- good pot life about 40 minutes;
- economical consumption, no more than 900 g per 1 sq. m with a layer thickness of 1 mm;
- effective, safe composition;
- convenient packaging.
It is not recommended to prepare the mixture in conditions of high ambient temperature and humidity, or in the presence of a draft. Otherwise, the viability of the solution will be reduced several times.
The disadvantage is that it is demanding on the surface. It must be cleaned and dried. Even a small contaminated area will cause poor adhesion of the material to the base.
Satentech
Paste putty for finishing plasterboard walls. It has good adhesiveness and contains special elements to ensure the base has good moisture resistance. Thanks to the specific properties of microparticles, a perfectly smooth surface is created. No cons found.
The finished solution is active for about 60 minutes, dries in two hours, and consumes 1 kg per square meter. m with a layer thickness of 1 mm. Upon contact with soil and moisture, it becomes unusable.
Tex
This is a latex putty developed on a latex base with modifier additives, filler components, and pure distilled water. A unique feature is the content of antiseptic substances that protect the base from the appearance of mold, dampness, and peeling of the decorative layer. After application, the putty forms a durable and elastic layer.
Tex products are characterized by the following properties:
- 500 g per 1 sq. is consumed. m;
- ready for the next treatment within a day;
- does not contain toxic substances;
- easy to apply and adheres well to substrates;
- does not form lumps;
- sold in a variety of colors, so it can replace a decorative coating;
- prevents the next layer from drying out and cracking.
The putty does not tolerate long-term storage at sub-zero temperatures.
Shitrock
A universal putty that quickly gained popularity. Consists of pyrophyllite, attapulgite, ethylene-vinyl-acetate polymer, talc, limestone and dolomite. It is in the set of components that the uniqueness of the material lies. Putty comes to the market in large plastic buckets that are easy to clean.
It is a finished product, has an oily consistency, and is suitable for dilution with water in small quantities. It is easily leveled, shows minor differences in layers, is excellently sanded, and has a long service life. The only drawback is the high price.
Pufas
Gypsum putty for filling cracks and leveling uneven surfaces. It adheres well to the surface after application, exhibits excellent resistance to shrinkage and deformation, is environmentally friendly, easy to use, capable of forming a smooth, uniform surface, and is economically used.
The manufacturer offers several types of such material. Therefore, before purchasing, it is important to study its technical characteristics and purpose. Consumers claim that any mixture guarantees the quality and durability of the resulting coating.
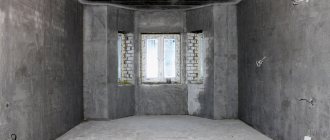
The need for putty work
Putty is a mandatory procedure, since plasterboard sheets have joints and places with screws. During final finishing, they can lead to unevenness that will be visible to the naked eye. In this case, the leveling mixture must be applied several times (at least three layers of putty solution). It follows from this that if there are load-bearing structures made of plasterboard in the room, careful finishing of the surfaces is necessary.
Let's figure out what a putty solution is. Putty is usually understood as a special quickly hardening mixture intended for construction and finishing work, in particular for leveling walls or smoothing out unevenness.
Recently, it has become popular to use putty for drywall, because this is how you can achieve a perfectly smooth surface for subsequent decorative wall finishing.
If you are going to carry out the finishing yourself, then you simply cannot do without certain knowledge. It is important to be able to properly prepare the leveling solution and carry out the work in stages, following the puttying technology. However, even a beginner can cope with this; the main thing is to determine which putty to putty on drywall in order to prevent the cost of unnecessary building materials.
On video: why you need to putty drywall.
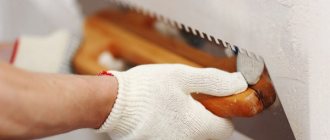
Materials for reinforcing seams and corners
Lack of proper sealing of gaps between sheets of drywall is the main reason for premature damage to the finishing coating, gradual destruction of the base material, and deterioration of its appearance. Therefore, sealing joints in preparation for painting is the main stage of finishing work, requiring special materials and tools.
Construction reinforced fiberglass tape
Made from non-woven fabric, it is a construction bandage and allows you to seal the joints of gypsum board sheets. Prevents cracks and seam fraying. It is used when the putty layer has already been formed and is covered with putty.
Mesh for seams (serpyanka)
Sold in various versions: each model has its own cell sizes, width and length. Sometimes such tape does not have an adhesive base, so it is covered with a layer of plaster. It is considered a good and convenient option for finishing joints and corners.
Paper perforated tape
This is a cheap and fairly durable material for sealing joints on gypsum boards. Perforated paper is cut into strips of the required length, and then poured with boiling water. At the same time, each joint of the plasterboard sheets is treated with putty. After a few hours, the joints are sanded, the tapes are treated with PVA glue and placed in the desired area. After the glue has completely dried, the paper tape for the joints and the sheets look like one whole.
Metal corner corners
A good choice for creating neat corners. The profile is made of steel, PVC, aluminum. Using special scissors, adjust the size of the corners, after which a putty mixture is prepared. The solution is distributed over the surface, the profile is placed and unevenness is corrected. Afterwards, the dried layer is sanded.
Instructions: how to putty drywall joints (video)
Additional information: Puttying drywall seams, how to putty drywall seams
Also, to fill the joints you will need reinforcing tape - serpyanka. It is a construction mesh based on fiberglass. One side of it is treated with an adhesive composition that fixes the tape to the surface. The width of the serpyanka varies - from 4 to 23 cm, length from 2 to 18 m.
Paper and serpyanka are most often used to decorate internal corners - the junction of walls, as well as walls and ceilings. The technology is similar to seam sealing. A certain amount of putty is applied to the corner, paper or sickle is glued onto it, the reinforcing strip is pressed into the composition with a narrow spatula, and excess putty is removed.
After this, they go through the corner again, applying a thin layer of putty on top.
Sealing drywall seams is not a difficult task, but it requires a lot of patience and accuracy, since there can be a lot of seams, and all of them will have to be sealed, and if they are also located on the ceiling, the master will be very tired. We advise you to take short breaks so that the quality of the work does not deteriorate, and so that the putty does not fall from the ceiling, you need to press harder on the spatula, so it will penetrate deeper into the seam more tightly.
The main reason for the formation of cracks at drywall joints is the properties of the material from which the plasterboard is composed. Gypsum absorbs and releases moisture from the air well and, depending on the season, the sheets either expand or contract. And if mistakes are made when installing the gypsum board and when puttingtying its joints, then their result will be the appearance of cracks.
To begin with, you can go over it with a sharp, even spatula and cut off all the most protruding irregularities. Next is the sanding process. Since corners and seams at this stage do not need to be sanded to perfect smoothness, take a sanding mesh with a mesh size of 180-200 and a wooden block.
A mesh is attached to the block (you can use staples from a construction stapler, but the staples should not stick out). This device levels the surface. When working, it is advisable to highlight it with oblique light - this way all the irregularities are more visible.
But you can’t putty plasterboard under wallpaper so carefully.
One of the possible defects is bubbles at the joints of the plasterboard. We cut the bubbling areas with a painting knife. Small bubbles can be removed completely. Next, we put tape around the area around the bubble and cover the defect with putty.
Level the surface with a spatula. How to properly putty plasterboard walls for painting video? A day later, we treat the area with a finishing compound and clean the area with a fine-grained abrasive.
What tools and materials will be needed for all stages of work?
To putty drywall for painting, you will need the following materials and tools:
- putty;
- set of spatulas;
- paint roller or brush;
- serpyanka or any other previously listed material for decorating corners and joints;
- sandpaper, block or sanding mesh;
- deep penetration primer, you can choose Ceresit ST 17 - it is universal and colorless, and does not turn yellow after drying.
You can choose any primer manufacturer. The main thing is that its technical characteristics are suitable for drywall and do not turn yellow after drying.
Plastering plasterboard under wallpaper
Drywall has a large number of advantages, due to which it has gained great popularity both among people who want to make repairs and among builders.
Its properties and structure make it possible to produce structures of almost any shape. In addition, using drywall to level the walls, you can significantly save on materials. If there are an abundance of irregularities on the wall, then you will need to use just a huge amount of plaster, after which you will have to work hard with putty.
But there are also some nuances. Despite the almost perfectly smooth surface of the drywall, there are still connecting seams that are immediately noticeable. A lot of people who have chosen drywall are wondering whether it is necessary to plaster drywall under wallpaper?
If the drywall sheets were monolithic, then this would not be necessary. But the fastening points, joints, and screw heads need putty, so preparatory work must be done.
Prepare the walls
Properly prepare cut seams: jointing
Joining is only needed to join the end side of the sheet with the open gypsum part. Use a sharp knife to make a chamfer at an angle of 45 degrees. 9 or 12 mm are retreated from the joint, and an incision is made at an angle. The finished surface is cleaned with sandpaper.
There is no need to unstitch factory joints.
Cleaning
Before processing the seams, remove all dirt and dust from the drywall using a dry, clean rag or soft brush. The protruding paper burrs are trimmed with a knife, and the screws are tightened so that they are slightly recessed into the drywall.
The easiest and most convenient way to clean drywall is to use a vacuum cleaner. After treatment, you should thoroughly wash the floor so that small debris does not stick to construction mixtures and surfaces.
Primer
Prepare the primer solution according to the manufacturer's instructions. The mixture is passed along cracks, seams, corners and places where screws are deepened. Leave until completely dry. If necessary, make another layer.
The procedure for finishing gypsum boards with your own hands: step-by-step instructions
Prepare a mixture for sealing seams, screws and corners
Prepare the putty in small quantities so that after finishing the work the container is empty. The process is carried out step by step according to the instructions printed on the packaging.
Seal joints and screws
All seams are sealed with reinforcing self-adhesive tape or sickle tape and covered with putty.
Particular attention is paid to self-tapping screws.
Following the sealing technology, the recesses are aligned with the total area of the drywall sheets.
Form corners (external and internal)
External corners are formed with a plastic or metal corner. The profile is applied to the wall and fixed with a construction stapler. Then apply a layer of putty and level it with a narrow spatula, correct unevenness and leave to dry. Afterwards, the dry corner is treated with sandpaper.
To form internal corners, use a building level. Lead it at an angle of 30 degrees. Then sizing is performed with reinforced tape. Putty work is carried out in the following stages.
During the process, they try to prevent displacement of the perforated elements. Otherwise, the finished version will have crooked corners and sloppy painting.
Prepare putty for basic work on the area
At this stage, prepare a sufficient amount of putty mixture. Follow the manufacturer's recommendations.
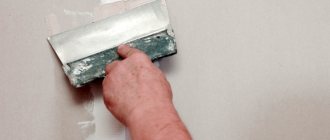
First layer
The putty is applied in a thin layer, leveled, and left to dry. If the first application of putty was not enough, then primer is applied to the walls again, and after some time it is puttied.
Finishing layer
After the first layer has completely dried, putty is applied again. Attention is paid to irregularities. They try to ensure that the main layer does not protrude beyond the previously designed corners.
Grinding
Processing with sandpaper removes unevenness, roughness and protrusions. The material can be replaced with a special attachment for power tools: it’s convenient and quick. After finishing the work, clean the room from dust and begin painting.
Puttying seams (joints) of drywall
The technology for filling joints is as follows:
- Carefully inspect all irregularities in the area where the sheets join. If any of the screws protrude, then they will need to be screwed in.
If some turn out to be recessed by more than 5 mm, then they should be unscrewed and screwed in again at a distance of up to 50 mm from the previous place. Alternatively, you can replace such a self-tapping screw with a longer one and not make another hole in the sheet. Cut the cut edges of the plasterboard at a 45-degree angle to a width of 3-5 mm. If the edge of the sheet is in the area of the junction, then there is no need to trim it. This is done to increase the surface adhesion area to the putty.
Don't forget to prime the cut edges! Plasterboard putty begins after this layer has dried.
Another layer of putty is applied on top of it with great pressure on the spatula. It should be recessed into the material so that during grinding it does not jump out as excess. For the last layer of putty, it is better to use a ready-made paste.
It is more flexible and the result of its use is much more attractive. The finishing layer of putty must be applied precisely at the level of the sheets themselves.
Apply only with a wide spatula with smooth edges. Working at this stage with an old tool is simply barbaric: it will leave scratches that you tried to avoid in all previous stages. The next, final stage begins after 4-6 days, when all layers of putty have dried. Sanding putty joints (seams) is done first with sandpaper, and then with its softer version - sandpaper.
How to putty gypsum board using a roller
The roller will be a good choice for a beginner - because working with such a tool is simple and convenient. However, many experts consider this option of applying putty to be inappropriate. But if you prepare the right solution and follow some rules, you can achieve ideal results.
What you will need: tools and materials
To putty gypsum board sheets, you will need a regular roller without long pile or pattern, as well as containers, primer, putty, and reinforced elements for decorating corners.
Preparing the mixture for working with a roller
The mixture is prepared the same as for puttying plasterboard with a trowel. Many people advise making the solution a little liquid: it is easier to apply. Prepare it immediately before starting work.
Alignment
The first step is to glue the seams of the sheets and remove all kinds of surface defects. When the putty has dried, apply a layer of primer.
Then take a roller with a pile length of no more than 3 mm, dip it into the ready-made solution and roll it over the surface. The process is reminiscent of simply painting walls. Leave to dry.
The putty layer should not be less than 1 mm. Otherwise, after drying, the primer and auxiliary elements will remain noticeable.
Grinding
Everything is the same here. The surface is treated with sandpaper or a special attachment for a power tool.
Five rules before you start working
The use of reinforcing tape for seams is mandatory
Before you apply the first layer of finishing putty to the drywall, make sure you don't forget to buy seam sealing tape. If you can still do without it when sealing seams with the starting compound (this is not recommended, but acceptable), then when working with finishing putty it is absolutely necessary.
Keep the necessary tools at hand
To work you will need:
- roller and wide brush;
- container for solution;
- drill with mixer attachment;
- a container with water for washing the spatula;
- paint float or sandpaper;
- rubber spatula;
- several spatulas with a width of 100 to 600 mm;
- A large spatula is the rule.
When working with dry mixtures and during surface grinding, do not forget to protect your respiratory system. Use a respirator.
Prepare the joints
Joints formed by manually cut sheets of gypsum board must be prepared in advance - cut off the edges at 45.
Do not mix a lot of solution at once
At the first stage, when sealing screws, the mixture is consumed slowly and dries quickly. It is recommended to mix no more than 5 liters of solution at a time.
Take your time
A rookie mistake is wanting to finish quickly. Even if the layer visually seems dry, wait until all the time allotted for the solution or soil to dry has passed.
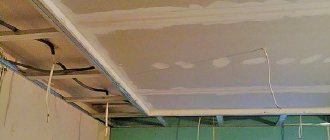
How to putty a ceiling: 3 tips
There are several life hacks on the topic of puttying the ceiling with your own hands:
- A fugenfüller will help save time and effort on processing seams. It is a tough and durable putty that is an excellent substitute for adhesive tape.
- The usual construction rule will replace a wide spatula and speed up the work process. But it should be constantly soaked in water so that no lumps remain on the surface. It’s simple - the mixture is usually applied with a small spatula, and then the ceiling is treated with this tool, trying to move quickly and maintain a layer of 1-2 mm.
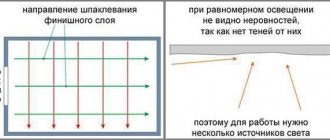
- To make the ceiling ideal, it is better to use high-quality lighting. Regular spotlights will do.
Denis Mosin
Master finisher. 17 years of experience. Decorative plaster expert
Ask a Question
To dry layers quickly, it is better to leave doors and windows open. Experts say that ventilation does not spoil the primer and putty.
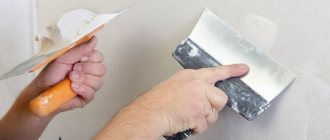
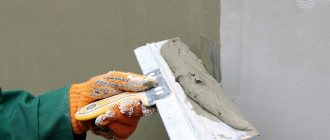
Tools for working with putty
It is very important to use the right tools when working with different types of putty, which are best suited for a given situation. This may seem like a minor aspect at first glance, but it is actually very important.
There are two different types of spatula that are used in different situations during putty - wide and narrow. Branded spatulas are better suited for the job than others, they even make the work less labor-intensive. A wide spatula is used for basic work, and a narrow one is an auxiliary tool for situational situations.
And it’s also worth remembering that if you use dry putty, then in some cases you need to use water to dilute the mixture, and in others you need to use a primer. Be careful with this aspect and always follow the instructions carefully.
If, after leveling the wall with putty, it is still not level enough, you can use a special aluminum profile. It is used to straighten curved non-plasterboard walls. Together with putty, it can even out any unevenness in different walls. This same aluminum profile is frozen vertically along the primed surface along the entire wall, and after that a layer of putty is applied. In this process, the profile serves as a support.