Drywall is often used to decorate the ceiling space. This material creates a smooth surface suitable for further decoration. Installing drywall on the ceiling is not difficult, so even a novice craftsman can do this type of finishing on his own. The main thing is to familiarize yourself with the algorithm for fixing sheets.
Prepare materials
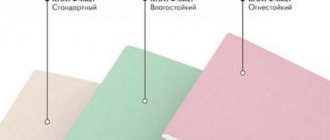
- Drywall 12.5 mm;
- PP profiles 60×27;
- profiles PN 28×27;
- profile extensions;
- single-level connectors;
- straight hangers;
- screws 3.5×9 mm;
- screws 3.5×25 mm;
- dowel-nails 6×40 mm;
- wedge anchor 6×40 mm;
- reinforcing tape;
- primer;
- putty;
- hydraulic level or laser level;
- bubble level;
- chop cord;
- metal scissors;
- screwdriver;
- perforator;
- drywall knife;
- plane;
- brush;
- putty knife.
Calculate the position of the suspended ceiling
YouTube channel “Guys from Stone” The first step is to determine at what level the ceiling will be located.
To do this, you need to find the lowest point of overlap and add the thickness of the frame to it. Using a hydraulic level, make a mark in one of the corners at an arbitrary height, and then transfer it to the others one by one. If you have a laser level, simply turn it on and mark the position of the horizon in each of the corners.
Connect all the marks in one line around the perimeter of the room using a chop cord. Measure the distance from the reference line to the ceiling in the corners and several places along each wall. The smallest distance will show the lowest point.
If there is no need to specifically lower the ceiling, then mark 40 mm down from the found point: 30 for the thickness of the frame and another 10 for the gap for installation. When installing large recessed lights, add the height that they will extend beyond the frame.
In our example, the lowest point is 1,640 mm. We go down 40 mm from it and get the ceiling level at a distance of 1,600 mm from the reference line.
Finishing
Step-by-step instructions on how to make a plasterboard ceiling with your own hands logically approached the post-processing of an already assembled surface. However, in terms of the number of micro-operations, this stage confidently pushes back all the previous ones:
- puttying joints and gaps;
- surface primer;
- decorative finishing.
The choice of implementation of the latter is solely on your conscience. Usually, to make a plasterboard ceiling more expressive, they use beautiful wallpaper, decorative plaster, and painting the ceiling base with water-based paint. When choosing one solution or another, make allowances for the functional purpose of the room.
It goes without saying that for a kitchen or bathroom, where high humidity prevails and temperature changes are frequent, it is best to choose the most practical type of finishing over drywall - painting with a reliable water-based emulsion.
Conclusion
A self-made plasterboard ceiling is not only the completion of any stage of your major renovation in an apartment or house, but also an excellent reason for your pride: it is always nice to create something useful by hand, based on the experience of already proven specialists. The proposed step-by-step instructions perfectly fulfill its function - to help with the installation of drywall for those owners who want to improve certain types of their installation and finishing skills. If you completed all the steps correctly and are completely satisfied with the result, you can congratulate yourself on the next conquered point on the way to the desired professional peak. But there is no limit to perfection, and therefore we present you with the next peak to conquer: the article contains instructions on how to make a ceiling from plastic panels yourself.
Photo: vk.com
How to make a ceiling from plastic panels yourself: instructional article - 40 photos
Mark the frame
YouTube channel “Guys from Stone”
For proper installation, you need to accurately mark the position of all frame elements. It consists of guides mounted on the walls, where the main profiles are installed, and they, in turn, are attached to the ceiling with hangers. Supporting profiles are mounted across the main ones, onto which drywall is directly screwed.
- Guide profiles. We have already noted their position in the previous step.
- The main profiles are installed at intervals of 1200 mm along the axes. In this case, the outermost beams from the walls are located at a distance of ≤ 1170 mm.
- Suspensions are mounted in increments of 650–1000 mm.
- Supporting profiles are installed every 500 mm.
The main profiles are marked with a red line, the load-bearing ones with a blue line, the mounting points for suspensions with gray circles.
For example, let's mark a room 3.5 by 3.6 m. Three whole sheets clearly cover the entire width of the room. The length is 1 m short, so we will add pieces of 1 × 1.2 m to each row. According to the installation technology, the joints of adjacent sheets should be staggered, in the manner of brickwork. This means that we start the first row from a whole sheet, the second from a piece, and the third from a whole sheet again.
Use a tape measure to measure all the necessary gaps. Place marks in the right places, and then connect them in lines using a tapping cord. Distribute the hanger fastenings so that there is no more than 1 m between them, or preferably less.
Common Mistakes
The most common mistake when installing drywall is incorrect calculations and markings, when a section of several centimeters wide remains.
The second mistake is attaching the sheets directly to the guide profile. Firstly, the fastening is obtained at the very edge of the sheet, where it will crumble, and secondly, the rigid adhesion of the ceiling to the partitions and walls can lead to cracks due to temperature changes. It is better to attach gypsum boards to profiles that are laid in close proximity to the guides.
Which is better: heated floors or radiators?
Warm floorBatteries
source: //mrgipsokarton.ru/potolki/kreplenie
Most often, plasterboard is purchased in order to improve the ceiling in an apartment. Namely, to make a new ceiling surface, perhaps even multi-level. The gypsum boards must be fastened correctly, because the strength of the structure depends on this.
Mount the guide profiles
YouTube channel “KNAUF Russia”
Attach PN 28×27 profiles around the perimeter of the room so that their lower part coincides with the previously marked line. If the wall is concrete or brick, attach the profile and mark the fastening points with a pencil. Then drill a hole with a hammer drill, insert a dowel through the profile and hammer the nail inside. You can attach guides to wooden walls with self-tapping screws using a screwdriver without pre-drilling.
If necessary, connect the profiles end-to-end, without overlapping each other. The fastening spacing is 250–500 mm, but at least three pieces per piece of profile.
For sound insulation, before installation, you can stick a special sealing tape or apply silicone sealant to the profiles.
Elements of increased complexity
In this instruction, we deliberately did not touch upon curved sections and two-level structures. Without experience working in one plane, you should not perform more complex operations. But, in general terms, we will describe the process of bending drywall.
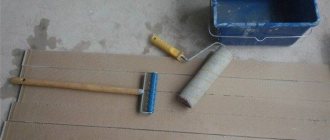
To do this you will need a spiked roller and a spray bottle of water. From the inside of the bend, a spiked roller is used to puncture the sheet along the entire deformed plane. Then moisten the surface well with water from a spray bottle, wait 10-15 minutes and very carefully bend the sheet of drywall. This operation should be performed by two people, applying effort from different ends of the sheet. Please note that after achieving the required shape, the gypsum board must be fixed in this position and wait until it dries completely.
To attach curved sheets of drywall, you must have the same bent profile. To bend the profile, its side flanges are cut with a grinder or scissors. The frequency of the cut depends on the bending radius and is selected individually.
The usual step is 5-10 cm. In this case, two identical PP profiles are prepared and connected at intervals that allow maintaining the required bending radius, but at least 30 cm.
Two-level ceilings are an even more difficult process for beginners. The main specificity of the assembly in this case is the reinforcement of the frame. For this:
- Suspensions are placed more often;
- All snap connections (crabs, extensions, etc.) are fixed with self-tapping screws;
- They provide for a run on two levels, without duplication.
Therefore, before thinking about a two-level ceiling, you need to learn how to assemble a simple structure from gypsum plasterboard.
Secure the hangers
YouTube channel “KNAUF Russia”
Next, at the previously marked points, install hangers for the main frame profiles. In reinforced concrete floors - using metal wedge anchors and a hammer drill, in wooden floors - with self-tapping screws and a screwdriver. After installation, bend the hangers down.
For sound insulation, you can also stick sealing tape on them or coat them with silicone. An even greater effect is achieved when using special anti-vibration suspensions with elastic inserts.
Install the main frame profiles
YouTube channel “KNAUF Russia”
Cut out the necessary pieces from the PP 60×27 profile and insert into the guides. Position them so that the centers of the beams coincide with the previously marked marks.
YouTube channel “KNAUF Russia”
If the length of one profile is not enough, add an additional section and join them together using a special connector.
Fix the main profiles in one plane
YouTube channel “Stone Guys”
To obtain a perfectly flat surface for plasterboard cladding, you need to align all the beams in one line. The easiest way to do this is with regular thread.
Lift all profiles 10–15 mm up and secure by inserting screws into the holes of the hangers. Stretch a thread across the profiles between the walls and secure them with self-tapping screws on the guides flush with the latter.
Also, the correct installation of profiles can be controlled using a bubble level / YouTube channel “KNAUF Russia”
Starting from the outermost one from the wall, release the profiles one by one and, aligning them so that they barely touch the thread, secure them with four 3.5 × 9 mm screws - two on each side.
First, fix the hangers in the middle of the beams to remove any slack. After this, the main profiles will almost clearly fall into place. All that remains is to check the thread and tighten the screws into the hangers.
Cost table
In order for you to have a rough idea of future expenses and be able to prudently adjust your budget, we offer you a small table that shows the average current prices for the materials used for finishing the ceiling with plasterboard.
| Name | Vacation unit | Price |
| self-tapping screws | packaging (200 pcs.) | from 120 rubles |
| gypsum board sheets | sheet(3 m2) | from 250 rubles |
| UD profile | PC. | from 40 rubles |
| CD profile | PC. | from 45 rubles |
| ceiling hangers | PC. | from 4 rubles |
| dowels | packaging (200 pcs.) | from 125 rubles |
Install support profiles
YouTube channel “KNAUF Russia”
Now, across the main ones, it is necessary to mount load-bearing profiles that will hold the drywall. Cut the beams to size from the same PP 60 × 27 profile and fasten them using single-level connectors (“crabs”).
If you don’t have special fittings at hand, you can use trimmed PN profiles about 100 mm long as improvised guides. They need to be attached to the main profiles with screws, and the load-bearing ones must be inserted into them and also secured with self-tapping screws.
Preparing the premises
Before starting work, it is recommended to clear the room of furniture and anything that clutters the space. Next, the old covering is dismantled from the walls and ceiling. Before installing drywall, it is recommended to level the walls using plaster and putty. The surface must be prepared for finishing. After this, utility lines are laid, which must be disguised by a suspended ceiling.
Install wiring and sound insulation
Electroas.ru
Before covering the frame with plasterboard, you need to lay electrical cables. As a rule, they are attached to the ceiling or suspensions. Under no circumstances should wires be laid inside the frame, as there is a risk of damaging them with screws when installing the sheets.
YouTube channel “KNAUF Russia”
To increase the sound insulation of the ceiling, mineral wool slabs are laid between the frame profiles or on top of it. If the free ends of the suspensions are sufficiently long, they are bent, thereby holding the sound insulation layer.
Disadvantages of gypsum board
- The problem is that gypsum board structures visually make the room smaller. This is especially important for standard apartments where the ceilings do not differ in height;
- The specifics of the installation require at least two people to participate in the repair;
- After installing a gypsum plaster ceiling there will be a lot of waste. The reason for this is the use of a jigsaw and other tools when cutting sheets;
- When moisture gets on an improperly treated ceiling, unpleasant stains remain. The point is the mineral gypsum base of the material. Therefore, you should not use gypsum board as a material for the ceilings of bathhouses, showers and other spaces with high humidity;
- Cardboard for the outer layers of gypsum board is susceptible to fungal diseases and mold because it is made from cellulose materials;
- In addition, to avoid corrosion and deterioration in the appearance of the seams, you need to update them regularly;
- Gypsum ceilings are not very durable. But if you can regularly update or give them a facelift, you won't regret the choice.
Cut out the sheets
YouTube channel “KNAUF Russia”
To cut the panels, mark the desired size with a tape measure and, applying the profile or rule, cut the cardboard with a knife. Hang and break the cut part, and then score the paper from the bottom side. Then use a plane to trim the edge along the cutting line.
Also, before installation, do not forget to use a plane or knife to chamfer at an angle of 22.5° on the edges that will be adjacent to other sheets. This is necessary in order to properly seal the joints with putty in the future.
Be sure to measure and mark on the sheets the places where the lighting wires are located. After finishing the work, the drywall can be easily cut through and the cables can be removed.
Calculations
Perhaps it’s worth starting with the most important thing - with an inspection of your premises and accurate measurements. In fact, it is very important not to make mistakes with the numbers, so that later you don’t rush to look for profiles or hangers that have suddenly ended:
- Using the familiar school formula, we determine the perimeter of the room (length + width) x 2;
- We calculate the required number of guide profiles (profile width/length) - a non-integer number is rounded;
- determine the required amount of drywall itself - (divide the width of the room by the length of the drywall sheet and round to the nearest whole number).
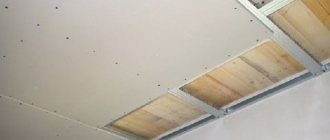
Cover the frame with plasterboard
YouTube channel “KNAUF Russia”
Together with an assistant, lift the sheet and place it in its place. Attach along the contour to all frame profiles. Join sheets in one row only on supporting profiles, avoiding allowing the edges of the drywall to hang in the air. Install slabs in adjacent rows with an offset of no less than a frame pitch.
knauf.ru
Wrap the screws evenly, avoiding distortions. Do not leave their caps protruding above the surface of the sheet, but do not recess them too much: they should be flush with the plane of the drywall or 1 mm lower.
Fasten the screws in increments of 150 mm, retreating from the edges covered with paper by 10 mm, and from the open edges by 15 mm. Shift the screws on adjacent sheets relative to each other by 10 mm.
Requirements to be observed when fastening
To ensure that the result of your efforts is high-quality and accurate, before performing work, carefully inspect the ceiling surface for defects:
- Fungus, mold formations;
- Cracks, sometimes deep;
- A layer of plaster that has fallen off the surface;
- In a private house, the foundation is prone to subsidence, which can lead to a violation of horizontality;
- Changes in altitude.
At first glance, these are trifles, but they cause serious damage to the structure during its further operation. Therefore, before installing gypsum boards, they are removed. The initial state of the ceiling determines the further method of decorating it.
Whatever material is chosen for finishing the house, perform the following steps: thoroughly clean the surface of soot, dirt, wallpaper, plaster, and apply an antifungal solution.
The ceiling surface is finished in the following ways:
- Installation on a metal frame;
- Mounting on a wooden frame;
- Installation on the wooden floor itself.
Seal the joints
YouTube channel “KNAUF Russia”
Upon completion of installation, all sheet joints are covered with putty using reinforcing tape. To do this, first make sure that the screws are securely fastened and, if necessary, tighten the protruding heads with a screwdriver.
Then use a brush to brush off any dust at the joints of the sheets and prime all cut edges. Fill the seams with putty using a putty knife. Glue reinforcing tape in the center of the joint and press it in with a spatula. Next, apply a second layer of putty. Use the same compound to seal the fastening points of all self-tapping screws.