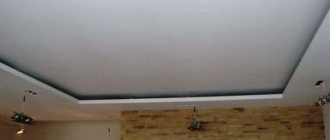
When you look at such an impressive ceiling structure, as in the photo below, it seems that only experienced specialists can cope with such complex architecture: the triumph of nonlinearity, inventive zonal lighting, skillfully emphasized accents in the visual appearance of the room. In reality, everything turns out much simpler: anyone can make such a two-level plasterboard ceiling with their own hands. Of course, this will require time, patience, appropriate tools and materials. And also our step-by-step instructions, which reveal all the secrets of successful and high-quality installation of a two-level ceiling, even to a person who has never seen drywall.
- General characteristics and selection of material;
- Necessary tools and materials;
- Calculating the amount of necessary consumables;
- Preparing the room and concrete base;
- Marking the room;
- Installation of the 1st level frame;
- Sheathing the 1st level frame with plasterboard;
- Installation of the 2nd level frame;
- Plasterboard covering of the 2nd level frame;
- Finishing the ceiling;
- A selection of videos on installation and finishing;
- Photo gallery of the most popular options;
- Conclusion.
General characteristics and selection of material
Drywall is a compressed gypsum sheet, formed into a sheet and wrapped with facing cardboard.
It has been successfully used in construction and decoration for more than 100 years, although it has only reached its peak of popularity today. The reason for such a belated turn to a very convenient and inexpensive finishing material lies on the surface: the active development of the entire industry - and as a consequence of this, an excellent offer on the market, allowing you to select plasterboard sheets of the necessary characteristics and color solutions.
- “breathable” material;
- environmentally friendly;
- not flammable;
- Maintains a normal level of humidity in the room for humans.
The main disadvantage of plasterboard sheets is that poor moisture resistance
. Moreover, there are gypsum board sheets on sale with a “pumped” moisture resistance indicator - they come, as a rule, in green or blue - but even in this case, drywall is not recommended for use outdoors. In addition, it is afraid of sub-zero temperatures and is fragile.
The range of uses for plasterboard is wide, but ceilings occupy a key place in it.
Buying the necessary material in order to make a two-level plasterboard ceiling with your own hands seems like an elementary task only in words. First you need to find out which of the existing types is best suited specifically for your renovation. This is determined by the functional purpose of the room:
- what is the humidity level in it;
- how high is the level of fire danger;
- frequency of temperature changes;
- lower and upper temperature threshold.
How to choose the right plasterboard sheets in order to make a two-level plasterboard ceiling with your own hands, our table will tell you, in which, next to each type of plasterboard, a recommendation is given on the conditions of use.
| Drywall type | Color | Purpose |
| Regular plasterboard | Grey | For interior decoration in rooms with normal and low humidity conditions |
| Moisture-resistant gypsum plasterboard | Green | For interior decoration in rooms with dry, normal, wet and wet humidity conditions |
| With increased resistance to open fire GKLO | Grey/Pink | For interior decoration in fire hazardous areas |
| Moisture-resistant with increased open flame resistance GKLVO | Green | For interior decoration in fire hazardous areas with high humidity |
Also, when selecting material for installing a two-level ceiling, pay attention to the following points:
- dimensions (most often 250 cm in length and 120 cm in width);
- type of side edge (straight, thinned, semicircular, rounded);
- sheet thickness (no more than 9.5 mm).
The dimensions indicated are standard, but you can always order sheets made to order. In this case, you will have to wait, but installing a two-level ceiling will be much more convenient and easier. As for choosing the type of side edge
, then again, for purely practical reasons, the choice of a semicircular or thinned edge seems optimal: less time needs to be spent on post-processing.
The most popular manufacturers:
- Knauf (Germany);
- Gyproc (Finland);
- Lafarge (France);
- Rigips (Austria);
- JSC "Gips" (Russia).
Drawing up a diagram of a two-level ceiling system
- Measure the length and height of the walls, check the corners.
- Focusing on the lowest angle, determine at what distance from the floor the lower level will be. The height of the box should not be so large that the entire structure looks bulky. When making calculations, be sure to take into account what communications will be behind the drywall. For electrical wiring, it is enough to leave 5 cm; for some types of lamps, pipes, ventilation ducts, a larger distance will be needed.
- Draw a sketch to scale by hand or on a computer.
- Draw up a drawing of the frame with the location of intersections and connections. The step between the elements of the guide profile is 30-40 cm, for the supporting profile - no more than 60 cm.
- Mark on the drawing the location of the electrical wiring, junction box, pipes, and fixtures.
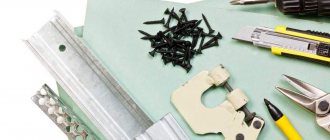
Frame materials
To work you need:
1. Ceiling guide profile (UD) to create the perimeter of the sheathing. It is made of galvanized steel with a thickness of 0.4-0.7 mm. There is an option with already made mounting holes. This simplifies and speeds up the work, but does not affect reliability in any way. UD profile dimensions: length 3 or 4 m, width - 28 mm, height - 27 mm.
2. Support profile (CD) to create the base of the frame. It is inserted into the UD and secured with hangers. It holds up all the drywall. For its manufacture, the same material is used as for the guide. CD profile dimensions: length - 3 or 4 m, width - 60 mm, height - 27 mm.
We advise you to study - Better electric planers - comparisons, reviews, ratings
3. Suspension. This is an element made of galvanized steel strip 0.9 mm thick. With its help, the lathing is additionally attached to the ceiling, preventing the profile from deflecting. The suspension is cut with metal scissors and then bent. Along the perimeter of this part there are protrusions that ensure reliability and rigidity of fixation. Dimensions: straight - 125x60x30 mm, folded - 60x27 mm.
4. Cross connector (crab). Designed for installation of its secondary sections to the frame base. It has the shape of a cross and is equipped with four clamps.
5. Pre-compressed sealing tape (PSUL). This is a self-adhesive material made of gray or black polyurethane foam in the form of a strip, impregnated with a neoprene composition. It goes on sale rolled into a roller. The gray tape has better characteristics. After placing the PSUL in the seam, it expands independently and fills cavities and gaps, which increases reliability. Many builders do not use tape, citing the fact that it is not necessary. But professionals advise not to skimp on this addition, since PSUL dampens shocks, sounds, and increases mechanical strength.
6. Dowels for fastening profiles and hangers to walls and ceilings. They are selected for the base to which the sheathing of the plasterboard structure will be mounted.
7. Self-tapping screws for the profile. To connect the guides and load-bearing parts together, screws of the bug type with a cross slot for a PH-2 bit are used. They also attach the profile to the hangers.
The profile is easy to cut, which allows you to create curved elements from it. To do this, the whip is cut through equal sections and bent along the required radius. It is possible to manufacture a ceiling frame from gypsum plasterboard from dry wooden beams measuring 50x30 mm. The only advantage of wood construction is environmental friendliness. Timber is more expensive than a metal profile, less durable, and requires processing before installation. All products are purchased with a reserve.
Choosing drywall
GKL is commonly called dry plaster. This is a construction and finishing material consisting of a gypsum core, lined on both sides with thick cardboard. The properties of the sheet allow it to be bent and cut, creating shapes of any shape, including curved ones. Antifungal components can be added as a supplement.
| Sign | Ordinary | Moisture resistant | Fire resistant | Moisture-resistant |
| Marking | GKL | GKLV | GKLO | GKLVO |
| Color | grey | green | pink | green |
| Marking color | blue | blue | red | red |
Fire-resistant and moisture-resistant sheets can withstand direct exposure to an open flame from 25 to 60 minutes. If there are no high fire safety requirements for the premises, then conventional gypsum board is suitable in almost all cases. For the kitchen it is better to choose GKLV or GKLVO.
Drywall has the shape of a rectangle. Standard sizes:
- thickness - 6-24 mm;
- length - 2500-4800 mm;
- width - 1200 mm, for slabs with a thickness of 24 mm - 600.
Sheets up to 9.5 mm thick are suitable for ceilings. They weigh less, which makes installation and the system as a whole easier. Special arched gypsum board is particularly flexible and allows you to create structures with bends.
Required tools and materials
You won’t be able to limit yourself to buying just plasterboard if you want to make a two-level plasterboard ceiling with your own hands correctly. After all, to secure the purchased sheets, you will first need to build a frame
, and no one canceled the finishing treatment. Let's look at those tools that can be safely called a “must have” for the installation of a two-level ceiling:
- metal scissors;
- screwdriver with drill;
- knife;
- hacksaw;
- square;
- roulette;
- laser level;
- spatulas;
- protective gloves;
- protective glasses;
- pencil;
- pliers;
- painting thread;
- Serpyanka mounting tape;
- ladder.
In the video below, an experienced craftsman very convincingly talks about why each of the tools we mentioned is just as necessary in the work of installing a two-level ceiling, as is fuel for the full functioning of your car.
And, of course, consumables, without which your tools will never be able to prove their usefulness:
- guide profile UD;
- CD ceiling profile;
- crab connectors;
- ceiling suspensions are straight or spring (at a distance from the concrete base of more than 120 mm);
- extensions for the profile (where the width of the room is greater than the usual length of the profile);
- dowels;
- screws 25-35 mm;
- primer;
- putty;
- painting mesh.
A very interesting video that will help you choose the right individual consumables for installing a two-level ceiling from the list above.
Pay attention to the profile sizes
and their purpose is shown in the image below.
putty
Gypsum putty is prepared as follows:
- Pour water into a clean container (liter per 1.6 kg of gypsum);
- Pour gypsum putty into the container, spreading it over the surface of the water;
- Allow the putty to swell for 3 minutes;
- Mix the mixture thoroughly with a drill and whisk or spatula;
Mixing with a whisk
- Wait another 3 minutes. The putty is ready for application.
Gypsum is prepared in small portions (3-5 kg of finished putty): after mixing, it is suitable for application for only 30-45 minutes.
It’s curious: ordinary alabaster sets much faster - in 5-10 minutes. The putty contains additives that slow down the hydration of gypsum.
The seams are puttied in at least two layers: the first fills the seam cavity, the second covers the reinforcing material. Serpyanka can be glued before applying the first layer: the seam will be filled through its cells.
Reinforcing the joint of sheets with serpyanka
Use self-tapping screws to attach the reinforcing corners. The putty will hide them.
In some cases (for example, if the reinforcement makes the seams noticeable due to its thickness), the ceiling requires filling of the entire surface. This is done with a wide spatula (regular or rectangular). The putty is applied to the spatula using a narrower tool.
The putty is applied with a narrow spatula to a wide one.
Attention: tools and the putty container must be washed before preparing a new batch. If this is not done, lumps of hardened plaster caught under the spatula will leave grooves on the surface of the seams.
Your tools should be clear of dried plaster
Calculating the amount of consumables needed
- plasterboard sheets
-
divide the width of the room by the length of the sheet, add 5% to the resulting number - the required reserve - and round to a whole number, add the amount that is necessary to use the second level; - guide profiles - again we take into account the width of the room, as well as the length of the profile, after dividing the first number by the second and subsequent rounding we get the whole number of elements we need.
In order to accurately determine the number of certain consumables for installing a two-level ceiling, in particular, self-tapping screws, remember that at least 8 screws
, and each ceiling suspension assembly needs
6 self-tapping screws
.
Also remember about the step that is followed when installing the sheathing for a two-level ceiling. It is at least 50 centimeters
.
Preparing the room and concrete base
- remove the remnants of the previous finishing material from the concrete ceiling base: be sure to clean it of crumbling plaster and treat it with an antiseptic to prevent the occurrence of fungus or mold;
- if there are cracks on the base, then seal them with cement-based putty, and then prime them;
- To adapt to the temperature conditions of the room, store the purchased gypsum board sheets for several days - it is best if they are in a horizontal position;
- try to free up the room as much as possible - remove the furniture, and if this is impossible due to its size, then cover it with film for protection;
- Compliance with safety precautions is a priority that must always be adhered to, so adjust your workplace to achieve the maximum level of comfort, prepare safety glasses, gloves, and check the serviceability of the stepladder.
And, of course, you can’t do this without additional help, so make an agreement with someone in advance - otherwise it will be very problematic to install a two-level plasterboard ceiling with your own hands.
How to sheathe a partition in two layers
The first step in making double skin is to secure the single layer. Next, you need to act in accordance with four basic rules for carrying out such work:
- The location of the vertical joints of plasterboard sheets when sewing on opposite sides of the partition should not coincide. These lines must be 60 cm apart from each other. Otherwise, cracks will appear and the structure will no longer be stable.
- The location of horizontal joints on the profile is mandatory (they should not hang without support). When sewing, horizontal connection lines (similar to vertical ones) cannot be placed at the same level. Even an approximate match is unacceptable. Minimum indentation – 40 cm
- If a number of horizontal joints are on one side, then they must be placed in a checkerboard pattern, maintaining the same established distance (40 cm)
- The joints of the outer and inner layers should also not match
Having mastered these rules, you need to do calculations and determine how many layers of drywall are needed on the wall in the case under consideration. And if you can’t do with just one, then exactly how many materials will be needed to sheathe the partition in two layers on both sides.
The technology used for carrying out the work includes the following points:
- Before installing the first layer of plasterboard (9.5 or 12.5 mm thick), insulating material is attached to the frame
- The sides are sheathed strictly alternately - first one, and then the other.
- Docking is carried out strictly on vertically placed profiles
- To join sheets in places where there is no profile, jumpers should be used (their installation can only be done together with a partner, who will hold the jumpers that have not yet been secured with screws)
- When installing the first layer, the step from one screw to another should not be more than 75 cm
- If wiring was placed inside the structure, be sure to mark where the ends of the wires are located (it would be best to photograph their entire location)
- The space between the profiles must be completely filled with sound-absorbing mineral wool (it’s good if there is a little excess of it, then there is no need to do additional reinforcement)
- After single-layer sheathing has been completed, the seams between the sheets are finished using putty (it is not necessary to use reinforcing tape to lay the joints of the first layer, but it will be needed when the second layer is ready)
- If putty is applied to the seams, work continues only after it has dried.
- The distance between the profiles should be equal to the width of the plasterboard sheet divided by two, then the connections of the first layer will fall on all even lines, and the second - on odd ones
It is difficult to fulfill all these requirements in the absence of calculations and records with appropriate notes, which will indicate:
- sheet dimensions
- coordinates of the location of jumpers and profiles
- wiring diagram
- general diagram of the partition with the parameters of the required sheets and frame
This will be required for more accurate orientation when installing the second layer. To secure the internal sheets, it would be better to use self-tapping screws 25 mm long, and external ones - 35 mm (the pitch in this case narrows to 25 cm).
IMPORTANT: when installing plasterboard in 2 layers, the working technology requires that the sheets of facing plasterboard do not lie flush against the surface of the floor or ceiling. Both at the top and bottom you should make an indent of 5-10 mm. To eliminate the possibility of internal stress in the sheets, they must be secured with self-tapping screws sequentially from the central part to the edges or moving from one edge to the other.
If the plasterboard covering in two layers is completed, then you can begin to make sockets and switches (if necessary). A wiring diagram will be helpful here. Installing the necessary elements will not require significant effort. Compared to the situation when the gypsum board wall is single, if the wall is covered with a two-layer coating, the connectors are made twice as deep.
When all the necessary niches are in place, you can start priming the joints of the second layer:
- Fill the gaps between the sheets completely with primer;
- Putty the seams on top;
- Using a spatula positioned at an angle of almost 90˚, remove excess from the wall (the seams should be absolutely smooth - not concave or protruding);
- Glue the tape.
The proposed course of action applies to vertical joints. When processing corner and horizontal joints, after filling empty recesses and niches with putty, you need to wait until the working area is completely dry. Only after this can you make a second (leveling) layer and stick the tapes.
It will be easier to get rid of unnecessary excess putty if it is a little thinner than originally planned. “You need to drive it out from under the reinforcing tape with a spatula (pressing firmly on the tool, you should move it up and down along the entire length of the tape).
After this, covering the partition with plasterboard sheets can be considered complete. The result is a dense structure with noise-insulating properties. Next, all that remains is to mount switches and sockets in pre-prepared niches and carry out cosmetic finishing of the double plasterboard wall.
If the frame is not made strong enough, the 2-layer plasterboard finish will soon crack. To ensure the safety of the structure, it is advisable to be careful when exposed to vibration (painting with a roller or sanding).
Room layout
The first action you must perform is to correctly mark the room so that in the future you can build an even and reliable frame for a two-level ceiling. To do this you will need a pencil, painting thread, and a laser level. If you decide to make a two-level plasterboard ceiling with your own hands, then at this stage you should already have a drawn up project with clear markings of levels. All that remains for you is to transfer ideas from paper to the rough ceiling.
- determine the height of the room in 4 corners, if the results differ - and this happens very often - take the corner with the lowest height as a starting point and make a mark on it;
- Using a laser level, we make similar marks in the other three corners and use paint thread to mark a line along the perimeter of the entire room;
- your markup is ready.
It is best to immediately complete the markings for the next level - this way you can know exactly how much material you will need, and also complete the work much faster. Decide what a two-level ceiling will look like:
- linear;
- arcuate;
- ragged.
After this, draw a line on the base of the two-level ceiling that will highlight the second level.
Installation of the 1st level frame
- we install UD profile guides - they are fixed on the wall at the level that you marked with painting thread, with an optimal fastening step of 60 centimeters;
- We fix ceiling hangers to the points marked on the base ceiling base with the same recommended step of 60 centimeters;
- insert the prepared ceiling CD profile and securely fix it with a suspension;
- in the end you should end up with such a simple but very practical frame;
- To prevent it from sagging, we use crab connectors - the structure will become much more stable.
The entire process of installing a first-level frame for a two-level plasterboard ceiling with your own hands is shown in the photo below.
General remarks
There are several of them:
- To install the ceiling frame, we strongly recommend using not a block, but a galvanized profile produced specifically for these purposes. Unlike wood, it has impeccable geometry, unlimited service life and is not prone to deformation when the humidity and temperature in the room changes;
Our choice is a profile frame
- It is customary to fasten frame elements to the ceiling and walls using dowel-nails. However, we, following the leading manufacturer of drywall, profiles and building mixtures - the Knauf company - recommend using wedge anchors for attaching hangers and guides to the ceiling. They will keep the suspended ceiling from falling in case of fire and, perhaps, save the lives of you and your loved ones;
In addition: dowel-nails do not hold well in the hollow-core floor slab. Anchors do not have this drawback.
A dowel-nail that gets into the cavity is held in the slab extremely weakly
- The types of profiles and frame design are selected depending on the specific requirements for the ceiling and the characteristics of the local building materials market. For example, ceiling profiles in some cases can be replaced with racks or guides. We will just give a few examples of how plasterboard two-level ceilings can be assembled.
Unconventional use of the guide profile: the frame supports are made from it
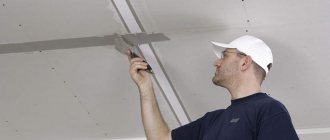
Sheathing the 1st level frame with plasterboard
Let's get to the most interesting and important. Although, in principle, all stages of installation are equally important, the contours of our future base of a two-level ceiling are already clearly visible.
- we fix the drywall on the profiles using a screwdriver and self-tapping screws; their caps should go deep, but not excessively, to prevent damage to the material;
- the correct sequence is the first sheet from the corner, the next one on the opposite side;
observe the spacing of the screws - no more than 15 cm; - in the locations of the lamps, make the necessary holes in advance and stretch the wiring;
- It is not necessary to attach drywall at the location of the second level of the ceiling, but remember that it should extend into it by about 10-15 centimeters.
Design
It is better not to start installing the ceiling without a detailed, scaled drawing. If a single-level ceiling does not require precise calculations, then two-level ceiling plans will not only make your work easier, but will also allow you to choose the most optimal shape. An excellent solution would be to create a model of the future ceiling in a 3D program.
Accurate computer drawing of a multi-level ceiling
When you are completely satisfied with the finished project, you can begin to calculate the amount of materials needed and carry out the electrical wiring.
Installation of the 2nd level frame
- we draw lines on the drywall that will help to correctly place the UD profiles;
- we fix the pre-rounded UD profile on the wall and ceiling - to give it the desired shape, it is necessary to make notches;
- we cut off the necessary fragments of the CD profile and insert the flat side into the already mounted UD profile, fasten them in increments of 50-60 cm for linear segments and 20-30 cm for round ones;
- if some pieces stick out, you should cover them with a UD profile.
Sheathing the 2nd level frame with plasterboard
Most often, a two-level plasterboard ceiling, if you do it yourself, causes difficulties at the stage of covering the second level. Largely due to the fact that the material must be rounded in order to be fixed to the arched structure. Despite the apparent simplicity of the manipulations involved, very often there are sad cases of damage to sheets. To do this, in order to eliminate such an annoying possibility, it is necessary to make notches on the sheet itself - only carefully so as not to damage the front part, lined with cardboard.
- complex arches require tedious segmentation - cutting out a number of fragments and their subsequent installation to the profile;
- do not forget to make holes for the lamps, if you plan to use them, and route the wiring under them.
Kinds
The designs of two-tier gypsum board ceilings are varied. The most popular are frame, diagonal, zonal and curly.
Framework
They are like a recessed frame around the perimeter with a protruding middle part. Volumetric lighting from spotlights or LED strips is installed in the niche. The effect of “floating” in the air is created, which enriches and makes even the simplest interior original. In addition, track moving lamps can be used to divide the room into zones or highlight an object.
Diagonal
This ceiling visually divides the room into two parts. In one it is located lower, in the other – higher. Illumination is often installed at the junction between planes of different heights, and the line itself can be straight or curved.
Diagonal two-tier ceilings are used to zone dining rooms combined with a living room or kitchen. They allow you to visually highlight the dining area, place of relaxation or cooking.
Zonal
With this design, zoning the space of the room is simplified.
The boundaries of each selection are emphasized by relief elements, lighting, color or texture of the finish. Before manufacturing, it is important to imagine in advance the arrangement of furniture, household appliances and equipment. The zoning effect is emphasized by the decoration of walls, floors, textiles, and decorative structures. Zoned ceilings are good not only in large rooms where there is room for creativity, but also in small rooms to optimize space.
Figured
This is a kind of convex painting on the ceiling. The designer conveys his thoughts through three-dimensional figures arranged in an artistic manner. Protruding fragments are emphasized by lighting, contrasting trim, and decorative details.
Curly ceilings are expressive, catch the eye and draw attention to themselves. In order not to overload the situation, they must be used very carefully.
Finishing the ceiling
So we have come to the final part of installing a two-level plasterboard ceiling with our own hands. Finishing will not cause you any difficulties: this is a fairly simple stage designed to make the installed ceilings as presentable and impressive as possible.
- seal the seams with sickle tape;
- take a narrow spatula and apply putty along each taped tape;
- carefully cover all the screws with putty so that the rust on their heads is not visible afterwards;
- treat the entire surface with a primer;
- We carry out finishing decoration - whitewashing, painting.
As a result, you should get a beautiful two-level ceiling with a harmoniously executed arch or with complex geometry with the majority of truncated fragments. Isn't this what you dreamed about when you started this tedious (or not so tedious?) editing?
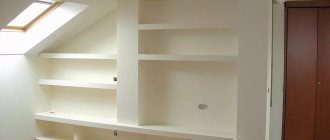
Photo gallery of the most popular options
Take a look at what nice options come out when people decide to make a two-level plasterboard ceiling with their own hands - and approach their work responsibly and creatively.