Leveling and beautifully decorating the ceiling in a room is a difficult and costly task. In this case, building a suspended ceiling with your own hands is one of the best solutions, which gives excellent results at a relatively low cost and labor intensity.
A suspended ceiling is a structure that includes a grid of metal profiles or wooden beams suspended on special fastenings to the main ceiling, and plasterboard with finishing or special slabs screwed to it. Unlike a stretch ceiling, a suspended ceiling is attached not only to the walls, but also to the rough surface, which avoids sagging in the center even when finishing large areas. Compared to traditional plaster, this design hides even significant unevenness and cracks in the old ceiling much better.
The main advantages and disadvantages of suspended structures
This type of finishing has become popular due to the following qualities:
- Perfectly hides flaws in the original rough surface. This finishing reduces absolutely all shortcomings to zero without additional effort, ranging from stains, small cracks and ending with differences in height.
- You can build structures of any shape, embodying all kinds of design fantasies.
- It is convenient to hide communications under the slabs, from wires to ventilation pipes. At the same time, they will always be accessible if repairs are needed.
- You can improvise with lighting: in addition to the main chandelier, built-in spotlights and overhead lights, LED lighting are installed.
- It has good noise and heat insulation, which is especially important on upper floors or with noisy neighbors.
- Modular ceilings are easy to repair: for example, if your neighbors are flooded, you don’t have to call a plasterer or repair the entire surface, but simply replace the damaged modules.
- Installation does not require specific tools or special skills, which makes it possible to build a suspended ceiling with your own hands.
The main disadvantage of this design is that it reduces the height of the room by 5-15 cm, depending on the unevenness of the rough ceiling and the lighting fixtures used. In addition, if the rough surface does not have significant unevenness, it will be much cheaper to simply putty it.
Ceiling profile: functional purpose
Initially, stretch ceilings were used to hide defects. Today, their functional purpose has expanded significantly: canvases are widely used in the arrangement of residential and office premises. The structures are installed quite quickly and are distinguished by a high level of aesthetics. The presence of design diversity allows you to choose an option for any design style.
Thanks to the special profile shape, it is possible to wind and stretch the canvas around the entire perimeter of the room
The first suspended ceilings were made of fabric. It was wetted and attached using wooden slats to the top of the walls. The fabric dried, stretched, forming an even canvas. Then impregnations were applied to it from a spray bottle. For the aesthetics of such a design, the quality of the slats and the method of their fastening were of great importance. Defects in wooden surfaces and loose fixation to the wall could contribute to the appearance of sagging and unevenness in the tensioned material.
Today, the slats have been replaced with a special profile for a suspended ceiling. And polyvinyl chloride film is used as a tension fabric. A frame is made from the profile along the walls or ceiling. The profile has a specific shape that allows you to insert and stretch the canvas around the entire perimeter of the room. In order for the tension to be ideal, it is necessary to correctly align the frame at a certain level and securely fix it to the surfaces.
What are the types of suspended ceilings?
The most common and inexpensive option is a solid ceiling, which is lined with sheets of plasterboard and plastered. This is what will be discussed in the next section.
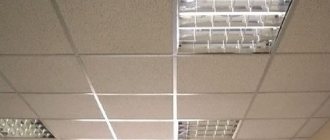
All other options are called modular, since the filing is assembled from special plates or slats. Modular ceilings can be cassette (made of square segments with edges of 30-90 cm), lattice (sometimes called mesh) or slatted (made of long elements such as lining).
Interesting! Each of the listed types can be plastic, mirror, metal, gypsum, wood, mineral, or consist of chipboard, fiberboard, and also be single-level or multi-tiered with levels of various shapes.
Drywall
This material is the most common solution. There are several reasons for this:
- low cost of plasterboard sheets, as well as components for creating a suspended frame;
- this material allows you to create any shape;
- high environmental friendliness of plasterboard;
- Unlike polymers, gypsum board is not afraid of high temperatures. Do you think that this advantage is not something significant? Then think about recessed lamps with halogen or incandescent lamps. In the case of PVC coating, they cannot be used precisely because of the heating of the surfaces;
- The material itself is tolerant of errors in the pattern. That is, a wide seam or an obliquely cut corner can eventually be puttied.
Where to start: calculation of materials, preparation of tools
As with any construction work, before you start building a suspended ceiling with your own hands, you need to draw up a plan, make calculations, purchase the necessary materials and check whether all the necessary tools are available.
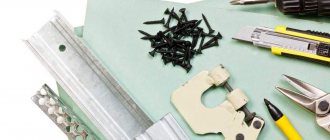
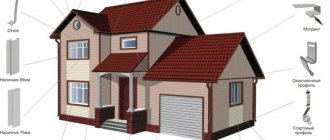
For installation you will need the following materials:
- Guide profile PN 28/27 (UD27).
- Sealing tape underneath.
- Ceiling profile PP 60/27 (CD60).
- Metal hangers for fastening profiles.
- Dowel-nails or self-tapping screws with dowels at least 4 cm long.
- Crab connectors for the profile, possibly special extensions.
- Self-tapping screws for metal (short) and wood (3.5-4 cm).
- Drywall. Typically, 9.5 mm gypsum plasterboard is used.
- Primer, starting putty, finishing putty, sickle tape.
- Paint, roller, wallpaper, glue or other finishing coating.
To roughly calculate how much materials to buy, you can use an online calculator. However, it is more convenient to assemble the ceiling according to a diagram drawn on paper. Using it you can accurately calculate the suspended ceiling. For this:
- Measure the perimeter of the room, as well as all niches and projections if the room is not rectangular. Draw it, respecting the scale (for example, 1 m = 10 cm). The length of the perimeter corresponds to the length of PN 28/27.
- Mark the location of the plasterboard sheets, taking into account that their standard width is 1.2 m, and their length is 2 m, 2.5 m or 3 m. Transverse (short) joints of the sheets should be offset, not in one line. Calculate how many sheets you will need.
- Use a pencil or a pen of a different color to mark the location of the main profiles. They must fall on the longitudinal (long, continuous) seams of drywall. Then add one on the left and right at a distance of 10 cm from the wall and one more on each sheet. As a result, the distance between profile lines (translated to real scale) should not exceed 40 cm.
- On each profile line, place a line every 60 cm of the actual scale. Add such marks in the area of the chandelier, if there is one. There will be suspensions: fastenings to the rough ceiling. Calculate how many to buy.
- Also, draw transverse lines every 50-70 cm - there will be jumpers between the profiles. It is advisable that they fall on the joints of drywall sheets. The total length of all longitudinal and transverse lines, except for the perimeter, is the length of the PP 60. The number of intersections they have, the number of connector crabs needed.
- If the longitudinal lines are more than 4.5 m (maximum profile length), extensions will be needed.
- You will need 2 dowel nails. for each meter PN 28/27 and 2 pcs. for each suspension. You need at least 2 screws for metal. for each sq.m., and for wood (plasterboard) - about 23 pcs. per sq.m.
As a result, the drawn diagram of the suspended ceiling looks something like this:
You will need a standard set of tools: a hammer drill, a screwdriver, metal scissors or a grinder, a tape measure, a level (preferably a laser), thread or marking cord, a simple pencil, a stationery or construction knife, a stepladder, a spatula.
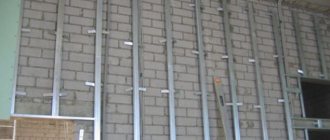
How to install a frame
How to fix a suspended ceiling? First, mark the installation locations of the guide profile using a laser level and make marks along it, retreating from the ceiling at least ten centimeters. You will need this distance to install spotlights.
Having marked all the walls, use a hammer drill to drill holes for the dowels and attach the guide profile to the wall.
Make marks on the wall with a pencil using a level that will help you install the ceiling profile (60 cm interval). For a single-level structure, markings are performed only on two opposite walls.
Attach the straight hangers to the ceiling and then begin installing the ceiling profile.
If the profile does not fit in length, join it by installing additional hangers to the ceiling, and screw the longitudinal connectors together with self-tapping screws.
Using a drill, connect the joints of the ceiling profile with the guides, as well as the suspensions with the C-shaped profile.
Make sure that the attached profile is without bending or sagging. An incorrectly installed ceiling may end up wavy and you will have to redo everything again.
After connecting the metal frame elements, check with a level to see if there are any deviations. Correct if you find any inaccuracies. Conduct wiring to the locations of future fixtures. If the roof of the house is not insulated enough, first lay insulation on the profiles, and only then proceed with the installation of sheets.
Suspended plasterboard ceiling with round element
Installation of a two-level suspended ceiling - step-by-step instructions, the work of our reader.
A significant event happened in our lives - the delivery of an apartment in a new building. And it was decided to start finishing from the kitchen. I really wanted to make a beautiful suspended ceiling. But finding a specialist and paying for his work is not cheap at all. And we did the ceiling ourselves.
First, a sketch was drawn of what we want to see in the end on a ceiling area of 12 square meters: a wave-like relief and recessed lamps. During the work, we needed the following tools: Metal scissors, hammer drill, screwdriver, roller, brush, spatula. And the following materials were purchased: Profile for drywall, anchor dowels, self-tapping screws, drywall, water-based paint, color scheme, non-shrink putty. For lighting: cable 3*1.5, switches 2 pcs. (single and double, 1 pc. each), lamps (6 pcs. - rotating and 3 pcs. - dual-mode), light bulbs (9 pcs. warm light).
All our work was carried out in five stages:
- making a frame from a profile, which consisted of two levels.
The frame was lowered from the ceiling by 15 cm. And another 10 cm for the “wave”. The structure was secured to the ceiling using anchor dowels and a hammer drill. The profiles were connected to each other using self-tapping screws. - laying electrical wiring under lamps; The lamps were divided into two groups: the work area and the dining area.
- plasterboard covering; The most energy-consuming work was completed at this stage. Assembling a “wave” from drywall turned out to be more difficult than we thought. But a great desire to do just that took over. Then we decided to cut many small rectangular elements and connect them using the same profile and self-tapping screws. An opening was also made for the hood.
- puttying; Once the main structure was sheathed, it was time for puttying and leveling. After all, it was necessary to create a smooth surface, and the structure was assembled from straight elements. Everything was puttied in five layers, the “wave” line was especially carefully worked out.
- coloring. When all the putty had dried, it was time to paint our ceiling. For this we bought water-based paint and a blue color scheme. They diluted it in a very approximate ratio, let’s say “by eye,” but the color turned out to be very delicate and rich. But in order to achieve such a result, they painted it in three layers. The larger surface was painted with a roller, and the joints and transitions were painted with a brush.
The end of our work was hanging the lamps and setting their operating modes. Above the dining area, the lamps had two operating modes: regular white and colored. There was also a separate switch for the work area lamps. The work area lamps could be adjusted to a certain lighting angle.
It took us almost a month to complete this ceiling, but the thought of what would happen in the end gave us strength and the desire to move on. Overall we are very pleased with our DIY suspended ceiling installation experience.
PVC panels
The next type of suspended structure that we want to consider is PVC panels. This ceiling is made independently using plastic wall panels (for more details: “Attaching PVC panels to the ceiling”).
Compared to drywall, the material does not offer many possibilities, but at the same time it is very cheap and easy to install. Often such ceilings are installed in damp rooms, that is, in bathrooms and toilets.
Useful tips
- Take the time to draw up a plan and double-check everything carefully at this stage. An error noticed on paper is corrected instantly. If you discover it during the installation process, you will waste extra effort and time, and if you don’t notice it, the entire ceiling may sag or crack, and you will have to start all over again.
- Carefully approach the choice of a helper: so that you don’t get under your feet again, it’s a pleasure to spend time with him and his help is tangible.
- Before attaching the drywall to the frame, let it lie flat on the floor to level it out.
Now you know how to make a suspended ceiling with your own hands and save on hiring builders, but this amount can be half or even the full cost of all materials.
Design features of the system
Understanding what the construction of suspended ceilings is will allow you to plan a work algorithm and select the right materials and components.
The suspended structure can be presented in two versions:
- in a base with a sheet finish that requires finishing;
- on the basis of formed sets that do not require final cladding.
As for the device, traditionally it is:
- frame made of wood or metal profiles;
- heat or sound insulating material;
- finishing.
The latter is implemented in several versions and can be:
- from plasterboard;
- from PVC panels;
- from finished aluminum cassettes;
- made of glass, etc.
Regardless of the options for finishing slabs, the design allows you to hide defects in the rough coating and disguise communications and pipes.
Stage seven. Finishing
Once the installation is complete, all that remains is to do the final finishing. First, all joints between the sheets are carefully puttied and leveled, as mentioned above. After the putty has dried, a layer of finishing material (for example, paint, plaster, etc.) is applied. Lighting devices are being installed.
Briefly about the main thing
Suspended ceiling systems have a standard design, consisting of a supporting frame that forms the sheathing, and decorative elements to define the plane. Cassette and rack systems are considered the most practical and easiest to install, but residential owners often resort to installing multi-level plasterboard ceilings, since the finished result resembles the standard finish of stone reinforced concrete floor slabs. To choose the most suitable design, you should familiarize yourself with the advantages and disadvantages of each system when installing and operating it in different rooms.
Stage one. Preparatory activities
Despite the fact that the suspended structure hides all the imperfections of the ceiling, it is still impossible to do without preliminary preparation of the surface.
First of all, you need to remove the old finish. After this, the ceiling is inspected for dents, cracks and other defects. The final stages of preparation are priming and puttying the ceiling. As a result, the surface will be smooth and even.
Acrylic primer for interior and exterior use