Drywall is very popular today; it is used for cladding walls and ceilings, and with its help, structures are created according to an individual project. Drywall is ideal for creating an arch, niche or shelf in the wall, for decorating the ceiling with various geometric shapes, but for this you need to know how to properly attach drywall to the profile.
It is also important to note the fact that repairs using this material will be cheaper, working with it is quick and easy, so even a beginner can handle this task with his own hands. After completing the repair, you will not spend a lot of time on cleaning, since working with plasterboard is dust-free, but does not leave behind a lot of debris.
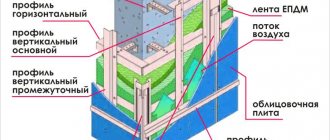
What does a finished metal frame with profiles look like?
Mounting methods
Frame method of wall mounting
This technology involves installation on a pre-prepared structure assembled from either wooden beams or galvanized profiles.
The frame type of assembly has the following strengths:
- Accurate geometry of surfaces and the room as a whole. With the right approach, the walls will be perfectly smooth and the junction angles will be perpendicular (unless the project provides for another option).
- Ability to implement complex design solutions.
- The frame method allows you to hide communications without additional preparation of the walls.
- Possibility of laying a thermal insulation layer.
There are 2 significant disadvantages: the frame takes up free space in the room, on average 3-4 cm per side; requires additional costs (profile, fasteners) and time for assembly.
Preparatory stage
After the project has been developed and a working drawing has been drawn, the calculation part begins. The final result in the calculations will depend on the following factors:
- Area and configuration of the room (height and length of planes, number of angles and their degree, profile fixation step);
- Length of metal slats (standard 3-4 m);
- Consumption of metal supporting structures in relation to the number of corners is 2:1.
Example of work
It is especially important to correctly determine the fastener pitch. The value of this parameter is influenced by the planned decorative coating:
- Wallpaper and paint – 60 cm;
- Gypsum and ceramic tiles – 40 cm;
- Built-in furniture – 40 cm.
Technologically, the installation of the frame in the corners differs in their size in degrees:
- Direct internal;
- Straight outer;
- Blunt or sharp (non-standard).
Profile mounting
The domestic market offers the following types of profiles:
- U-shaped guide UD-27.
- Frame CD-60.
- Guide for racks UW-40. Possible cross-section options are 50, 75, 100 mm.
- Support stands CW-50. Cross section 50, 75, 100 mm.
The last two options are used for forming walls from scratch, and the first two are used for assembling a frame on finished walls.
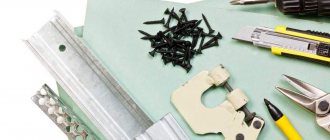
During the work, special fasteners are also used:
- The “crab” connects the frame profile to each other at a right angle.
- Tape brackets with holes.
How to install the sheathing:
- Marking the perimeter of the room. A laser level (or a regular bubble level with a rule) is used to check all planes of the room. The most protruding areas of the wall surfaces are determined. With respect to these areas, under the level, observing the angles, the places where the frame profile is attached to the walls are marked, control lines are drawn on the floor and ceiling for installing guides. The distance between the wall planks is 60 cm, the fastening spacing is the same. You should take into account the standard sheet size (120x250 cm) and mark the wall in such a way that the profile necessarily fits into the joints of the gypsum board.
- Installation of guides. According to the markings, guides (UD-27) are attached to the floor and ceiling. Fixation is carried out with ordinary self-tapping screws (50-70 mm); if the base is concrete, use dowels or other suitable fasteners.
- Installation of racks. A frame profile (CD-60) is inserted into the guides and connected to the wall with perforated strip brackets.
The bracket is fixed directly to the wall with ordinary self-tapping screws, if necessary, through a dowel (into the concrete). The guide and frame profiles are connected to each other with special metal screws (flea). All work is performed by controlling the plane of the structure and the level of each rack. - Installing jumpers. Jumpers are needed to give the frame additional rigidity and provide support for the joints of drywall sheets. The lintels are made from a frame profile (CD-60), for this purpose, at the junctions with the pillars, the side edges are cut off (with a grinder or metal scissors). They are fixed with the same fasteners as for the wall brackets.
- Sheathing with plasterboard. Wall sheets (thickness 12.5 mm) are laid starting from one of the corners, usually vertically. Horizontal installation is also possible, the main thing is that there is rigid support on the profile at the joints.
The fasteners are made using metal screws so that the cap is easily recessed into the sheet (about 1 mm). If you drown more, the head of the screw will fall through and will not perform its function.
For convenience, there are special bits on sale that limit the depth of immersion. Trimming sheets along the edges is done with a regular knife, or a wallpaper knife.
The distance between the screws is no more than 40 cm in any perpendicular direction.
Complex curved structures are formed with a special profile. It is on sale, but not everywhere, and such systems cost a lot. Therefore, to create a figured finish with plasterboard, a regular profile (CD-60) and sheets of galvanized metal are often used. These materials are given the required shape by cutting in the right places with scissors or a grinder.
Calculation
To ensure that there are no obstacles to high-quality installation, all the nuances need to be considered at the planning stage and compiling a list of necessary materials and fasteners.
Calculation rules:
- You need to clearly understand at what distance the fasteners will be fixed. This parameter is determined based on the weight of the structure. The standard pitch between screws is 30 centimeters. If a heavy structure is to be installed, and additional objects will be attached on top of it (shelves, paintings, a TV on drywall), then screw in the screws at a distance of 10 centimeters from each other;
- It is worth considering the size of the plasterboard sheet;
- To select the number of screws, calculate how many layers of gypsum board there will be in the finished structure.
Installation on a wooden beam
This option is less preferable than installation on galvanized profiles. The fact is that wood is more susceptible to deformation due to changes in temperature and especially humidity. If these deformations are pronounced, then cracks may appear on the finished surface. To minimize the likelihood of cracking, it is advisable to use dry wood, since it is when the wet bars dry out that critical changes in the geometry of the frame occur.
Installation sequence:
- Marking the walls. This is done in the same way as for the profile.
- Assembling the sheathing. Installation is carried out according to the markings. The timber must be present along the entire perimeter of the walls (in the corners on both sides), as well as taking into account the size of the sheets at their joints.
The distance between the slats, as well as the fastening pitch, is 60 cm. Fixation to the walls is carried out with self-tapping screws, in concrete with appropriate fasteners. The plane is leveled either with spacers or mounted on perforated brackets for the gypsum board profile. It is less preferable to use gaskets, especially wooden ones (fibreboard and similar materials are also not recommended). Wood, even dry wood, is prone to deformation, which is why the gaskets fall out over time and there is play in the frame. - Installation of drywall. This process is no different from that for a galvanized profile. Mounted on 30 mm wood screws. You can use longer ones, the main thing is that they do not rest against the brick base.
Note! The plasterboard is fastened with the front side into the room. It is quite easy to determine the front side - it is usually lighter and may have markings on it.
Which ones to choose?
The type of fastener is one of the main factors influencing the reliability and quality of drywall fastening. Therefore, special attention should be paid to their selection.
When buying self-tapping screws, it is advisable to consider a few simple rules.
- Give preference to self-tapping screws with a countersunk head. This will make it easy to embed them into the drywall structure. It is undesirable to use hardware for such work that has a hemispherical head.
- The self-tapping screw must match the type of base. For example, in a log house they use wood fasteners that will easily fit into the tree and secure the sheet. A similar algorithm can be used for wooden frames formed when covering the ceiling or walls.
- The length of the screw is selected individually for a specific situation. It is important that it goes inside the frame no less than 2-3 cm. This is especially true for self-tapping screws, which are not supplemented with dowels and represent the main fixing element.
- The material matters. Almost all self-tapping screws are made of steel, but the structure of the metal may differ. The cheapest are black hardened screws. They can withstand loads well, but can rust over time. These changes may affect the decorative finishing layer.
Installation of gypsum boards on walls without lathing
This solution is relevant when installing a frame is impossible or unnecessary. Most often, sheets are attached with glue. There are several methods of such finishing and each of them has a number of features.
Preparatory activities:
- We remove all fragments that do not adhere well to the wall;
- Fill cracks and potholes with mortar;
- Apply a penetrating primer;
The second and third points imply a certain drying time: the solution dries completely in 2-3 days, the primer in 1-2 hours.
Installation on different surfaces:
- On a flat wall. Monolithic surfaces made of reinforced concrete or stone with minimal deviation from the level (no more than 1 cm) are considered smooth. There are no significant irregularities on them, as, for example, on a brick wall without grouting. For gluing, special mixtures, polyurethane foam, and even liquid nails are used if the surface is perfectly smooth.
Polyurethane foam is also popular - On a brick wall. If the masonry was carried out in compliance with the level, the installation of gypsum boards is practically no different from that described above. If there are irregularities, additional preparation of the wall will be required. One option is to pre-glue strips of plasterboard and use them as beacons.
When installing sheets, glue is applied slightly above the level of the strips. Special mixtures based on cement or gypsum are used as binding materials. - On curved surfaces. As in the previous method, you first need to install beacons from drywall fragments. The difference is that in places of significant unevenness you will need to lay two or more strips.
Installation:
- The glue is applied directly to the sheet so that the treated area is at least 10% of the total. The mixture is evenly distributed around the entire perimeter and in two stripes in the middle.
- Pads about 10 mm thick are placed on the floor level.
A sheet with glue applied is placed on them and gently pressed against the wall. At this stage, the plane of the sheet and its level are checked using the rule. If necessary, the position is adjusted. - Fastening with mushrooms or dowels is possible only after complete polymerization of the adhesive seam.
- In the same way, all whole sheets are mounted, after which they begin to trim and install the outer fragments.
To properly join the gypsum board sections, a small chamfer is removed from their edges for better adhesion of the putty.
Video process:
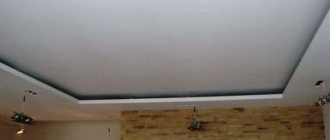
To the ceiling on the frame
Unlike wall plasterboard, ceiling plasterboard is thinner, its thickness is 8.5 cm. This is due to relatively lower impact loads and the need to lighten the structure. Wall sheets can be used, but only if there is no other option, since in this case the sheathing will have to be strengthened.
Sequencing:
- Marking. A laser or water level on the walls marks the perimeter of the ceiling.
Either its lowest point or the value determined by the project is taken as the basis. Also at this stage it is better to note the location of the frame profile and the fastening of the brackets. The guides are installed on two opposite walls. The frame profile should be located at the edges of each sheet and two strips in the middle (when installed lengthwise). The jumpers are marked perpendicularly, every 50 cm, taking into account the size of the sheets (so that they fall on the joint). - Installation of guides. Guides (UD-27) are attached according to the markings. Fixation to the walls is done with dowel screws.
- Installation of frame profile. The CD-60 profile is inserted into the guides and secured to them with small metal screws.
It is additionally fixed to the ceiling with strip brackets in increments of 30 cm. - Jumpers. They are made from CD-60 (sawed at the joints with a grinder or scissors), attached to the main profile with small metal screws (flea).
If you plan to hang a chandelier for it, you need to prepare a place in advance. You can install a mortgage from a wooden block, but it is better to make everything from metal, especially since there are ready-made solutions for such situations on sale.
Pros and cons of drywall in repairs
Advantages of drywall:
- Ease. The material itself is quite light, but at the same time can withstand moderate loads (you can hang shelves).
- Quick wall finishing. When finishing a wall with plaster, a lot of dirt does not form, as, for example, with traditional finishing of concrete walls. Walls are processed quickly and easily.
- Smooth walls. Due to its geometric parameters, when installing a gypsum wall, a perfectly flat surface is obtained.
- Drywall is an environmentally friendly building material.
- Quick installation. To install drywall, you only need self-tapping screws. Depending on the material to which the fastening will be made, you select the appropriate screws. For fastening to wood you will need a plasterboard-wood self-tapping screw, and for metal you will need plasterboard-to-metal self-tapping screws.
- In plasterboard niches you can easily hide communication elements.
Cons of drywall:
- Hygroscopicity. From direct exposure to water, a sheet of drywall swells and becomes completely unusable.
- Does not withstand heavy loads. You can easily hang a shelf on a plasterboard wall, but nothing more. You cannot hang a TV bracket or heavy furniture; the structure may fall.
Installation of drywall to the ceiling without a frame
This finishing option is used if the ceiling plane is flat, it will be single-level, the work needs to be done quickly and at minimal cost, there is no need to hide the wiring or install spotlights.
Preparatory activities:
- Cleaning the base. Everything that does not adhere well is removed; it is advisable to remove the old coating down to the concrete base.
- Sealing cracks and potholes followed by applying a primer.
- Marking for a level (laser or water) taking into account the thickness of the plasterboard and adhesive layer.
Self-tapping screws
Installation of drywall on a concrete base is carried out as follows:
- We apply the sheet to the ceiling and mark the places for the screws (for example, with a screwdriver with a thin drill);
- Using the marks left by the drill, we make holes with a hammer drill and install dowels (6x40 mm dowels are optimal);
- We lift the sheet again and fasten it with self-tapping screws (40-50 mm). We tighten the fasteners gradually, so that adjustment remains possible.
- If there are voids in some places, they can be filled with polyurethane foam by first drilling a technological hole.
- After polymerization of the foam, tighten the screws with a immersion of 1 mm.
This installation option is suitable for leveling ceilings with any curvature; the main thing is to choose the correct length of screws and fill the voids with foam.
For mastic or glue
Sequencing:
- We apply the mastic in a continuous strip along the perimeter of the sheet, and in the middle, dotted, at a distance of 30-40 cm.
- The mixture can also be applied to the base; it is advisable that the treated areas do not coincide.
- We apply the sheet to the ceiling and level it by tapping. To control the plane, we use a rule, a level and follow the markings.
Before the final polymerization of the mastic, it is advisable to support the sheet from below.
Find quality products
What screws are used to secure drywall to the profile? High quality. We already know what characteristics self-tapping screws should have, but how do we know which fasteners are of high quality? The first thing you need to do is visually inspect the hardware. The fasteners must be completely identical. You shouldn’t be happy about the low price when you see that the screws have different thicknesses or uneven shapes.
Correct screw ratios regardless of its length
Ideal cross-shaped holes for the slot are another sign of product quality. Moreover, the hole for the slot should be exactly in the center of the screw. Before choosing self-tapping screws for drywall, you also need to inspect their color. We already mentioned that it should be black. However, it should be a uniform black color, which indicates the high quality of the phosphation or oxidation carried out. Here are the screws you need for drywall.
Marking on screws is another indicator of quality. But, as a rule, these are products of well-known brands, which means their cost will be higher.
When purchasing fasteners that are not packaged, you need to check the stated characteristics. There are cases (often in small towns) when the sizes of self-tapping screws sold do not correspond to the declared characteristics. It is ideal to take a caliper with you to the market to ensure the dimensions are correct. Sometimes it happens that self-tapping screws 3.5x35 mm after manual measurement for some reason turn out to be 3.3x32 mm. In hardware stores, the risk of stumbling upon such a “setup” tends to zero.
Molly dowel for gypsum board
This type of fastener is intended for fixing any relatively heavy objects on a surface finished with plasterboard. In addition to gypsum plasterboard, it can be used in hollow cinder blocks, bricks, concrete slabs, as well as on some sheet materials. They are used to attach massive paintings, lamps, mirrors and even kitchen cabinets.
Structurally, molly resembles a butterfly dowel, but this is only at first glance. The butterfly opens as a result of tightening the screw, and a special tool is needed to open the molly.
The fixation is done as follows:
- A hole is drilled in the drywall corresponding to the diameter of the outer cage of the dowel.
- Molly is inserted into the hole until the teeth stop in the plane; the bolt head and washer remain outside.
- A gun groove is inserted between the bolt and the washer, after which, by pressing the handle, the bolt is pulled out until the butterfly on the inside of the plasterboard is fully opened (the fact that the molly has fully opened will be noticeable by the force).
At this stage, the bolt can either be tightened to the desired level and the required object can be hung on it, or the bolt can be unscrewed and used for fixing later.
Subscribe