Liquid wallpaper is one of the most common seamless coatings. In order to apply them to plywood, the surface must be carefully prepared. This article describes how to repair the surface and prepare plywood for liquid wallpaper and what materials will be required for this. Liquid wallpaper has high aesthetic and performance properties. They are widely used in finishing premises for various purposes. The basis for applying the material can be concrete, plaster, drywall, plywood and other surfaces.
Problems
How, in fact, does a plywood base differ from plasterboard or putty concrete?
- Joints. Due to production technology, the thickness of sheets from one batch may vary significantly. A difference in thickness of just half a millimeter will be more than noticeable.
- Hygroscopicity. Depending on humidity, the linear dimensions of sheets can change noticeably; in this case, the wallpaper will wrinkle or, conversely, stretch - until tears appear.
- Texture. The surface of veneered plywood is embossed and can be seen through the layer of paper covering.
A nuance: first grade sanded plywood has an almost ideal surface and is completely free of the described problem.
What types of plywood are used for wall decoration?
The sequence of preparing plywood for subsequent gluing depends on its type. So first of all, it is advisable to figure out which type is mounted on the walls.
There are several types of plywood for construction work:
- longitudinal and transverse - depending on the direction of the layers;
- moisture-resistant and increased moisture resistance;
- increased fire resistance;
- polished (on one or both sides) or unpolished;
- without finishing coating and laminated.
Since decorating walls with wallpaper involves working with water-based glue, the moisture-resistant properties of plywood play the most important role.
The labeling of this material will help you understand this:
- FBA and FK - low moisture resistance;
- FSF and FSF TV - moisture-resistant types;
- FB and BS - high degree of water resistance.
Solutions
Is it possible to stick wallpaper on plywood, despite the problems described?
Without a doubt. However, surface features will have to be taken into account.
Wallpaper selection
Thin paper wallpaper without embossing is very popular. Their price is more than low; For stickers, any adhesive can be used, including flour paste.
However, for our case they are extremely undesirable:
- The paper will make visible all surface defects - joints and veneer texture.
- Paper has low elasticity and can tear and wrinkle when humidity fluctuates.
So which wallpaper should you choose? The instructions are obvious:
- The preferred material is vinyl. Plasticized polyvinyl chloride will not only provide reliable protection against moisture: thanks to its elasticity, the wallpaper will not tear at the joints of the sheets. However, non-woven wallpaper for painting is not much inferior to vinyl in elasticity.
- Embossed, textured wallpaper, unlike thin ones, will hide both the joints and unevenness of the veneer.
Surface preparation
It comes down to three steps:
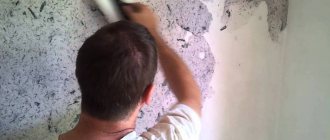
- Grinding. First of all, the joints of the sheets are carefully sanded: even if there are differences in thickness, then in the absence of a clear boundary, the seams will not be noticeable.
Tip: A sander will save you a lot of time and effort. Manual processing of joints will be extremely tedious, especially at a great height above the floor.
An important point: if the plywood is nailed with ordinary nails, the caps should be coated with varnish or drying oil. With high air humidity, rust can appear through any wallpaper.
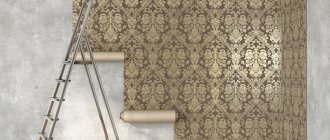
- Primer. Before wallpapering, the entire surface must be primed. A typical solution is to use wallpaper paste diluted with water; however, any acrylic-based penetrating primer for wood surfaces will work.
Is it necessary to glue the joints with serpyanka? The answer depends on the type of wallpaper:
- If, contrary to the recommendations given above, you have chosen thin paper, the serpyanka will somewhat reduce the likelihood of the wallpaper tearing along the joint. However, be prepared for the fact that the putty strip of serpyanka will stand out on a flat wall.
- Vinyl and non-woven fabric do not require reinforcement of seams. The mesh won't do any good; however, no harm can be expected from it either.
Sticker
How to paste wallpaper on plywood with your own hands? Just like on any other surface.
- In the case of heavy, dense wallpaper, it is better to coat both the wallpaper and the wall with glue. The roller, by the way, will save you a lot of time compared to the brush.
- Thin wallpaper is always glued in the direction from the light source (usually from the window). Otherwise, the overlaps of the strips, despite their small thickness, will be noticeable due to the cast shadow.
- How to hang wallpaper on plywood if you have chosen vinyl or non-woven fabric? Of course, end-to-end, without overlapping stripes.
Non-woven fabric and vinyl are glued end to end, without overlaps.
- When sticking, air bubbles from under the strip of wallpaper are removed with a dry cloth; The glue that appears at the edges is removed with a sponge.
- Avoid drafts while drying. Wallpaper should dry at constant humidity and temperature.
Surface preparation
Plywood is not the worst base for covering with paper wallpaper, but at the same time, the finishing process contains some features, knowledge of which will allow you to do high-quality wallpapering yourself.
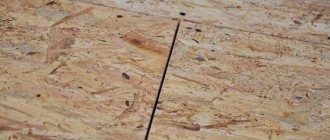
The main thing to pay attention to is the seams between adjacent sheets of plywood. Unlike drywall, plywood sheets are almost impossible to lay without causing gaps. They must be sealed first. The edges of the plywood must be carefully sanded and covered with sickle tape. This will reduce the possibility of seams coming loose.
Plywood has a heterogeneous color and texture, which makes it look like wood.
Another difficulty is that plywood has a heterogeneous texture and color, which makes it look like wood. If you are planning to get a natural look for the walls, then this property is more likely to be a positive thing than a negative one. But if the plywood is covered with thin and light wallpaper, then its color will give the wallpaper a non-uniform shade. Therefore, before installation work, it is necessary to treat the surface of the walls with a thin layer of finishing putty. The dried putty should be thoroughly cleaned and then painted with oil paint. For dark and thick vinyl wallpaper, you can skip this point, since this material can hide slight surface roughness and uneven tone.
Related article: How to make a bathtub stable
If you did not treat the plywood with putty, then you definitely need to apply wallpaper glue to it and give it time to absorb well. If this is not done, then when gluing most of the glue will be absorbed into the veneer, which will lead to rapid peeling of the wallpaper.
You can prepare the surface in another way, which involves using wide paper strips instead of putty. First, 40 mm wide strips of paper are glued, 30 mm wide strips are glued onto them, and finally 20 mm wide paper strips are glued onto them. After the glue has dried, the strips are rubbed with pumice. In this case, the nails with which the plywood is attached to the wall are recessed to a depth of 1 mm, and then covered with varnish or drying oil so that they do not rust over time. Instead of paper, you can use gauze strips, which, after gluing, should also be puttied and painted with oil paint.
Liquid wallpaper
We’ve basically figured out how to glue wallpaper onto plywood. However, along with the usual paper or relatively new polymer wallpaper, there is another solution. But the hygroscopicity of veneer raises doubts: is it possible to apply liquid wallpaper to plywood?
An attempt to apply a wet mixture that takes a long time to dry on dry birch veneer will give a completely predictable result - deformation of the surface. The plywood will begin to delaminate; Chips may rise in some places. So this option is no longer available?
Nothing like this. It is enough to simply protect the veneer from moisture with a primer. Traditionally, ordinary oil paint was used for this purpose; however, water-based liquid wallpaper does not stick to it very well without preliminary sanding.
Fortunately, we live in the 21st century, and you can find a lot of easy-to-use and inexpensive products in stores to protect surfaces from moisture. The most obvious solution is an acrylic primer, which will solve all possible problems at a low cost (also find out how to cut a circle in plywood).
Deep penetration acrylic primer.
It is enough just to drown and putty the nails or screws, apply it in one layer and wait for it to dry.
With this small amendment, the question “can liquid wallpaper be applied to plywood” can be answered unequivocally in the affirmative.
What will you need for work?
After completing the preparatory work and completely drying the primer and putty, you can glue the wallpaper onto the plywood. To do this, you need to stock up on the following tools and materials:
- wallpaper glue and a container for diluting it;
- conical roller for joints;
- a knife with a retractable blade;
- level for vertical marking of the first strip;
- a lint roller for applying glue and a cuvette;
- foam roller for pressing wallpaper;
- rags to remove excess glue.
Advice
A glue roller with a telescopic handle will be a good helper both when gluing walls and when decorating the ceiling. It will help save both energy and time.
How to apply liquid wallpaper to a wooden surface?
Applying liquid wallpaper to concrete and plasterboard walls is a fairly common design trend. But there is very little information about applying it to wooden walls. Indeed, in the general instructions for use you can find very little information. Of course, for a person who is planning renovations at his dacha, this is not enough. I would like the topic to be explored as much as possible. That is why our article on applying liquid wallpaper to wooden surfaces, osb boards and plywood contains answers to all questions. First, let us remind the reader about the properties of the material.
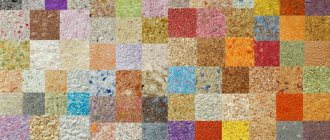
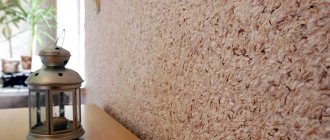
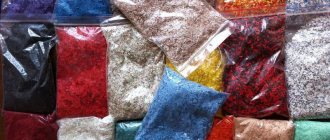
Liquid wallpaper: what it looks like, what its composition is
The decorative finishing material is a dry crumbly mixture in a plastic bag, packaged 1 kg. Thanks to their unique composition, the mixtures have a lot of useful properties. The basis is CMC glue, cellulose and textile (silk) fibers. Depending on the predominance of certain fibers in the composition, liquid wallpaper is divided into cellulose, silk (also known as silk plaster) and cellulose-silk. Additionally, the dry mixture may include dyes, as well as various decorative elements (reinforcing threads of synthetic fibers, glitters made of mica or foil). The range of liquid wallpaper can be found here.
Composition and technical characteristics
Today, most putties consist of a latex base and acrylic resin. These polymers are mixed with drying oil or PVA glue to strengthen the consistency. Plaster of Paris, chalk and a piece of laundry soap are also added. Depending on the purpose for which the mixture is used, the proportion of ingredients changes. Technical characteristics of putties depending on the material from which they are made:
- gypsum (inexpensive, does not crack, is elastic, but when it dries, it loses this property and collapses, especially in damp places or places of high vibration: 1st floor, railway, highway);
- acrylic (ideal moisture protection for plywood, improves its adhesion, sells at high prices).
- If you don’t have the opportunity to buy a polymer consistency, you can make it at home: PVA + crushed chalk + sawdust.
Consumption per 1 m2
One square meter accounts for approximately half a kg of dry putty mixture. The solution must be applied evenly with a spatula or brush, having previously primed the surface.
The ease of correcting defects in wallpaper is one of the undeniable advantages of the material. For example, cracks appeared on the surface after drying. All actions to correct this issue will boil down to soaking the wallpaper with water and leveling it.
Properties of liquid wallpaper
Compared to other finishing materials, liquid wallpaper has a number of advantages:
- environmental friendliness (natural composition);
- versatility - the material can be used in heated and unheated rooms for interior decoration of balconies and country houses. That is, you can apply liquid wallpaper to a wooden surface, OSB boards, plywood and even metal.
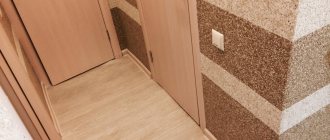
- Seamless coating (finished surface without joints or seams).
- Plastic. The material perfectly hides minor surface defects.
- Easy to apply. To work, you only need a plastic polisher.
- Antistatic properties (liquid wallpaper on osb does not attract dust and does not accumulate harmful static charge).
- Local repairs. Individual damaged areas can be easily restored without the need to remove the entire coating.
How to glue liquid wallpaper on a wooden surface, osb board or plywood?
Before applying liquid wallpaper to OSB, you need to prepare the surface. Remove all elements from the walls - shelves, brackets, cornices and even hardware. All paraphernalia that cannot be installed (window sills, moldings) are covered with polyethylene or sealed with masking tape.
Wooden wall panels, OSB boards, plywood are surfaces that do not like contact with water. Without pre-treatment, wooden walls will swell from exposure to moisture and plywood will begin to warp. What to do?
Before applying liquid wallpaper to an osb board, plywood or wooden panel, the surface must be sanded and large fibers, burrs and splinters removed from it.
Further, experts recommend applying universal alkyd-based building enamel PF-115 or its equivalent to the surface without fail. The enamel will create a strong, waterproof barrier on the wall. And only after the paint has completely dried can you apply liquid wallpaper to the wooden panel.
Application of liquid wallpaper on wooden wall panels
To glue liquid wallpaper onto plywood, wood or OSB board, you will need a plastic polisher. Please note: it is not recommended to use a metal tool, since exposure to water may cause rust to appear on it and get into the mixture. As a result, red spots may appear on the finished surface.
In addition to hand tools, you will need a container for soaking the mixture (see instructions for preparing the solution), a spray bottle, and a ladder or scaffolding for working at height.
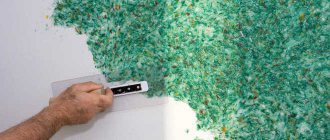
- Pick up the required amount of material with a spatula and apply it to the wall.
- Distribute the composition over the surface with a thickness of 1-1.5 cm. Move from the corner from left to right, smoothing the material over the surface with linear translational movements. Avoid continuous circular movements with the tool.
- Tears and uneven surfaces should be removed immediately while the surface is damp.
The drying time of the finish is 24-72 hours (depending on the humidity and air temperature in the room).
This article outlines general recommendations for preparing the surface and applying liquid wallpaper to wood, plywood or OSB boards. Following our advice, even a beginner without experience can cope with applying decorative finishes to wooden surfaces.
Step-by-step instructions for gluing
Before gluing, you need to dilute the glue, taking into account its swelling time. Manufacturers indicate it in the instructions, as well as the ratio of the dry mixture and water that needs to be added. When the glue is ready, you can proceed to gluing.
- Lay a covering film or old newspapers on the floor.
- Measure the height from floor to ceiling.
- Cut the fabric to the required length. This is convenient to do by pressing the wallpaper with a wide metal spatula.
- Make vertical markings on the wall for the first strip using a level.
- Coat the plywood with glue, covering the width of the space a little further than the markings (15-20 cm more than the width of the canvas). For convenience, the glue is poured into a cuvette (tray) in portions. It’s convenient to pick up the solution there: the roller is evenly saturated, and excess glue is easily removed by rolling it over a flat surface.
- If the wallpaper is paper, then glue is additionally applied to the canvas itself from the reverse side.
- The upper part of the canvas is applied to the wall and leveled with a foam roller in several movements. All movements are performed from the center to the sides.
- After this, smoothing is performed - air bubbles are expelled. During this operation, you need to be careful not to grab the spatula and smear the excess glue squeezed out from under the wallpaper on the front side. If they appear, they must be removed immediately with a dry cloth.
- The second strip is glued butt to the first. It should be taken into account that the pattern must match completely.
- After the second strip is glued to the plywood, the joints are pressed down with a conical roller.
- All subsequent canvases are glued in exactly the same way.
Advice
Do not forget to apply glue with a brush in the corners and along the joint strip. This operation is not labor-intensive and does not take much time, but it prevents the wallpaper from “sliding.”
Is it possible to apply liquid wallpaper to a wooden surface?
Liquid wallpaper is allowed to be applied to wooden objects only after you make sure that they do not change their shape due to moisture. It is also worth considering that the thinner the plywood, the greater the likelihood that it will deform. Therefore, before application, use a primer in two or three layers, and then matte paint or any waterproof primer offered by the seller to protect the liquid wallpaper from deforming damage. Also, if these building materials are not available, it is recommended to first coat the surface with white oil paint, then apply a layer of standard white matte paint for good adhesion.
Pros and cons of liquid wallpaper on a wooden wall
- Quite easy to clean. A surface without a varnish coating can simply be vacuumed. This cleaning will be enough to remove dust and fine dirt.
- If there is a varnish coating, then wet cleaning is allowed for such a surface.
- Surface dependence. If, after applying liquid wallpaper, yellow spots appear, then, most likely, this was influenced by metal embedded parts or moisture that comes through the plaster.
Preparing the walls
Some manufacturers, for advertising purposes, claim that liquid wallpaper is a special material that can be used to cover walls of various materials without preparatory work. But in reality, to successfully apply wallpaper to walls, preparatory work is still necessary, even if it is applied to smooth drywall.
Therefore, before performing this type of work, be sure to:
- In the absence of an old layer of plaster, wallpaper, paint or other coatings that may come off the coating.
- In terms of strength, the wall should be sufficiently rigid and strong and should not break or deform.
- The fact is that vertical differences and defects are located no more than two to four millimeters above the average plane of the wall.
- In the absence of protruding objects such as nails, pins and so on. If they are still there, then it is necessary to remove them and make the places in which they were located level.
- In the absence of large cracks, chips, depressions and potholes.
Preparation
In the case of thick canvases, it is advisable to putty plywood under the wallpaper. For this, a special polymer putty is used, which adheres well to the wood, and its outer layer will not come off even when soaked with an adhesive solution. It is very important to seal all possible cracks and seams in plywood sheets before gluing. Firstly, gaps will be noticeable under the wallpaper, although, naturally, vinyl or non-woven wallpaper will really hide minor surface irregularities quite well. Unsealed seams also pose a risk to the durability of the coating. An excess air flow may flow through them, which simply will not allow the canvas to dry evenly, and in the future will definitely affect the quality of the surface.
Attention! It is necessary to putty the surface after all possible cracks and seams have been sealed. In this case, a certain layer of mastic on the seams is removed to distribute the putty evenly. It would be useful to use gauze or a special reinforcing mesh when preparing plywood. It is glued to PVA, after which a layer of putty is applied on top. This move will further improve the condition of the surface and make it more convenient for further work with wallpaper.
Application technology
After preparing the wall for work, to obtain a successful result, you must perform the following steps:
- Place a little material on the base, using a spatula or just using your hand, after putting on gloves, pick up a little material and lay it on the wall. We distribute this mass in a layer not exceeding four to five millimeters. Level the surface with a spatula.
- We distribute the composition along the wall in a layer not exceeding 2 mm.
- After this, you need to moisten the grater, apply the flat surface to the surface and smooth the wallpaper using circular movements.
- The next step is to make the edges smooth to compact the material and reduce the likelihood of it peeling.
- After completing all the steps, it is recommended to treat the liquid wallpaper with varnish.
If you did everything correctly, then, absolutely, the result will please you.
How to properly glue wallpaper onto plywood?
Plywood is not the best material for wall cladding, but sometimes it is the only possible one. If you plan to level the walls with this particular material, then it is advisable to do this using its moisture-resistant and sanded form. Whether the sheets are sanded or not can be seen with the naked eye, but moisture-resistant sheets include those marked with the following markings: FSF, FSF TV, FB and BS. The last two have the highest water resistance class .
One of the most popular types of decorative finishing is wallpaper. But is it possible to glue wallpaper onto plywood? Can. But not all produced types are suitable for these purposes. To figure out what wallpaper to glue to plywood, you need to first understand what sheets the walls are lined with.
Preparing walls for wallpapering
If this is the most common option (unpolished and non-moisture resistant), then a number of preparatory work must first be completed:
- sand the surface, paying special attention to the joints;
- prime;
- cover with a layer of putty, and special strips of paper or sickle tape can be glued to the seams (but it can be visible);
- It is advisable to additionally paint with alkyd enamel;
- You can proceed to gluing only after the primer and putty are completely dry.
For a sanded and moisture-resistant base, steps 2 and 4 can be skipped.
Selection of finishing materials
After completing the preparatory work, the choice of decor begins. Thin wallpapers are not suitable for gluing this type of base; paper varieties without embossing should also be avoided (the veneer pattern and all surface imperfections can be visible through them).
It is better to choose one of the following types:
- vinyl - best suited for these purposes, hiding all the joints and flaws of the wood, and their elasticity will mask the defects if the wooden base dries out or moves a little ( buy online );
- non-woven fabrics for painting ( buy online ) – their thickness and elasticity are also sufficient to hide all surface imperfections;
- duplex - double paper with a relief pattern or embossing.
Is it possible to putty and plaster plywood for painting or wallpaper?
Putty for plywood is necessary for leveling the base, improving the quality of adhesion, increasing service life, preparing surfaces for painting, plastering, and wallpapering. The work uses putty mixtures of gypsum, cement, polymer; various materials are used for interior and exterior decoration.
Properties of plywood
Plywood sheets are produced with different technical characteristics depending on the type of material.
The compositions differ in moisture resistance, strength, durability and elasticity. In accordance with the developed marking, the type of glue used to impregnate and fix the veneer in the manufacture of finishing products is indicated.
- 1525x1525;
- 1220x2440;
- 1500x3000, etc.
The thickness of plywood products is 3-30 mm.
- pine;
- birch;
- larch;
- spruce, etc.
Determine whether plywood can be puttyed depending on its characteristics. The types of finishing material are assigned the appropriate markings (FBA, FB, FSF-TV, FC, BV, BS, etc.). Recommended putty for plywood, which is highly resistant to moisture.
- FSF;
- BS;
- FC;
- FSF-TV;
- FB.
The materials differ in the quality of processing and are divided into non-laminated and laminated types. Sheets with sanding on one side are marked with Ш1. Plates with double-sided grinding are designated Ш2.
On what surface can liquid wallpaper be applied?
Concrete blocks are increasingly used in construction (foam concrete, aerated concrete and others) - they are light and durable. However, a feature of these materials is increased porosity. Concrete absorbs moisture very well; liquid wallpaper cannot be applied directly to it - it simply will not stick.
Serious preparation is needed here. Simply painting concrete with water-based emulsion will not work - the walls will absorb the pigment and the gray base will still show through the liquid wallpaper. Oil paint is also not an option; applying it over large areas is impractical. It is toxic, clogs pores and does not allow the walls to “breathe”, and is very difficult to remove during the next renovation.
The concrete surface needs to be puttied. To do this, it is better to use a gypsum mixture; apply it in a thin layer so that the base does not show through. The putty surface is covered with two layers of primer, and after drying with 1-2 layers of white water-based paint.
Advice! If you add PVA glue to the paint (in a 2:1 ratio), this mixture can not only paint the walls, but also significantly strengthen the surface.
The small scales will bind together and securely lock in place – this will prevent the coating from peeling off. Another plus is that the glue will improve the adhesion of liquid wallpaper and walls.
How to prepare drywall for finishing
In terms of its structure, drywall is a fairly moisture-intensive material. Therefore, its usual treatment (puttying seams and joints) is not suitable in this case. To prepare plasterboard walls or ceilings for finishing with liquid wallpaper, the entire surface is puttied with a gypsum mixture. The layer of material should be uniform and dense enough to avoid bald spots. After this, the base is primed and painted in the same way as in the case of concrete.
Another nuance is the fasteners. The screws that fasten the slabs and frame together can rust under liquid wallpaper, even through a layer of putty. It is recommended to use galvanized fasteners.
Important! If the plasterboard structure has already been assembled using conventional metal fasteners, the screws should be sunk into the material as much as possible, and the caps should be painted with white oil paint.
Drywall is very smooth, the coating is easily applied to the surfaces finished with it. This is an ideal option for a beginner trying to apply liquid wallpaper for the first time.
Whitewash as a base
Whitewashing is the worst option as a basis for gluing liquid wallpaper! It’s better to remove it right away than later it will fall off along with the finish. Due to its structure, which is porous, whitewash will prevent the wallpaper from contacting the wall and will simply fall off. Be sure to remove it! The fastest solution consists of the following points:
- Wet the whitewash from a spray bottle
- Wait for it to swell and become completely soaked.
- Scrape the whitewash down to the base with a spatula
- Wash the surface with a sponge or cloth
- Let dry
- Apply primer
- Putty the uneven parts and sand them
- Apply primer
- Everything is ready to apply the decorative layer.
How to stick wallpaper on plywood so that it is smooth, secure and beautiful
In old apartment buildings and country houses, the walls are often covered with plywood, as a cheap and quite practical substitute for drywall. However, if the latter is manufactured in compliance with all standards and standard sheets come off the assembly line absolutely identical in thickness and area, then plywood made from wood does not comply with any standards. Sometimes it is difficult to find two absolutely identical sheets in one batch. And, one wonders, how to stick wallpaper on plywood in this state of affairs? There is only one answer - carefully and after preliminary preparation of the surface. Content
- How to stick wallpaper on plywood if it is not evenly applied to the walls
- Pasting wallpaper onto plywood, choosing the covering material
- How to hang wallpaper on plywood with a guarantee of durability
1 How to stick wallpaper on plywood if it is not evenly applied to the walls
As you know, the smoother the surface, the easier it is to wallpaper it, and the best option, undoubtedly, is plasterboard. But this pleasure is expensive, and not everyone can afford it, because in addition to the sheets of wall covering made on the basis of gypsum, special profiles will be required, and, of course, considerable professionalism during installation. Therefore, many today take a simpler route, upholstering walls with plywood. And often there is no one to warn about the difficulties ahead. Which ones? Quite serious, but quite surmountable.
The main problem that you have to face before gluing wallpaper onto plywood is uneven joints between the sheets. It is very difficult to cover walls with plywood to create a perfect, uniform surface. This means that the upholstery will “play” with differences at the seams. The best option to combat such disgrace is to glue the joints of the sheets with sickle tape, then prime the top with high-quality putty and sand it. Rest assured, the differences will become almost unnoticeable, especially if the plywood is of high quality and the walls are relatively smooth.
2 Wallpapering on plywood, choosing the covering material
If you look at a dacha built at the dawn of Soviet power and run your hand along the wall, you will be able to feel the texture of high-quality multi-layer plywood under the darkened paper wallpaper. And if suddenly you want to clean the walls of the old faded coating, then make sure that even ordinary poor paper wallpaper adheres tightly to the plywood . Maybe it's the glue? It is very doubtful, since only modern industry pampers us with a wide variety of adhesive compositions, and previously we made do with the usual starch infusion, called paste. So, is paper wallpaper best? But wait with premature conclusions, because you need to be careful when gluing wallpaper on plywood. To begin with, paper is not the most durable material, and today vinyl is much more popular. In addition, vinyl wallpapers can be embossed, which perfectly masks uneven joints if you were not able to completely smooth them out. But the best option is gluing non-woven wallpaper, which holds its shape perfectly, even if the plywood becomes slightly deformed over time. As for masking completely unflattering joints, reed wallpaper will help you here, the rough surface of which will perfectly hide any unevenness.
Keep in mind that wallpapering on plywood is carried out only after priming with glue, after which, after a short period of time, the canvas can be applied.
3 How to hang wallpaper on plywood with a guarantee of durability
Of course, it is difficult to predict in advance how plywood will behave after the wallpaper pasted on it has dried, but one thing is certain - over time, this product of the wood industry may well become deformed. And it’s good if this almost inevitable deformation occurs somewhere in the middle of the sheet, but the edges can also “play”, aggravating the unevenness of the joint. How to glue wallpaper on plywood in this case? We can say with confidence that glass wallpaper and a composition specially designed for gluing it will provide you with a high-quality surface for decades. The same can be said about metallized fabric. But, let’s say, how to cover walls with wallpaper so that they last forever... There is such a wonderful composition as liquid wallpaper. They do not require glue, but the surface must be appropriate - since liquid wallpaper contains water among its components, the wooden surface must be sufficiently resistant to high humidity. In other words, either choose waterproof plywood (there is such a thing), or it must be carefully secured so that the deformation already mentioned repeatedly above does not occur. But after finishing the decorative finishing, you don’t have to worry about the coating; any damage to the applied composition can be corrected in no time, just moisten the desired area and rub the mixture with a spatula, or if there is significant damage, apply a new layer.
Work process
How do you stick wallpaper on plywood? Let's look at this process step by step:
- First of all, you need to prepare the room itself for work. To do this, you need to remove debris, wash the floors, and clean the room from dust.
- Protect the flooring with a protective film to prevent it from being damaged by the adhesive mixture.
- Prepare the wallpaper glue - you need to do this in advance, since it needs to sit a little. It is also important to strictly follow the instructions. If you ignore the instructions, all the work done will be in vain, since the surface will be damaged, and the material will either deteriorate or simply come off.
- The work will depend on what type of wallpaper was chosen. If the wallpaper is non-woven, glue is applied only to a strip of wallpaper, and is not necessary on the wall, otherwise it will become covered with bubbles and will be damaged. Each roll contains instructions indicating the type of wallpaper; special attention should also be paid to it.
- Taking into account the drawing, the length of the surface to be pasted is measured. The roll is laid out on the floor and the same length is measured as against the wall, plus 2-3 cm for an allowance.
- It is better to start gluing from the corner where the window is located so that the joints are less visible. But do not glue directly from the corner, but at a distance of 3-5 cm.
- Before gluing, a vertical, even strip is measured on the wall using a level the width of a roll of wallpaper.
- Having glued one strip, you need to measure the next strip, but you need to take into account the fact that if there is a pattern on the wallpaper, it needs to be adjusted. This is how the room is papered until the next corner.
How to glue wallpaper with adjustment is shown in the following video:
The inner corner is glued as follows. The wallpaper strip is cut to the width of the one that goes from the previous strip to the corner plus 5cm.
All strips are glued from top to bottom, smoothing and expelling air from the center to the edges using a rubber roller and a soft rag; you need to press the roller or rag with medium force.
The video shows how to glue wallpaper in a corner:
When hanging wallpaper, you need to exclude a draft in the room, at least for a day. Or the wallpaper, at best, will fall off, and at worst, it will bubble and deteriorate. May change color. Yellow streaks may appear on the surface.