Liquid wallpaper is a new and still unusual type of decorative design. They decorate not only the walls, but also the ceiling. The surface is smooth, without seams, and minor imperfections are hidden. In addition, liquid wallpaper is easy to apply with your own hands without the involvement of specialists. Let us consider in detail the types of materials and features of choice. We also provide step-by-step instructions for applying wallpaper and minor repairs.
Is it possible to apply liquid wallpaper to the ceiling?
It is possible, such a finish will adhere well to the ceiling. But it is important to take into account the characteristics of the room. There are no problems in living rooms. But liquid wallpaper gets wet when in contact with water. Therefore, when renovating in wet areas (kitchen, bathroom, etc.), they must be protected from influences. To do this, the surface is coated with waterproof varnish, preferably 2-3 layers. You can choose glossy or matte. It is worth testing it before applying. Take plywood with an area of about a square meter, apply liquid wallpaper, and after drying, paint it with the chosen varnish. The result is carefully assessed: how smoothly the composition is absorbed, whether there are any stains or highlights, how many layers need to be made.
Important! If the wallpaper is varnished, it will lose its main advantage - maintainability.
The material is suitable not only for apartments, but also for unheated premises - for example, country houses. When applying, the temperature should not fall below +15º. And in the future, the coating can withstand both cold and heat.
Liquid wallpaper is damaged by rain and high humidity; in this case, even varnish will not be able to protect it. That is, they are suitable for gluing on a glazed loggia, but not on an open balcony.
How much material will be needed?
When calculating the amount of dry wallpaper, you should keep in mind that the consumption declared by the manufacturer is usually underestimated: one package is enough to cover no more than 4.5 square meters. m of ceiling provided the surface is completely flat. Therefore, it is necessary to provide a reserve, and the remaining material can be used in the future for restoration of damaged areas.
It is better to buy mixtures from one batch, as there may be noticeable differences in shades.
Which liquid wallpaper is best to choose for the ceiling?
The material is sold in the form of a dry mixture, which includes:
- cellulose;
- adhesives and binders;
- textile fibers of various types;
- dyes (optional);
- decorative particles (glitter, mineral chips).
The properties largely depend on the type of additives. The composition without textile particles is the cheapest, but fades over time. Cotton is denser, with an interesting and complex structure due to heterogeneous fibers. The finished surface is matte, has the ability to cut off noise and retain heat.
Silk wallpapers are the most expensive. But they are the most durable and do not fade even with prolonged exposure to sunlight. Looks shiny. Because of this additive, liquid wallpaper can be called “silk plaster”.
There are mixed formulations containing both types of plant fibers. They combine their advantages, but are not so expensive.
All types of liquid wallpaper can be recommended for use on the ceiling.
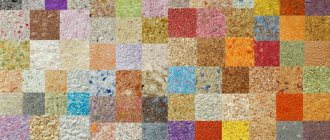
Ready-made mixtures are available in different shades or uncolored. In the latter case, a water-soluble color is added. The quantity is determined according to the table on the packaging, taking into account the volume of the finished mixture (after dilution). But it’s difficult to get the right shade, so for non-professional repairs it’s better to choose one that’s already painted.
Pastel shades are chosen for the ceiling - they increase the height. This effect is especially pronounced for cool tones, which are recommended for low rooms. It is better to avoid dark colors or use them sparingly, on individual fragments.
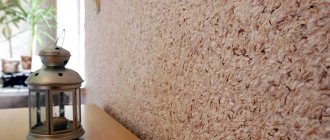
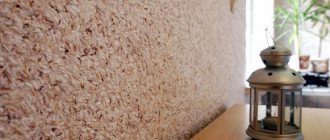
Decorative additives greatly influence the appearance of the coating and the overall design of the room. The texture resembles stone or fabric, sparkles or inclusions of contrasting color appear. If it seems that there are not enough of them in the package, you can buy them separately and add them. With a wide selection of shades and additional textures, there are many finished surface options. There is a suitable one for any interior.
What is the material?
This is a packaged fibrous mass of textile and cellulose components with the addition of specialized impurities. The additives used are sparkles, stone inclusions, stars, and glaze. They give the plaster layer an extraordinary texture. Cotton, cellulose, silk and mixed compositions are used as a base.
Larger additives will give the ceiling a pronounced rough effect.
Based on the color scheme, you can choose wallpaper to suit every taste, if the desired color is still not on sale, using liquid wallpaper of a light shade by adding a water-soluble color is not difficult to achieve the desired result.
How much material will be needed per 1 square meter
To avoid noticeable transitions and joints, it is advisable to immediately prepare the required amount of material. The mixture is sold in 1 kg packages, each indicating how much area it is enough for (3-6 square meters, depending on the composition and manufacturer).
But in reality the cost may be higher. The fact is that the calculations are given for ideal conditions: a properly diluted mixture and a well-prepared base. Then a layer of 1.5-3 mm is enough. Some factors increase consumption:
- If the solution is too liquid, the wallpaper will not stretch well.
- If it is too thick, it also results in a thick layer.
- When the surface is smooth, adhesion decreases and the amount required increases.
- Material gets caught in cracks and imperfections, causing more wastage.
Therefore, it is better to buy wallpaper with a reserve. The remainder can be used for minor repairs. To do this, the mixture is spread on polyethylene in small cakes and dried, and then removed.
To roughly calculate how much mixture will be needed, first measure the area of the ceiling. This number is divided by the minimum specified footage. The result is rounded to the nearest whole number. This will result in the smallest number of packages that need to be purchased.
Ceiling preparation
The first working stage is proper surface preparation. First, the old coating is removed or processed. Areas with cracks and potholes that need to be carefully repaired with putty deserve special attention. Furniture is covered with polyethylene before starting work to avoid contamination.
Note! Liquid wallpaper does not require such careful leveling as for painting or paper sheets, since it can hide minor imperfections. However, a properly prepared surface will significantly reduce the consumption of the applied finishing mixture.
Let's consider some features of preparing the ceiling for applying finishing material.
- The old wallpaper is completely removed.
- Whitewash is easily removed by simple washing.
- Any greasy or dirty stains are removed from the surface.
- All protruding objects (nails, screws) are carefully removed.
If reinforcement is visible through the crumbled concrete of the ceiling, it is painted over with latex or oil paint to avoid corrosion, and after drying it is puttied.
- There should be no traces of cracked or peeling paint anywhere.
- The gypsum plasterboard ceiling must be puttied over the entire surface.
- After cleaning, the base is primed and left until the composition dries completely.
Advice. If the ceiling was covered with brightly colored oil paint that is difficult to remove, you can apply several layers of primer to it. This will prevent the colors of the old and new coatings from mixing. A white or transparent composition will do. When processing, do not use Ceresit ST-17 primer: it can lead to the appearance of yellow stains.
Read more about methods for removing old coatings - wallpaper, paint, plaster - here.
USEFUL INFORMATION: Suspended ceilings: how to make it yourself?
Technology of applying liquid wallpaper to the ceiling
It’s easy to create a design like this yourself. Accuracy and consistency are important.
What tools and materials may be needed
For the preparatory stage you will need:
- thick plastic film and paper tape to protect the room;
- plaster and putty;
- metal spatula;
- ladder;
- water container (if there is old wallpaper on the ceiling);
- ditch for primer;
- roller and brush.
Before starting work, furniture is removed from the room, and if this is not possible, it is carefully covered. A film is spread on the floor and secured with tape near the walls.
For application you will need:
- bucket for diluting the mixture;
- plastic spatula;
- grater-stroker made of the same material;
- and again the stepladder.
Surface preparation
Liquid wallpaper can be laid on all types of surfaces: bare concrete slabs, moisture-resistant drywall, wood. The main thing is not to forget about the acrylic primer. The only exception is chalk-based whitewash; it must be carefully removed using a dry method (trowel, sander, etc.) so as not to saturate the surface with water. Otherwise, wash the chalk thoroughly and wait until it dries.
If there is mold on the ceiling, it must be removed with a spatula or a stiff brush and treated with an antiseptic composition. Then the cracks in the ceiling are repaired. Liquid wallpaper can hide unevenness, but this increases consumption. If significant leveling is required, use gypsum plaster, and to eliminate smaller defects, putty.
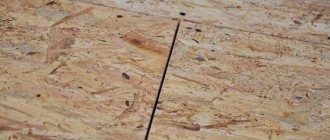
If the ceiling is leveled by a suspended structure, wallpaper can be applied to it. Most often, plasterboard sheets are used for this purpose. The joints between them are puttied, a reinforcing mesh is laid and leveled again. The caps of the screws are masked (they should be slightly recessed into the surface). Other materials, such as OSB boards or plywood, are also puttied.
Then wait until it dries completely and prime the surface. This stage:
- improves the adhesion of wallpaper to the rough ceiling;
- protects them from stains if reinforcement, iron fasteners, etc. remain in the thickness;
- prevents moisture from the finishing from being absorbed into the wallpaper.
Therefore, it is important to choose the right composition. A deep penetration primer with water-repellent properties is suitable. The product is applied in 2-3 layers, each after complete drying and perpendicular to the previous one. The primer should lie smoothly, without drips or splashes. Manufacturers recommend white and colorless acrylic compounds for purchase.
After this, painting is required. The surface becomes homogeneous in appearance, in addition, adhesion improves (due to microparticles). A water-based composition is suitable, preferably a façade one (for exterior work) - it better protects against moisture. Most often they choose white, sometimes to match the color of the future coating.
If after applying the primer the ceiling turns out to be uniformly white, painting with water-based emulsion is not necessary.
The preparatory stage is very important. The result largely depends on how carefully it was carried out.
How to apply liquid wallpaper to the ceiling
The dry mixture is diluted with water. The required quantity is indicated on the packaging, usually 6-7 liters. It is recommended to dilute the entire package of the mixture, and not part of it. This is due to the fact that during transportation and storage of wallpaper, the glue included in the composition may be distributed unevenly throughout the package. And there is a risk of violation of proportions. The remainder of the mixture is dried on polyethylene and used for further repair of minor defects. In this form, the composition can be stored for a very long time.
Attention! Liquid wallpaper is mixed manually. If you take a construction mixer or drill with a special attachment, the tool will break the fibers. As a result, the surface will look different from the sample.
Sometimes additional additives are used - for example, mineral or glitter. They are diluted in liquid and only then poured into the main composition.
After mixing, the wallpaper should settle and swell. The mixture is transferred back into the bag or the bucket is tightly closed with a lid.
Depending on the manufacturer and the exact composition, this takes from 15 minutes to 8-12 hours. If you have to wait a long time, it is better to prepare the material in the evening. When time has passed, the wallpaper is mixed again. Sometimes, when diluting the material, not all the water is used, so that a little (about half a liter) is added at this stage.
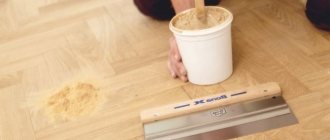
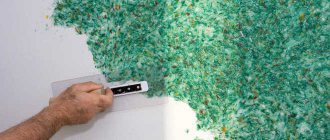
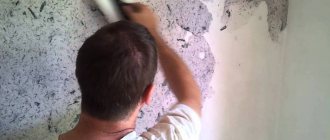
The composition is applied to the ceiling with a wide spatula and leveled over the surface. The tool is held at an angle of 10-15º. You can distribute the wallpaper in a circular motion, zigzag, in one direction or in a checkerboard pattern, chaotically. This determines how the surface will look. You can try it on a small, inconspicuous area and see the result.
By this point, the ceiling decor (plinth, sockets, etc.) should be in place. The coating is rough and it is very difficult to glue anything to it.
When the entire composition has been applied, check how smooth the surface is. To do this, turn on the lighting and carefully examine the result. Unevenness is smoothed out with a wide spatula moistened with water.
In the bathroom or kitchen, when using liquid wallpaper to finish the ceiling, one more step is required. Protective varnish is applied to the dry surface. Some manufacturers even offer similar compositions in their line of liquid wallpaper products (for example, SILK PLASTER)
Advantages and disadvantages
Liquid ceilings are used for interior decoration and for other reasons:
- ease of preparation. To prepare the material for work, you do not have to spend a lot of time and effort. So, when using ordinary roll wallpaper, they need to be measured and joined correctly. Liquid formulations are simply poured with water and waited a little before applying;
- ease of use. The material is applied to the ceiling surface, like ordinary plaster or putty. The consistency of the finished compositions is similar to cotton blends. Distributing such a substance will be much easier than gluing rolled sheets;
- does not require careful preparation of the base. Liquid wallpaper will reliably mask minor flaws and defects in the rough ceiling, resulting in a flat and smooth surface;
- seamless. After finishing, there will be no seams or transitions left on the ceiling, while the use of rolled wallpaper requires careful adjustment of the joints;
- liquid wallpaper can be applied to ceilings painted with water-based or oil-based paint, without the need to remove the previous finish;
- such compositions are used for repairing ceiling surfaces in small rooms, rooms of non-standard sizes and shapes;
- the material is completely safe for health, made from environmentally friendly components, does not cause allergic reactions, and is odorless;
- Having finished the ceilings with liquid wallpaper, you don’t have to worry if damage occurs somewhere. They are easy to eliminate: just moisten the defective area with water, remove the previous layer of material, apply a new one;
- repeated use is another plus to the benefits of liquid wallpaper. To remove the finish from the ceiling, the coating is generously moistened with water, then removed in small pieces, soaked in warm water, mixed and applied again. In this case, dry storage of dismantled wallpaper is allowed for up to 6 months.
Source material
As for the disadvantages, liquid wallpaper also has disadvantages. These include:
- Compared to paper alternatives, they are more expensive. But the service life is 7-10 years, while for most paper analogues the operational period is limited to five years;
- poor color range. However, this minus can be easily compensated for by using colored pigments, glitter and other decorative components, with the help of which it will be possible to obtain the desired shade and design;
- Liquid wallpaper must not be washed. If any area is heavily contaminated, it is removed and a new layer of composition is applied to the cleaned area. Due to low moisture resistance, liquid wallpaper is rarely used to decorate ceilings in bathrooms and kitchens. If the material is used to decorate these premises, the liquid ceiling is covered with a layer of colorless varnish.
- fresh finish takes a long time to dry. Drying speed is affected by air humidity and temperature. On average, the complete drying time of the composition is 2-4 days. You can speed up the process by using a heater or drafts, leaving windows and doors open.
Interesting information: how to hang wallpaper on the ceiling (step-by-step guide).
Creating drawings and patterns
Images of clouds or the sun would be appropriate on the ceiling. Straight or wavy lines, simple patterns, etc. are also applied. Such designs can be made by combining liquid wallpaper of different colors or their texture with a smooth surface.
For large volumes, first mark the outline on the ceiling. To do this, you can take chalk or a pencil. Then paper tape is glued along the edge. Liquid wallpaper is applied to the free area. After drying, the adhesive tape is removed. Carefully distribute a product of a different color nearby or leave a smooth surface (which must be pre-painted).
For small decorative elements (for example, stars), a stencil is cut out of thick paper or cardboard. It needs to be glued to the ceiling with double-sided tape, and then filled in with the figure, also very carefully. When the composition begins to dry, the stencil is removed.
Mixed materials
In this case, one mixture may contain several types of additives - cellulose and fabric in different quantities. This way, a beautiful decorative effect is achieved at an affordable price. The cost of the material will depend on the proportions of the materials included in the mixture, as well as their type.
Some components, such as metallic glitter or mineral additives, can be purchased separately. If desired, they are added to the mixture of liquid wallpaper to give the coating one or another decorative effect.
Repair of minor defects
The ceiling suffers less than the walls, but defects can also occur there. Due to leaks during a flood or improper preparation, stains appear. And when installing tall cabinets, lamps or cornices, liquid wallpaper sometimes gets touched and scratched. Fortunately, the surface can be repaired.
If a stain has formed on the ceiling, this area needs to be wet, wait a little and remove with a spatula. To seal the exposed area, pre-prepared leftover material will be useful. They are moistened to the desired consistency and applied with a spatula.
Preparing the mixture
Pour the contents of the package into a bucket of water and carefully move it with your hands. The water should be at room temperature. The ratio of water and mixture can be found in the instructions included with the wallpaper. If you need to add color, pour it into this mixture. You can use a construction mixer to mix the composition. The mixture after preparation should be plastic without air bubbles.
Next, you should leave the material for an hour to swell, after which the mixture is ready to be applied to the ceiling. To prevent drying out, wrap the substance in plastic wrap and use it as you apply it.
How to remove liquid wallpaper from the ceiling
This has to be done for several reasons:
- The preparation was carried out incorrectly, as a result the silk plaster became stained, partially peeled off, etc. In such cases, it is impossible to correct the situation with a little effort; everything needs to be removed and re-glued.
- The upstairs neighbors were seriously flooded, and a significant portion of the roof was damaged.
- I'm just tired of the old decoration and want to update the renovation.
Before starting work, you need to remove or carefully close the furniture, remove frames from sockets and seal the holes, lay film on the floor and window sills. This will save the rest of the repair.
To remove the coating, you will need a spatula (preferably with a curved handle - it’s more convenient), a roller and a wide brush, as well as a water container. In stores you can find universal wallpaper removers, for example, Metylan. They are sometimes replaced with improvised recipes:
- shampoo;
- shower gel;
- liquid soap;
- dishwashing liquid;
- 2 tablespoons of vinegar and hair conditioner per 5 liters of water.
The solution is applied to the wallpaper, and when it gets wet, it is removed with a spatula. Some areas may need to be re-treated.
Liquid wallpaper is sometimes removed from walls using a sanding machine, a steam generator or a hair dryer. But these tools are quite heavy; using them on the ceiling is inconvenient and unsafe. The risk of injury increases significantly. It is permissible to use only compact devices and with great care.
Bucket and water: preparing the mixture
After the dust has settled and the damp stains from the soil have completely disappeared, you can begin preparing a working mixture of liquid wallpaper. This procedure does not require viewing training photos or videos - just read the manufacturer’s instructions on the packaging. Typically, the mixture needs to sit and swell for 5 to 12 hours, so you should calculate the time and effort in advance.
Important! You can only mix the entire package in one bucket, not part of it. Also, you cannot mix the contents of different packages of liquid wallpaper. To avoid changes in the coating, it is better to treat the entire ceiling in the room at one time.
- We fill the prepared container with exactly as much water as the manufacturer recommends (usually 7–10 liters). It’s good if the liquid is warm, but not higher than 40 degrees.
- Pour the bag with decorative fragments into the water first to ensure even mixing.
- Now add the dry mixture and thoroughly knead the contents of the container with your hands. If it is necessary to cover a large area, we make a separate batch for each package of dry material. Before applying to the surface, the finished portions must be mixed.
- When the mass is evenly saturated with water, it must be left for the period indicated on the package, and stirred again before use.
Important! When mixing, do not use mechanical devices: rough handling damages the structure of the material, which will significantly worsen its appearance and texture. Remnants of wallpaper from the previous mixing are allowed to be added to subsequent ones.
The finished mixture can be stored in an airtight container for several weeks without losing its characteristics.
USEFUL INFORMATION: How to remove old wallpaper from drywall without extra effort
Finishing options and ideas
Liquid wallpaper has many shades and textures. Thanks to this, you can create a ceiling suitable for any interior and style.
Mechanical method
Liquid wallpaper can be applied using a plaster gun (texture spray gun). This method is great for use in large areas. For these purposes, a device with a minimum pump power of 200 l/min and a nominal operating pressure of 0.5 MPa is suitable. A nozzle with a diameter of 5–10 mm can be used. However, it is worth remembering that the sprayer will not be able to work with rough textures.
USEFUL INFORMATION: How to quickly remove non-woven and vinyl wallpaper from walls
Using a spray bottle, liquid wallpaper is glued in two layers:
- for the first, thinner (about 1.5 mm), a mixture diluted with water is used;
- for the second, thicker one, use a composition of normal consistency.
The mass is sprayed in one direction. You can start applying the finishing layer after the first one has dried.
As a result of mechanical application, a larger wallpaper texture is formed than when applied manually. To make it smaller, you need to roll the still wet top layer with a roller, periodically wetting the tool in water.
It is better to find out all the nuances of working with the sprayer in the manufacturer’s instructions.
What types are there and how do they differ?
Danish plaster is available for sale in a wide range. It is produced by both foreign and domestic companies. In addition to the manufacturer, it differs in the following properties:
- by texture and relief;
- by composition;
- according to readiness: fully prepared or ready for painting;
- Drying time: from 12 to 72 hours;
- by the presence/absence and type of decorative additives.
This material has many textures - from a matte, uniform surface to imitation stone. The depth of the relief also varies. Also, during application, you can create a relief pattern yourself using a textured roller. Decorative additives - flocks, sticks, glitters - create different effects depending on their type. You can purchase wallpaper without such additives and independently select the necessary elements and arrange them in accordance with your preferences.
Types of liquid wallpaper by composition
All types of silk plasters necessarily contain binding (adhesive) components, plasticizers and textile fillers. There are several types of liquid wallpaper on sale, differing in the type of textile fillers and their ratio.
- Cellulose. Without adding silk or cotton threads, the cheapest option for liquid wallpaper.
- Silk. Silk threads are used as filler. The cost depends on the percentage and type of silk. Wallpaper with natural silk threads is very expensive. They have a long service life and are resistant to sunlight.
- Pulp-silk. Fiber mixture. Both in cost and in other parameters - the average between the first two options
- Pulp-cotton. Contains cotton and cellulose-based technological additives.
The ratio of silk or cotton threads is always indicated by the manufacturer. For example, silk can be from 10 to 100%.