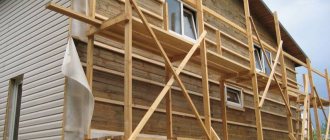
Siding is a relatively inexpensive and uncomplicated finishing operation that can be done with your own hands.
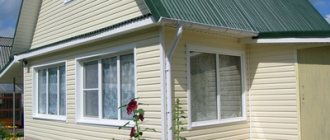
For wooden houses, this method is most convenient, since plastering wood is a complex and unreliable task.
In addition, the possibility of forming a ventilated facade, which protects wooden walls from getting wet and rotting, is very important, since it helps to increase the service life of the house.
Types of siding
The manufacture of siding began about half a century ago with wooden cladding panels similar to horizontal lining. Since then, the range has expanded significantly.
Today there are the following types of material:
- Wood.
- Metal.
- Plastic.
- Fiber cement.
At the same time, each type of material has its own varieties, composition and other manufacturing options.
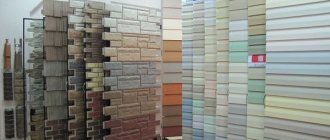
In addition, siding has different design options.
Popular profile types:
- Ship's
- Under the beam.
- Under a log.
- "Herringbone."
- Under the brick.
- Under a stone.
A wide selection of profiles and colors creates ample opportunities for finishing houses in different styles and color combinations , while essentially doing the same job.
Tips and tricks for finishing
Do not finish finishing at temperatures below those specified in the siding documentation. Under such conditions, the material becomes brittle and will crumble when cutting parts.
Installation of vinyl siding should begin at the back of the house, that is, the side that is not visible from the street. At first, novice masters, until they get the hang of it, always make mistakes, and here they will be the least noticeable. This installation order is all the more desirable if the panels are overlapped in length, since the joints from the street side will be practically invisible.
A plumb line and level are mandatory tools for monitoring siding installation.
Every 3rd row must be checked for horizontalness using a level.
What siding is best for a wooden house?
The most successful choice of siding for cladding a wooden house is determined by the specific characteristics of the wall material and the cladding itself.
Wood must be able to dry, protected from fire or the appearance of insects, rodents, mold or mildew. Such requirements are more fully met by metal and vinyl siding .
These types are the most common, easy to install and require virtually no maintenance.
They differ from each other in the amount of thermal expansion (it is greater for vinyl siding), the characteristics of the material (metal can bend, vinyl often breaks due to this), elasticity (metal panels retain dents, and vinyl ones return to their original shape).
Experts recommend using metal siding, but it is on average twice as expensive as vinyl, which somewhat weakens its position.
Selection of materials
Before covering a wooden house with siding, it is worth studying basic information about the types of material. The following brief description can be given:
- plastic siding is the cheapest, most practical, but is afraid of mechanical stress;
- metal - strong and durable, but needs protection from rust (does not apply to aluminum);
- wooden - fits perfectly into the properties of a wooden house and will be the best option, but buyers may be put off by the price;
- fiber cement - not so popular, not flammable, durable, but difficult to install and has a large mass.
Next, you need to select the sheathing material. It can be made of wood or light metal profile. Installing metal sheathing is easier on uneven ground. Such a frame will be strong and reliable.
But covering a wooden house with siding on a wooden frame yourself will cost less. You also don’t have to worry about protecting the wall and sheathing at the points of contact with the element, since they are made of material with similar properties. When purchasing and selecting wood for sheathing, it is important to ensure that the wood is:
- without delaminations;
- without deformation;
- without bluish spots or signs of rot.
Before starting work, the wooden sheathing is impregnated with fire retardants and antiseptics. The former increase resistance to fire, and the latter to mold and mildew.
Choosing lathing - which is better for a wooden house, wooden or metal?
Lathing serves to solve several problems:
- Support for siding panels.
- Providing a ventilation gap.
- Mechanical support of external insulation.
To simultaneously perform these functions, two layers of sheathing are required:
- The first - the sheathing itself - is installed directly on the wall surface coaxially with the siding panels; insulation boards are attached between the sheathing strips. The thickness of the sheathing strips should correspond to the thickness of the insulation (or be slightly larger).
- The second layer - the counter-lattice - is installed across the first. It creates a ventilation gap, while at the same time serving as a support for the siding panels.
NOTE!
If external insulation of the house is not needed, then one layer of sheathing is installed, perpendicular to the panels.
The materials used for sheathing are::
- Wooden bars.
- Metal guides for gypsum boards.
The use of wooden blocks is traditional; they are easiest to attach to wooden walls, but the characteristics of the material are largely unsatisfactory . Wood is difficult to adjust its plane, changes its dimensions when it shrinks or swells, and is susceptible to rotting and warping.
Until recently, wooden blocks were much cheaper than metal guides, but today this difference has practically disappeared.
The properties of metal planks are significantly superior to wooden ones - they are almost perfectly straight, easy to adjust the plane and do not change their properties over time.
The speed of installation and adjustment of the plane when using metal guides is much higher, and the result is much better than when installing wooden sheathing.
Finally, metal strips do not burn, which is important for wooden walls, for which the fire danger is much more real than for stone buildings.
Panels for house cladding
Ventilated facade systems have been around for decades and have proven themselves in operation. Such systems are installed with various decorative materials, but the technology is practically the same.
What advantages does this method of cladding a building have over other forms of design:
- reduces heat loss by 30% , which means it saves the family budget by reducing energy costs;
- improves the sound insulation properties of load-bearing walls, using a curtain facade system you can reduce the level of sound penetration by 70% ;
- excellent maintainability , the façade can be reconstructed in small sections;
- long service life of the entire system, including the insulation layer;
- ease of care and maintenance.
On a note! The ventilation facade system creates the effect of a thermos, that is, the house does not lose heat in winter and coolness in summer.
Layout of materials in a ventilated suspended facade system
In addition to the obvious advantages, such a system does not require any additional costs for preparatory measures before installation. To be fair, it is worth noting that sometimes the base material of the building requires such work, especially if it is old wood, but more on that later.
To summarize, we can say that a ventilated facade is a beautiful and practical solution that can be quite easily implemented, even with your own hands .
Prices for popular finishing wall panels
Wall panels
Installation of the selected sheathing
First of all, you should mark the area of the walls, mark the axes of the planks in accordance with the pitch of the sheathing. Direct hangers for drywall are attached along the marked axes . The distance between them is about 60 cm; for metal siding, the number of supports can be increased.
Installation of the sheathing begins with the installation of two extreme strips . Their position is carefully adjusted according to the building level or plumb line, after which cords are pulled between them to adjust the plane during installation of the intermediate strips.
Intermediate strips are installed in previously prepared suspensions, their position is adjusted using stretched cords.
Window openings are also decorated with sheathing strips . If the windows are installed in a single plane with the wall, then you only need to frame the opening around the perimeter with slats (usually a double row); if the opening depth is more than 20 cm, it is also necessary to install slats along the slopes, controlling their plane.
IMPORTANT!
If the walls are insulated, then the plane must be ensured on the first, main layer of the lathing, so that the installation of the counter-lattice strips is carried out on a prepared system and does not require adjustment.
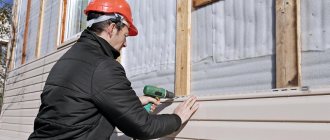
DIY siding installation
In addition to the fact that you will need the panels themselves for work, you also cannot do without the starting and finishing strips, platbands, internal and external corners, as well as decorative strips that will hide the places where the siding is extended. If you compare the price of these consumables with the siding itself, it’s mere pennies, so don’t skimp, buy quality products so that the sheathed house is perfect and the finish doesn’t deteriorate after a few months.
So, the execution process is as follows:
- First you need to set the starting bar. It has a slightly different structure. The plank is fixed to the sheathing with screws, staples or nails. Decide for yourself what to use. Subsequent sheets of siding will overlap the attachment point. Work should start from the bottom, moving upward, as shown in the photo.
- When the initial strip is fixed, you can begin to fix the first sheet of siding. Thanks to the locking system, you can easily connect the starter strip to the first sheet of siding. All that remains is to attach it to the sheathing and proceed to the other rows. The work is done progressively, without haste. The material can be secured with self-tapping screws or nails.
- When working, use the following tips: attach the siding from the center to the edges, securing it with a nail or staple in the center of the slot. So, if the material expands under the influence of temperature, it will move slightly, but not deform. In addition, the head of a nail or screw does not need to be deepened or not tightened. Otherwise, it will not be able to move.
- When extending panels, maintain a distance between them of 5–7 mm when installing in summer, and 12–15 mm in winter.
The process continues until all elements are installed and the house is sheathed. Decorative corners, platbands and other decorative elements are used.
Insulation, vapor barrier and waterproofing
Wooden walls have good thermal insulation properties, but the joints between logs or beams are a source of penetration of cold outside air . Often, before installing siding, the walls are insulated, thereby reducing heating costs and improving the microclimate of the room.
For external insulation of a wooden house, the best option would be to use mineral wool, and of soft varieties. This choice is dictated by the surface features of wooden buildings, the walls of which have many irregularities and differences.
The soft structure of the insulation will ensure a tight fit of the material to the wall, eliminating the formation of voids or gaps . For tighter contact, it is recommended to use thin rolled mineral wool in several layers, this will make it easier to press the material against the wall and fix it to the surface.
Vapor barrier of insulation in this case is irrelevant, since the atmospheric air does not have sufficient vapor pressure, and the steam coming from inside must be effectively removed outside.
In this case, effective waterproofing will be required to prevent moisture from penetrating into the insulation from the outside. This could be rainwater seeping under the casing, fog, etc.
The best option is to install a waterproof membrane (a film with specially sized holes that allows vapor to pass in one direction, but prevents moisture from entering in the opposite direction). This coating will allow steam to escape, dry the insulation and protect it from contact with external humidity.
Frame making
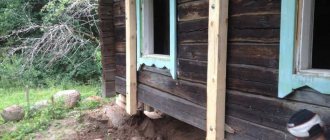
Before attaching the sheathing to a wooden house, it is necessary to remove the decor that protrudes beyond the walls (for example, window frames, drainpipes or ebbs). If there is a layer of finishing material, it should be carefully removed.
After preliminary preparation, the partitions are inspected, cracks are eliminated, as well as areas affected by rot are treated.
Do-it-yourself selection and installation of lathing
The location of the sheathing bars depends on the chosen installation scheme. For horizontal positioning, a vertical frame is used. If the home owner decides to install the products vertically, then horizontal beams should be mounted. In this case, the owner must take into account in advance the negative visual effect of narrowing the sheathed walls.
You can assemble a vertical frame for installing siding from wooden blocks.
To make the frame use:
- A wooden beam pre-impregnated with antibacterial liquids that reduce the rate of decay. It is necessary to take into account the curvature of the slats or the risk of bending the elements with a screw under the influence of external climatic factors.
- Metal profile with a galvanized surface, resistant to rotting, but having high thermal conductivity. An additional advantage is the stable geometry of the parts that do not bend during installation or during operation.
Algorithm of work when installing sheathing for horizontally directed siding:
- Mark the lines for installing the slats vertically with a gap of 400 to 500 mm.
- Screw metal U-shaped hangers (every 500-600 mm) using screws or dowels inserted into pre-drilled holes.
Insulation and waterproofing
To protect the house from cooling, a layer of thermal insulation is used, which has increased vapor permeability compared to the characteristics of the wall material. This requirement makes it possible to minimize the formation of condensation at the line of contact between layers of dissimilar substances, which causes rotting or deterioration of the protective properties of the insulation. For residential buildings, compacted mineral wool slabs are most often used, in which windows are cut to allow the suspension plates to exit.
The preferred insulation material is mineral wool, which allows water vapor to easily pass through.
After laying a layer of wool 5-10 cm thick in the openings between the frame beams, it is necessary to attach a waterproof membrane over the insulation, which allows steam to escape, but prevents the penetration of moisture from the air into the thermal insulation. The film strips are installed in a vertical direction, overlapping (layers overlap up to 15-20 cm) and additionally secured with adhesive tape.
Continuation of frame assembly
Step-by-step instructions for dummies for the further manufacture of the frame include the following steps:
- Mount the strips with screws in the corner areas, the outer surfaces of which should be located on the same vertical plane.
- Pull the cords diagonally to control the position of the frame.
- Install and secure in the hangers with screws pre-cut (if necessary) slats made of wooden or metal profiles.
If it is intended to install an insulating layer with increased thickness from polystyrene foam boards, then a double frame is used. The base strips are screwed horizontally, then the thermal insulation layer is laid and secured with disc-type dowels. After placing the waterproofing membrane on top of the main frame at an angle of 90°, a counter-lattice is mounted. The gap ranges from 300 to 600 mm. Additional strips provide ventilation of the space between the thermal insulation layer and the sheathing.
Technology for installing sheathing under siding.
Installation of the starting bar
The starting strip serves as the lower support of the siding sheet, ensuring the locking of the first row of panels. With its installation, the installation of siding on the prepared sheathing begins.
Procedure:
- The lowest point (edge) of the sheathing sheet is determined. This may be the top cut of the base or another height.
- 40 mm is marked upward from it and a horizontal line is drawn along the perimeter of the house. The horizontal line is checked by level, errors are not allowed .
- The starting bar is leaned against the drawn line with its upper edge and secured with self-tapping screws. The first strip is installed at a distance of the width of the corner profile flange plus 6 mm from the corner. It is recommended to keep the distance between the screws within 20-30 cm ; under no circumstances should you screw them all the way.
- The starting bar should move freely thanks to the oval mounting holes, for which the screws are screwed in exactly in the middle. This condition applies to all siding elements, since it is necessary to ensure compensation for thermal expansion of the material . This is especially important for vinyl siding, the expansion coefficient of which is higher than that of metal siding. For the same reason, the next starting strip should not be attached end-to-end; a gap of 6-12 mm is made.
The use of a J-profile as a starting strip is not recommended, since rainwater accumulates in the recess, and the shape of the profile does not provide reliable fixation of the panel lock . With a strong gust of wind, such a panel can be torn off, which creates a danger for the entire skin.
Preparatory work
Before directly installing the cladding, you must perform the following steps:
- The main material of the walls is freed from the old cladding, as well as from the dust and dirt present on it.
- Rotten or moldy areas are cut off and sanded down to “healthy” wood. The inspection should be carried out with the utmost attention: even a small colony of microorganisms hidden under the siding will have time to cause considerable damage to building structures before being discovered.
- Next, the walls must be thoroughly lubricated with antiseptic impregnation.
- After the impregnation has dried, the walls are covered with a waterproofing, vapor-permeable membrane. Be careful: this film must be installed on the correct side. At this stage, it will be enough to grab it lightly, for example, with a construction stapler. In the future, the membrane will be more firmly fixed by the frame.
Installation of waterproofing
Note! The plaster, if it is in good condition, does not need to be knocked down. During the installation of the siding frame, it may fall off in places, but this does not threaten any special building structures.
Frame installation
First of all, you need to decide on the frame material. Wood is cheaper and easier to work with, but two circumstances must be taken into account:
- The maximum permissible humidity for timber is 20%, and it must be dried in the open air. Finding such material is not so easy, since, as a rule, freshly sawn wood with a moisture content of over 50% goes on sale. A frame made from it will undergo the shrinkage already mentioned here, that is, it will dry out and become deformed.
- Even after treatment with the most effective antiseptic impregnation, the wooden frame will not be durable, since it does not have waterproofing protection.
Slats in a wooden frame have to be installed quite often - every 30 cm.
Frame installation diagram for horizontal siding
A more practical material is galvanized steel. Profiles made from it are not afraid of humidity, will not change their shape under any circumstances and can be installed in increments of 40 cm.
The frame elements are installed perpendicular to the siding panels. That is, if the cladding will be mounted horizontally (the most common option), then the slats or frame profiles should be screwed vertically to the walls. The construction of the frame begins with the installation of elements at the corners of the building, then the profiles framing the window and door openings are screwed in. After this, you can install intermediate elements.
When the profiles are positioned vertically, their installation is controlled using a plumb line, and when the profiles are positioned horizontally, using a building level.
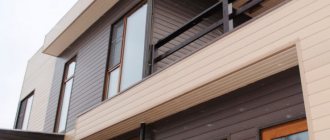
Home with vertical vinyl siding
How is siding attached?
- Fastening siding does not require any additional operations (drilling holes, using separate fasteners) except for adjusting the length or trimming the top panels for installation into the finishing strips. All connections are made with standard locks or fixed on the sheathing using holes in the nail strips of the elements . In this case, important conditions must be observed:
- Self-tapping screws are screwed strictly perpendicular to the surface and exactly in the middle of the oblong hole to allow some movement in one direction or another.
- The screw caps must be at least 1 cm in diameter and do not press the elements tightly. All siding should “dangle” slightly and be able to move with thermal expansion . Failure to comply with this condition will lead to swelling of the surface of the canvas or partial destruction of the panels.
This is most relevant for vinyl panels; their expansion (or contraction) is most pronounced. For this reason, it is not recommended to use dark-colored siding.
Equipment
Additional elements
Here are the parts included in the cladding kit:
- Narrow long panels are the main element from which the cladding is assembled.
- The corner is external, usually 3 m long.
- The corner is internal, has the same length.
- The starting plank, into the protrusion of which the lowest cladding panel is placed. Installed above the plinth and above window/door openings. Typically 3.8 m long.
- J-section plank. This part covers the ends of the panels if the cladding is open. For example, if the siding is not installed along the entire perimeter, or there is an extension adjacent to the house, which it was decided to leave unfinished. In addition, the J-plank is used as a frame for gable trim, and if desired, it can also be used as a finishing strip.
- Planks with T-shaped and H-shaped sections. They are used to design joints between siding panels - mainly when extending them along the length. The length of one part is 3 m.
- Near-window slats. They are used in cases where windows and doors are recessed into the wall. Length - 3 m.
- Platbands. They are used for finishing openings, the filling of which - a window or a door - is located in the plane of the outer surface of the wall.
- Window tides. Before purchasing, you should make sure that you have not already installed them: these parts are usually supplied complete with metal-plastic windows.
- Drain plate. An additional accessory designed for installation above a window.
- Wind board.
In addition to the above, you will need soffits - perforated panels that line the space under the eaves of the roof. Thanks to perforation, ventilation of the ventilated gap under the roof is ensured.
Installation of internal corner strips
Installation of internal corners is carried out immediately after installing the starting strips (simultaneously with external corners and the profile). The corner strip is attached 4-6 mm lower than the edge of the starting strip .
To ensure that the nail strip does not stick out from below, it is trimmed by 4-6 mm . A temperature gap of 1-3 mm is left on top between the corner strip and the soffit . If the corner strip rests on the plinth, then a gap of 4-6 mm .
The upper self-tapping screw is screwed along the upper cut of the nail bar hole, preventing the element from going down. The remaining screws are screwed in the usual order, in the middle of the holes.
Completion of finishing
How to properly sheathe a building under a roof? You need to follow this algorithm:
- Measure the distance between the bottom of the finish strip lock and the penultimate siding panel. From this distance, subtract 1-2 mm per indent and obtain the required width of the last panel. The element is marked and the upper part, in which the locking connection is provided, is cut off.
- At the top of the last plank, hooks are made, which are located in increments of 20 cm. To do this, make cuts and bend them outward.
- The prepared strip is inserted into the penultimate panel and snapped into the finishing profile.
To sheathe the pediment, use profiles for internal corners or starting ones. The installation technology is similar to cladding the main part of the wall. In the same way, you need to trim the panels and remember the gaps of 6 and 9 mm. The last, uppermost section of the gable can be secured with a self-tapping screw directly through the panel material. This can only be done here; in other cases, drilling holes is not allowed.
Installation of external corner strips
Installation of external corner strips is carried out in the same way as internal ones; it is necessary to ensure the same clearances and tolerances.
If the height of the wall exceeds the length of the corner strip, they should be connected with an overlap of 25 mm , for which the nail strips of the upper profile should be cut to the required height, taking into account the temperature gap. The connection is made in the direction of water flow - the upper profile on the lower one.
Calculation of the amount of material and fasteners
Scheme of the general cladding of a house with siding.
In order to immediately purchase the required amount of siding and components, you need to measure and calculate the area of the future covering along with the openings, add 5% in addition to the existing area. Materials for insulation and insulation are calculated in the same way.
But you will need to work hard with the frame elements. To the length of all corners of the house, multiplied by 2, you need to add the perimeters of all windows and doors. This will give you the size of the required guide profile.
The height of the building from the ground to the beginning of the roof, multiplied by the length of the perimeter of the house, divided by 0.5-0.6 m, will show how much rack profile is needed in linear meters.
You also need to calculate the required number of fasteners and components. For a frame made of galvanized profiles, it is best to use a “P” shaped fastening. The length of the rack profiles must be divided by 0.7 m and multiplied by their number. This will give you the number of required fasteners.
You also cannot do without self-tapping screws; it is advisable to purchase TN25 and LN9. The first type can be calculated by multiplying the number of U-shaped fasteners by 2, buy 5-7% more (with a margin). LN screws cannot be calculated so accurately; the numbers will be approximate in any case.
H-profile assembly
The H-profile allows you to neatly join the panels in the longitudinal direction. Its installation is completely similar to the installation of corner profiles.
The choice of location for H-profiles is dictated by the aesthetic considerations of the owner - they can be installed symmetrically, ensuring the same length of panels, or use some entire panels, trimming another span.
The main popular types of finishing of houses made of timber
Since many owners of such houses prefer the natural appearance of wood, wooden lining or a block house is often used to decorate the outside of a log house. The curtained facade of a house is created very often from these materials with your own hands. They are made from sawdust from the wood processing industry. The house block is produced in special panels equipped with tongues and grooves, so you can finish the walls of the building yourself, since this process is simplified and does not take much time.
The advantages of these materials include an affordable price and ease of work, and the resulting exterior cladding of houses made of timber is highly practical. However, since natural wood is used in the production process, lining also has all the disadvantages of this material.
Thermal panels. These elements are considered an interesting solution for any structure. The material, made using a unique technology, does not require additional insulation for a house made of timber, since its structure already has a special thermal insulation layer that provides excellent protection for buildings from the cold. It is very simple to insulate a log house from the outside using such thermal panels, and they also provide an increase in the sound insulation parameters of the building. Available in numerous colors and easy to install. They are light in weight, so there is no significant load on the foundation of the house. However, these panels are expensive.
Brick cladding of timber houses is considered quite popular. The result is a beautifully finished house, which has a long service life and excellent protection of the walls from various negative factors. However, the process itself is considered complex, so you usually have to resort to the help of specialists
Additionally, it is important to make sure in advance that the foundation will withstand such a serious impact.
Finishing with stone or tiles. It is durable and resistant to temperature changes. The materials are available in different textures and colors, and are also durable and have low moisture absorption. Decorating a log with their help is quite difficult, so usually a beginner cannot cope with this job. Also, the cost of such cladding is high, as is the weight.
Thus, the best way to sheathe a house is decided by the owner of the building, who must be guided by his work experience, available financial capabilities and his preferences.
Installation of row panels
Siding panels are usually installed from the bottom up (although sometimes it happens the other way around). The first panel is inserted into the sockets of the corner and H-profiles (or two corners), snaps into the lock of the starting strip from below and is secured with self-tapping screws along the upper nail strip .
CAREFULLY!
A 6mm temperature gap must be left on each side; tight installation is prohibited.
The next row of panels is installed in a similar way - from below it is snapped into the lock of the previous panel, from above - fixed with self-tapping screws . This way the entire canvas is installed to the top.
Carrying out work in winter
When performing work at subzero air temperatures, the fragility of the plastic increases. The brought material should not be stored near heating appliances. Vinyl panels should be cut in a heated room. Since the material contracts when cooled, a thermal gap of 6 mm is provided between the ends. Other actions are performed by analogy with the work algorithm described above. If the technology is followed, the siding strips will not warp when the air temperature rises.
Vinyl siding should only be cut indoors.
How to go around windows and doorways with siding
The order of design of window and door openings depends on the depth of their installation relative to the plane of the wall (on the width of the external slopes).
In the absence of slopes, i.e. when a window or door block is installed flush with the plane of the wall, ordinary platbands are used to form the opening around the perimeter (for doors - on three sides) .
If the installation depth does not exceed 20 cm, a J-profile is used, and for slopes greater than 20 cm, a set of cut pieces of the main panel is made, repeating the wall cladding along the slopes.
In such cases, an external corner strip is installed along the outer perimeter, and a finishing strip is installed along the window (door) frame . This type of cladding resembles finishing a narrow section of a wall.
Opening frames
When securing the siding with your own hands with insulation, you may encounter difficulties at this stage of the work. The fastening in this case depends on how the opening is located relative to the plane of the outer wall: flush or recessed.
Waterproofing is required around windows
In case of flush openings, the façade should be finished in the following order:
- Performing waterproofing of openings.
- Fastening trims or J-type profiles. For each opening you need to use 4 platbands: 2 horizontal and 2 vertical.
- The profiles are connected to each other. A bridge cut is made on each side of the upper profile. They are bent down to divert precipitation into the lower profile. Areas of material on the vertical strips that prevent connection with the upper ones should be removed. The side and top profiles are connected so that the bridges are inside.
- The operations are repeated with the lower casing. But in this case the bridges are cut in the side elements.
Installing profiles around windows
To work with recessed openings, you need to follow the same recommendations as in the previous case. The differences lie in the use of profiles of different shapes.
Installing the finishing strip
The finishing strip is installed before installing the top siding panel. It is usually placed close to the cornice or soffit; the top siding panel is cut along the nail strip and placed under the curl of the finishing strip profile .
From below, the top panel snaps into the lock of the previous panel in a standard manner, thus completing the installation of the section of the canvas.
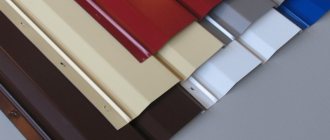
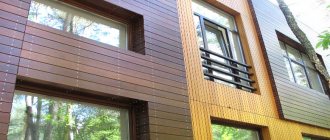
Color range of metal siding for logs
The color range of metal siding is truly wide. First of all, I would like to note the variety of wooden textures that are standard for a timber block house.
However, you have an excellent opportunity to order any color from a wide range of colors, the famous RAL construction catalogue.
In conclusion, I would like to note that the siding is supplied covered with a special film, which will protect it from damage during transportation and will allow you not to worry about the safety of the surface until installation.
Siding has become one of the most popular materials for facade finishing. There are many reasons for this: it is relatively inexpensive, unpretentious, durable and lightweight. Plus, this material looks great.
Installation of log siding has become popular. - the task is feasible and feasible. To work, you will need a minimum set of tools, strict adherence to recommendations, accuracy and attentiveness. Also, to better understand the essence of the process, you will need some general information.
Installation of Log siding has become popular.
Expert advice
To coat surfaces correctly, you need to follow the recommendations:
- Fasteners must be installed in the center of the holes that are made at the siding manufacturing stage. In this case, the heads of the hardware must not be tightened completely in order to leave a small space for temperature deformation.
- It is better to mount the panels horizontally, moving from right to left and from bottom to top.
- Laying wood siding is possible only on galvanized parts, otherwise the material will rot.
- You should always leave gaps. If work is carried out in the cold season - 9 mm, in the warm season - 6 mm.
- Vinyl products should not be scratched or damaged in any way. If this happens, they should be left for pruning.
- Finishing the facades of log houses is possible only six months after the construction of the structure, so that it has time to settle.
Covering a house with siding yourself is a rather complex, labor-intensive and time-consuming procedure. To carry it out correctly, you must carefully study the instructions that come with the material, and also follow the above recommendations. The faced façade must be washed and treated only with approved means and methods.
Additionally, we suggest watching a video that talks about typical mistakes when installing siding.
Features, dimensions and advantages of the material
The basis for the production of siding for a block house is cold-rolled galvanized steel, which is opened with a polyester or polymer composition. This type of material is produced by companies that specialize in the production of rolled metal. Externally, the material can have a smooth or structured surface, which is designed to create a high-quality imitation of a rounded log.
The material has a multilayer structure, which provides unique performance characteristics and allows the material to be used in various climatic zones, including northern regions and areas with high humidity.
Among the main advantages of this material are the following:
- maximum resistance to sudden changes in temperature and humidity changes. Metal siding can be used at temperatures from - 55 ° C to + 75 ° C. At the same time, the material will not lose its original performance characteristics;
- the original characteristics of the metal provide excellent strength and make the panels resistant to various types of mechanical stress;
- metal siding is absolutely fire resistant. It does not support combustion, and damage to the structure is possible only at a critically high temperature;
- The complete environmental safety of the material is also one of the most important characteristics of the material.
- Finishing a house with metal siding can significantly increase its insulation capabilities. Special technology of ventilated facades provides excellent increased heat conservation and reduced monthly payments for heating the building;
- simple and quick installation allows you to transform a building in a matter of days. Installation does not require the use of special tools or special skills, which allows you to carry out all the work yourself;
- the material does not require maintenance during operation, and its care is limited to ordinary wet cleaning, which does not require the use of special detergents;
- a wide selection of colors provides ample design possibilities;
- The long service life of a metal blockhouse is more than 50 years, which is the best indicator among competing materials.