You will find all the answers to questions about how to cover a house with siding in our article. Wood is a wonderful building material that has been tested for thousands of years. But at the same time, we have to admit that, in comparison with other building materials, wood is characterized by the least resistance to the negative influences of the external environment, which adversely affects not only its appearance, but also its working qualities. In this regard, it is highly desirable to provide effective protection for wooden enclosing structures, and for this purpose today siding is most often used. Next we will talk about how to choose it and how to properly cover the walls of a wooden house with your own hands.
Before you start finishing the house siding
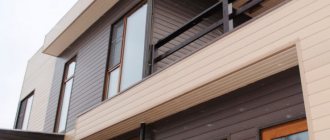
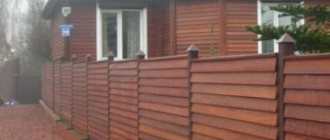
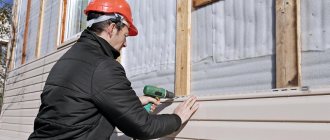
This is what a house covered with vinyl siding looks like.
When planning to decorate a wooden house with siding, you should take into account some features of such buildings:
- If a house is built from logs or solid timber that have not been processed in drying chambers, it will shrink over a long period of time. This means that the geometry of the structure will change in some way. To the naked eye, the shrinkage will be invisible, but if the finishing is fixed to the walls, it will probably be deformed and in some places may even collapse. Shrinkage is also taken into account when constructing the roof: the rafters are not fixed rigidly, but according to a sliding pattern.
- Depending on the design, wooden walls can have a vapor permeability from 0.06 (across the fibers) to 0.32 mg/m*h*Pa (along the fibers). Siding, whether vinyl or metal, has zero vapor permeability. If we screw the facing panels close to the wall, then the steam that has penetrated into it from the inside, having no outlet, will turn into condensation on the outer surface (under the siding).
Moisture is dangerous for any building material, as it increases the thermal conductivity of the structure and, when freezing, creates gradually increasing cracks in it. And in the case of wood, it also leads to rotting. Therefore, a house covered with siding will serve you for many years.
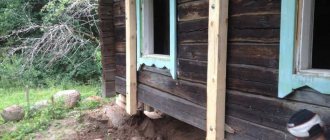
This is what an unprotected tree turns into over time
Therefore, it is very important to ensure effective steam removal: the siding is mounted so that there is a ventilated gap (builders say ventilated) between it and the wooden wall.
There is no need to install a ventilated gap only if the inside of the wall is covered with a vapor barrier film or trimmed with some absolutely vapor-proof material, for example, covered with vinyl wallpaper. But this solution has a drawback: to remove excess humidity, it is necessary to increase the ventilation performance, which leads to an increase in heat loss and, accordingly, heating costs.
Houses made of laminated veneer lumber, as well as those built using frame technology, are not characterized by shrinkage: all wooden elements from which they are built are thoroughly dried before starting construction work.
Types of siding panels
Finishing the facade with siding
Depending on the material from which the siding is made, it can be wood, polyvinyl chloride (vinyl), acrylic, fiber cement or metal (steel, zinc, aluminum). All types of finishes differ in cost, durability, resistance to all kinds of damage and other characteristics.
| Finishing the facade with siding | Type of siding | Flaws |
Vinyl | It can reproduce any texture, looks impressive, and has a wide range of colors. Sheathing made from this type of siding is resistant to negative factors (can be used at temperatures from -50 to +50), is lightweight and has an affordable price. | At high humidity and sudden temperature changes, it can become deformed, is susceptible to mechanical damage, and has a relatively short service life. |
Acrylic | Resistance to fading in the sun and high temperatures (up to +85 degrees), excellent strength characteristics, resistance to chemicals, does not ignite | High price |
Metal | The material is strong and durable, resistant to temperature changes, does not contribute to the proliferation of fungal spores and harmful microorganisms | Low sound insulation, possibility of peeling off the coating from the metal base at the cut points. Aluminum siding is subject to mechanical damage, after which it is no longer possible to return it to its original appearance. |
Wood | High environmental friendliness, thermal insulation, variety of texture and pattern on the cut | Insufficient strength, fragility, flammability and deformation, difficulty in maintenance, high cost |
Fiber cement | The material can replace natural stone, as it is made from cement, water, sand and cellulose. Resistant to atmospheric influences, not subject to corrosion, rotting, does not contribute to the development of fungus and mold, easy to operate | High price, difficult to purchase (practically not common in Russia) |
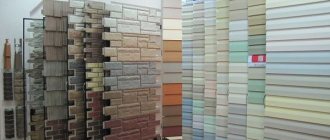
When it comes to color solutions, the most common are pastel materials - they are much cheaper than bright siding (this is due to the addition of expensive components that prevent the finish from fading in the sun).
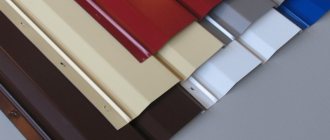
Variety of metal siding color palettes
Variety of siding colors
Vinyl material should be mentioned separately, since it is considered the most practical and inexpensive option for finishing the facade of any building. It is made from PVC panels and is presented in a large assortment in any specialized store or on the construction market. In addition, vinyl panels are quite easy to install, so you can do all the work yourself.
Siding prices
Siding
Material selection
Siding today comes in three varieties:
- fiber cement (another name is cement fiber);
- metal;
- polyvinyl chloride (for short called vinyl or simply plastic).
Vinyl siding is the most popular - it accounts for 70% of all sales.
Vinyl siding
This is explained by a number of advantages of this material:
- Low cost.
- Light weight, due to which there is no need to strengthen load-bearing structures and foundations, and delivery and installation are extremely simplified.
- The widest selection of colors and textures. PVC plastic, like any other, can easily be given any shape, which manufacturers successfully use: siding is produced that imitates wood, brickwork, straw and other materials.
- Resistant to all weather conditions.
- Sufficient mechanical strength.
When choosing vinyl siding, consider the following:
- The cheapest panels are those that imitate wood. They are also the most popular - they account for approximately 80% of consumer demand. Siding with a more complex texture may cost more.
- You shouldn’t buy cheap siding from a little-known manufacturer out of a desire to save money. Some buyers think that there is not much difference, they say, siding is just a piece of plastic. In fact, a lot depends on adherence to technology: low-quality siding does not burn evenly, but in spots. In addition, the material itself is less resistant to ultraviolet radiation, which causes the destruction of polymers.
Siding in pastel colors is considered the most preferable. Compared to brightly colored panels, it has the following advantages:
- fades less quickly and less noticeably in the sun;
- less susceptible to thermal expansion;
- has a lower cost.
Among the manufacturers of vinyl plastic, Russian, Docke, FineBer, Grand Line, Northside, Belarusian Atlantic, U-Plast, Vox, Polish Royal, Canadian Vytec, Mitten and American Elixir, Variform have proven themselves well.
Securing the starting J-profile
Cladding a house with siding with your own hands at the next stage involves the following procedure:
- Finding the lowest point on the sheathing using a level. It is necessary to measure 50 cm upward from this point and mark this point (for example, with a loosely screwed screw).
- Sequential marking of lines with self-tapping screws along the perimeter of the building.
- Pull the cord at a distance of 50 cm from the bottom along the screws.
- Marking the location of corner profiles on slats. The profile is laid to the corner, its edges are marked.
- Fixing the first starting profile along a rope with a gap of 6 mm from the future border of the corner profile.
- Fastening the remaining starting strips with a gap between adjacent ones equal to 10-12 mm for thermal expansion.
- Checking the level of the starting bars.
Installation of the starting profile
The profile must be mounted perfectly level. If there are deviations at this stage, the entire siding of the wooden house will be distorted.
Equipment
Additional elements
Here are the parts included in the cladding kit:
- Narrow long panels are the main element from which the cladding is assembled.
- The corner is external, usually 3 m long.
- The corner is internal, has the same length.
- The starting plank, into the protrusion of which the lowest cladding panel is placed. Installed above the plinth and above window/door openings. Typically 3.8 m long.
- J-section plank. This part covers the ends of the panels if the cladding is open. For example, if the siding is not installed along the entire perimeter, or there is an extension adjacent to the house, which it was decided to leave unfinished. In addition, the J-plank is used as a frame for gable trim, and if desired, it can also be used as a finishing strip.
- Planks with T-shaped and H-shaped sections. They are used to design joints between siding panels - mainly when extending them along the length. The length of one part is 3 m.
- Near-window slats. They are used in cases where windows and doors are recessed into the wall. Length - 3 m.
- Platbands. They are used for finishing openings, the filling of which - a window or a door - is located in the plane of the outer surface of the wall.
- Window tides. Before purchasing, you should make sure that you have not already installed them: these parts are usually supplied complete with metal-plastic windows.
- Drain plate. An additional accessory designed for installation above a window.
- Wind board.
In addition to the above, you will need soffits - perforated panels that line the space under the eaves of the roof. Thanks to perforation, ventilation of the ventilated gap under the roof is ensured.
Components and start of work
To properly cover a house with siding from the street, you must strictly follow the manufacturer's instructions. Most of the complaints about self-stuffed PVC cladding then arise precisely because of non-compliance with the banal rules of its installation.
There are several types of vinyl siding planks:
Types of components
The variety of plank shapes only simplifies independent cladding. There is a set element for every corner and ledge of the house; you just need to correctly calculate the required number.
Preparatory work
Before directly installing the cladding, you must perform the following steps:
- The main material of the walls is freed from the old cladding, as well as from the dust and dirt present on it.
- Rotten or moldy areas are cut off and sanded down to “healthy” wood. The inspection should be carried out with the utmost attention: even a small colony of microorganisms hidden under the siding will have time to cause considerable damage to building structures before being discovered.
- Next, the walls must be thoroughly lubricated with antiseptic impregnation.
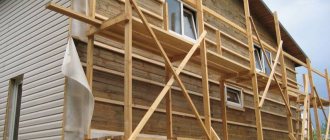
- After the impregnation has dried, the walls are covered with a waterproofing, vapor-permeable membrane. Be careful: this film must be installed on the correct side. At this stage, it will be enough to grab it lightly, for example, with a construction stapler. In the future, the membrane will be more firmly fixed by the frame.
Installation of waterproofing
Note! The plaster, if it is in good condition, does not need to be knocked down. During the installation of the siding frame, it may fall off in places, but this does not threaten any special building structures.
Frame installation
First of all, you need to decide on the frame material. Wood is cheaper and easier to work with, but two circumstances must be taken into account:
- The maximum permissible humidity for timber is 20%, and it must be dried in the open air. Finding such material is not so easy, since, as a rule, freshly sawn wood with a moisture content of over 50% goes on sale. A frame made from it will undergo the shrinkage already mentioned here, that is, it will dry out and become deformed.
- Even after treatment with the most effective antiseptic impregnation, the wooden frame will not be durable, since it does not have waterproofing protection.
Slats in a wooden frame have to be installed quite often - every 30 cm.
Frame installation diagram for horizontal siding
A more practical material is galvanized steel. Profiles made from it are not afraid of humidity, will not change their shape under any circumstances and can be installed in increments of 40 cm.
The frame elements are installed perpendicular to the siding panels. That is, if the cladding will be mounted horizontally (the most common option), then the slats or frame profiles should be screwed vertically to the walls. The construction of the frame begins with the installation of elements at the corners of the building, then the profiles framing the window and door openings are screwed in. After this, you can install intermediate elements.
When the profiles are positioned vertically, their installation is controlled using a plumb line, and when the profiles are positioned horizontally, using a building level.
Home with vertical vinyl siding
How to cut siding?
There are several options, a regular hacksaw, a circular saw, hand scissors and a sharp knife.
If you are using a circular saw, make sure the blade has fine teeth. If you are cutting vinyl siding, the saw needs to be set in the opposite direction; any other type of siding can only be cut in the forward direction. Using scissors, you can cut out elements of any shape and size. It is best to carry out cutting with safety glasses and start cutting from the fastening part upwards.
We recommend reading a detailed article about vinyl siding for exterior decoration; in it you will find information about the types, differences, pros and cons of such finishing.
Do-it-yourself siding on a wooden house step by step: step-by-step instructions
A feature of PVC plastic is its relatively high coefficient of thermal expansion. Therefore, vinyl siding must be installed in such a way that it remains able to change in size with changes in temperature. The master must adhere to the following rules:
- Leave a gap of 1–1.5 mm between the surface of the plastic and the head of the nail or screw. The fastening element should be located in the very center of the oval fastening hole.
- Expansion joints should be left between adjacent siding elements.
The size of the guaranteed gap depends on the ambient temperature during installation:
- at a minimum temperature (for most brands of siding it is -5 degrees, for some - up to -20 degrees C), parts must be installed with a gap of 9–10 mm;
- when installing in warm weather, the seam width is 6 mm;
- in hot conditions, the gap should be reduced to 3–4 mm.
If the siding parts are tightly clamped or installed close to each other and to other elements of the building, the cladding will warp when it warms up.
Step-by-step instructions for installing siding. How to cover a house with siding.
Step 1: installation begins by securing the starting strip. When installed horizontally, it is placed along the bottom, controlling the position with a building level (if there is no reference point such as a plinth).
Installing the starting bar
Step 2: Install the first panel. With one edge it is inserted under the protrusion of the starting bar, and with the other it is screwed or nailed to the frame. In this case, there should be no stress or tension in the panel.
Installing the first panel
Advice. Siding can also be attached to a wooden frame with nails, but it is better for a novice craftsman to use self-tapping screws - driving a nail with a hammer can very easily damage the plastic panel.
Self-tapping screws should be galvanized, 25–30 mm long, equipped with a press washer. Their approximate quantity is 20 pieces. per 1 m2 of cladding. As already mentioned, the screws should not be tightened all the way, so that the plastic part has some freedom of movement.
Step 3: continuing the installation of the first row, screw the second panel. It can connect to the first in two ways:
- Overlapping. In this case, both edges of the panels (they are called lock and nail) are trimmed so that the overlap is 25 mm.
- Butt joint with temperature gap. In this case, the ends of the panels at the junction are closed with a T- or H-shaped profile. Do not forget that this profile should also be able to expand freely: a gap of 3 mm is left between its upper end and the cornice (or soffit), and 6 mm between the lower end and the plinth, porch or similar restriction. In this case, the lower end of this part should be 6 mm below the lowest edge of the starting bar.
Overlapping siding joint
Note! If the house was recently built and has an extension, it is necessary to take into account the different amount of shrinkage of the foundations of both structures. Based on this, their cladding should be done separately, even if the wall of the extension continues the wall of the house. In this case, the panels at the border between buildings must be joined using an H-shaped profile.
Step 3: start laying the 2nd row. Having placed the panel with the locking edge down, it needs to be interlocked with the panel of the previous row; in this case, the nail edge is screwed to the frame. The subsequent rows are laid in the same way.
Engage panels correctly
Step 4: having reached the window openings, the panels that will be located under them are cut by an amount equal to the width of the opening plus one expansion joint on each side. Next, it is necessary to create hooks on these panels (cut out and extruded with a special punch), with the help of which they will engage with the platbands or near-window strips.
Window opening design
The panel located above the opening is also trimmed and equipped with hooks, through which it will “grab” the upper frame of the window. You can screw the starting bar over the opening - then there will be no need for hooks.
Step 5: Having laid the penultimate row, we screw the top edging - finishing strip, J-profile or inner corner - close to the cornice or soffit. Next, you need to estimate how much to trim the width of the panels of the last row: to do this, measure at several points the distance between the lock of the penultimate row and the recess in the final part, subtracting the temperature gap of 1–3 mm from this value. In accordance with the obtained size, it is necessary to narrow the panels of the last row, cutting them from the upper (nail) edge. For fastening to the finishing strip or a part installed instead of it, hooks pressed outwards are made in the upper part of the panels. Their pitch is 20 cm. The upper edge of the panel with hooks is inserted into the finishing strip, and the lower edge into the lock of the row below. The panel is then pushed upward so that the lock at the bottom and the hooks at the top are latched simultaneously.
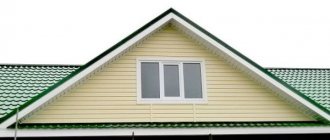
Step 6: move on to facing the gables. To do this, the ends of the panels must be cut at an angle equal to the angle of inclination of the slope. The easiest way to do this is to use a pre-made template.
Facing of gables
Before starting work along the overhangs, it is necessary to secure J-profiles, under which the ends of the panels will be hidden. Further actions are carried out in the same way as when facing walls. The panels must be positioned in such a way that there is a gap of 6 mm between them and the J-profiles.
Step 7: All that remains is to fix the soffits that line the under-eaves space. This is done like this:
- We draw a line on the wall, which is a projection of the lower edge of the cornice.
- Along this line we screw a receiving profile for the soffit to the wall and another one along the edge of the cornice.
- We measure the distance between the inner walls of the profiles and subtract 6 mm from the resulting figure.
- We cut the soffit in accordance with the calculated value and install it between the profiles.
Installation of spotlights
Vertical installation of siding is carried out in a similar way, only the frame profiles are screwed horizontally, and the starting strip is laid vertically so that its position coincides with the central axis of the wall.
Type of frame for vertical cladding
Frame for siding
The frame can be assembled either from wooden blocks or from a metal profile, which is used to install plasterboard sheets. Today, some siding manufacturers offer ready-made frame elements that are sold complete with cladding.
The question of which frame is better: wooden or metal is asked by many novice home craftsmen.
- Lumber is cheaper, but for lathing facade finishing, bars of at least 1st grade are required. That is, dry, without a large number of defects: delamination, cracks, bluish spots, wormholes and eyes. They must be treated with an antiseptic and fire retardant. But keep in mind that under the influence of high humidity and then drying, the bars may warp, which will affect the quality of the finishing of the wall of the house.
- In this regard, metal elements are better. They do not change their size under the influence of changes in temperature and humidity. They do not need to be treated with anything, but they are more expensive.
Installation of sheathing
Before installing the sheathing to the wall, you need to prepare it.
- Facade elements are dismantled: drainage system, window and door frames, drains, etc.
- If there are defects on the wall, then they must be repaired with a repair mortar, for example, cement-sand with a ratio of 1:2. You can use ready-made facade putty or plaster.
- Since siding is primarily installed horizontally, this means that the sheathing elements must be installed vertically. Therefore, first markings are made on the wall, where vertical lines are drawn every half meter. In the corners, regardless of the specified pitch, lines are drawn without fail.
- Along the marked lines, straight hangers are installed every 50-60 cm, which are attached to the wall with self-tapping screws on plastic dowels. That is, they drill holes in the wall, drive dowels in with a hammer, attach a hanger, which is tightened with a self-tapping screw. There are at least two fasteners for each suspension.
- Direct hangers must be installed along the perimeter of window and door openings. Here the installation step is from 30 to 50 cm.
- If the facade of the house is planned to be insulated, then this must be done right now.
Wall insulation
For a facade that is covered with siding, it is best to use slab thermal insulation material. This is mineral wool or polystyrene foam. The main thing is to accurately select the insulation thickness. For central Russia, a thermal insulation layer thickness of 50-60 mm is suitable. Mineral wool and polystyrene foam boards are sold at this thickness.
If a house is insulated and covered with siding in the northern region, then the thermal insulation layer must be at least 100 mm. And here there is a difficulty, because the antennae of direct suspensions have a mounting length of 80 mm. That is, the insulation is thicker. In this case, proceed as follows:
- wooden blocks with a cross section of 50x50 mm are installed vertically on the walls along the marked lines, which are not aligned vertically;
- and then direct hangers are installed on them and attached to them with wood screws.
There is a simpler and better option - a short block of the same cross-section is installed under each suspension, which is pre-attached to the wall. And already there is a suspension for it. This is how the distance from the cladding to the wall surface increases, where an insulating layer with a thickness of even 130 mm will fit.
As for installing the insulation, through cuts are made in each slab with a knife so that the antennae of the hangers can squeeze through them. Therefore, it is very important to accurately determine the locations of the cuts.
Attention! You cannot make large holes for direct hangers. This will reduce both the strength and thermal characteristics of the insulation.
The slabs themselves must be laid tightly to each other so that gaps do not form between them. If any cracks still remain, they must be filled with foam sealant. This is foam in a can, but not mounting foam. It does not expand in volume in air.
Continuation of frame assembly
A profile is mounted in one corner of the facade. It is leveled vertically using a level and attached to the suspension antennae with special self-tapping screws, which craftsmen call bugs or seeds. Now four or five strong threads are tied to the profile, which are pulled to the opposite corner of the house. Here, each thread is aligned horizontally, having previously been attached to a self-tapping screw screwed into the wall. That is, the threads should form a plane that is even both vertically and horizontally.
First, a corner profile is installed along them, attaching it to the hangers, then the rest are intermediate. Be sure to install profiles around the perimeter of window and door openings.
Installation of siding with insulation
If the walls of the house do not consist of insulated sandwich panels (frame technology), but of solid logs or timber, they should be insulated. The heat insulator is selected taking into account the vapor permeability of the wall:
- if the inside is covered with a vapor barrier or trimmed with a vapor-proof material (vinyl wallpaper or polymer plaster), you can use polystyrene foam;
- if nothing prevents the penetration of steam into the wall from the inside, insulation should be done with basalt wool. The vapor permeability of foam is 0.05 mg/m*h*Pa, so if it is installed on top of a wall that allows steam to pass through well, moisture will form on its outer surface.
Basalt wool is produced in the form of flexible mats (this design is also called rolled) and rigid slabs.
Installation of roll insulation
The mats are glued to the wall, then covered with a vapor-permeable waterproofing film and finally fixed with frame profiles.
Scheme for insulating a house with basalt wool
Plates - both basalt and foam - are mounted slightly differently:
- A wooden frame is fixed to the wall, the bars of which are placed parallel to the siding panels. That is, if horizontal installation of the cladding is assumed, then the wooden frame for the insulation should be installed horizontally. The pitch between the bars should be equal to the width of the heat insulation slabs, and the height of the bars should be equal to the thickness of these slabs.
- Thermal insulation slabs are laid between the frame elements. For convenience, they can be secured with glue.
- The insulation is covered on top with a waterproofing film, which is sewn to the frame using a construction stapler. Please note: it should be vapor-permeable only if basalt wool is used as a heat insulator. Polystyrene foam can be covered with cheaper film, for example, polyethylene.
- A siding frame is installed on top of the insulation frame, the profiles of which are already located perpendicular to the cladding panels (in our example, vertically). At the same time, these profiles will hold the insulation in the gap between the bars.
Next, the siding is installed using the technology described above.
Siding panel care
Caring for siding panel cladding is much easier than caring for other cladding. It needs to be washed with a hose from time to time, and to remove old stains, use a soft brush or rag. To avoid damaging the material, do not use abrasive household products or harsh improvised means. In addition, do not clean siding with chlorine bleach, organic solvents, substances that contain acetone, or are used to polish furniture. Dirt from its surface can be easily removed with a solution of water and washing powder, as well as any water-based cleaners. If you need to remove chewing gum from the panel, you can use a solution of water and vinegar.
Vinyl siding care
Siding is one of the most modern, practical and inexpensive facing materials for the facades of any buildings. In addition, as you can judge from this article, installing siding panels is a painstaking but doable task, so it is safe to say that finding the best solution for your own home will be very difficult.
Tips and tricks for finishing
Do not finish finishing at temperatures below those specified in the siding documentation. Under such conditions, the material becomes brittle and will crumble when cutting parts.
Installation of vinyl siding should begin at the back of the house, that is, the side that is not visible from the street. At first, novice masters, until they get the hang of it, always make mistakes, and here they will be the least noticeable. This installation order is all the more desirable if the panels are overlapped in length, since the joints from the street side will be practically invisible.
A plumb line and level are mandatory tools for monitoring siding installation.
Every 3rd row must be checked for horizontalness using a level.
Calculation of material for cladding and necessary tools
To calculate consumables, you need to calculate the area of the facade covered with siding, and then divide it by the square footage of the selected panels. In this case, it is necessary to take into account the sizes of windows and doors that the house has, removing them from the calculations. You also need to take a 10% margin for adjustment so that everything can be finished without problems or restrictions.
To decorate a house with siding you will need the following set of tools:
- Level and plumb;
- Ladder;
- Hammer;
- Screwdriver;
- Roulette;
- Scissors and hacksaw for metal.
If the walls of the cottage are built of concrete or brick, then you will need a drill to drill holes for the dowels of the sheathing. An angle grinder won’t hurt when doing siding on your own house. It will make cutting the panels easier and faster.
Insulation, vapor barrier and waterproofing
Wooden walls have good thermal insulation properties, but the joints between logs or beams are a source of penetration of cold outside air . Often, before installing siding, the walls are insulated, thereby reducing heating costs and improving the microclimate of the room.
For external insulation of a wooden house, the best option would be to use mineral wool, and of soft varieties. This choice is dictated by the surface features of wooden buildings, the walls of which have many irregularities and differences.
The soft structure of the insulation will ensure a tight fit of the material to the wall, eliminating the formation of voids or gaps . For tighter contact, it is recommended to use thin rolled mineral wool in several layers, this will make it easier to press the material against the wall and fix it to the surface.
Vapor barrier of insulation in this case is irrelevant, since the atmospheric air does not have sufficient vapor pressure, and the steam coming from inside must be effectively removed outside.
In this case, effective waterproofing will be required to prevent moisture from penetrating into the insulation from the outside. This could be rainwater seeping under the casing, fog, etc.
The best option is to install a waterproof membrane (a film with specially sized holes that allows vapor to pass in one direction, but prevents moisture from entering in the opposite direction). This coating will allow steam to escape, dry the insulation and protect it from contact with external humidity.
The nuances of laying siding under the roof
To install the top panel located under the roof overhang, you must:
- Attach the finishing profile to the edge of the wall.
- Using a ruler or tape measure, measure the distance between the lock of the top panel installed on the partition and the inner plane of the groove in the fixing profile.
- Transfer dimensions taking into account a technological gap of 1-2 mm (allows you to compensate for temperature deformations or measurement errors).
- Using a hacksaw or an abrasive wheel mounted on an angle grinder, cut off part of the workpiece with a lock.
- Cut the hooks on the installed strip (the gap between the petals is 200 mm), and then bend the cutouts to the front side.
- Install the finishing panel and fasten the lock by moving the element upwards.
Installation of spotlights
If the frontal board is covered by a wind board, then installation is carried out in the following steps:
- The finishing strip is installed, into which the J-chamfer is then attached with the upper edge. If the J-bevel is wider than necessary, it can be trimmed.
- J-profile installs on the wall.
- The soffit must be cut to the required size and installed between the J-chamfer and the J-profile. Fasten with self-tapping screws.
If the wind board cannot cover the front board, then the following option is provided:
- Attach the J-profile along the top of the front board, and the outer corner at the bottom.
- Install another J-profile on the wall in the same way as the first installation option.
- Prepare a soffit of the required size.
- Install one soffit between the J-profile and the outer corner on the front board and a second soffit between the outer corner and the J-profile on the wall.
- In this option, we do not recommend using brown soffit. The sun's rays will hit the front board covered with soffit, and this can serve as an unfavorable factor for accelerated fading of the vinyl.
Where did he come from?
Siding in translation means...those. Yes, yes, those same seasoned wooden boards, cut to size and planed to a profile, laid over the sheathed surface or frame in a herringbone pattern. Initially, overlapping planking was used in shipbuilding; Pleasure fofana boats made using this technology can still be found in some places.
It was either the Vikings or our Pomors who came up with the idea of sheathing, but now you can’t tell. Both required strong, lightweight, durable vessels that did not require frequent repairs, suitable for navigation among ice. In the powers whose fleets sailed to low latitudes, sheathing of ships did not take root, and was then completely forgotten - it is extremely prone to fouling.
The northern peoples soon, for the sake of saving wood, which was scarce beyond the Arctic Circle, and for greater strength and durability of buildings, began to sheathe houses with planks. This made it possible to build faster in new places, so plank buildings were especially popular among Russian pioneers. The Anglo-Saxons met them in Canada and Alaska, which was then a Russian possession. In general, there were many of our compatriots living in America; on the map south to San Francisco and east to Detroit there are names like Russian Fort, Russian Point, etc.
Practical and highly engineered Americans fell in love with siding, and clapboard private houses became widespread there, although the cowboys from the Wild West themselves hardly suspected that the buildings in their settlements were built using Russian technology. Nowadays, siding is made from modern structural materials; the parts are connected with snap locks. This freed the siding from the only drawback of its ancestor - the obligatory caulking of the seams, which had to be replaced annually.
We are sheathing a shed or garage - why metal?
We will look at detailed instructions on how to work with the most common type, vinyl siding, a little below. Moreover, many panels are needed for the walls and facade of the house; it will be somewhat cheaper than other materials. But a garage or shed can be sheathed with metal. If possible, then it is better to purchase polymer-coated material. It will be more wear-resistant, and its service life reaches 50 years. Another undeniable advantage is fire resistance, which is so important, especially if it is necessary to decorate the walls of a garage or warehouse in which flammable substances are stored. In addition, due to their excellent strength, such panels are in demand for cladding shops, gas stations and even factories.
Having made the necessary calculations and purchased the material and components you like, you can begin installation work. We remove all elements from the walls of the garage so that they are as free as possible. Then we clean them of dirt and, if necessary, prime them. Next, we assemble the frame from the profiles, maintaining a distance between cells of at least 60 cm and no more than 1 m. Do not forget to leave a technological gap for ventilation, 5–10 cm is enough.
Since this type of siding has a long service life, the frame should be made only from galvanized profiles. Do not use wooden slats for it; they will rot much earlier than the cladding material becomes unusable. And if, for example, you have a wooden shed (often these utility rooms are made of timber), then such lathing will also allow you to level the surface.
Installation of remaining panels
Finishing with siding with insulation (or without it) is then performed in two ways:
- overlap extension;
- extension using H-profile.
With the first method, you will need to first shorten the panel locks and fastening frames so that the overlap length is 2.5 cm. Installation of the H-profile is carried out according to the same principle as the corner elements. It is necessary to remember about the gaps of 0.6 cm from the starting strip and 0.3 cm from the soffit.
Every 2-3 rows it is worth checking the horizontal position of the siding using a building level. When passing through openings, a piece of trim falling into a window or door is simply cut off.
Finish options
Finishing a country house with siding can be done in several ways:
- Horizontal cladding. Use horizontal panels.
- Vertical cladding. This is done using vertical siding.
- Decoration of the entire façade area with a basement view.
- Various combinations. It all depends on the imagination and tastes of the owner. You can combine horizontal and vertical, basement with horizontal or vertical siding. You can also add other types of finishing materials (natural or artificial stone, facade tiles, plaster).