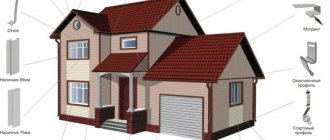
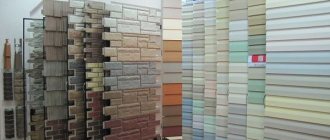
Brief description of siding and its types
A person without professional training can install siding with his own hands.
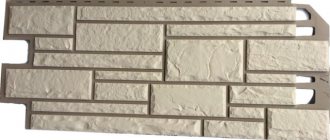
Siding consists of narrow slats with an external relief pattern that imitates masonry or the structure of wooden structures. Locks are located on the end edges of the parts, allowing you to sheathe a wall of any height using a pre-assembled frame.
The blanks are lightweight, and the small area allows one person to install the elements.
In addition to the standard horizontal material, there are products for vertical placement (there are universal options).
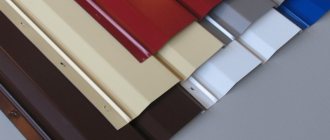
Finishing parts are divided into categories according to the raw materials used for manufacturing:
- wooden - characterized by increased thermal insulation, but have a short service life and require periodic treatment with an antiseptic followed by painting;
- composite (from a mixture of polymers and wood flour) - characterized by increased resistance to precipitation and correspond in structure to wooden products;
- acrylic - they are more expensive (compared to PVC), but can withstand changes in ambient temperature from -50 to +85°C without the risk of deformation;
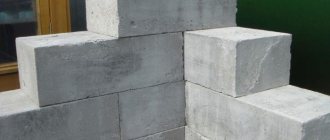
- fiber cement - characterized by increased weight and strength;
- plastic (polyvinyl chloride or vinyl) - resistant to temperature changes or precipitation;
- ceramic - have a high cost;
- made of carbon steel with an additional protective layer - they are resistant to mold or mildew, but rust if the top layer is damaged.
The variety of types of siding allows you to finish the exterior of your home in any stylistic direction.
Why siding
When considering the complex characteristics of the proposed materials for wall decoration, pay attention to the following factors:
- finishing operating conditions;
- total cost of finishing;
- environmental friendliness.
Information about the characteristics of siding that may be useful for making a decision on covering a house with siding:
- durability;
- subject to temperature deformation;
- resists direct sunlight and adverse external influences;
- impact resistant;
- it is easy to install;
- the finished facade can be easily repaired;
- fire safety.
If you decide to use siding on your home, the first step is to visit a hardware store in person. When buying online, it will be difficult for you to find out the following features:
- uniform color on the outside and inside, indicating the quality of the material;
- quality of mounting holes;
- uniform thickness of panels around the perimeter and among themselves.
Preparatory activities before finishing
Before starting installation work you must:
- calculate and deliver materials for the manufacture of sheathing to the plot;
- purchase a pre-calculated amount of finishing material and auxiliary parts (metal or wooden beams, screws and nails);
- prepare a tool for marking, cutting or installing material.
Calculation of the quantity of materials
Before sheathing a house, you should calculate the need based on design documentation or measurements of the dimensions of walls, window and door openings. To determine the amount of timber, you should take into account the installation step of metal or wooden guides, which is in the range of 400-500 mm.
When calculating the amount of material, the area of the openings is subtracted from the area of the walls, and 10-12% of the reserve is added to the resulting result in case of damage to the building material during delivery or errors during installation work.
Additional elements
By extensions we mean finishing and transition strips that allow you to decorate corners, door or window openings. The list and quantity of materials are calculated on the basis of a sketch drawing of the house indicating the dimensions of the walls and openings for window or door blocks. The material of the auxiliary profiles can match the characteristics of the main finish. It is allowed to use details of a different color to highlight the contours of the building.
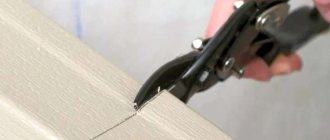
Necessary tools: how to cut building materials
To carry out installation work you will need:
- hydraulic or laser level to determine the correct position of sheathing slats and slabs;
- metal scissors for cutting workpieces or guides;
- electric drill for tightening screws;
- set of replaceable heads for screws;
- construction marker for marking;
- a corner for checking the correctness of the angles between the beams;
- plumb line for additional control of the vertical position of the frame;
- pliers and a nail puller for preparing the surface of the walls of the house.
Lathing
To carry out high-quality installation of siding on the walls of a brick, frame or wooden house with your own hands, you need to create a frame, and there are good reasons for this:
- You can make imperfections in the walls outside the building invisible.
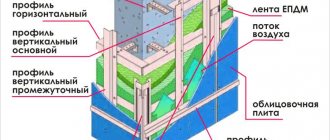
- It is possible to install insulation and waterproofing, which will help save on heating residential premises.
- A ventilated facade appears, eliminating condensation and moisture.
The lathing is assembled from wooden material or a metal corner, which is preferred in the case of protruding parts, although it costs more and is more difficult to install. Metal lathing does not swell from moisture, does not deform, does not rot, which allows it to serve for a very long time. When starting to install the frame on the walls of a wooden house with your own hands, do not forget to treat them with antiseptics, as required by technology.
The choice of fastening elements with which the frame will be installed directly depends on the material of the sheathing. The technological gap between the wall and the sheathing strips can be 15 cm, and it depends on what kind of insulation will be installed. If additionally only waterproofing is installed, only a couple of centimeters may be enough, while the insulation will cover more space (up to 15 cm).
The step between the elements of the vertical sheathing is usually 50 cm, and the installation of the frame itself is carried out under strict level control using guides.
Frame making
Before attaching the sheathing to a wooden house, it is necessary to remove the decor that protrudes beyond the walls (for example, window frames, drainpipes or ebbs). If there is a layer of finishing material, it should be carefully removed.
After preliminary preparation, the partitions are inspected, cracks are eliminated, as well as areas affected by rot are treated.
Do-it-yourself selection and installation of lathing
The location of the sheathing bars depends on the chosen installation scheme. For horizontal positioning, a vertical frame is used. If the home owner decides to install the products vertically, then horizontal beams should be mounted. In this case, the owner must take into account in advance the negative visual effect of narrowing the sheathed walls.
You can assemble a vertical frame for installing siding from wooden blocks.
To make the frame use:
- A wooden beam pre-impregnated with antibacterial liquids that reduce the rate of decay. It is necessary to take into account the curvature of the slats or the risk of bending the elements with a screw under the influence of external climatic factors.
- Metal profile with a galvanized surface, resistant to rotting, but having high thermal conductivity. An additional advantage is the stable geometry of the parts that do not bend during installation or during operation.
Algorithm of work when installing sheathing for horizontally directed siding:
- Mark the lines for installing the slats vertically with a gap of 400 to 500 mm.
- Screw metal U-shaped hangers (every 500-600 mm) using screws or dowels inserted into pre-drilled holes.
Insulation and waterproofing
To protect the house from cooling, a layer of thermal insulation is used, which has increased vapor permeability compared to the characteristics of the wall material. This requirement makes it possible to minimize the formation of condensation at the line of contact between layers of dissimilar substances, which causes rotting or deterioration of the protective properties of the insulation. For residential buildings, compacted mineral wool slabs are most often used, in which windows are cut to allow the suspension plates to exit.
The preferred insulation material is mineral wool, which allows water vapor to easily pass through.
After laying a layer of wool 5-10 cm thick in the openings between the frame beams, it is necessary to attach a waterproof membrane over the insulation, which allows steam to escape, but prevents the penetration of moisture from the air into the thermal insulation. The film strips are installed in a vertical direction, overlapping (layers overlap up to 15-20 cm) and additionally secured with adhesive tape.
Continuation of frame assembly
Step-by-step instructions for dummies for the further manufacture of the frame include the following steps:
- Mount the strips with screws in the corner areas, the outer surfaces of which should be located on the same vertical plane.
- Pull the cords diagonally to control the position of the frame.
- Install and secure in the hangers with screws pre-cut (if necessary) slats made of wooden or metal profiles.
If it is intended to install an insulating layer with increased thickness from polystyrene foam boards, then a double frame is used. The base strips are screwed horizontally, then the thermal insulation layer is laid and secured with disc-type dowels. After placing the waterproofing membrane on top of the main frame at an angle of 90°, a counter-lattice is mounted. The gap ranges from 300 to 600 mm. Additional strips provide ventilation of the space between the thermal insulation layer and the sheathing.
Technology for installing sheathing under siding.
How to attach window siding strip
To secure the siding to the window, use a window strip or J-profile. The choice of fastening element depends on the location of the window. The window can be located flush with the wall or equipped with external slopes.
If the window is flush with the sheathing, use a J-profile. First, secure the slats to the sides of the window opening (vertically) so that they do not protrude beyond the window. After this, install horizontal slats: above the window and below the window.
Cut horizontal J-rails not flush with the window, but with a margin of 6 cm on each side. The cutting angle can be made straight or 45°. Do not forget about temperature changes, leave a small gap between the joints of the profiles.
To secure the siding to the window, use a window strip or J-profile. The choice of fastening element depends on the location of the window (photo No. 9)
To finish a window opening with slopes up to 22 cm wide, near-window (or wide near-window) strips are used. Installation of the window structure takes place in two stages: first, finishing strips are installed around the perimeter of the window, after which window strips are installed on them.
Slopes whose width exceeds 22 cm require an integrated approach to installation. On the perimeter side of the window, a J-profile is installed; on the outer part, a structure is mounted from the outer corner into which the siding panels are inserted.
Self-installation of siding: stages
After completing the assembly of the frame, they check the correct position of the elements, correct any deficiencies found, and then begin installing the slabs. To hold the skin in place, you will need to secure the starting profile and corner strips. When performing work, you must follow the recommendations of the finishing manufacturer.
Failure to comply with the requirements leads to skewing of the panels or damage to the edges.
Before starting installation work, the quality of the products is assessed:
- Products are inspected selectively; uneven coloring with foreign inclusions on both the front and rear parts of the part is not allowed. There should be no peeling of protection on metal plates.
- Several elements are inspected, assessing the uniformity of wall thickness. Floating dimensions or depressions indicate poor product quality.
- Check the condition of the mounting holes. Burrs or burrs are not acceptable. At the same time, you should evaluate the ends of the locks, which must have a flat surface.
Installation of the starting strip (J-profile)
J-profile is used for laying the bottom strip. On the outside, the bar has a side that prevents it from falling out. To attach the guide, determine the bottom line of the position of the finish, and then step back 4 cm upward and draw a horizontal line. After this, the plank is applied to the sheathing and secured with screws through oval holes to wooden or metal beams. The screws are not tightened all the way, which allows you to maintain the mobility of the profile. A temperature gap of 5-7 mm is required between the ends of the planks.
Installation diagram of the starting bar.
Attaching corner strips
At the inner corners of the building, using screws in increments of 25-30 cm, it is necessary to attach a rail or J-bar, the lower edge of which corresponds to the position of the starting profile. To improve installation, it is allowed to cut off the mounting flange from the corner to a height corresponding to the size of the starting pad.
When increasing the profile in height, it is necessary to cut off the flange from the top bar by 3 cm, and then join the parts with an overlap of 2-2.5 cm (the front part of the top bar overlaps the bottom one to ensure water drainage).
Some craftsmen use the installation of a pair of J-planks located on the sides of the inner corner. The technology provides an improved appearance of the finish, but it is impossible to seal the joint line between the elements. Water entering the gap freezes and destroys the plastic or metal. Attempts to minimize gaps lead to damage to parts due to temperature deformations.
H-profile
The profile is installed vertically and secured to the sheathing with nails or screws. The element allows you to neatly connect the planks and protects the joint line from precipitation. When installing the H-profile, a gap of 5-6 mm is maintained (in winter, the parameter is increased to 10 mm). The element allows you to connect plates of different widths. The resulting joint has high rigidity.
Installation of the H-profile is carried out immediately after installation of the starting strip.
The bottom edge of the profile must be positioned 6 mm below the edge of the starting pads. If there is a protruding foundation under the bulkheads of the house that prevents thermal expansion, then a gap of 5-7 mm is provided between the end of the guide and the concrete bases. It should be taken into account that if the walls of the house are shorter than the dimensions of the planks, then the H-profile is not used.
Extension of panels
If the length of the elements is not sufficient to seal the wall of the house, then it is necessary to connect the blanks using the following methods:
- Installation using an H-shaped profile mounted on the sheathing and forming a rigid joint.
- By overlap joining. Before joining, the fastening frame is cut off from the part to a length that ensures that the central sections overlap by 2-2.5 cm and the gap between the edges of the frames is within 12 mm. The frames are cut with scissors according to the applied markings, and the burrs are removed with a knife or an abrasive tool.
Framing door and window openings
The methods for bypassing openings for window or door blocks are identical, but it is necessary to install sills on the windows to drain water. The technology for tying the openings depends on the deepening of the frame relative to the plane of the wall. If the window opening is located in the same plane as the partition, then platbands with grooves are used to install the edges. They are attached to the sheathing until the house is sheathed. Before finishing the openings, bars and a layer of synthetic or natural insulation are installed (the work is carried out simultaneously with the installation of the frame on the walls of the house).
Technology of finishing windows and doors with siding.
For openings up to 20 cm deep, J-planks are used, which are attached to the installed siding, and a finishing profile is mounted on the window or door block. The gap around the perimeter of the opening is filled with planks. For deep openings, you will need to mount a universal strip around the perimeter of the block, insert siding elements and decorate the outer edge of the opening with a complex angle.
The final covering of the walls of the house is carried out after the completion of the procedure for decorating window or door openings.
Laying the finishing strip
The closing trim strip allows you to shape the edge of the finishing panel and fix the position of the part. The plank is attached to the sheathing horizontally, and on the last slab an edge with holes for fixation with nails is cut off. On the slabs it is necessary to make cuts 20-30 mm long in increments of 20-25 cm, the petals are folded forward. Once the finishing strip is installed, the petals ensure a tight fit.
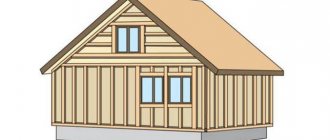
Installation of a pediment
The pediment is finished by analogy with vertical planes, maintaining gaps to compensate for thermal deformations. Installation begins from the center line along a pre-installed sheathing with a layer of thermal insulation.
Scheme of gable siding.
To trim the material along the top edge, use a rectangular wooden or metal template, which is moved along the J-profile attached to the slopes. To strengthen the upper section, it is possible to install a screw through a hole drilled in the body of the part. There is no other way to secure the bar.
Installation of finishing profile
Installing the finishing siding profile - Installing the finishing siding profile
The finishing profile is installed on the wall:
- directly below the roof eaves or soffit, or
- in the place where siding is replaced from horizontal to vertical;
- above (in an inverted position) and below window openings protruding from the wall.
For ease of work, the finishing profile is often installed simultaneously with the installation of ordinary siding, since it is located quite high on the wall and there is no point in climbing a ladder or constructing scaffolding to install this one element. It is much easier to install it when the installation of ordinary siding approaches the location of the finishing profile.
In any case, the finishing profile must be installed before the adjacent ordinary siding panel.
When installing the finishing profile, we do not know in advance where the row siding panel will be cut, so we can install the finishing profile on the wall by inserting it into the J-profile. Then, wherever the strip siding is cut, it will engage either the finish profile or the J-profile.
The nuances of laying siding under the roof
To install the top panel located under the roof overhang, you must:
- Attach the finishing profile to the edge of the wall.
- Using a ruler or tape measure, measure the distance between the lock of the top panel installed on the partition and the inner plane of the groove in the fixing profile.
- Transfer dimensions taking into account a technological gap of 1-2 mm (allows you to compensate for temperature deformations or measurement errors).
- Using a hacksaw or an abrasive wheel mounted on an angle grinder, cut off part of the workpiece with a lock.
- Cut the hooks on the installed strip (the gap between the petals is 200 mm), and then bend the cutouts to the front side.
- Install the finishing panel and fasten the lock by moving the element upwards.
Roof gable sheathing
The pediment is the section of wall between the roof slopes. The complexity of its cladding lies in the fact that the panels must be cut at a certain angle. For the rest, the standard circuit and components are used.
Most often, the walls of the house are decorated with horizontal siding, and the pediment is decorated with vertical siding. The transition between them is carried out as follows (from bottom to top): last horizontal panel – finishing strip – ebb – J-profile – vertical panels.
First, the J-profile is installed along the entire perimeter of the gable, and then they begin to make a template for cutting the sheathing material.
To make it, one panel is supported vertically or horizontally (depending on the direction of the cladding) on the starting profile at the bottom of the gable. The second element is placed under the roof slope so that it overlaps the first. As a result, you can mark the cutting line you need on it. This will be the template for finishing the gable with siding.
Carrying out work in winter
When performing work at subzero air temperatures, the fragility of the plastic increases. The brought material should not be stored near heating appliances. Vinyl panels should be cut in a heated room. Since the material contracts when cooled, a thermal gap of 6 mm is provided between the ends. Other actions are performed by analogy with the work algorithm described above. If the technology is followed, the siding strips will not warp when the air temperature rises.
Vinyl siding should only be cut indoors.
Dismantling process
To disassemble the structure (for example, to replace several panels or install new trim), you must:
- Using a factory unpacker or a homemade tool made from 3 mm thick sheet, remove the edge of the bottom siding plate from the guide. The tip must be inserted into the gap and pulled towards you, while simultaneously moving the tip along the panel.
- Bend the edge of the top strip, and then use a nail puller to remove the fasteners (or unscrew the screws with a screwdriver). It is not recommended to make sudden movements, which could lead to damage to the panel.
- Remove the siding strip and lay it on the ground, and then continue dismantling the structure.
Restoring corner profiles does not require siding removal. It is necessary to cut off the front part of the part while preserving the base attached with screws or nails to the sheathing. In place of the cut out part, a fragment of the profile is mounted and fastened to the remaining base using aluminum blind rivets.
Do-it-yourself technology for dismantling siding.
Covering a wooden house with siding
Even if you've never known how to install siding, don't worry. The work is similar to the sequential assembly of a construction set, which you can probably handle on your own. The operating principle is the same from the base to the gable of the roof.
The first panel is inserted into the starting profile, and then the finishing is increased in the “bottom-up” and “left-to-right” directions. It is important to follow some rules:
- The sequence of using self-tapping screws to fasten the panel is from the middle to the edges.
- Do not tighten the screws too tightly. The temperature gap between the siding and the screw must be at least 1 mm.
- Install the fastener in the center of the corresponding hole.
- If the wall of the house is longer than the panel, use a connecting profile. When installing it, also leave a gap of 2-3 mm for thermal expansion of the material.
- The optimal pitch for screwing in self-tapping screws is 300-400 mm.
To work with such a large number of fasteners, it is better to purchase a high-quality power tool.
Useful tips and tricks for tiling beginners
Recommendations for beginning craftsmen on how to perform the work:
- Exterior finishing elements to protect against water should be installed from bottom to top or from left to right.
- Panels made of metal or vinyl are installed using fasteners with a thermal gap that compensates for changes in the size of parts depending on the temperature of the material. When using galvanized nails, a gap of 1 mm is required between the edge of the head and the surface of the part. During installation, fasteners are placed in the center of the oval holes.
- When installing a layer of vinyl siding, do not drill holes in the panels. Screws or nails are installed into the sheathing at a right angle; when tilted, the mobility of the coating layer relative to the base is disrupted.
- After installing every 3 finishing panels on the sheathing, check the position of the upper edge of the part with a level. Deviations of siding from the horizon are not allowed.
- The lock between the panels should ensure tight contact between the parts; excessive force should not be applied during installation.
- There is no need to seal the joints between the planks with sealants or other materials, since different coefficients of thermal expansion lead to warping of the finish and make disassembling the structure difficult.
- Between the construction of a house made of logs or timber and the procedure for installing the frame and layer of siding, at least 5-7 months must pass for the walls to shrink.
The strength and tightness of the finish, which can last up to 50 years without repairs (if vinyl panels are used), depend on compliance with installation technology and careful work. It should be remembered that thermal gaps are required between the elements. Violation of the rule leads to warping or destruction of the panels and frame. If the home owner does not have the skills to conduct construction work, it is recommended to invite a team of installers, which will reduce the cost of finishing the house with siding.
Installation principles
Vinyl is a material that tends to change its shape and size when temperature factors change. This must be taken into account during installation. Therefore, when assembled, the structure of siding panels should not be tightly attached to the frame; parts and elements should be able to move easily relative to other components and parts.
The siding panels have technological holes for fastening, which have an oblong shape. This is not accidental; the self-tapping screw must be screwed into the center of this hole (with the exception of the upper fastener of vertical elements), so as not to interfere with the change in the shape of the material.
Do not screw the self-tapping screw tightly, leave a gap of 1 mm under its head. Do not screw the panel through the vinyl; if necessary, make a hole with a notch. The diameter of the screw must be smaller than the resulting hole.
Leave 6 mm gaps between the end of the siding panel and the profiles (J or H), in case of expansion. If installation takes place at low temperatures (-5 and below), increase the gaps to 9 mm. The gaps at the vertical panels are 3-4 mm at the top, 6-8 mm at the bottom.
Overlaps and joints do not need to be treated with sealant.
A metal profile or wooden beam is used as lathing guides. To make the façade last longer, it is preferable to install a metal frame. But, if you still decide to use wooden ones, make sure that they are well dried. Vertical guides are mounted at a distance of 40 cm.
When installing starting profiles, the gap between them should be 12 mm. When joining siding panels “overlapping”, trim its fastening parts so that there is 12 mm between them.
When installing the panel, do not overdo it, apply just enough force so that the siding lock snaps into place with the lower profile, do not overtighten or deform the structure.