Is it possible to apply liquid wallpaper to ceiling tiles?
In the latter case, the repair will not be of the best quality - liquid wallpaper does not fit very well on the ceiling tiles. ... However, such a finish will look good only if the wallpaper has a dense structure and completely hides the existing pattern on the surface of the panels.
Interesting materials:
Who is the lead singer of the band Sweet Dream? Who is the lead singer in the group Christmas? Who is in the band Little Big? Who created the Beatles? Who created the Queen group? Who created the logging group? Who participates in the Leningrad group? Who died from the Band Eros group? Who died from the Resurrection group? Who's in the Friendzone group?
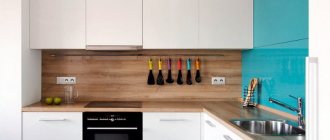
Using tiles and wallpaper for kitchen decoration, photo options
One of the most comfortable and popular places in any home can be called the kitchen. At the same time, the kitchen decoration should not only be pleasing to the eye, but also withstand temperature changes, high humidity, and surfaces should be easy to clean from dirt and grease. Experienced housewives primarily value functional design, which is not devoid of originality. Wall decoration in the kitchen has no restrictions; it is the most versatile field for implementing bold design ideas. Each material has its own characteristics, advantages and disadvantages. In practice, traditional finishing materials have a clear superiority, which is why finishing the kitchen with tiles and wallpaper, photos of which are collected in the selection, is especially popular.
Ceramic wallpaper, what is it?
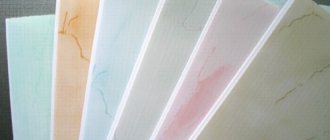
The spread of so-called ceramic wallpaper has become quite a common phenomenon recently. This material is available in two different forms and has certain characteristics that you need to know about the following facts:
- The first type is special sheets that are made from polymer fibers. Ceramic chips of different shades must be applied to this canvas, thus creating certain designs or patterns. The production of this material involves high-temperature processing, due to which the base is sintered with a special polymer coating. As a result, we get a very attractive finishing coating for decorating walls in the bathroom, kitchen and other areas of the apartment.
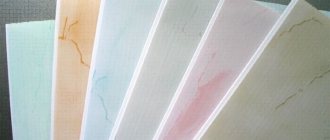
- The second option is ceramic tiles, the peculiarity of which is an interesting technique for laying it, eliminating tile joints. After you install such tiles on the walls, it will be quite difficult to distinguish them from their classic roll “brothers”. The only difference will be that this type of finish is made of ceramics.
The main advantages of such products include the following factors:
- Light weight and thin products. This, firstly, facilitates and speeds up the installation process, and secondly, it makes it possible to finish fairly light structures, such as, for example, plasterboard arches, walls and partitions.
- In addition, we receive a material that, in essence, combines the advantages of tiles, on the one hand, and ordinary roll wallpaper, on the other. They are not afraid of water and remain durable and reliable, even despite prolonged exposure to moisture.
- Preparing the surface for laying “ceramic wallpaper” is not particularly difficult, since it is possible to have a less ideal wall. By the way, you can learn more about how to prepare walls before finishing a bathroom in the article “Aligning the walls in the bathroom before wallpapering.”
- If you are not familiar with the installation techniques of such coatings, you should not worry or worry. The fact is that the technology of work is very similar to how ordinary tiles are installed.
Selection of adhesive composition
The choice of adhesive for gluing ceiling tiles is a rather important issue.
On sale there is a special water-based composition, solvent adhesive, compound and hot melt adhesive. Also, do not forget about liquid nails and universal glue. You can rely on the manufacturer's recommendations for choosing an adhesive composition; they are contained in the instructions.
Return to contents
You can start gluing tiles from different starting positions:
- The most well-known is considered to be pasting from the central point of the room, which gives the appearance of the ceiling a neat appearance. Why find the geometric center of the ceiling and mark the surface. The disadvantage of this option is the difficulty of pasting the base of the chandelier. In this regard, many builders advise sticking from the chandelier. The work will be greatly simplified. But with this arrangement, each time there is a risk of the formation of a narrow strip on the edge, which for some reason is not parallel to the wall. If the option of diagonal arrangement of tiles is chosen, then it is very important to carry out accurate markings. Why take a couple of threads and stretch them between adjacent corners of the room. The intersection (point) formed by the threads is the desired center of the room. This tile arrangement is optimal for large areas.
- Pasting with diamonds. Squares are marked from the central part of the ceiling and lines are drawn diagonally from each. The corner of the fixed element is placed in the center of the ceiling, and the sides are aligned with the marked line. When pasting with diamonds, more material is wasted.
Bustilate glue - types and technical characteristics
Among the large number of modern adhesive materials, bustilate is quite popular. Many types of this adhesive composition are effective in various areas of finishing work, which makes it truly universal. We want to talk more about the technical characteristics, advantages and disadvantages, as well as the nuances of use today.
General information about boostilate
This synthetic glue is the brainchild of domestic scientists. Appearing within the walls of NIIMosstroy in the 1960s, the glue quickly began to gain popularity due to its ability to be used in a variety of areas of activity.
The material contains the following components:
- Chalk;
- Latex;
- Water;
- Thickener carboxymethylcellulose (CMC);
- Preservatives and other additives.
Technical characteristics of the adhesive composition
Externally, the composition is a viscous white mass without lumps or impurities. Glue consumption per square meter is approximately 0.08-0.35 kilograms, which can be considered a fairly economical indicator. Bustilate dries to a strong setting in about 24-36 hours at a temperature of 20 degrees Celsius. When completely dry, the glue does not bleed through even a thin layer, and is also odorless. The adhesive strength is 40 kgf/1cm2, which is a fairly serious indicator, opening up various use cases for the glue.
Areas of application of bustylate
- Gluing wallpaper of various types;
- Fixation of carpets and linoleum;
- Installation of polymer and ceramic slabs, as well as wood and asbestos-cement panels.
The practice of gluing wallpaper using bustilate has been going on for the last half century. And, despite the abundance of new wallpaper adhesives, bustilate continues to be used as actively as possible. Finally, this glue is added to the cement composition in order to give it greater strength.
Types of bustilate
There are several models of adhesive compositions on the market with different performance characteristics for various jobs. The main models are as follows:
- Bustilat Lux. Used as a base for the installation of polymer materials;
- Bustilat N. It is used for gluing heavy wallpaper, linoleum without a base, as well as synthetic carpets to walls;
- Bustilat M. A universal composition that allows you to effectively glue wallpaper, floor carpets, tiles and much more. The adhesive has the advantage of excellent adhesion to almost all surfaces. Adhesion to a brick, whitewashed and plastered wall will be maximum. In addition, the composition can be used as a primer;
- Bustilate Omega. Used for installing wallpaper, carpet and other types of paper-based finishes;
- Bustilat D. Effective in gluing difficult-to-install polymer materials with a smooth surface.
Advantages and disadvantages
- No toxicity. Most bustylate models do not contain harmful chemicals and do not release them into the air, regardless of external conditions;
- Reliability. Over decades of use, the positive qualities of this glue have been well studied, as have the technologies for its effective use. They trust the product and know how to work with it;
- Availability and low cost. Finding boostilate in the nearest hardware store will not be difficult, but its cost, thanks to the low price of the initial components and optimization of production, is low;
- High elasticity. Even if the surfaces to be bonded are deformed, the glue, to some extent, will retain its bonding properties.
- The composition is practical. High bonding abilities allow this glue to equally effectively withstand both light wallpaper and heavy ceramic tiles. In addition, the composition can be used as a primer and waterproofing.
Important! Despite the excellent penetrating and insulating properties of the glue, if there is an alternative in the form of profile products, it is better to use it.
This glue simply does not have any serious drawbacks, showing its best side in a variety of areas of use. The only thing worth mentioning is his age. After all, over these decades, a large number of analogues have been produced, many of which may be superior to boostilate in certain indicators and be more reliable under certain operating conditions.
How to determine the type of whitewash
In order to understand whether ceiling tiles will stick to whitewash, you must first find out what type of whitewash was applied to the ceiling.
There are only two types of material used to make whitewash mortar - chalk and lime. At first glance, they have the same color and structure, but have completely different physical properties. There are several simple ways to determine the type of whitewash:
- If you run your finger across the surface of the ceiling, the chalk will leave clearly visible white marks on it. Lime stains much less, so the trace from it will be barely noticeable.
- If you scrape off a little whitewash, rub it between your fingers and try to wash it off with water, the chalk will be washed off almost immediately, but the lime will stick to the skin and will be more difficult to wash off.
- If you apply a drop of lemon juice to the whitewash, the chalk will react with it, which will be accompanied by a characteristic hissing and the formation of bubbles.
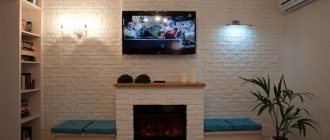
Wallpaper in the toilet: which one to choose and how to combine it with tiles?
As already mentioned, wallpaper actively participates in the formation of style. If a specific direction is chosen for the toilet, then the wallpaper should be selected accordingly.
So, for a bathroom in Provence or country style, wallpaper with a delicate flower pattern is ideal. The same samples would be appropriate in modern classics.
Wallpaper with a metallic pattern, as well as black-and-white and silver-gray pieces with ornaments, will fit perfectly into luxurious American classics and art deco.
Wallpaper with large green leaves is popular for bathrooms. They are very organic in the modern atmosphere, including the Scandinavian one. These wallpapers are also suitable for eco-friendly designs.
In general, the natural theme for toilets is now relevant. Living green walls are created in bathrooms, surfaces are decorated with moss, real wood cuts are used for countertops, etc. These details create the illusion of spaciousness and freshness in a small room. To maintain eco-themes, not only “green-leaf” wallpapers are suitable, but also samples made from natural materials (or imitation ones). We are talking about the so-called grasscloth wallpaper, that is, fibrous. They are expensive, but they last a long time. They are more resistant to moisture and cleaning than their paper counterparts.
If you don’t like the designs, ornaments, or textures, you should turn your attention to plain wallpaper without a pronounced texture or pattern. It will harmoniously fit into any style surroundings.
As for the combination method , the most common option is dividing the walls by height. There are tiles below, wallpaper on top. To what height should I lay the tiles? There is no single canon. You can do it in a way that is convenient for the owners.
It must be taken into account that the tiles perform not only an aesthetic, but also a protective function. Because, unlike wallpaper, it can be polished to a shine. It would be logical to cover with tiles the surface of the walls that may be subject to contamination and moisture.
In general, the classic height of the panels (and the tiles perform exactly this function when dividing walls) is up to the upper edge of the back of the chair. Of course, the height of chairs varies, but on average it is somewhere around 90-95 cm .
However, the height of the “tile panel” should also depend on the size of the tile, because it is very desirable to do without trimming. Here it is better to make a decision in the direction of increasing rather than decreasing the height. For example: if you are laying tiles 12 cm high, it is preferable to take 8 whole tiles (the cladding height will be 96 cm), rather than 7 and a half. If the height of the tile is 40 cm, it would be more correct to lay 3 rows of whole tiles (it will be 120 cm), and not 2 with a core.
Marking the ceiling for tiles
In order to evenly and accurately stick the tiles to the ceiling, you should mark it. In this case, it is necessary to think about the future location of the pattern in advance. Do not forget that the pattern at the junction of the tile and the wall should be the same on both sides.
So, first of all, you need to determine where the middle row of tiles will be located. To do this, it is necessary to carry out a series of mathematical calculations: calculate how many whole tiles can be glued in one row, and divide the remaining distance by two. This will give you the average width of the outer tiles.
The ideal non-marking marking tool - laser level
It's better to start counting from the middle.
If you get an even number of material, then the middle will be at the junction of the tiles. If it’s odd, it will hit the center of the tile. In this case, it is recommended to move the reference line to the edge of the middle tile and use a chockline to mark a line across the entire ceiling surface.
Then you need to repeat the same steps with the transverse side of the ceiling.
Since the standard dimensions of the tiles are 50x50 cm, it is necessary to mark the marking lines in 1 m increments. Then all the seams will be smooth. After all, types of tiles such as extruded and stamped are usually disproportionate.
If there are some discrepancies, the tile laying may not be uniform. But this can be easily corrected with a plinth selected according to the appropriate width.
In general, you can glue ceiling tiles onto whitewash, both at right angles and diagonally, especially since the pattern is practically no different from the usual one. If you don’t have enough experience, it’s better to use this option: the seams can be easily masked later using finishing putty.
Gluing tiles
The proposed method is suitable both for completely tiling a room, and for decorating details or returning one loose tile to its place.
Scheme for grouting joints between tiles.
First of all, prepare the glue. To do this, pour the dry mixture into a prepared container and add water according to the instructions. Stir the mixture thoroughly until the lumps are completely dissolved; it is most convenient to do this with a drill with a whisk attachment. Let the glue rest for 10 minutes and stir again. A properly prepared composition should be homogeneous, without lumps, clots or separations. You should not immediately prepare the entire required volume of glue, as it quickly loses its properties.
Now you can proceed directly to gluing. Using a notched trowel, apply the adhesive to the wall or tile. In the second case, the tile needs to be moistened so that the porous surface does not “pull” water out of the adhesive. Place each tile according to the markings and press firmly against the wall. To secure the fixation, you can use a rubber hammer, but be careful not to split the coating. It is important to ensure that the corners of the tiles fit snugly against the wall, otherwise, during operation, destruction will begin from this place.
To keep the seams even and symmetrical, use plastic crosses, but be sure to remove them before the glue is finally fixed. Otherwise it will be very difficult to do this. After gluing every 2-3 m² of tiles, remove any exposed adhesive using a sharp object. Periodically check the prepared installation diagram and do not forget about installing a frieze or decorative border. If you also plan to lay the tiles on the floor yourself, you should not lay the last row of wall tiles. This should be done last, as this is the only way to make the seam as invisible as possible.
You may be interested in: Installation of a plasterboard niche with lighting
Good luck with your work!
This happens, you see: you want to change something in the apartment, radically change the interior. And if, for example, you saw a beautiful ceiling tile in a store and suddenly realized that it was exactly what you needed - you know, repairs are just around the corner.
The only downside is that the ceiling tiles are already there, and I’m just too lazy to remove them and prepare the walls again.
Important! Is it possible to paint foam ceiling tiles, HERE!
But everything is changing... and now you can even glue tiles onto old, previously glued tiles.
Surprising but true.
Here it is necessary to highlight that ceiling tiles made of polystyrene foam, which are lightweight and easy to use, are convenient for pasting ceiling tiles onto an unprepared surface.
Advantages of this work:
— Time saving;
- Chance to spend a small amount of money;
— the ability not to free up space from standing furniture;
Where to begin?
Everything here is the same as in the standard case - you need to start from the center.
If your room has an irregular shape or uneven walls, then it is better to glue the tiles diagonally.
If your room is small, then it is advisable to glue the ceiling tiles parallel to the wall.
What if there are gaps left?
The gaps that remain visible between the tiles can be sealed with acrylic putty.
Is it possible to make the ceiling a little non-standard?
Certainly. Use contrasting colors, arrange them in a checkerboard, zigzag or snake pattern.
What kind of glue should I use and how should I apply it?
Adhesives that are called synthetic are applied as follows:
1. Apply glue to the tiles
2. Press it to the ceiling and tear it off immediately.
3. Wait for the glue to dry and press it to the ceiling again.
How to glue wallpaper to the ceiling
The entire process of gluing wallpaper to the ceiling can be divided into small stages of work:
It is better to glue wallpaper to the ceiling together.
- Take accurate measurements of the ceiling surface and calculate how many strips will be needed to cover it. Important! It is necessary to take into account small allowances so that the strips extend slightly onto the wall when pasting. The excess then needs to be cut off using a stationery knife.
- It is necessary to prepare glue and tools that will be needed during the work process.
- After this, you need to cut the wallpaper into strips according to the measurements taken earlier, taking into account the allowances along the edges.
- Apply glue to strips of material.
- Glue the prepared strips to the ceiling.
- Smooth out the wallpaper. Make sure that no wrinkles form. You need to press the joints especially carefully.
- Allow the wallpaper to dry overnight.
Tools needed for work:
Place the cut piece of wallpaper with the pattern down and carefully coat the entire surface with a brush and glue.
- wide and narrow glue brushes;
- sharp stationery knife;
- container for preparing adhesive solution;
- plastic or rubber spatula;
- a roller made of soft plastic or rubber for better gluing of seams;
- pen, ruler, preferably angular;
- good wallpaper glue that has not expired.
Related article: Features of IKEA countertops
When cutting wallpaper into strips, it is very important to consider the following points: the joints of the strips will be invisible if they are glued in the direction from the window. It is desirable that these joints be as small as possible. To achieve this result, the direction must be chosen along the room. Another trick is the need to create a small reserve. The length of the strips should exceed the dimensions of the ceiling by 4-6 cm, which will need to be cut off.
Installation Tips
Technical aspects
When combining tiles and trellises, you often have to solve rather paradoxical issues. And often beginners are interested in whether it is possible to lay tiles on wallpaper?
Let's try to understand the situation in detail:
- As we know, rolled materials are glued to the wall using glue, which penetrates not only into the base, but also into the finish itself (i.e., paper or non-woven fabric).
- When applying tile adhesive, it is very likely that the liquid contained in it will fall on the wallpaper adhesive, and it will partially lose its adhesive properties.
- It is also worth noting that ordinary tiles have significant mass, and therefore will exert a significant “pull-off” force. No wallpaper adhesive is designed for such loads.
It is safest to glue tiles onto a permanent base.
Note! This applies to thin ceramic wallpaper to a lesser extent, but you shouldn’t take risks here either: it’s better to spend a few hours working with a spatula than to “screw up” an expensive material.
The question of whether it is possible to glue wallpaper to tiles is somewhat less popular, but still occurs.
The answer is not so clear:
- From a practical point of view, there are no problems. To ensure adhesion, it is enough to degrease the tile or sand it with an abrasive.
- The appearance of the coating is a completely different matter. The seams between the tiles will appear under the trellises in 9 cases out of 10, so you will have to cover them up first. This process is labor-intensive, so it’s easier to knock down the tiles with your own hands and putty the wall.
It is important to know!
To glue ceiling tiles onto tiles, you must overlap the seams, that is, each tile must be connected to three or four tiles from the top layer.
You can glue another tile onto the old tile. But this cannot be done on the second layer.
You will need to remove it first.
Of course, experts advise neglecting it and gluing the ceiling tiles according to all the rules, with careful, clean surface preparation.
But, you see, if you have a rented apartment, little time, or you’re simply used to changing the look of your apartment so often, then this is for you.
Invent, try, change!
Decor options
Imitation of ceramic wallpaper
One of the innovative solutions that began to be used in interior decoration only recently is the so-called ceramic wallpaper.
This material is characterized by the following:
- Products are available in two forms . Most often these are ordinary ceramic tiles, which require seamless installation. An image is applied to its front side, and after gluing the material, the coating becomes practically indistinguishable from ordinary trellises.
Material in the bathroom interior
- The second type of this finish is much more interesting . It is a polymer fabric onto which multi-colored ceramic chips are applied. Thanks to high-temperature processing, the ceramic layer is sintered with the polymer, and the output is a canvas with unique decorative and performance characteristics.
Note! The domestic market presents mainly materials from European manufacturers. On the one hand, this indicates a fairly high level of quality, and on the other, the price of the products is quite high.
- The main advantage of such ceramics is its high elasticity . Due to the fact that the polymer base bends well, it can be glued to any surface. At the same time, the material retains almost all the advantages of tiles, so bathroom tiles under wallpaper are not afraid of moisture and do not lose strength over time.
- The relatively small thickness and low weight also make this material very attractive : the finishing does not load the load-bearing structures, and therefore even false walls made of thin plasterboard can be covered.
Photo of the finished surface
Advice! These tiles are installed in almost the same way as regular tiles. At the same time, it is characterized by less demands on the base: in some cases, the instructions even recommend gluing it on top of the old cladding in order to reduce labor costs.
Trellis for tiles
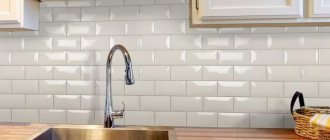
The second alternative to traditional materials used for interior decoration is wallpaper that imitates a surface lined with tiles or clinker.
They are characterized by the following:
- Firstly, this material is usually highly resistant to moisture. Since such trellises are usually glued in kitchens or baths, the requirements for durability are put forward accordingly.
Wallpaper for the kitchen under the tiles must be waterproof and withstand regular washing
Note! The most popular trellises are based on foamed vinyl. However, recently, part of this niche in the market has been occupied by acrylic products, which also withstand moisture well.
- Secondly, to improve the quality of the imitation, embossing is usually applied to the surface of the material, repeating the contour of the tile seams. To make this embossing more noticeable, the thickness of the roll is increased to 1.5 - 3 mm.
- As for ease of installation, wallpaper like tiles is no more difficult to glue than regular finishing material. Naturally, to achieve the best result, the wall should be carefully primed and leveled, although a layer of foamed vinyl allows you to mask minor unevenness and defects in the base.
Advice! When gluing, special attention should be paid to the alignment of the pattern. In most cases, a whole number of tiles are depicted on a roll, but you have to work hard when cutting.
Required Tools
You will need the following set of tools:
- sharp knife;
- painting cord;
- hard spatula;
- scissors;
- roulette;
- pencil (marker).
Before starting work, the following materials must be prepared as basic materials: glue, water, tiles and baseboards.
TOP 5 best glues
What is the best mosaic adhesive? Trusted brands, numerous customer reviews and discussions on forums allow us to highlight several specific compositions.
UNIS 2000
Russian glue is suitable for both ceramic and glass mosaics. It has leveling ability (up to 15 mm) and is used for work inside and outside the building. Has high adhesion to all materials, including natural stone. The finished solution can be used for 3 hours, the tiles can be adjusted within 3 minutes. Walking is allowed after 24 hours. The seams are rubbed out after 2 days.
Glue selection options
When choosing adhesive for ceramic kitchen tiles, you should pay attention not only to its price and what surfaces it is intended for. Experts highlight a number of points that also need to be taken into account when choosing:
- The type of surface on which ceramic tiles will be laid.
- Various surface irregularities. Often the surface on which you plan to lay floor tiles may have unevenness in the form of bulges or depressions. In this case, in some places the layer of glue will need to be applied thickly, and in others thinly. Experts recommend using glue whose technical characteristics allow it to be laid in layers of varying thicknesses.
- Elasticity of glue. It determines how easily the adhesive can withstand stresses that may occur when the base or ceramic tiles are deformed. If it is necessary for the base and tiles to be as mobile as possible during operation, then it is better to give preference to glue with a high degree of elasticity. If you do not take this point into account when choosing an adhesive, the laid tiles may crack due to any displacement of the base.
- Type of tile. Different types of ceramic tiles have different degrees of hygroscopicity. This must be taken into account when choosing glue in order to choose the most suitable option. For tiles with a low level of hygroscopicity, adhesives with a minimum water content are recommended, and vice versa.
- Tile size. Many manufacturers produce adhesives that are designed specifically for specific tile sizes. This is due to the fact that larger slabs require a more viscous adhesive that will be applied in a thick layer, while smaller slabs will require a more versatile option.
- Place for laying tiles. Very often, ceramic tiles are laid on top of heated floors. In this case, you should choose an adhesive that will allow the tiles to shrink and expand under the influence of different temperatures.
- Time for styling. In cases where it is necessary to complete facing work as quickly as possible, it is recommended to use quick-drying adhesives.
Main works
After the markings have been completed, you can glue the ceiling tiles; it is quite possible to do the work yourself, but, of course, it will take quite a lot of time. It is better to start gluing tiles from the center.
Before starting, it is recommended to sort the tiles by size, because... most often it is uneven. The number of medium-sized tiles is always greater.
The sequence of operations is as follows:
- cut the tiles with a knife, if necessary, to obtain the same size or think in advance about the layout of uneven parts;
- Apply glue to all four sides around the edges. If the part is large, then it is better to apply glue in the center, but if the thickness of the tile is small, it is better to apply the glue pointwise so that it does not show through under artificial light;
- attach the tile to the central part of the surface, carefully aligning it with the previously applied markings;
- Remove excess glue around the edges with a rag;
- Press the tile for several minutes so that the glue sets and the part does not fall off under its own weight. If dents remain on the surface from pressure, then it is better to use a wide wooden strip as a material at hand;
- stick other parts along the marked lines along the entire surface of the ceiling;
- The last tile most often does not fit in size, it is simply cut off. This can be done with a knife, achieving the most even line possible;
Joints between tiles can be masked with finishing putty.
To attach foam skirting boards, it is also better to use putty rather than glue.
In what cases is whitewash cleaning required?
If the whitewash is old, applied in several layers, and still does not hold firmly, crumbles or “breathes” in some places, then there is only one way out - you need to get rid of it. To do this, clean the surface with a spatula and warm water slightly acidified with vinegar. A small area (approximately 1 sq.m) is moistened with water, and then the whitewash is cleaned with a spatula - and so on, meter by meter.
After the whitewash has been completely removed from the surface of the walls or ceiling, it is necessary to apply a primer and wait until it dries completely. This will take about a day. Further, if necessary, the surface is puttied, covering cracks and irregularities, and primed again.
OSB tiles are very popular and in demand today due to the fact that they can be used to glue wallpaper. This building material also boasts an affordable price, so it can be used to decorate any room. Gluing wallpaper onto tiles is quite easy, but to obtain the most effective and attractive result, it is necessary to carry out preparatory work. Of course, you can stick wallpaper onto tiles without preliminary finishing, but in this case the building material may begin to peel off after some time.
OSB tiles are produced by gluing together several layers, which consist of sawdust and include various resins and boric acid. Due to its versatility and ease of use, this material is actively used to create various structures. In addition, it boasts impressive thermal insulation and environmental friendliness, which is essential for modern spaces.