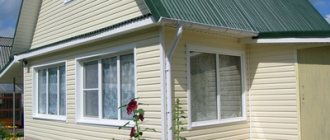
You can restore the attractiveness of the facade of an existing building or residential building and insulate it using metal siding. Anyone who wants to feel comfortable in their home in winter and summer, without wasting time and money on facade repairs, asks themselves the question of how to cover a house with metal siding with their own hands. The walls of your home will acquire a neat appearance and will be reliably protected from the effects of precipitation and other adverse weather conditions, and from external noise.
Metal siding samples
Functions and characteristics of profiles for siding installation
To ensure a more reliable connection of panels, all manufacturers produce additional products. It is necessary to take into account the characteristics of each type.
Starting bar
The initial profile is the first and fundamental fragment. It has a complex shape, which can be divided into two elements:
- Top part. Includes a series of elongated holes for secure attachment to the base. Depending on the option, it may have one or two rows of grooves for fastening.
- Lower section. This zigzag-shaped element is part of the locking connection and provides a secure connection to the first piece of siding.
- Screwdriver or drill with adjustable speed. It is used for screwing in self-tapping screws, therefore it is additionally equipped with suitable bits.
- Level. Necessary for setting planks and profiles. If accurate alignment is not performed, further work will be extremely problematic.
- Grinder, saw or electric jigsaw. Used for cutting fragments to the required size.
- Pliers for creating holes. "Ears" provide more reliable fixation when connecting the finishing strip or molding.
- Hammer. Used when nails are used instead of screws.
- Mallet. Sometimes necessary for displaying panels. If such a tool is required, most often this means non-compliance with temperature clearances.
- Measuring devices: ruler and tape measure.
- The location is determined, after which the part is aligned in a given direction exactly according to the level.
- If trimming is required (especially when working with window openings and roof overhangs), it is done without forming an angle or maintaining a 45-degree bevel. The siding must be inserted with a gap; there should not be a tight fit.
- Fastening is done according to standard rules with a gap between the head and the surface.
Metal siding is chosen by those who want a beautiful and reliable facade finish. It is strong and durable, and most importantly, its appearance will remain attractive for a long time (up to 50 years) without additional care or painting.
It is very important to perform the installation correctly in order to maintain the performance properties of the material.
The best option is to contact professional installers. But if, for any reason, you want to carry out the cladding yourself, we strongly recommend that you follow all the rules and follow the instructions step by step. In this article we will take a detailed look at the technology for installing metal siding.
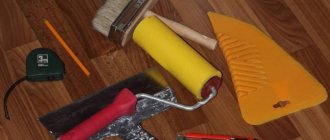
Tools and coverage required for the job
After all the necessary calculations have been made, you can think about the tools that will be needed for installation work. Depending on the method of fastening the casing, you will need:
- metal scissors for cutting siding sheets;
- a hammer drill, if you need to make additional holes for fastenings;
- screwdriver for fastening the cladding to self-tapping screws;
- punch - a special tool for cutting metal by bending it up or down;
- rivet gun, if external corners are attached to these elements;
- hammer for nailing;
- construction level, preferably laser;
- tape measure with a fabric backing to avoid scratching the siding;
- plumb line;
- square
Don't forget about protective equipment: glasses and gloves. It is also recommended to purchase a can of paint that matches the color of the facing. It is possible that the coating will be damaged during the installation process, but paint can be used to eliminate the resulting defect. You should not use a sander to clean the edges and corners of cut sheets of metal siding, because... this may damage the paint and cause corrosion.
The design of the exterior of a house is not limited to metal siding panels. The kit includes many other elements that help create a unified structure on the facade of the building. Additional elements include:
- cornice strips - for decorating the joints of panels, window and door openings;
- external and internal corners - for external corners and internal connecting corners;
- window strips - for slopes on windows and doors;
- starting bar - lower guide support for subsequent bars;
- finishing strip - for the top panel;
- soffits - for decorating overhangs and cornices;
- connecting strips - for designing connecting strips;
- J-bar - for decorating windows and doorways.
J-bar for decorating windows with metal siding
It is advisable to buy all components and additional elements from one manufacturer, so that there is no discrepancy in shades and joining of parts to each other.
Step-by-step installation of metal siding
Before proceeding directly to the installation of metal siding, it is necessary to take careful measurements; there should be a little more siding, since natural losses occur during its cutting. When purchasing metal siding, fastening plays an important role, since the strength of the facade structure depends on its choice. To avoid problems when working with siding, you need to carefully prepare the wall surface by removing old plaster, brickwork, and anything that might interfere with the work. The instructions for installing metal siding are as follows.
STEP 1. Installation of the sheathing is the most critical stage on which the strength of the structure depends. To implement this cunning plan, metal profiles used for cladding with plasterboard, or wooden slats, or bars of various sections will come to the rescue. Depending on the type of siding installation, and it can be installed both vertically and horizontally, how the sheathing will be positioned depends. When metal siding is placed vertically, the sheathing is fixed horizontally
In this case, it is important to choose the right distance between the bars or profile so that the structure is strong. The optimal distance is 40 centimeters
STEP 2. The next stage of installing metal siding with your own hands is attaching the frame to the load-bearing surface of the wall
In order for the structure to look ideal, it is necessary to follow several rules, and special attention should be paid to ensuring that the siding panels rest on two slats or on two metal profiles at the same time. In this case, the sheathing should not peek out - this must also be taken into account
Remember also that the fasteners must be strong, and all surfaces must be checked using a level so that the entire surface is vertical.
STEP 3. Before attaching the steel siding directly, you need to worry about the construction of the insulation layer. Polystyrene, foam plastic and other types of insulation materials are good, but mineral wool is better suited for this, allowing the walls to breathe. It is cut into strips corresponding to the dimensions of the sheathing and laid between the profiles.
STEP 4. To avoid damage to the insulation, the technology for installing metal siding at the next stage involves laying a vapor barrier film. It is necessary to start laying it from the bottom of the facade, moving upward, while the sheets should overlap each other.
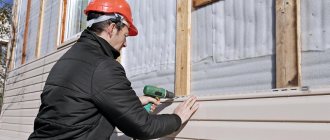
STEP 5. The final stage of work is laying the metal siding panels. To do this, you need to unpack everything and peel off the film, and most often the material arrives in this form. The rules for installing metal siding stipulate that the panels should be laid from the bottom up, with each panel inserted into the guide beam secured to the sheathing using screws or nails. The installation of the last panel, which most likely will have to be cut using a grinder, may cause some difficulties. Installing the finishing strip of metal siding will help hide the cut points - the final stage indicating the completion of the installation of steel siding.
If you have done everything according to the instructions, then you will be greeted by a façade with a unique design that can delight you for decades, and siding from trusted manufacturers can last up to 50 years. In addition, you don’t have to periodically paint the walls of your house; what’s more, this is an environmentally friendly and fire-resistant material that you installed yourself.
We invite you to watch a video of fixing metal siding:
Where to begin
To the question of how to cover a house with metal siding, we will answer this way:
- The solution to this problem begins with the project and design of the facade . You must clearly know what color schemes you want to use when cladding your house. Today there are many companies that willingly offer their services in this area.
- The sheathing work is painstaking, but not that difficult. You can install metal siding with your own hands if you follow the instructions and recommendations . We will tell you where to start and how to do it.
Metal siding technology
Cladding the façade of a private house with metal siding and insulation takes place in several stages, each of which is important in its own way.
Preparatory work
If the cutting of the material has not been carried out in advance, then the cutting must be done independently. First, the protective film is removed from the cladding. If this is not done, then under the influence of sunlight it will stick so that it will be very problematic to tear it off.
Next, the wall is prepared, cleaned of uneven surfaces; if the old finish is in the way, it is removed. All existing cracks are expanded, primed and puttied. For defects larger than 15 cm, reinforcement is necessary. All elements are dismantled: drainpipes, antennas, etc.
The base requires special attention. The foundation should be without problem areas
The base and walls are treated with bitumen mastic to ensure waterproofing. Wooden houses are impregnated with fire retardants. If necessary, a vapor barrier is attached to them.
The next step is to make markings so that the vertical guides lie smoothly, without distortions. A pencil and a laser level are used for marking. The distance between the posts is usually 50 cm. You can also mark the fasteners. Beacons are installed vertically every 70-80 cm, horizontally - every 50 cm.
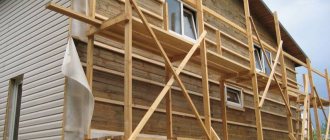
Construction of sheathing
Lathing is an important element for installing metal siding. Basically, standard materials are used for its arrangement: wood or metal profile. The process of constructing a wooden frame is as follows.
- Timber with a section of 50x40 or 50x50 is treated with an antiseptic and fire retardant.
- Markings are made on the wall in increments of 50 cm for attaching the beams.
- When the wooden blanks have dried, holes for fasteners are drilled on them every 20-30 cm. The projection of all holes is transferred to the marking and holes for dowels are drilled with a hammer drill.
- The bars are aligned according to the markings and pre-fixed. Afterwards, a substrate is laid between the planks and the wall, and when they are level, they are finally fixed.
- The gap between the beam and the wall is filled with polyurethane foam to eliminate “cold bridges” after installing the insulation.
The metal profile lathing is erected according to a similar scheme. After marking, the hanging frame elements are attached to the wall. Next, the corner elements are first inserted, the cord is pulled, and the remaining segments are mounted. Make sure that all frame parts are clearly level. The quality of the entire cladding as a whole depends on this.
Hydro- and thermal insulation of walls
At this stage, insulation boards are laid between the sections of the sheathing. It can be mineral wool, polystyrene, polystyrene foam, etc. The density of the material is selected based on the region of residence. The further north you go, the thicker the insulation you need to use. It is secured using “fungi”. When using polystyrene, all gaps are filled with foam.
Finishing the house with metal siding with insulation
A film is stretched over the thermal insulation to remove condensation from the wall surface. The elements are overlapped and glued with construction tape.
On the advice of experts, it is better to build a counter-lattice made of wooden beams on top of the waterproofing membrane. This is necessary to improve ventilation of the entire structure.
Panel installation
When all the guide strips are installed, the installation of ordinary elements is carried out. The first row is wound around the corner, snapped onto the starting bar and secured with self-tapping screws into the holes in the profile on top of the panel. Make sure that the screw is positioned strictly in the center of the hole and do not tighten it until it stops. Between all subsequent planks it is necessary to leave gaps of up to 5 mm. Also, cut the horizontal strip to the required length, but do not put it completely at a vertical angle, leave about 5-8 mm. After the edge of the plank is inserted behind the vertical element, it is lowered until it joins the previous row and checked with a level for horizontalness. All subsequent façade cladding is carried out according to this scheme.
At the end of laying the metal siding, a finishing strip is installed. If it is too wide, cut it, then bend it so that it goes beyond the edge of the previous plank. Notches are made along the edge of the siding, extending into the installed profile, which ensure reliable fastening.
Polymer coatings
To ensure that the material is not only reliable and practical, but also attractive in appearance, a special polymer coating is used. The following polymers are used to cover metal siding:
- Polyester. With its help, designers achieve bright colors and glossy surfaces of building materials. Such panels can serve for a very long time, without losing their functional and practical properties.
- Matte polyester. This coating allows the material to imitate other natural construction and cladding coatings, such as wood. The matte polymer contains Teflon, which can extend the service life of the panels. The most popular option is metal siding under timber or logs. Externally, the material is so similar to natural wood that it is almost impossible to notice the difference. Compared to wood, this material is less finicky and does not require special care; periodic washing with water is sufficient.
- Polyurethane. The polymer includes mineral granules, making the panels look like natural stone. Such panels will be resistant to the sun and mechanical stress, since a coating of marble chips or clinker is applied on top. Externally, the panels will resemble masonry, the maximum resemblance will be to granite, brick and marble. The main advantage will not be external attractiveness, but thermal stability and non-susceptibility to rotting.
- Plastisol. This polymer makes the panels look like genuine leather. Thanks to this coating, the house will look very rich and presentable. It is best to use metal siding that imitates leather in regions with high humidity.
Preparatory work
Before installing the main covering, it is necessary to carry out a number of previous activities:
- All excess is removed from the base. The old decorative finish can be left if it does not interfere with further work and will not lead to problems in the future.
- The condition of the surface is assessed. Seams and cracks are unstitched, treated with a primer and sealed. If the damage is more than 10–15 cm, then additional reinforcement is performed.
- The base is prepared separately. The foundation must not have significant defects.
- The surface is treated to prevent the appearance of microorganisms. The wooden facade is impregnated with fire retardants.
- The coating is thoroughly dried.
- If required, a vapor barrier is attached (most important when working with wooden houses). The peculiarity of this material is that the film is placed with the rough side facing the wall. The joining is done with an overlap, everything is glued with mounting tape. Fixation is carried out with staples directly to the covering or using slats. The fastening areas are sealed.
At the same time, the missing tools and materials are being prepared.
Construction of sheathing
When deciding how to properly cover a house with metal siding, take into account that the simplest and most affordable option is to create a frame from standard elements.
Wooden
Due to the fact that a properly fixed sheathing is a guarantee of the reliability and durability of the coating, the work must be approached very responsibly. Step-by-step algorithm of actions:
- To install the frame, a beam with a section of 50*40 or 50*50 is used. The material is pre-treated with antiseptics and fire retardants.
- The surface is being marked. The main posts should be placed perpendicular to the cladding panels. Lines are drawn in increments of 50–60 cm.
- After drying, the timber is drilled out for screws. The pitch of the mounting holes is from 20 to 40 cm. These fixing points are transferred to the previously marked lines. Using a puncher, holes are drilled for dowels according to the marks.
- The racks are aligned and pre-fixed, after which the beam is leveled and substrates are placed under it. Final fixation is carried out.
- For greater convenience, corner posts are set using a plumb line and level. A cord is stretched between them, allowing you to quickly align the remaining elements.
To construct a wooden sheathing, carefully processed and dried timber is used.
The resulting gaps between the wall and the timber are carefully filled with polyurethane foam. This will eliminate the appearance of “cold bridges” after laying the thermal insulation material
Metal
Do-it-yourself lathing from metal profiles is erected according to the following scheme:
- Marking is being carried out. Installation lines are drawn in increments of 50–60 cm. When working with a base, 35–50 cm.
- The hanging frame elements are being fastened. To do this, holes are drilled at a distance of 35–45 cm according to the markings, hangers are attached to self-tapping screws and dowels and bent to the desired shape.
- The corner segments are positioned first and carefully aligned along the plane. A cord is stretched between them to align the remaining racks.
The alignment of the metal frame racks is done using a cord that is pulled between the corner profiles
Carrying out work on assembling the frame requires accuracy; all parts must be placed exactly level and form a single plane.
VIDEO:
Hydro- and thermal insulation of walls
Covering a house with metal siding often involves additional insulation. Various materials are suitable for this, but the most affordable and preferable for self-installation are mineral wool or penoplex (an improved version of polystyrene foam).
Thermal insulation and waterproofing are carried out as follows:
- When choosing a wooden frame, mineral wool is placed in the resulting cells. It is laid tightly, without gaps. Work is carried out wearing protective equipment for the respiratory tract and mucous membranes.
- The metal frame is excellent for laying penoplex. To do this, even during installation of the sheathing, the slabs are pinned onto installed and bent hangers. For additional fastening, dowels with a large head are used. The material is placed without matching the joints of adjacent rows, the corners are overlapped. Additional sealing is carried out.
- A film is stretched over the entire surface to protect against moisture penetration. The joining points are combined with a large supply of material.
Disadvantages of profiled sheets and individual strips
The advantages have already been mentioned - low price, home protection. However, they should not mislead owners regarding the ideality of the material - the disadvantages of such cladding are significant. More details:
- Susceptibility to corrosion. Metal and humidity are not the best neighbors. Siding made from it is supplied for sale treated with mastics or other compounds to prevent the appearance of rust stains. However, during installation you will need to cut it to the required dimensions and the edge will be exposed. Owners should keep in mind that self-processing of the cut is extremely important.
- Cold facing. Finishing a wooden house with metal siding is necessarily accompanied by insulation, since the material itself is not capable of retaining heat. In addition, there must be a layer between the wood and the iron, otherwise the temperature difference will certainly lead to the formation of condensation, and then the house risks starting to rot.
- Poor sound insulation. Even if modern mattresses are placed under the casing, a cannonade at night from weather conditions is guaranteed.
Instructions for covering a wooden house with metal siding
To do quality work, you should start with the correct selection of products and subsequent surface preparation. So:
- The choice of a quality product depends on the integrity of the manufacturer and its period of presence on the construction market. If you have to buy goods in an unfamiliar network, then you should pay attention to the color of the raw materials - metal siding for finishing a wooden house should be without visible streaks and a fine network of cracks. Their presence indicates a poor-quality coating, which will peel off from the profiled sheet over time.
To work on the entire surface of the house, not only sheets or strips are purchased, but also a starting profile, corners - external and external, platbands, joints. It is also worth checking each element for the functioning of the locking interfaces - they should snap into place without difficulty.
- Next is the preparation of the walls. This means cleaning the surface from protruding parts - platbands, thresholds, window sills. Dirt and debris are also swept out, and the caulk is changed.
In advanced cases, entire whips are replaced. Otherwise, finishing a wooden house with metal siding will be a futile act - damage in the form of wet rot and mold will transfer to the sheet, and then corrosion is just around the corner.
- The next stage is preparing the sheathing. For all types of siding - from wooden lining to fiber cement panels, one rule works - install profiles for attaching the planks strictly perpendicular to the sheathing itself. That is, if it is decided to lay the siding horizontally, then the sheathing has only vertical guides and vice versa.
The metal profile or wooden beam for the sheathing must be wide. The calculation is simple - insulation thickness + 1.5 cm of free space. The fastening step is 50-60 cm, that is, a standard styrene plate will fit into the sheathing sector tightly and without gaps.
- Choice of insulation. Decorating the outside of houses with metal siding is not complete without insulation. Firstly, an old log, not to mention timber, does not hold heat well.
- After the slabs or mats are laid, they begin to attach the waterproofing. Rolled rubber, polymer film or other materials that can trap even vapors are good for this purpose. The waterproofing is secured with a furniture stapler.
- Now you can start lining. Horizontal or vertical finishing of houses with metal siding begins with the installation of a starting strip. The position of the entire canvas depends on it, which means you should act strictly according to the level.
Rules for installing metal profile lathing under siding
The sheathing is fastened to the outer wall using self-tapping screws. The length of the screws is selected based on the weight of the profile and siding covering, as well as depending on the thickness and material from which the walls are made. For a wooden house, only self-tapping screws can be used, while fastening to a brick or other stone wall must be done using dowels. Holes of the required diameter are drilled in the wall, into which dowels are then driven. The metal profile for siding is attached as part of the sheathing in increments, the size of which depends on the weight of the finishing material. In other words, the heavier the siding, the smaller the distance between the profile sheathing strips should be. Often, the manufacturer's instructions included with the siding contain recommendations regarding the sheathing pitch for a given material.
Installation of siding under a log on a vertically and horizontally installed profile
The profile for metal siding in the form of a lath, depending on the direction of fastening the facing material, can be mounted vertically or horizontally. If the panels are planned to be mounted horizontally, then the profile should be positioned vertically. If siding is installed vertically, horizontal sheathing will be required.
How to attach a metal profile to a facade
Let's consider the technology of installing a metal profile on a facade with your own hands:
The profile strips are fixed to the house using metal hangers. The metal suspension is a thin galvanized plate with special holes.
Using the holes you can adjust the distance between the wall of the house and the profile. The hangers are bent, giving them a U-shape, and then fixed to the walls with self-tapping screws and dowels. The distance between the hangers must correspond to the selected installation step.
When the hangers are attached to the facade, the profile is attached to them. It is inserted into the suspension at the required distance from the wall and screwed using the appropriate holes in the suspension and self-tapping screws.
Scheme of fastening the profile and timber to the facade using a suspension
- Installation of the sheathing is usually started by installing the side profiles at the edges of the wall (if the installation of the siding is horizontal and the sheathing is vertical). They are set strictly according to level, since they will serve as a guide for the installation of all subsequent profile strips.
- A string or fishing line is pulled between the side profiles in several places along the height. All other profile strips should be installed according to the tension.
- Since fastening the profile on hangers may not be rigid enough, to give the sheathing additional strength, jumpers from the same profile can be fixed between the planks.
- Installing siding on a metal profile will allow you to create a more reliable structure if you use a more complex fastening system instead of sheathing hangers. Such fasteners are made from pieces of galvanized profile with a cross-section of 27x28 mm. One section is attached to the wall with its wide part, and the second is inserted between it and the main profile strip. The elements of such a unit are fixed using self-tapping screws.
Photo: assembly of the fastening profile assembly for mounting the sheathing on the facade
- The same fastening structure should be used if the length of the suspension is insufficient to compensate for unevenness on the wall plane.
- Among other things, a 27x28 mm metal profile, the price of which is lower than the standard 60x27, is also used for other purposes. So, it is this that serves as a starting strip when installing vertical sheathing.
We figured out which profile is best suited for installing siding and determined how to create a profile frame from it. In addition, we found out which means and structures can be used to most securely attach the profile to the facade. We hope that our article helped you find the answer to your question. We recommend additionally watching a training video about the rules for installing façade siding.
Scope of application and production
Metal siding can be used when finishing the facade, plinths, and individual sections of the building facade. For the manufacture of this type of siding, cold-rolled steel sheets are used. The thickness of such sheets is 0.5 millimeters. As a rule, sheets are processed with pural, plastisol, acrylic and polyester. Thanks to these polymers, the siding is protected from corrosion. Also, coating siding with polymers extends the life of the facing material.
Frame for siding
The frame can be assembled either from wooden blocks or from a metal profile, which is used to install plasterboard sheets. Today, some siding manufacturers offer ready-made frame elements that are sold complete with cladding.
The question of which frame is better: wooden or metal is asked by many novice home craftsmen.
- Lumber is cheaper, but for lathing facade finishing, bars of at least 1st grade are required. That is, dry, without a large number of defects: delamination, cracks, bluish spots, wormholes and eyes. They must be treated with an antiseptic and fire retardant. But keep in mind that under the influence of high humidity and then drying, the bars may warp, which will affect the quality of the finishing of the wall of the house.
- In this regard, metal elements are better. They do not change their size under the influence of changes in temperature and humidity. They do not need to be treated with anything, but they are more expensive.
Installation of sheathing
Before installing the sheathing to the wall, you need to prepare it.
- Facade elements are dismantled: drainage system, window and door frames, drains, etc.
- If there are defects on the wall, then they must be repaired with a repair mortar, for example, cement-sand with a ratio of 1:2. You can use ready-made facade putty or plaster.
- Since siding is primarily installed horizontally, this means that the sheathing elements must be installed vertically. Therefore, first markings are made on the wall, where vertical lines are drawn every half meter. In the corners, regardless of the specified pitch, lines are drawn without fail.
- Along the marked lines, straight hangers are installed every 50-60 cm, which are attached to the wall with self-tapping screws on plastic dowels. That is, they drill holes in the wall, drive dowels in with a hammer, attach a hanger, which is tightened with a self-tapping screw. There are at least two fasteners for each suspension.
- Direct hangers must be installed along the perimeter of window and door openings. Here the installation step is from 30 to 50 cm.
- If the facade of the house is planned to be insulated, then this must be done right now.
Wall insulation
For a facade that is covered with siding, it is best to use slab thermal insulation material. This is mineral wool or polystyrene foam. The main thing is to accurately select the insulation thickness. For central Russia, a thermal insulation layer thickness of 50-60 mm is suitable. Mineral wool and polystyrene foam boards are sold at this thickness.
If a house is insulated and covered with siding in the northern region, then the thermal insulation layer must be at least 100 mm. And here there is a difficulty, because the antennae of direct suspensions have a mounting length of 80 mm. That is, the insulation is thicker. In this case, proceed as follows:
- wooden blocks with a cross section of 50x50 mm are installed vertically on the walls along the marked lines, which are not aligned vertically;
- and then direct hangers are installed on them and attached to them with wood screws.
There is a simpler and better option - a short block of the same cross-section is installed under each suspension, which is pre-attached to the wall. And already there is a suspension for it. This is how the distance from the cladding to the wall surface increases, where an insulating layer with a thickness of even 130 mm will fit.
As for the installation of insulation, through cuts are made in each slab with a knife so that the antennae of the hangers can squeeze through them
Therefore, it is very important to accurately determine the locations of the cuts.
The slabs themselves must be laid tightly to each other so that gaps do not form between them. If any cracks still remain, they must be filled with foam sealant. This is foam in a can, but not mounting foam. It does not expand in volume in air.
Continuation of frame assembly
A profile is mounted in one corner of the facade. It is leveled vertically using a level and attached to the suspension antennae with special self-tapping screws, which craftsmen call bugs or seeds. Now four or five strong threads are tied to the profile, which are pulled to the opposite corner of the house. Here, each thread is aligned horizontally, having previously been attached to a self-tapping screw screwed into the wall. That is, the threads should form a plane that is even both vertically and horizontally.
First, a corner profile is installed along them, attaching it to the hangers, then the rest are intermediate. Be sure to install profiles around the perimeter of window and door openings.
How did vinyl siding come about?
In order to understand whether it is worth covering a house with siding, let's delve a little into the history of this material. The history of vinyl siding began in the middle of the last century in North America. Most of the population lived in the suburbs, in small private houses. The walls of the houses were frame, so the outside was sheathed with boards, which were laid overlapping at an angle and then painted. The main disadvantage of this finish was the fragility of the board. Exposure to rain, sun, and wind led to deterioration of the boards and fading of paints. To ensure that the exterior of the house remains attractive and the property does not decrease in value, wood siding is used.
Houses covered with siding
The solution to this problem, at the end of the 50s, was the development of the polymer industry and the development of special finishing materials. This new material consisted of panels made from dyed vinyl (PVC), imitating the appearance and shape of traditional wood paneling. This is how houses covered with siding appeared, the cladding of which was not afraid of any vagaries of the weather. In addition, in terms of technical and functional parameters, installation speed and durability, this material had no analogues.
The economic benefits of using vinyl siding were visible to the naked eye. Having installed it, the owner of the house could forget for many years about the problems of repainting, repairing, updating the facade, wasted nerves and wasted money. It is thanks to its technical characteristics that vinyl siding very quickly became popular in the construction market of North America, subsequently conquering European countries and the whole world.
Over half a century of siding production in the USA and Canada, a wealth of experience in its production has been accumulated. Therefore, houses covered with siding can be found everywhere. Currently, siding is not only a material for exterior work, but also a culture for covering the facade of buildings. It is not for nothing that the word siding itself is translated as cladding, outer covering.
Initially, vinyl siding was developed for cladding frame houses, so if you are planning to build a frame house, you can consider this material. The frame of the house, as a rule, is built from dry wood, this guarantees that the percentage of drying out will be extremely low. Therefore, there is a guarantee that when drying out, the siding coating will not deform.
Houses made of timber have other cladding options. Firstly, if the timber is planed or glued, then it is not at all necessary to sheath it. The look of natural wood is a natural addition to any structure. To maintain its aesthetics, it is enough to periodically update its paintwork. Secondly, a wall made of timber allows you to use other materials in decoration, for example, plaster, tiles, etc. It is enough to prepare the appropriate foundation.
The only option when siding can be considered for a house made of timber is if the wood from which the house is built has dried out and cracks have appeared in its walls. In this case, in addition to the siding itself, you will have to properly insulate it using mineral or stone wool.
As for stone houses, I consider it a complete waste of time to decorate them with vinyl siding. By using siding in decoration, you will never be able to make a house different from others. Vinyl siding is very limited in its ability to create unique designs. In addition, there are restrictions on the length of the elements, which forces the use of additional connecting elements, and this is completely bad taste.
Accessories for additional elements for metal siding
Price from 150 rubles per piece Price is valid under certain order conditions Buy
| For proper installation and a finished look of the building facade, metal siding is completed with additional elements. They help to arrange all complex areas of the facade, maintain the tightness of the cladding and make it possible to easily design an architectural detail of any complexity. The component strips play an important role in the reliability, strength and durability of the cladding. Each element has its own purpose and technological location during installation. Without metal additional elements, it is impossible to ensure complete installation of metal siding and achieve high-quality performance characteristics of the facade. All components are made of hot-dip galvanized steel with a polymer coating of the same color as the metal siding or, at the customer’s request, in a color contrasting to the color of the main siding panels. |
| Additional elements are made from steel of the same thickness as the metal itself (0.45 or 0.5 mm). As a rule, two types of standard mounting strips are produced - simple and complex geometric shapes. They have different shapes and sizes, but their purpose and “seats” during installation are the same. It should be noted that for the block house and log siding profiles, we additionally produce our own metal components that are adjusted to the specific semicircular shape of this profile, especially for the internal and external corners, which consist of two parts - lower and upper. In addition, for each manufacturer, the dimensions of even standard components may differ. |
The standard length of all planks is 2 or 3 meters, but it is also possible to manufacture individual lengths to suit the customer’s dimensions.
| Our company has its own bending machine and can offer its customers any individual metal elements for the facade and roof - slopes, caps, ebbs, parapets, plinths and any metal elements (bending) of individual shape, size and color. The price of such products depends on the type of metal coating, its thickness and the size of the individual element itself. Production time is 2, 3 days. |
Attention! It is important. Standard metal strips from one manufacturer may not be technologically suitable for steel siding panels produced by another plant due to differences in the geometry of the products. Even a slight difference can make it impossible to install planks and siding from different manufacturers
However, the same mounting elements are suitable for different siding profiles (shipboard, herringbone, under the board, etc.) produced by the same manufacturer
Even a slight difference can make it impossible to install planks and siding from different manufacturers. However, the same mounting elements are suitable for different siding profiles (shipboard, herringbone, under the board, etc.) produced by the same manufacturer.
Material characteristics
Metal siding is a universal material that can be used as external cladding on any building. Sometimes it is used for interior decoration. It is a lightweight panel made of steel, zinc or aluminum. The surface is covered with paint and a protective varnish or a layer of polymer.
As for sizes, almost all panels have standard dimensions:
- full width - 211 mm;
- useful width - 188 mm;
- thickness - 5 mm;
- length - 0.5–6 m.
Some products may have a width of 100–300 mm or 500 mm. The length recommended by experts, which is convenient to work with, is 3 m.
A wide range of colors and shapes of metal siding will help realize any design ideas. Wood-like cladding looks great and, unlike natural wood, weighs much less, without creating additional load on the house. From a distance it is difficult to understand that the sheathing is made of siding and not wood. A lot can be said about the advantages of this material. There are several main advantages:
- affordable price compared to any other cladding. The exception is galvanized material, it is more expensive than the rest of the range;
- resistance to any weather factors, not susceptible to attack by biological pests;
- simple installation and high speed of repair work at any time of the year;
- used for finishing facades of any geometric shape;
- can be used for arranging a ventilated facade;
- the color of the house facade will remain the same even after prolonged exposure to sunlight;
- long service life, more than 50 years.
Metal siding has an affordable price.
The disadvantages of the material include mechanical instability. If the cladding is subjected to a strong impact, a dent will remain on it. Such a defect cannot be eliminated and a piece of casing will have to be replaced. Unlike vinyl siding, steel siding is not susceptible to fire, therefore it is considered fireproof.
Installation of metal siding
For an example of installation, let’s take the horizontal cladding of Shipboard siding:
- If there is a base, then we begin the installation of metal siding by installing the base flashing. Place a starting bar on top of it along a horizontal line;
- Next, we take a set of additional elements (we use volumetric connecting, end and corner strips) and install them one by one in a vertical position;
- We insert the shiplap siding panels on top into the grooves, lower them down to the limit. We attach the first lower panel after it is fixed using the starting strip. We fasten it using self-tapping screws with press washers 16 by 4.2 in the vertical guides along the length of the upper edge;
- We fasten other siding panels in a similar way, constantly measuring the horizontal accuracy during installation and at the same time checking the adhesion of the panels to each other. The length of the panel should be calculated in such a way that its ends cannot reach the stop in the near-window strip, in the outer and inner corners by 8-10 mm;
- If there are windows on the decorated wall, then we reach the beginning of the window opening and secure the panel. If the length of the panel is higher than the base of the opening, then its top is cut to the width of the window with the addition of 8-10 mm on the sides and in depth to create a slope of the window ebb;
- Then we proceed to installing the frame of the window opening. Let's start by creating a window sill with an angle of inclination from the window. The ebb should be wider than the window opening itself by approximately 50-60mm on each side. We bend the edge in the window sill upward along the entire width from the outer side of the metal siding. Afterwards we install the side slope strips and at the end we mount the top strip;
- Be sure to check whether the profile of the window trim fits well and whether flowing water does not get inside;
- A similar technology for installing panels around doorways.
Installation of metal siding We finish the shipboard by framing the upper edges of the cladding.
We carry out the entire installation exclusively from the bottom up.
Video:
As you can see, the fastening technology is quite simple and can be done with your own hands on other sidings, such as Block House and Log.
During installation it is important:
- To make a high-quality installation of metal siding, it is better to prepare a sheathing of wooden slats;
- If the house has obvious differences in the facade, then they can be smoothed out by installing a special metal profile. The profile helps to achieve the most even plane when facing;
- Lathing steps should not exceed 50-60mm;
- When installing the cladding, and adhering to a specific step, do not forget about the possible fastening of insulation sheets, each of which has standard dimensions.
Be sure to take this point into account so that you can install insulation without any problems in the future.
Finishing of windows and doors
For cladding window and door openings, a J-profile or special platbands are used. Installation is carried out depending on the depth of the openings. Recessed windows and doors are decorated with platbands similar to corners. Sometimes the platband is installed together with the slopes.
Finishing of windows and doors with metal siding
If the niches are located flush with the wall, then for their cladding they use elements intended for this purpose - aprons. Their installation begins from the bottom of the window niche. Next, the side parts are mounted. It should be taken into account that the side elements should be located on top of the bottom bar. The top panel should overlap the side parts. A cornice is attached to the bottom bar.
Without decorative decoration of windows and doors, a mark is made on the profile, which is located at a distance equal to twice the length, width and height of the openings. Cuts are made in the corners, and the profile is bent with the letter P. It is fastened along the perforations in the central part, at a distance of approximately 15 cm from the corners. Next, the J-profile is installed. All openings are designed in a similar way.
Subsystem installation
Due to the fact that metal siding is installed using lathing, this type of finishing belongs to the category of ventilated facades. In this case, there are no personal differences in technology compared to other types of siding panels.
But, given the durability of the metal cladding, it is desirable that its substructure be constructed from the same durable materials. Therefore, this article will focus on installing a metal frame under the siding with your own hands.
Metal siding: installation on an aluminum frame
Basic Concepts
Types of siding
Today, covering houses with metal siding - a panel that is used to decorate the external walls of buildings - is one of the popular types of finishing.
This is due to the fact that the material has a number of advantages over its competitors:
- Strength;
- Non-flammability;
- Resistance to mechanical damage;
- Resistance to temperature changes;
- Low coefficient of thermal expansion;
- Low operating costs;
- Ease of installation.
The panel has the following parameters (in millimeters):
- Metal thickness – 0.5. (Building standards regulate the maximum deviation from the standard thickness with normal rolling accuracy +/- 0.05 - SNiP III-B.5-62)
- The length of the lamella is up to 6,000 (usually made according to the customer’s size with a discreteness of 50);
- Length of decorative elements – 2,000;
- Lamella width – 200;
- The width of the working surface of the lamella depends on the configuration of the board.
The canvas can be made in several versions - single board, Christmas tree board, ship board.
Helpful tip 1: When calculating the required amount of material, take into account not the square footage of the wall, but the parameters of it and the sheet of the product. Thus, you will insure yourself against shortages and avoid interruptions in work. Helpful tip 2: Know that when ordering sheets, you can indicate the sizes you need, because Products of this kind are rarely kept in stock; more often they are manufactured for a specific order. The number of planks in one length is a multiple of five sheets (this is due to the width of the standard sheet). Helpful tip 3: When choosing a board configuration, focus on the usable width of the product. This way you can accurately calculate the required number of sheets.