Duplex wallpaper is a type of paper covering that is usually classified as “heavy”. A characteristic feature of the material is the structure of the canvas. It includes 2-3 layers of paper of different densities. The third layer is sometimes a layer of fine wood dust or non-woven viscose. During manufacturing, reliefs can be applied to them, imitating ornaments or textures of other materials for finishing.
When using such materials, it is important to follow all the rules for gluing them so that they do not lose their characteristic relief.
Surface preparation
The poor quality of wallpapering is due to the presence of microvoids on the surface. If the wall is poorly prepared, then there will be more such cavities and in fact the sheet will stick only half or thirty percent. Very often, uneven walls are the cause of poor-quality wallpapering. In order for the wallpaper to last for a long time, the wall should be perfectly leveled.
In rooms where there is high humidity, there is a high probability of mold appearing on the walls. Before gluing, the walls must be primed so that after a short time the fungus does not develop under the wallpaper.
Wall preparation includes the following phases:
- cleaning walls;
- first priming;
- plastering;
- puttying;
- second priming.
The surface should be cleaned especially carefully, this may include:
- lime;
- dye;
- old plaster;
- concrete walls.
The latter are easier to process; red brick walls are the most difficult to process.
Conclusion
Nowadays, everything natural and environmentally friendly is at the height of fashion. Gluing capricious paper material does not tolerate neglect. The reward for your patience will be spectacular, breathable walls that are safe for others.
Pay a little attention to the video in this article; the video will reveal many useful secrets of the process.
Wallpaper, which is chosen for covering indoor rooms, can create attractive effects in the form of expanding the existing space. They can add some notes of peace and tranquility. It is pleasant to relax in a room where the wallpaper is chosen correctly.
Overlapping wallpapering technology
In order for paper wallpaper to be glued end-to-end correctly, it is necessary to strictly adhere to the required technology. In this case, you first need to take care of proper preparation of the base. If this point is violated, then all further work will go down the drain.
To start gluing paper wallpaper, you need to prepare the base and tools. The materials you should take care of are the following:
- Paper canvases. Such material can be selected taking into account the required color and density. The main thing is that it is a very high quality and safe material. In addition, choose products with a long service life. On the packaging you can find information that indicates the environmental safety of the wallpaper. You can also ask the seller for a certificate, which should confirm the quality and safety of the wallpaper.
- Glue for canvases. Here you need to be very careful, since it is the glue that will determine how long this finish will last you and whether there will be yellow spots on the surface of the canvas. It would be nice if the paper wallpaper and glue were from the same manufacturer. Of course, you can choose another glue, but make sure that it matches the wallpaper you have chosen.
A set of tools for wallpapering
In addition to materials, you will need to stock up on the following tools:
- bowl for preparing glue;
- a ladder or table so that you can properly glue the wallpaper at the top;
- to distribute the glue over the wallpaper and the wall surface, you need to use a paintbrush, which will allow you to evenly distribute the composition over the surface;
- a special spatula and a rubber-based roller will serve to level the surface.
If all preparatory measures have been completed, then you can proceed directly to the process of butt gluing. The sequence of actions is as follows:
Prepare the base, level the walls and remove all defects. For these purposes, it is worth using putty, which is carefully applied to the wall. After this, be sure to treat the wall with a primer. Thanks to him, it is possible to achieve a strong adhesion of the wallpaper to the surface. If necessary, the primer is applied a second time, and the corners are carefully processed. Preparing the glue should be done right before you glue the paper wallpaper. To prepare the composition correctly, use the instructions on the package. Now it’s worth figuring out how to properly glue paper sheets end-to-end.
These measures should be carried out very carefully, since such coatings are very weak. Apply the adhesive to a sheet of wallpaper, wait a couple of minutes for the glue to absorb
Now you can start gluing the canvases. Moreover, it is necessary to glue from top to bottom, and then carefully smooth the canvas. To ensure that the sheets are attached correctly and evenly, it is necessary to draw vertical lines every 2 meters. You can actually make them using a level. When paper webs contain a design or pattern, the strips must be aligned according to the pattern before gluing. The joint must be strong and neat. You can achieve a similar effect if you use a rubber roller. This completes the end-to-end wallpapering process. If you do everything correctly and accurately according to technology, the resulting finish will serve you for a long time. It is very important to maintain the beauty of the wallpaper by caring for it from time to time.
How to glue
Duplex paper wallpaper is glued using the same method as any other paper-based wallpaper. But you need to take into account that Germany produces heavy material for which special glue is used.
In addition to glue, the following tools will be required for work:
- knife;
- roller;
- level or plumb line;
- spatula for cleaning walls;
- glue brush.
Also, this material can peel off under its own weight after drying if they are glued to a poorly prepared surface.
Surface preparation
To begin with, remove the previous cladding from walls that have been previously moistened with water using a spatula. If the walls were treated with water-based paint, this is also removed.
Marking and cutting
Measure the height of the wall. Roll out the roll with the wrong side up and make a mark on it corresponding to the measurement. Cut into several strips of the desired length.
Measure and cut the required length of wallpaper
Advice!
If the ceiling or floor is uneven, then when cutting it is worth adding another 5-10 cm to the height of the wall, this will help to accurately glue the strips. When cutting wallpaper with a pattern, you need to take into account the tolerance. Add a value from 5 to 30 cm to the length of the wall and cut the wallpaper into appropriate pieces.
Making markings on the wall
Marking the walls will help you glue the wallpaper as smoothly and neatly as possible. You need to draw a vertical line from the ceiling (a plumb line, a laser level and a video will help) and measure a segment from it equal to the width of the canvas. Repeat the required number of times.
Advice!
Wallpaper should be applied correctly away from the window, especially if it is done overlapping.
This way the joints will be less noticeable visually.
Wallpaper gluing scheme
Historical fact
The history of the use of wallpaper dates back more than three centuries. Then fabric was nailed to the ceilings and walls, covering cracks and crevices and creating a certain amount of illumination in the rooms. Leather was widely used, which has not lost its relevance today, even if not everyone can afford leather wallpaper on the walls of their home.
The first paper coverings, which became the ancestors of duplex wallpaper, were made in China in the first half of the 2nd century. n. e. They were made from rice paper and were brightly colored with images of people and animals.
The nuances of gluing paper wallpaper
1. Cheap? And this is how you look: individual models can be bought for 40-50 rubles per roll (“Mirage”). You can hardly find it cheaper. But the most expensive ones are also paper: American Schumacher costs about 130.0 thousand rubles. per handset ($2.0 thousand). Looks like the paper is different.
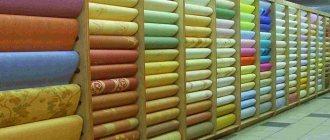
2. Capricious? Again, it's not that simple. On sale you can find trellises of different structures: single-layer (simplex) and two or more layers (duplex). The first ones are cheap, thin, capricious (difficult to stick on the wall - the seams come apart due to shrinkage during the drying process, tear under your hands when smoothing), short-lived. This is more of a temporary wall decoration.
Types of paper wallpaper with basic characteristics.
This behavior of the wallpaper gave new life to the gluing technology that was used by grandparents and their parents - overlap. The thin structure of the fabric allows the seams to be unnoticeable.
Multilayer wallpaper (duplex) consists of a base and a decorative layer, which are firmly glued together. They are more expensive than single-layer trellises, but their service life is 2-3 times longer. In addition, there is no headache when gluing - they are more technologically advanced: they do not get too wet, smooth out well, and are glued end-to-end without any problems.
The multilayer nature of the wallpaper has brought confusion to the concept of paper wallpaper. So, not only home craftsmen, but also some professional finishers classify as such trellises, where the base is paper and the decorative coating is:
- vinyl;
- textile;
- acrylic;
- velours;
- veneer;
- cork;
- bamboo;
- linkrust.
Less commonly, but also paper wallpaper is considered to be a canvas where the base is non-woven and the decorative layer is paper. The properties of the listed types of wallpaper are completely different. We emphasize that paper wallpaper is considered to be canvases where all layers are made only of paper.
Modern equipment has made it possible to organize the production of paper trellises with different textures:
- smooth;
- embossed;
- for painting;
- embossed.
As a result, different surface textures were added to the huge selection of colors and patterns. All this allows you to choose wallpaper to suit any interior style. It should not be forgotten that the royal classics do not recognize other types of trellises. Only paper ones.
In conclusion, one last caveat: imported wallpaper has a different size, which should not be forgotten. Thus, American trellises have a length of 8.23 m and a width of 68 cm. In Europe, the width is 75 or 106 cm and the length is 25 m.
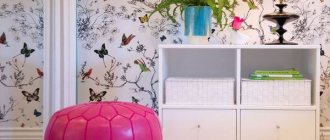
Design solutions for the use of embossed wallpaper in the interior
- Silkscreen printing will look great in living rooms and bedrooms. Moreover, the size of the room does not matter. The main thing is to successfully choose the pattern and color of the material.
- Bright silk-screen wallpaper is suitable for bright rooms - the glare of the sun's rays will highlight their beauty.
- If the room is dominated by artificial lighting, then it is better to choose embossed wallpaper in pastel colors.
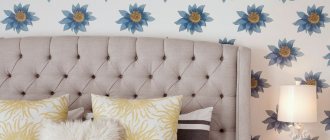
- In large rooms you can use wallpaper with large figures and scenes.
- You can choose embossed wallpaper to suit any style of room, due to the fact that they imitate textures well: wood, brick, paint, tile.
- Don't limit yourself to one type of wallpaper. The combinations look very interesting. So, for a room in a high-tech or loft style, a combination of wood relief and brick is suitable. And for a retro style, you can choose wallpaper with a pattern that imitates plaster and painting.
- Walls covered with embossed wallpaper in a patchwork style will look fresh and unusual. To do this, you need to use different types of wallpaper, cut into shreds. Such a heterogeneous motley “patchwork blanket” on the wall will decorate a child’s room or living room in a country style.
[media=https://www.youtube.com/watch?v=PrcPzN2I_2o]
Features of gluing paper wallpaper
You need to study the markings and prepare the strips in accordance with them. Arrows on both sides of a vertical line at the same level (straight marking) indicate that the pattern needs to be drawn up. At different levels - they are glued in reverse order, with each subsequent strip directed in the opposite direction. An arrow on one side indicates that there is no need to adjust the pattern.
The list of other basic rules for pasting walls contains the following points:
- All remnants of the previous coating are removed from the panels with a spatula, after which the surface is wetted, which is necessary for better adhesion.
- The glue is diluted according to the instructions or purchased ready-made.
- They begin to smear the strip first, and then the wall panel. The edges of the strip must be processed.
- Start applying from the top. At the same time, the wallpaper is folded. You need to glue the paper strips from the corner, aligning them vertically with a plumb line or level.
- Use a rubber roller or a dry cloth to smooth the fabric. To expel air and excess glue, do this from the center to the edges.
The paper will shrink as it dries. To prevent cracks from appearing, the strips are glued with an overlap of 0.5 cm. Subsequently, when the paper dries, the wallpaper will shrink.
You must first apply the glue to the paper, so that during the time it is applied to the wall, the paper wallpaper has time to become saturated. If you buy ready-made wallpaper glue, before gluing paper wallpaper, mix it thoroughly, achieving a uniform consistency. The main thing is to choose the right composition to ensure reliable bonding.
Subspecies
If we talk about the types of such material, they are distinguished mainly by the texture and pattern that is applied to them. Thus, several types can be distinguished:
- smooth wallpaper;
- wallpaper for painting;
- embossed;
- corrugated.
Corrugated ones, by the way, are made using a special printing called flexographic. The smooth type is the most common - it is distinguished only by the presence of a pattern. The embossed type also has a texture, that is, a certain relief that looks very good together with the pattern.
Regarding the properties of duplex wallpaper, it is worth noting their presentable and distinct appearance. In addition, they have excellent moisture resistance, as well as a certain resistance to light. Duplex wallpaper is a more durable and, so to speak, “long-lived” version of wallpaper - you don’t have to worry that over time they will lose their appearance. They can also be painted, since their top decorative layer, as well as the structural material from which they are made, are perfectly compatible with paint. In addition, the surface is treated with a water-repellent composition, which will allow you to repaint the wallpaper a large number of times, if necessary, of course. As for the thermal insulation properties, here too the material showed its best side - they do not allow air to pass through, and therefore have a low heat loss rate.
Wallpaper is a traditional finishing material. Today, such paintings can be selected for any interior, be it a solid classic or elaborate baroque. Currently, one of the most original and affordable are stylish duplex wallpapers, available in a wide variety of colors. Let's take a closer look at this interesting finishing material.
Types of wallpaper and methods for gluing them
To understand the gluing technique as much as possible, it is best to start with the characteristics of the canvas itself and move on to further gluing technology. As mentioned above, depending on the chosen canvas, the gluing technique varies, so be careful.
Paper wallpaper
Consist of 2 layers - both paper. Among the features of this type of canvas are:
- possibility of masking irregularities
- strength due to 2 layers of thick paper
- air conductivity
- environmental friendliness - only natural products are used in production
- price – the cost is lower than other alternatives
Among the disadvantages are poor moisture resistance and a short service life - up to 5 years.
You need to select adhesive for paper covering according to the markings on the roll. In most cases, an adhesive mixture for heavy fabrics is suitable.
Before the gluing process itself, you first need to prepare the wall surface. So, the old coating, if any, is removed, unevenness and defects are repaired, fats and acids are cleaned.
Technique for gluing paper sheets
You can glue embossed duplex wallpaper by following these steps:
- The finished wall surface is treated with a primer for better adhesion. For everything to dry and give the best results, wait about a day.
- Measure the lengths of the room to be covered and place them on the rolls. For cut strips, it is advisable to leave 5-6 cm for allowances. Make sure that the patterns and designs match at the joints.
- Prepare the glue as indicated in the instructions and apply markings to the wall on which the strips will be glued.
- Start gluing from the window, removing bubbles (if they have formed) with a spatula as you go. After pasting the strip, remove excess with a special knife.
Also try to apply the recommendations. Thus, work should be carried out at a favorable temperature in the range of 15-22℃.
Close all doors and windows in the room during the procedure. When working with switches and sockets, it is better to de-energize the room.
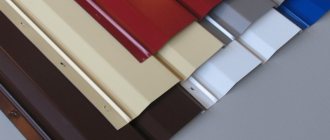
Hot and chemical stamping vinyl wallpaper
Despite the fact that production methods differ significantly, each of these canvases has qualitative characteristics:
- durability – service life reaches up to 15 years;
- moisture and heat resistance;
- possibility of wet cleaning;
- thermal insulation ability of the coating;
- resistance to direct ultraviolet rays.
Each of these materials also has its own disadvantages; both canvases conduct air poorly, which is why the room should be ventilated frequently. You should also add an advantage to each type, for hot stamping - environmental friendliness (during production, wallpaper heats up and releases some harmful elements), for chemical stamping - resistance to mechanical damage.
The technology for gluing vinyl wallpapers of various types of embossing is identical to paper ones. The only difference is the selection of glue. Based on the markings, select the appropriate glue and do the same as with the paper gluing technique.
Non-woven types of wallpaper
Produced for further coloring. The base of such a fabric consists of cellulose fiber bonded together with polymers. Among the main advantages of this coating are its strength, resistance to combustion, and also:
- good ability to visually mask wall irregularities;
- large width of rolls, due to which simple gluing is ensured;
- possibility of wet cleaning, as well as repeated painting
Among the disadvantages are mainly poor air conductivity and high cost.
Technique for gluing non-woven wallpaper with hot and cold stamping
Regardless of the embossing method, non-woven fabrics are glued in the same way. However, before gluing them, you need to check the level of translucency. So, apply the coating to the wall surface when there is direct sunlight. If the material does not show through, everything is fine, but if flaws are visible, you will have to paint the wall in 1 color tone.
Glue for non-woven fabric should be thick, which remains colorless after drying. The work itself proceeds according to the following scenario:
- Strips are cut to a given length with a “surplus” of 3-6 cm. Make sure that the patterns and designs match.
- The prepared adhesive mixture is applied to the wall.
- The cut fabric is applied to the area treated with glue and pressed.
- When bubbles form, they are removed with a rubber brush.
- The remaining strips are glued end-to-end, observing all patterns and designs.
Butt wallpaper technology
There are only two ways to hang wallpaper: overlap and butt. Only very thin paper wallpapers are glued with an overlap or processing is done in the corners. This method wastes a large amount of material, and, as a rule, overlapping fabrics stand out too much at the joints. Therefore, it is preferable to choose the second method.
To create a beautiful decorative wallpaper covering as a result, we follow this scheme:
The finished wallpaper is smeared with glue from the center to the edges, very carefully so that there are no dry spots left. Important! When processing, the glue should not get on the front side of the wallpaper. After the wallpaper is greased, you need to fold the canvas in half, thereby allowing it to be even better saturated with the mixture. Wallpaper manufacturers indicate the period of time for impregnation on the packaging, so you need to soak for as long as written and for each canvas this figure should be the same
This stage determines how neatly the joints will fit together and what the finished coating will look like. The canvas must be glued to the wall from top to bottom exactly along the previously drawn line. You need to start pasting from the window. Important! If there are pieces left that are unnecessary, you can cut them off with a very sharp knife only after the wallpaper is completely dry.
The wallpaper is smoothed with a special wallpaper spatula, and excess glue is removed with a soft, clean cloth or sponge. You need to use a spatula from the middle to the edges of the canvas so that excess air comes out.
After one canvas has been glued, you can prepare the next one, following the already familiar algorithm. It is applied end-to-end with the first one to form an invisible seam. Under no circumstances should the wallpaper overlap each other. As soon as the canvas is glued and passed with a spatula, you need to use a special roller to go along the seam in order to press it even more firmly to the wall.
To properly wallpaper the walls end-to-end, you need to take into account external factors. This is the air temperature in the room, which should be no more than 20 degrees. It is also necessary to close the windows and doors in the room so that drafts do not interfere with the drying of the glued canvases. Direct sunlight also does not have a very favorable effect on freshly hung wallpaper.
Technology and rules of gluing
The gluing procedure is simple: the strips with applied glue are pressed tightly against the plane of the wall, it is very important to prevent the appearance of bubbles and unevenness. Vinyl wallpaper is glued using a special compound
Installation is done end-to-end; it is strictly forbidden to glue vinyl overlapping, they are dense, the seams will be visible, which is unacceptable
Vinyl wallpaper is glued using a special compound. The installation is done end-to-end; gluing vinyl overlapping is strictly prohibited, they are dense, the seams will be visible, which is unacceptable.
How to start?
The process must begin with preparing the workplace. You cannot lay sheets on top of old ones; you should thoroughly prepare the surface of the wall and only then start smearing.
An important detail: a lot depends on the room in which the wallpaper will be located. It is not recommended to use embossed wallpaper for the kitchen due to high humidity.
The texture actively accumulates microparticles and the sheets quickly fade.
For the kitchen, smooth wallpaper that can be easily wiped with a damp sponge is best suited.
How to paste wide wallpaper?
Wide meter sheets are still a rarity, but this format, in fact, is no different from regular sizes. The advantage is that the number of joints between sheets is noticeably reduced, gluing is easier, and labor costs are noticeably less.
Advantages:
- the price is noticeably lower;
- less labor costs;
- easier to adjust seams.
Flaws:
- there are difficulties during installation, especially for beginners;
- Even the smallest deformations of the wall can interfere with work.
If the room is of non-standard dimensions, certain difficulties arise in fitting.
Pasting on corners
Two canvases should not be combined together in the corner area. The sheet should be overlapped at the corner with an allowance of no more than five centimeters.
All joints are pressed tightly against the surface, only then can they be securely glued.
Gluing yourself in the corner with an overlap is not very difficult, even wallpaper with a pattern:
- markings are applied;
- a vertical line is correctly applied, which is located from the corner at the same distance as the width of the roll;
- Glue is applied to the wall, and a layer of glue of the same width is applied to the inside of the canvas;
- the canvas is glued;
- the second canvas is glued on top with an overlap.
After the second sheet is glued, the surface should be carefully rolled with a rubber roller to avoid air pockets that may appear under the wallpaper.
Butt or overlap?
Butt gluing with trimming and pattern selection is technologically simple: the method makes it possible to create a wallpaper joint in the corner that is almost invisible, but if the wallpaper has large patterns, then this technology is not suitable.
In order to mount them overlapping, you should use a special glue that will be applied to the very edges of the canvas. The first sheet is processed, the canvas is mounted with an overlap of up to 2 centimeters.
Wallpapering must begin from the corner. First you should make detailed markings: how the sheet will “lay down”. On the wall at the top of the corner, an indentation of no more than two centimeters is made beyond the width of the wallpaper and then a mark is placed. Then the level is lowered and a vertical line is drawn. It will be a kind of beacon along which the sheets will be aligned during work.
-How to glue the seams?
When working, special attention should be paid to the joints. They must be well processed: it is unacceptable for air to penetrate under the surface, otherwise after a short time “bubbles” will form in these areas and they will lag behind the wall
When installing wallpaper yourself, you definitely need a companion and a high stepladder. The partner will:
- feed sheets;
- support the canvas;
- press the canvas with a brush.
To prevent air from remaining under the wallpaper, press it against the wall during installation from the center to the edge. Uneven wallpaper residues at the bottom are carefully removed using a special construction knife.
Covering the ceiling
Before gluing wallpaper to the ceiling, you need to examine its surface.
Should be embroidered and puttied again:
- cracks;
- chips;
- unevenness.
All ceiling defects will have to be leveled so that the angle with the walls and ceiling is exactly ninety degrees. After the work is completed, it will be necessary to prime the surface with a special primer that penetrates deeply into the surface.
If there is a high percentage of moisture in the room, then another priming will be necessary with a special composition that eliminates mold and mildew.
Markings are made on the ceiling according to the width of the sheet and glue is applied, and the surface of the wallpaper is carefully leveled with a roller.
After the sheets are glued, you should wait a couple of days and therefore glue the baseboards and borders
Door and window openings
It is best to remove the platbands while gluing. If this is not possible, when leveling the wallpaper, fit it as tightly as possible to the outer edge of the casing, press it with a wide spatula, and cut it with a construction knife.
It’s good if there is a small gap between the wall and the platband, then you can leave a small allowance and tuck it under the platband. The easiest way to make the window opening look neat is to cover the joint between the slope and the wall with a plastic corner.
After completing all of the above steps, the room will be transformed! All that remains is to install the baseboards, bring in the furniture, and you can celebrate your housewarming party!
Why choose paper wallpaper?
It would seem that in the age of colorful vinyl and environmentally friendly non-woven fabrics, the demand for paper rolls should drop significantly, but this is absolutely not the case
Inexpensive wallpaper is still wildly popular, and that’s why it’s so important to know how to properly apply paper coverings to the walls of an apartment, cottage or country house. What is so good about this wallpaper?
- Paper canvas for walls has a noticeable range in price, from the most “penny” rolls to more expensive and spectacular ones. This coating is available to all segments of the population, and the choice of colors and patterns is very impressive. For those who passionately want, but cannot afford, vinyl-look walls, there is always a chance to find colors similar to expensive ones among the paper assortment.
- Paper canvas can be used to decorate walls in rooms with low humidity, less than 40-60%.
- This wallpaper is environmentally friendly, easily breathable, does not cause allergies, and is ideal for rooms where children live.
Classic “clothing” for walls also has obvious disadvantages: it wears out quickly, fades in direct sunlight, is not resistant to impacts and other damage, and most often does not tolerate moisture. However, all these disadvantages can easily be turned into advantages, because this coating can be changed as often as you like, the main thing is to master all the nuances of gluing paper wallpaper.
Paper material is environmentally friendly and easy to use
Difficulties in working with the material
The most common difficulties arise when working in the corners of a room. Often when preparing walls it is difficult to get a completely flat angle. However, it is quite easy to correct the situation. The next strip should be aligned strictly vertically and overlap the previous panel. Then, when the wallpaper is dry, make a straight, vertical cut across the overlapping section. Pull back the bottom strip and carefully coat the top with glue and press the paper against the wall.
Attachments of glued trellises under the ceiling and near the floor are cut with a sharp knife, if necessary, using a long metal ruler. You also need to cut holes for switches and sockets with a knife. These actions can only be performed after the wallpaper has completely dried, otherwise there will be a high probability that the knife will not cut, but will break the newly glued edge of the canvas.
When hanging wallpaper, you need to know that the vinyl coating is practically impervious to air, so it takes about 2 days for the wallpaper to dry completely. Otherwise, all efforts will be in vain.
Why duplex is better than simplex
Simplex is a single-layer paper coating. This type of material is no longer produced in the West, and domestic manufacturers are actively switching to producing exclusively two-layer fabrics. But you can still find them in stores.
Single-layer types are short-lived, quickly fade, tear even with minor mechanical stress, and with a modest range of colors, the designs are unclear. When wet, they begin to stretch out, which complicates their sticking. But due to their specific consumer qualities, they are often used to decorate rooms with increased environmental safety requirements - for bedrooms and children's rooms.
Duplex, thanks to the functional separation between the layers, is free from these disadvantages. The layer that serves as the base ensures reliable adhesion of the canvas to the walls. It does not stretch and does not allow glue to penetrate the decorative layer. The two-layer construction has good density, which makes installation easier and also allows you to veil most wall defects. Additional processing of the outer layer with various substances makes it possible to obtain a fabric with the required qualities.
Pasting walls with paper wallpaper. Sequence of work
Tools, utensils and devices that need to be prepared in order to work efficiently:
- a special knife (ask in the store) or wallpaper scissors. These tools must be in good condition and well sharpened;
- a pencil, or better yet more than one. You definitely need a tape measure and a long meter ruler;
- a bucket or any capacious container for glue, brushes and a regular fur roller for applying the adhesive solution;
- special roller for wallpaper;
- sponge for removing excess glue;
- pieces of clean cotton rags.
Cutting and marking the wall
To cut the canvas correctly, you need to roll out the roll inside out and measure the height of the wall, adding about 5 centimeters. Paper wallpaper without a pattern is cut into several strips at once; if there is a pattern, you need to ensure that the pattern matches. If you are not sure that the walls in the entire room are the same height, each strip should be cut with a margin of 7-10 cm.
In order for the canvases to be glued correctly vertically, the walls will have to be marked. You need to start marking from the window, clockwise.
Marking walls before wallpapering
Preparation of canvases
Before gluing paper wallpaper, they must be thoroughly lubricated with glue. It would be correct to apply glue to the canvases by laying them out on a large table. But if this is not the case, try to keep the area on the floor always clean and the glue does not get on the front side of the wallpaper.
Place several strips so that the distance from the edge of the table is about two centimeters, after which, on top, butt to the edge, place the strip that you will work with first. This is done so that when spreading the canvas, glue does not get on the surface of the table and stain the wallpaper on the front side.
The glue is applied evenly, with a roller or brush, over the entire area, starting from the middle. You need to make sure that there are no missing sections. If the glue is applied correctly, there will be no bubbles.
The strip is folded into three quarters, starting from the top, and left for 10 minutes to soak. The glue should be well absorbed; you want the wallpaper to literally get wet.
Before applying paper wallpaper to the walls, you need to soak it well with glue.
If the canvases are very thin, then they can be applied to the wall immediately after applying the glue. Any glue that gets on the front side should be removed with a damp sponge without waiting for it to dry, but you should not rub it.
We move the next strip to the edge of the table and repeat the whole process again.
Choosing the right options
Usually, one of the above methods for processing pasted surfaces is given priority in a situation with one or another type of wallpaper. The following is a detailed description of existing technologies.
Thin type of paper wallpaper
Before removing wallpaper from drywall, it is worth assessing the strength of the paper adhesive on the ceiling or partition. You need to start work in the most inconspicuous area (for example, in a niche or in one that will be covered by furniture elements in the future). To work you will need:
- a pair of spatulas of different widths for scraping wallpaper;
- sponge and dishes with warm water.
The sequence of actions will be as follows:
First of all, moisten a small area of the surface with a sponge soaked in warm water. The main thing is to calculate your efforts so as not to spoil the adjacent plasterboard layer by soaking. Movements must be oriented in the up-down direction sequentially. This way it is possible not only to moisten the paper, but also to immediately prevent excessive wetting of the surface. Then they wait 5-10 minutes, and then proceed to mechanical cleaning procedures. There is no need to rush, trying to moisten the entire wall. It is better to do this gradually - as the old stripes are eliminated.
Vinyl covering
In a situation where there is vinyl wallpaper covering a plasterboard structure, the technology of work will be somewhat different and technically more complex.
For effective penetration of moisture into the vinyl structure, it is recommended to soak not just with water, but with an adhesive solution prepared in a proportion of ¼ of the norm. The soaking composition is prepared in advance, which greatly facilitates and speeds up the process.
The application of the adhesive solution is carried out by analogy with the technology of soaking with water. With only one difference: due to the dense composition of the materials, it will have to be applied more than once, but a couple of times.
The number of wetting procedures will be determined by the degree of density of the wallpaper material. The higher it is, the longer the wetting process will take. Hence the expectations. It is best to soak wallpaper in rows. Each canvas is moistened from the top to the bottom. What is not less important.
Then, using a construction knife, cuts are made at the junction of the wallpaper material and the ceiling plinth. To do this, carefully pick up the edge of the sheet with a spatula. Thanks to the reliable base, vinyl products can be separated much easier than paper ones; to do this, you just need to pull the canvas and it will come off entirely. After tearing off most of the covering, wallpaper fragments may remain on the plasterboard surface. They should be moistened again and the spatula used again.