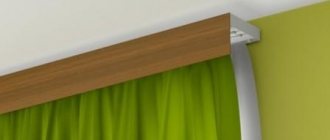
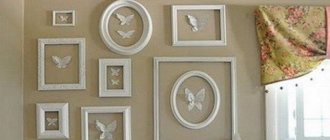
Polyurethane ceiling plinth is one of designers’ favorite decorative materials for finishing ceilings and floors indoors. The ceiling plinth made of polyurethane in the interior gives the space originality and special sophistication. This is due in no small part to the incredible flexibility of this material.
Polyurethane foam skirting boards are valued for their ease and speed of installation. A wide range and variety of style solutions allows them to compete with the classics of the genre - gypsum stucco, which, as you know, allows you to create original decor. The polyurethane ceiling plinth, photo below, can without hesitation be considered a work of art.
How to choose the right beauty, what to paint it with, how to mount it - just a small part of the questions answered in this article.
Polyurethane skirting: features and advantages
Both royal chambers and an ordinary apartment - this is how one could determine the purpose of polyurethane decor. Polyurethane skirting boards for the ceiling undoubtedly belong to the former in terms of decorative characteristics, and to the latter at a relatively reasonable cost.
Polyurethane ceiling plinth in the interior
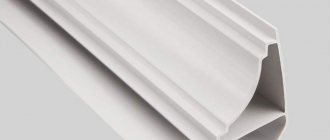
A polyurethane ceiling plinth is similar in density to wood, but unlike it, time has no power over polyurethane - it does not crack or deform. This is an environmentally friendly material with virtually no odor, hard and durable. The modern analogue of gypsum stucco does not crumble over time, does not turn yellow and is much lighter.
Decorative polyurethane plinth can have a flexible shape
Advantages of polyurethane decor
- Safety. The absence of any harmful emissions allows them to be installed in any room, including a child’s room.
- Durability. Polyurethane floor and ceiling plinths retain the attractiveness of their original appearance for many years. Polyurethane is not subject to temperature effects, is resistant to moisture, pollution, and does not support combustion.
- Variety of designs. It is not at all necessary that the ceiling cornices or polyurethane floor plinth be a smooth white profile. The range of these products is extremely wide: interesting design, variety of shapes and textures, the possibility of built-in lighting, the presence of a cable channel, etc.
- Availability. Anyone can afford to buy polyurethane skirting boards, even those on a modest budget.
- Easy to install. The light weight of these products significantly reduces labor costs during installation, especially in rooms where the ceilings are high.
- Possibilities. These products are able to mask any errors and architectural imperfections, uneven walls, ceilings and floors that exist in the apartment. Moreover, flexible polyurethane floor plinth, to which rubber plasticizer is added, can be used for finishing figured ceilings, arches, columns and other curved architectural elements.
- Versatility. Due to their high performance characteristics, such skirting boards can be used for ceilings of various configurations, floors or countertops.
Relief wide polyurethane floor plinth is an element of classic decor.
However, along with so many advantages, polyurethane plinths also have some disadvantages. Firstly, they are relatively expensive, for example, they are about two to three times more expensive than plastic ones, and secondly, their weight. Unlike “weightless” PVC or foam profiles, polyurethane skirting boards are not very convenient to use with stretch ceilings, because in this case the decor will have to be glued only to the wall, and this will lead to the fact that over time the heavy fillet will begin to sag or peel off.
Kinds
Domestic and foreign manufacturers offer several types of polyurethane skirting boards. They have different design and operational features.
- Increased flexibility. They are indispensable when finishing rounded corners or columns. Such panels are also called radius panels.
- Self-adhesive. The back surface of such products is treated with a special adhesive composition, protected by a thin film. When installing the panels, the shell is removed, and the plinth is securely attached to the wall surface. Basically, such solutions are used for finishing ceilings.
- Hidden. These models are designed to be installed in line with a wall surface. They perfectly hide the joints and can fit perfectly into any interior and style of the room. Such skirting boards do not accumulate dust - this is one of their main advantages.
- Connelure. Thanks to their special design, they allow you to install linoleum or other elastic cladding on the wall.
Polyurethane skirting boards are also electrical - inside their design there are special recesses designed to hide wiring. Externally, these strips are similar to ordinary ones.
Texture and color
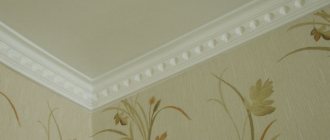
Sometimes you can come across the opinion that polyurethane turns yellow over time. In fact, such a statement as that a polyurethane baseboard must necessarily be white is wrong. The material is initially yellow, but as for the familiar virgin white color of the product, it is obtained during the manufacturing process by priming or laminating the surface of the plinth.
Contrast of light and dark in the interior
Polyurethane skirting boards come in two versions:
- laminated - the product is covered with a film that slightly smoothes its relief, especially small ones. Allows painting with chemically neutral paints;
- primed - the primer is applied in two layers, and almost any paint is suitable for it. Such a surface can not only be painted, but also give it various effects such as aging, wear, etc. This option is more expensive, but, on the other hand, it is also more durable and completely unpretentious in cleaning - such decor can be washed without any damage.
Decorative stucco molding made of polyurethane with gilding
Skirting made of polyurethane with antique effect
Today you can choose paint to decorate in any style. Paint and varnish of any shade will allow you to imitate various materials - natural stone, wood, even fabric. In such cases, in addition to color, it is important to emphasize texture. For example, characteristic holes are made in a “wood-look” plinth, similar to traces left by a wood bug.
Polyurethane ceiling plinth photo: bright colors make the children's room truly elegant
Scope of application
Skirting boards made from foamed PVC are most often used to decorate the junction of walls and ceilings, if plasterboard is used in finishing these surfaces.
From the bulk of building materials offered on the market, two main types of skirting boards can be distinguished:
- Smooth.
- With an image.
Both options are very similar in appearance to gypsum stucco. However, PVC material is lighter than gypsum, so there are no problems with the collapse of such “stucco molding”. Polyurethane skirting boards are usually used when decorating rooms in classical styles - Empire, Art Nouveau and Baroque.
Also, their foamed PVC skirting boards are divided into types according to width and installation method. There are products that are glued to the surface of the ceiling or floor. And there are those that are attached only to walls. There are also baseboards with cavities where you can lay electrical wiring or LED lighting. There are various polyurethane elements on sale that ensure the aesthetics of the work performed - corners and end caps.
Installation of polyurethane plinth
Installation of polyurethane products is fast, clean and easy.
Preparatory stage
Installation of baseboards is one of the final stages of repair. By this moment, putty and plastering work should be completed, and not only in the installation area, but throughout the entire room.
Installation of ceiling plinth
If it is necessary to replace electrical wiring or various communications, at this point I dismantle the old wiring and install new ones. If you intend to lay a polyurethane floor plinth with a cable duct, you must secure the wires in advance.
Surface marking
After completing the preparatory work, before cutting the plinth, begin marking the surface for the plinth. First, they are placed along the walls, measured with a tape measure and the places where they need to be shortened are marked. In this case, the edges of the fillet must be applied very tightly to the wall and floor or ceiling in order to prevent it from moving from its final position.
Marking a baguette in the inner corner of the room
A line is drawn at the location where the upper edge of the profile meets. Do the same with the adjacent plank. At the intersection of these lines, the desired joint angle is formed. Marks are made at the top and bottom of each fillet, strictly corresponding to the markings.
Trimming the baseboard
The most difficult thing when installing skirting boards for the ceiling is the process of cutting their corner joints. For polyurethane, as well as for plastic, you can purchase corner segments.
Corners for decorating the joints of skirting boards at the corners
This problem can be solved without special fittings - by cutting the planks in a miter box with a standard set of stencils: a 45-degree stencil is used for the internal and external corners, and a 90-degree stencil for intermediate joining.
Carpenter's miter box for trimming skirting boards
Fitting the product to the outer corner is done as follows:
Profile adjustment for external corners
The bar on the left side is inserted into the miter box and pressed against the nearest edge. Please note that the side of the plinth adjacent to the ceiling surface should be at the bottom. The hacksaw is inserted into the stencil from left to right.
To trim the right vector of the outer corner, the baguette is similar, but on the right side it is placed in a miter box. You also need to work with a hacksaw at 45 degrees, respectively, from right to left.
Profile adjustment for internal corners
To trim the inner corner at 45 degrees, repeat the same steps, but in a mirror image.
The process of cutting with a miter box
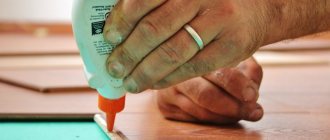
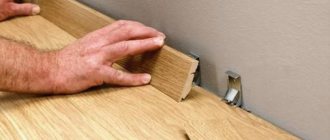
Gluing the baseboard
Baguettes are glued using glue for polyurethane skirting boards, for example, acrylic sealant.
Acrylic sealant for gluing skirting boards
Using a knife, cut off the plug from the tip of the tube and insert it into the gun. Apply the sealant in a zigzag pattern along the back side of the baseboard.
How to apply glue to baseboards
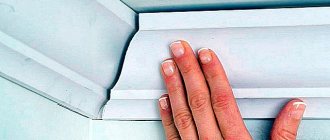
Raise the bar to the ceiling, place it in a corner and align the bottom edge along the marks on the wall. Evenly, without pressing the plinth with your fingers from the front side, press it into the corner. The sealant released from the edges of the panel is immediately wiped off with a damp cloth, simultaneously sealing the adjoining seams. Apply sealant to the end of the laid fillet for joining with the next fragment.
Extending baguettes in length
Measure the distance from the corner to the end of the laid fillet, trim it and glue it in. In this way, they pass through each of the walls in the room, changing the internal angle on the structures to the external one. The joints of the skirting boards are puttied using a rubber spatula, achieving a complete visual joint. A day later, when the sealant has completely dried, a primer is applied over it for painting.
The principle of laying floor skirting boards is absolutely the same. It’s even easier to carry out the work, since you don’t have to climb high.
See the details of installing polyurethane fillets below.
Polyurethane ceiling plinth installation: video instructions
Reviews
“The hardest part is cutting, especially in the corners. The first time I suffered. I had to buy more material. I hadn’t even heard of what a miter box was, I drew it out with a pencil. True, it turned out more or less normal. Now we will know." Ivan Alexandrovich, Moscow
“If there is no miter box, you can use a paper blank. You cut out a 45° corner, place it against the bar, and hooray. But here you need to get better.” Oleg, Olenegorsk
“Yeah, at first my wife and daughter almost beat me in the face for fussing around for so long. Moreover, I took the template from a friend and cut it at an angle of exactly 45°. I’ll cut it off and put it on the wall, but that’s not it. It was possible, of course, to close the joint with a corner. But it's a matter of principle. Okay, my neighbor suggested it. Otherwise I would have gone gray prematurely. It turns out that in Russia not every wall has an angle of 45°. Adapted. Using the same paper, I cut off a little at a time and checked the cut by applying it to the corner. In the end, believe me, it can turn out to be either 40 or 48°.” Sergey, Shatura
“No, yes, Russian walls. Russian roads. Russian wives." Ivan Alexandrovich, Moscow
Painting polyurethane baseboards
Before painting the polyurethane baseboard, you must wait at least 24 hours for the glue to completely set. It is best to paint the product with a spray or aerosol cans of paint in several layers. It is advisable to use acrylic to be able to easily clean it in the future.
How to paint a polyurethane baseboard to get special effects, say, patination.
Painting the ceiling plinth with glaze
Taire-colored glaze is used to treat the surface of a polyurethane baseboard without affecting the middle part. Next, you need to shade the joints of the painted and unpainted parts, and also remove the top layer of tinting. As a result, the convex parts will become brighter and lighter, and the deep parts will become richer. Then the relief layer is highlighted with a dark tinting of UMBER color. Finally, the painting effect is enhanced with a brush.
Required Tools
To perform independent installation of these elements on a suspended ceiling, you need to have the following tools:
- gun for liquid nails;
- pencil;
- miter box;
- knife;
- putty knife;
- roulette;
- stepladder;
- a rag to remove excess glue;
- film to protect the canvas so as not to stain it with glue.