On your marks! Attention! The renovation has begun! The use of PVC panels in the repair of walls and ceilings increases its speed by an order of magnitude. However, this does not mean that quality will suffer. The choice of high-quality material, consistent implementation of the technological process and a little effort will lead to excellent results. The only negative is the inability to perfectly connect the ceiling and wall, as with plastering and subsequent painting. You can turn it into a plus if you use a plastic ceiling plinth. It will not only cover an unpresentable gap, but if chosen correctly, it will noticeably emphasize the chosen design.
Features of using ceiling plinths
Ceilings made of plastic panels mounted on a wooden or metal frame are quite popular. This is explained by a very impressive list of advantages of such ceilings: they are inexpensive, practical, quite durable, and at the same time have a very attractive appearance. In addition, such a ceiling is installed relatively quickly and simply.
One of the tasks that the master has to solve during the installation of a ceiling made of plastic panels is arranging the joint between the ceiling and the wall (see How to join a ceiling plinth: description and recommendations). And here two points need to be taken into account:
- On the one hand, the joint needs to be disguised and made aesthetically attractive. First of all, this concerns the part of the ceiling in which the ends of the trimmed panels are located.
- On the other hand, by rigidly securing the panels, we do not allow them to move - and small movements of the panels due to changes in temperature and humidity are inevitable. If you fasten the ends of the panels, as they say, “tightly”, there is a high probability that the entire ceiling will be deformed under the influence of temperature changes.
For the correct arrangement of this unit, a ceiling plinth is used - a special design that makes it possible not only to bridge the gap, but also to leave sufficient space for the free movement of the panels. The groove in the plinth is used as a fastening for plastic elements; they are not fixed, but retain the ability to move within a few millimeters.
Flaws
Unfortunately, scientists have not yet come up with a material that will be free of disadvantages. The plinth on the plastic ceiling also has some flaws.
If you compare foam and PVC profiles, you can understand that products of the first type have a wider base. Due to the fact that the vinyl profile has a narrow base, it cannot cope with hiding wide cracks. And this is not just a matter of installation errors.
PVC has a fairly high coefficient of thermal expansion. And the larger the volume of the room, the greater the distance between adjacent baguettes and the wall should be. And this in no way contributes to improving the aesthetic appearance of the room.
Installation of PVC skirting boards complicates the procedure a little
installation of ceiling panels
. For example, it is not easy to fasten the last panel in a row so that nails or screws are not visible.
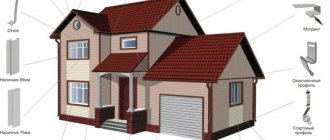
Advantages of ceiling skirting boards
So, let’s summarize - what are the advantages of plastic ceiling plinth over other methods of arranging the junction of the ceiling and the wall?
- The ceiling plinth simultaneously acts as a fastening for plastic panels and as a decorative overlay for the corner.
- Plastic ceiling plinths are made from the same material as the ceiling panels themselves, and therefore do not require special care (see Final lesson on ceiling ABCs: installing ceiling plinths). In addition, by purchasing a ceiling plinth together with plastic panels, you practically guarantee a complete match of the color scheme.
- The design of the plastic ceiling plinth is such that it provides a sufficient degree of freedom to the ceiling panels. This prevents the ceiling from deforming.
Ceiling with plinth around the perimeter
If these advantages seem convincing to you, then you can proceed directly to installation work.
Adjustment at corners
If the corners in the room are not straight, but are, for example, 48 degrees or 42, the baseboards must be adjusted to each other.
Often the miter box turns out to be useless, which is why you will have to use a clamp. The homeowner needs to take a board with the same width as the baseboard and set the desired angle on it, then press the board and baseboard together with a clamp. At the same time, the required angle is cut on both sections. In this case, the board serves as a guide that will prevent the saw blade from moving out. In other cases, working with a miter box is a way to make a corner of ceiling plinths: this tool does not require skills or special knowledge from the homeowner and is a template for cutting.
Ceiling frame
The plastic ceiling plinth is somewhat more difficult to install than traditional molding. And yet, if you carefully study the recommendations below, you will be able to install the plinth for the ceiling quickly and efficiently.
- We begin installing the plinth by installing the frame. The frame is mounted from wooden planks, which are attached to the ceiling either using anchor dowels, or (if the ceiling needs to be lowered in relation to the ceiling) using hangers.
Note! If you plan to cover not only the ceiling, but also the walls with plastic panels, the lathing is also mounted on the walls (see Plastic ceiling plinth: first acquaintance). In this case, the top strip of the wall sheathing will be the basis for the ceiling plinth.
- The optimal way to install frame slats is as follows: first, we fix the slats on the two outer hangers, and then level them. This way we can guarantee that the resulting ceiling will be perfectly flat.
- When the frame is ready, you can begin installing the fastening profiles. This is exactly the profile that a plastic ceiling plinth is made of.
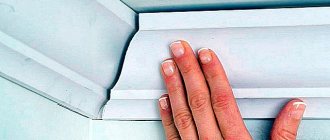
- As you can see in the photographs presented in this article, on one side of the ceiling plinth there is a special groove - a tongue and groove. It is into this groove that the plastic lining should be inserted during installation. Depending on the type of structure chosen, either wall or ceiling panels are inserted into the groove.
Installation of a ceiling made of plastic panels
Preparatory work
- Use a metal brush to remove all particles from the surface of the ceiling that do not adhere well, including old whitewash, paint, plaster (how to wash whitewash from the ceiling?).
- After mechanical cleaning, wiping with a damp cloth and removing any remaining dust and debris is required.
- If small cracks or chips are visible, they need to be filled with putty so that they do not increase over time and do not cause stains to fall off.
- After this work, the surface must be dried and treated with an antiseptic primer. Since a closed space will form between the ceiling and PVC plates, this will become an attractive environment for mold and mildew in damp rooms. Applying a primer will prevent the development of harmful microflora.
- In order not to be distracted during installation by searching for missing tools, available materials and materials, it is recommended to calculate the required quantity and assortment and purchase everything in advance.
Advice If you plan to lay insulating material, then it is necessary to make adjustments to the quantity calculations and to the ceiling markings, taking into account this layer.
Calculation of the quantity of materials
installation of ceilings made of plastic panels
- Determine the area of the ceiling: in rectangular rooms it is calculated as the multiplication of adjacent walls, in rooms with complex geometry - as the sum of different areas of simpler elements.
- A material of suitable length is selected: if the length of the room is 4.2 m, then a 6 m slab will be required, since the trimmings will look unaesthetic.
- To calculate the number of slabs, it is best to use graph paper or a checkered piece of paper, on which to plot the area of the room to scale, and then draw the appropriate number of panels in width along the long side.
- To determine the number of profiles for the frame, a more complex calculation will be required: on the same sheet as in the previous paragraph, corners are drawn parallel to each other in increments of 0.6 m. Then the length of all lines is summed up and divided by the standard length of the element.
- The number of dowels and self-tapping screws is calculated by the number of profiles and a pitch of 0.6 or 0.3 m.
- The ceiling plinth is applied along the perimeter of the room, which is calculated by twice the sum of the adjacent sides of the room.
All materials must be purchased approximately 10–15% more
Required materials and tools
- impact drill with medium and low speeds or screwdriver;
- construction level on alcohol capsules or laser;
- miter box;
- metal scissors;
- angle grinder;
- hacksaw;
- metal screws, dowels;
- metal clips, screws with a press washer, “liquid nails”;
- rag.
The materials you will need:
- the slabs themselves have a reserve;
- ceiling and wall frame profile;
- stringers with or without spokes, depending on the height of the ceiling covering from the ceilings;
- acrylic sealant for sealing joints between slabs.
Tip: To work at height, you will need a stepladder. You need to stock up on a rag to clean off traces of sealant, protective clothing, including goggles and a respirator.
Trimming and installing skirting boards
Now that we have a frame in front of us, and we have decided how we will position our plinth in relation to the ceiling elements, we need to trim the plinth for the corner connection. This is done like this:
- For proper joining, the plinth must be cut at a strictly defined angle. To maintain this angle, we use a miter box. A miter box is a plate with slots for a saw or knife, which make it possible to cut at the desired angle.
Cutting the plinth in a miter box
- For angles of 90 0, trimming is carried out in the easiest way: we place one piece of the ceiling plinth in a miter box and cut it at 45 0. We place the second piece in the miter box on the other side (without turning it over), and cut it at exactly the same angle, but in a different direction.
- If you need to join the plinth at a different angle, then it is better to first make a template from cardboard or unnecessary pieces of plinth.
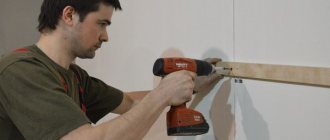
- We attach the trimmed skirting boards to the frame. To attach the plinth to the wooden slats of the frame, use a construction stapler or wood screws. If the frame is made of a metal profile, then the plinth is attached using metal screws (with a drill).
- It is also possible to install the plinth using liquid nails glue.
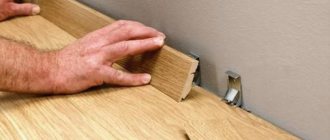
After installing the baseboard, plastic panels can be inserted into the tongue. In this case, you need to try not to damage the edges of the tongue - in some models of skirting boards the tongues are quite thin-walled.
Panels inserted into the baseboard tongue and groove
Based on materials from the site: https://potolokspec.ru
Home / Types of ceilings / Made from plastic panels / Why and how to attach ceiling plinth for PVC panels?
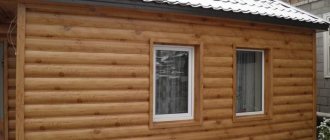
Very often, when it is necessary to quickly and inexpensively repair a ceiling, PVC panels are used.
This is an inexpensive and quite aesthetic option for finishing the ceiling. There is one caveat: if you mount the panels on a frame without special profiles, then an unsightly gap remains at the junction of the wall and the decorative canvas. To get rid of it, you can use a special ceiling plinth designed for PVC panels.
What are plastic panels for walls and ceilings, their advantages
To understand how to repair a ceiling made of plastic panels, it is recommended that you familiarize yourself with the strengths and weaknesses of this finishing material.
The composition of polymer products includes polyvinyl chloride, which is characterized by sufficient lightness, hardness and strength, which makes it possible to sheathe walls and ceilings in residential spaces, shopping centers, and offices.
A decorative image or design is placed on the outside of the panels using offset printing, thermal printing or lamination. To give a higher degree of strength, wear resistance, antistatic effect and resistance to sunlight, the surface is coated with matte or glossy varnish.
Manufacturers in the process of manufacturing finishing materials from polyvinyl chloride do not use phenol-formaldehyde resins, which have a negative impact on human health. For painting PVC panels, water-based paints are selected.
A variety of plastic finishes makes it possible to decorate bathrooms, toilets, bedrooms, hallways, and living rooms.
The positive characteristics of plastic products include:
Simplicity and speed of installation of PVC panels. Even an untrained person can install the sheathing and finish the room, especially if the base base does not have serious irregularities or cracks. Often installation work is carried out using liquid nails. If the surface needs to be leveled, then a metal or wooden structure is mounted - a frame, where the panels are fastened with self-tapping screws. During operation, the coating does not cause any particular difficulties, washes well, and is not afraid of wet cleaning. But in order not to spoil the appearance of the plastic panels, it is not recommended to use household chemicals; it is enough to prepare a soap solution. Environmentally safe for humans, does not emit toxic substances or harmful fumes. Good degree of strength.
Here it is important to make the right choice, use a denser coating for wall cladding, and a lightweight option is quite suitable for the ceiling surface. Sufficient level of heat and sound insulation. When decorating a room in this way, you can improve sound insulation parameters and retain heat. Wide range of color solutions
The traditional option is white panels, but there is also plastic with imitation of natural stone, wood or with patterns. Moisture resistance. Thanks to the smooth surface, the plastic does not retain moisture, and the absence of pores in the coating structure prevents pathogenic microorganisms from spreading. This quality of the panels determines their use in bathrooms Resistance to changes in temperature in the room Long service life of the coating, subject to proper installation and selection of high-quality material Relatively low price in contrast to metal panels
Among the negative characteristics are:
- Low level of resistance to ultraviolet rays, especially for white plastic, which over time loses its original appearance and turns yellow
- Low degree of impact resistance. With a slight load, traces of dents or deformation may remain on the coating. It is recommended to purchase panels from reputable manufacturers
- The presence of a specific odor. This drawback is felt during the first time after finishing the room. But after a few days it completely disappears
- In terms of environmental friendliness, plastic is inferior to natural materials, so it is not advisable to use it for decorating children's rooms.
Why is it needed and how is it used
The main task of this decorative element is to disguise the junction of the wall and the ceiling panel. However, it can also act as a fastener. Due to the fact that it has a special groove into which the edge of a piece of fabric is inserted, you can simultaneously secure the free edge and give the joint a beautiful look.
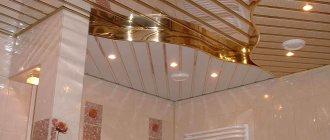
There are several types of ceiling fasteners, which can be called skirting boards or profiles - whichever is more convenient for you. They are similar in design and the differences concern only the appearance of the decorative edge. It can be with a pattern, gilded elements or simple, white.
The main advantage of using this part of the finish is the ability to leave a small gap between the wall and the covering fragments. It is necessary for possible deformations of the fragments that make up the canvas due to thermal expansion or movement of the walls during shrinkage of the house.
A special type of such fastener will be a collapsible version, which has a removable outer part. This type of fastener greatly facilitates the installation of ceilings made of PVC planks in general and makes the installation of the last plank, with which difficulties often arise, as simple as possible.
Installation and its features
It all starts traditionally - marking, then installing the frame.
Even at the marking stage, it is necessary to very carefully align the main installation points of the frame components and this plank in the same plane. This is necessary so that the ceiling subsequently turns out to be level. Therefore, sufficient time and attention must be given to marking and installing the frame base.
The next stage is trimming the joints of the parts in the corners. If you plan to use special connecting corners, then careful adjustment of all connections is not required - it is enough that all the segments fit into the corner connector and are tightly fixed there.
If you do not plan to use corner connecting strips in the corners, you will have to very accurately trim the corners of the joined parts. This can be done using a tool called a miter box. This tool allows you to cut parts at an exact 45 degree angle.
But this option is almost never suitable - the corners in our apartments rarely correspond to 90 degrees and in order to properly connect two sections, you will need to make a template according to which the trimming will be carried out.
If the question arises: how to attach the ceiling plinth, which is intended for PVC panels, to the wall or parts of the frame, then you can use any method that is more convenient. There are installation options using liquid nails; you can use a construction stapler if the fastening is to wooden parts, or the most traditional one - using dowels with self-tapping screws.
In the latter case, it is necessary to fasten it very carefully so as not to split the mounted section. To do this, it is better to first drill a small diameter hole in the place where the self-tapping screw is screwed in and through it, make the final fixation.
When all the sections are assembled, you can begin installing the strips themselves from which the decorative covering is assembled. This should be done very carefully so as not to damage the outer edge of the plinth. It can be quite fragile and can crack if handled carelessly.
"load...
Stretch ceilings » Components and accessories
conclusions
Plastic plinth has a number of advantages:
- Available in unlimited colors.
- During operation it does not require special care.
- Installation is easy even for a beginner.
- They don't rot.
- The material is not afraid of water, moisture and ultraviolet radiation.
- Service life more than 100 years.
- No additional preparation is required before installation.
- Flexibility and lightness allow for high-quality installation.
The plinth performs three main functions:
- Protective. Thanks to this solution, the walls are protected from moisture during cleaning.
- Decorative. The floor surface becomes decorated. In many cases more expressive. Emphases in this case are placed as desired. The leading elements can be the floor, the wall, or the baseboard itself, if it is a contrasting color.
- Leveling. Hides all defects and irregularities that formed during the repair process.
By attaching the ceiling and floor plinths in the living room, you can emphasize the completion of the repair work. If you want the installation to be carried out by a specialist, then in the online service you can easily find a large number of organizations that will help you in this matter. On the main page, the company's contacts will be at your service.
Did you manage to solve your problem using the recommendations from the article?
Yes!
46.83%
No. More answers required. I'll ask in the comments now.
37.24%
Partially. There are still questions. I'll write in the comments now.
15.94%
Voted: 709
PVC ceiling plinth 3m
No matter how carefully and diligently you carry out repair work, small irregularities and defects always remain.
Most often they are observed at the joints of different surfaces and materials. And here special decorative elements come to the rescue. Moreover, they are different for each case.
For example, the joints of PVC ceiling panels with walls are masked with ceiling plinths for plastic panels. They differ from their foam and plasterboard counterparts by the presence of a fastening lamella added along the entire length. It is with its help that such a plinth is attached to the ceiling and walls.
Before purchasing any finishing material, you need to calculate its required quantity. And it's very easy to do.
First, measure the length of all the walls in your room, not forgetting those with doors and windows.
Add up all the resulting values - this will be the perimeter of the room. The plastic ceiling fillet (this is also what this decorative element is called) usually has a length of 3 meters. Divide the resulting value by 3, round to the nearest higher multiple of three, and add one more - just in case.
This is exactly the amount of material you will need to close the joints. How to do this correctly?
Types of plastic panels
The building materials market offers a huge selection of plastic panels for interior decoration, which differ in size, color, and design features.
According to the area of application, PVC panels are divided into ceilings and walls. The material used for finishing ceilings is more fragile and lighter than the material used for finishing walls.
Therefore, ceilings made of PVC panels should be installed carefully so as not to accidentally damage them with sharp objects. Wall plastic is stronger and less flexible because it contains more PVC.
Based on the type of decorative layer, PVC panels are divided into matte and glossy. The surface of the matte canvas is without any coating, so they are cheaper than glossy ones. Glossy canvases are coated with special varnishes on top, which additionally protect the plastic from exposure to the sun and moisture, so it is much easier to care for them.
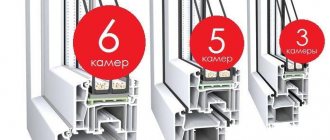
What are PVC panels
Plastic panels vary in size: width, height and thickness. Plastic panels with a width of 125 mm and 250 mm are most often used, since they are easier to install. Wider canvases are less flexible, so it is more difficult to assemble a suspended ceiling from them. The thickness of the panels for walls and ceilings is different. So, for the ceiling, the optimal choice would be panels with a thickness of 6 mm and 8 mm, and for walls - 10 mm and 12 mm. The standard length of PVC panels is 5.95 mm. Panels 3 m long are often sold on the building materials market, which means that they are cut into pieces.
Installation of skirting boards
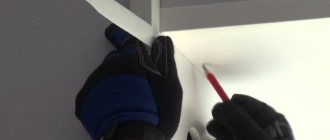
The purchased blanks need to be “cut” to the size of your room. The length of the walls is already known. Using these dimensions, using a miter box and a hacksaw, cut pieces of the required length with cuts at the desired angles.
There are two ways to secure the ceiling plinth for PVC panels:
- Just “hang” it on the edge of the ceiling surface. The remaining small gaps between the wall and the fillet can be filled with sealant of the appropriate color.
- Install a standard UD profile under the ceiling and attach a ceiling plinth to its lower part. In this case, gaps may also remain, not only under the fillet itself, but also under the profile. They need to be sealed using the same sealants.
Skirting on the ceiling
If for some reason none of these options suits you, then the plastic plinth for the ceiling can be installed directly on the wall under the ceiling using fasteners.
To do this, you need to make small holes in the extended wall under the pressure lamella with a drill.
It’s good if they turn out to be slightly smaller in diameter than the intended fasteners. Next, depending on the material from which the wall is made, parts for fastening are selected and the fillet is installed with their help. And only at the end a PVC panel is inserted into the groove.
This method is more reliable, accurate and, if performed successfully, gives a better aesthetic result.
But this requires one condition. The walls to which the plastic ceiling plinth will be attached must be as smooth as possible. Otherwise, the decorative element will only emphasize their curvature, and may also not withstand the bending stress and simply break.
In general, plastic fillets are the final touch in finishing your home, allowing you to give the renovation completeness and integrity.
Comments and reviews on the material
Decorative plugs
Another option for sealing joints is to use decorative caps for internal or external corners. Both types are usually sold at the same place where the baseboard itself is sold, and are often the most suitable in style and color. In the event that plastic and foam baseboards are used, corner and end caps are a necessary finishing detail.
Decorative caps in white
In gray
When using decorative corners on the ceiling plinth, the installation looks like this:
- The skirting boards are placed in place and cut. The accuracy of the fit does not matter; if desired, you can cut at a right angle.
- A cap is placed on the corner.
- All elements are mounted with glue, screws or secured in another suitable way.
- Seams that are too large are puttied or filled with sealant.