It is difficult to do without updating the ceiling surface when it comes to a complete renovation. And although worthy alternatives are a dime a dozen in the niche market, installing PVC panels on the ceiling is still one of the most popular options. Largely due to the ease and accessibility of the work itself, as well as the absence of serious requirements for the selection of available tools. How to install PVC panels on the ceiling with your own hands will be discussed in our detailed instruction article. All the necessary photo and video materials will help you.
- Selection of material
- What you will need for installation
- Tool preparation
- Preparing the base
- Marking
- Frame preparation
- Installation of plastic panels
- Conclusion
Selection of material
Direct installation of PVC panels on the ceiling surface is still like the moon, until you have decided on the color, texture and size of the material. Every hardware store will immediately offer you a wide range of plastic panels, so finding the right option for you requires effort. Nevertheless, here are some tips to help you avoid making mistakes with your purchase:
- for small rooms, select panels with a width of no more than 25 centimeters, for large ones - respectively, more than 25 centimeters;
- pay attention to the product specification: ceiling panels, despite their visual similarity, differ from wall panels in their lighter weight;
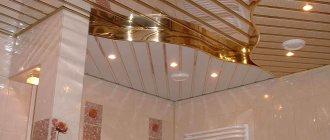
- ordinary white panels are most often used to decorate public and home bathrooms; for other options, it is best to choose colored or textured options - visually they can support even the most interesting and non-trivial interior;
- if the task is to visually enlarge a room that cannot boast of a decent area, the ideal choice would be panels with a glossy surface, which significantly work to create volume and depth;
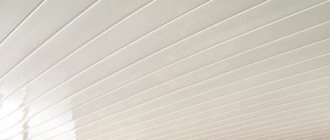
- choose panels with a hidden seam - this way your ceiling will look more monolithic, but if you are going to use a whole cascade of built-in lamps, then it is quite possible to buy material with a visible seam, the main thing is to fit it correctly into the interior composition.
Plastic ceiling finishing: main characteristics
The material used to manufacture such panels is polyvinyl chloride, as it has a high level of safety. In addition to the already noted production of plastic panels, material such as PVC is also used for the manufacture of certain types of dishes. Which adds another convincing argument in favor of such a design. First you need to figure out how to attach plastic panels to the ceiling.
It is also necessary to clearly distinguish between plastic panels for the ceiling and slabs for the walls. Ceiling panels are significantly lighter, which affects their mechanical strength, but allows them to be attached to the upper parts of the room without fear. So, if you attach wall panels to the ceiling, there is a risk that the adhesive mixtures will not provide good adhesion, and sooner or later such a panel will fall off. And if the ceiling panel is used on walls, then the risk of deformation of the surfaces from the slightest touch increases.
This type of ceiling is a type of suspended ceiling, since in this case a frame for the ceiling made of plastic is also installed, and the sheathing itself is mounted on it. Both wooden and metal slats can be used as guides. The material you can choose is inexpensive and simple, but it’s still worth purchasing high-quality materials that cost an order of magnitude more than usual. You can also purchase moldings or ceiling plinths to give a better look to the ceiling surface so that they look good, both in photos and in person (read: “How to install ceiling plinths for PVC panels - mounting instructions”).
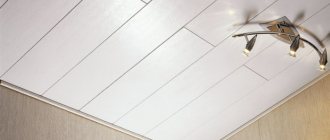
At the same time, covering the ceiling with plastic has certain features. Thus, the appearance is largely influenced by the type of panels used during installation. Glossy panels can significantly hide joints and seams, as the surface reflects light, which gives the entire structure even more originality. You can also purchase matte or patterned panels, but in this case there is a high risk of emphasizing the joints or seams.
What will be needed for installation?
Everything you need for installation is listed below in an easy-to-view list:
- self-tapping screws;
- anchor bolts;
- dowels;
- bars (for wooden frame);
- ceiling plinth;
- CD and UD profiles;
- "crab" type pendants.
Main types of panels
All types of commercially available panels can be classified according to several parameters.
Texture: glossy and matte.
By dyeing method:
- Plain, with increased UV resistance;
- Lacquered - in this way a glossy surface is created. A significant drawback is that the thinnest film of varnish is destroyed by any mechanical impact, resulting in a visible scratch;
- Laminated to look like natural materials. The main problem with such a ceiling is ultraviolet radiation. When exposed to sunlight, the laminate very soon begins to peel off;
- Mirror - a special film applied to the panel allows you to reflect up to 90% of the light. Such ceilings are installed in restaurants, large shopping centers, swimming pools, etc.;
- With printed design;
- With thermal printing, allowing you to diversify the color range of images.
By installation method:
- with visible seam;
- seamless.
The sizes of PVC panels can be:
- length - 270 cm, 300 cm, 400 cm, 600 cm;
- width - 10 cm, 20 cm, 25 cm;
- thickness - 10 mm.
Tool preparation
Check if you have all the necessary tools at hand. So, you will need:
- roulette;
- pencil, marker;
- level;
- painting cord;
- corner;
- metal scissors;
- jigsaw;
- hammer drill (drill);
- screwdriver
Harpoon technology for installing PVC stretch ceilings
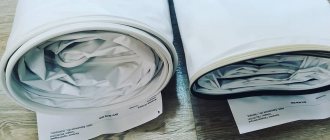
Another technology by which PVC suspended ceilings are installed is harpoon technology. Harpoon technology is used for the installation of imported PVC stretch ceilings. Stretch ceilings after harpoon installation technology are a sealed structure where the PVC sheet is stretched onto special fastenings - baguettes, using fastenings - harpoons (2) (see picture). Fastening and tensioning of the fabric occurs in a preheated room.
harpoon system
For all installation technologies, the PVC sheet must be completely adjusted to the size of the room. The fabrics must be welded under stationary conditions. Holes must be made for the lamps.
Marking
- use a level to determine the lowest point of the ceiling base;
- step back 5 cm and mark a point that will serve as the level of your future ceiling;
- use a paint cord or hydraulic level to draw a line along the entire perimeter of the premises;
- Your markings for making a frame for PVC panels are ready.
Base
The installation of the frame begins.
The profile around the perimeter of the room will be installed first. It should be positioned strictly horizontally and adjacent to the wall as tightly as possible. A plastic profile is attached to it, which will simultaneously serve as a fastening element and mask the junction of the wall and the ceiling sheet.
When all the parts are secured around the perimeter of the room, you can begin installing the transverse components of the frame.
Depending on the complexity of the design, hangers may be needed. They are mounted on the floor plane at the rate of one hanger for every 60 centimeters of the profile. From the wall, the distance to the first element is about 30 centimeters.
Frame preparation
The frame for subsequent installation of PVC panels can be made of wooden blocks, plastic or metal profiles. The decision on this issue is made only by you, but one cannot help but cancel the generally accepted fact: in rooms with high humidity it is best to use metal profiles (read more about the technology for installing ceilings from PVC panels in the bathroom), which are not as afraid of the influence of moisture as ordinary bars .
Frame made of wooden blocks
It will cost you about half the price of a metal one, and it will be assembled a little faster. True, you need to select beams with a cross-section of at least 3 by 3 cm.
A nuance that you need to pay attention to: the price of perfectly smooth bars is equal to the price of finished metal profiles.
How much do you estimate your time spent perfecting crooked beams?
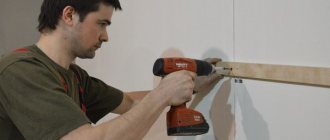
However, if you have successfully dealt with the uneven bars, then your next step is to fix them on the ceiling using self-tapping screws. Maintain a step of 60 cm
, and if you want to bring the plane perfectly level, then prudently drive in the outer planks and pull nylon cords from them to the center and along the edges.
Already in accordance with the stretched cords, drive in the remaining beams in a similar way, observing the minimum required step of 50 cm
.
Lathing made of plastic U-shaped profiles
will cost you about the same amount as a metal one, but it is far from universal: if later you want to change the PVC panels to some other material, you will have to prepare the frame again.
This is what it looks like in the picture.
But this is how it is in reality.
The principle of fastening to the base is the same as that of a frame on wooden beams, with the only difference being that the fixation should be done using fastening screws through pre-mounted wedges. The advantage of this option is the amazing convenience of direct installation of PVC panels, which are easily driven into the groove. Well, we have already mentioned the disadvantages above.
The most common option for making a frame is from metal profiles
.
We won't reveal anything new to you here:
- the longitudinal CD profile is inserted into opposite grooves of the UD guide profile;
- using crab-type hangers, the longitudinal CD profile is additionally secured to the ceiling with anchor bolts;
- step for installing hangers - from 60 to 80 centimeters;
- the step for fixing the profiles is 50-60 centimeters.
Advantages of using plastic products
Those who have installed a suspended ceiling made of PVC panels on their own note such distinctive features as:
- Durability;
- Good ductility and sound insulation;
- Protection from fading in the sun and from moisture;
- Easy to clean;
- Environmentally friendly;
- Effectively hides ceiling unevenness;
- Allows you to discreetly place electrical wiring under the lighting elements.
Designers recommend choosing PVC panels in colors so that they do not irritate the eyes. Calm tones visually increase the volume of the room.
Installation of plastic panels
- We attach the ceiling plinth with a mounting groove to the frame around the entire perimeter using self-tapping screws;
- we insert the first panel with a tenon inside the starting profile and fix it on the guide bar with a self-tapping screw, bracket or clamp - depending on what type of structure you have chosen;
- the installation of the next panel does not bring anything new: it is inserted with a tenon into the groove of the previous one, pressed against the guides and fixed at the back;
- the last panel is the most difficult, and in order to install it accurately, you need to cut it to length and then cut it to width in accordance with your measurements, and then carry out direct installation;
- in the case when the last panel is not included, it is always easy to get rid of excess material using a stationery knife.
If you follow all the steps scrupulously, the installation of PVC panels on the ceiling surface will be easy and flawless. Here's what it all looks like in the video:
But this is what may well happen to you during installation.
Features of caring for ceiling panels
We figured out how to make a ceiling from PVC panels, but in order for it to maintain its ideal appearance and be in good condition for as long as possible, you need to follow a few simple care rules:
- The surface must be wiped at least once a month with a damp cloth to remove settled dust and other contaminants;
- If more complex stains such as limescale appear on the plastic, then when washing, use any standard bath detergent. You can only use compounds without abrasive particles, so as not to damage the surface or make it dull;
- It is very convenient to use special foam mops; with their help the process will go much faster;
If you have such a mop, you can wash the ceiling while standing on the floor
- For more difficult stains, use special cleaning compounds for plastic, they are sold in hardware stores.
- Finally, if the surface begins to lose its shine, then wipe it with a solution of ammonia, dampen a rag and treat the entire surface. This method is very effective, but it will not help if the plastic has become dull due to numerous scratches.
Following simple rules of care will allow you to maintain an ideal appearance for decades.
Fastening
How to attach MDF to the ceiling?
The main nuance when performing work is the possible fastening of the ceiling panels not only at a right angle, but also at 45 degrees.
Fastening MDF panels occurs in several stages:
- After installing the frame, you should mark the places where fastenings for self-tapping screws will be installed. This should be done by first applying the panel and measuring, marking the required distance with a pencil;
- It’s most convenient to place all the fasteners on the frame slats in advance so as not to be distracted. Special clamps for fixing MDF panels are very convenient and invisible;
Kleimers
- how to attach mdf panel to ceiling? To do this, you can use self-tapping screws if the sheathing is made of wood. For a metal frame, special clamps are used. The panels are also designed to fit together comfortably, like a puzzle. This is another plus;
- how to attach MDF sheets to the ceiling? here . Since the ceiling will be assembled from parts, the seams are masked with special decorative panels. It is better not to glue the MDF ceiling with glue, but you can additionally fix the attachment points if the frame is wooden.
When installing the panels, do not forget about the lighting fixtures; it is advisable to carry them out and partially install them during the installation of the MDF panels. You can finally connect them after the work is completed.
Which glue to choose for PVC panels
If the installation technology is followed, the cladding is installed quickly and easily. The correct adhesive for panels will be a composition that meets the following requirements:
- transparency after drying;
- high quality gluing;
- resistance to changes in temperature and humidity levels;
- insensitivity to alkali, direct exposure to light;
- durability;
- fast setting;
- no unpleasant odor.
Manufacturers offer various options for mixtures, for example, “liquid nails”, which are applied with a hot-melt gun. The following compounds received good recommendations: Moment-Montazh, Titan, polyurethane sealant - all adhesive mixtures do not expand after drying. For lamellas with different colors, Kleiberit 636 and Moment Crystal brands are suitable - the compositions are of high quality, do not contain harmful components and, after drying, do not show through the cladding.
How to properly attach lining to the ceiling and finishing video
Advice! When using liquid nails, the composition should be selected taking into account the thickness of the lamellas. There are mixtures for thin cladding elements with a normal level of fixation and for thick panels with enhanced fixation. Using the second version of adhesive for thin panels, the user will experience swelling of the coating.
Types of liquid nails for PVC panels:
- Composition 601 – pot life 10 minutes, suitable for interior finishing work with different types of materials.
- Composition 901 is universal, adheres well to concrete, plastic, iron, and wood. Suitable for external and internal work, firmly holds heavy format structures. Viability 8-12 minutes.
- Composition 915 has a high level of moisture resistance and is suitable for use in bathrooms and showers. There are no harmful components in the composition, so liquid nails 915 are considered an environmentally friendly product. Potlife 8 minutes.
When can PVC panels be glued to the ceiling?
Fastening plastic panels to the ceiling without lathing can be done in the following cases:
- This cladding can be glued to flat concrete bases in residential premises and places with high humidity.
- Plastic boards are glued to a flat wooden ceiling, provided that the base is properly prepared and the appropriate adhesive mixture is selected.
- If the ceiling is leveled with plasterboard sheets, then after filling the seams and priming the surface, the plastic trim is glued to the ceiling surface without the use of lathing.
- You can also glue a polyvinyl chloride cladding to a smooth plastered surface. At the preliminary stage, such a surface is primed with a deep penetration mixture.
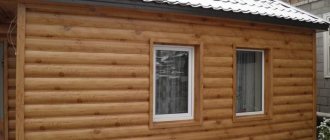
As for the places where plastic finishing is used, such ceiling cladding is used in bathrooms, toilets, kitchens, corridors or hallways, on loggias or balconies.
Important! Fastening PVC panels to the ceiling using the adhesive method is only possible on a solid, level base. The coating will not adhere well to a loose, dusty, uneven and fragile base and may come off over time.