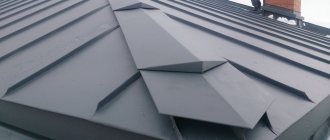
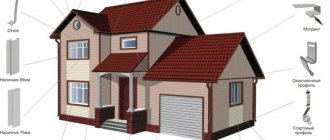
Any, even the simplest roof, requires the use of special elements that form its joints, kinks, junctions of slopes and areas adjacent to walls and gables.
Additional elements made from the same materials that make up the main elements of the roof are its constituent parts, giving it functionality, reliability, durability and a complete attractive appearance.
They protect the roof from the aggressive effects of external factors, atmospheric and natural phenomena, protect against the penetration of foreign debris and dirt, and also perform a waterproofing function in the interior and under-roof areas.
Additional elements additionally beautifully decorate the overall appearance of the roof, improving the joints, kinks and areas where it adjoins the walls. And they are installed in a similar way to installing sheet materials.
There are many basic additional elements. Junction strips, ridges, aerators, valleys - they are all necessary in their own way and perform an important function in the arrangement of the roof. Next, we will look at how to properly install the eaves strip on the roof.
The eaves strip for the roof is a typical representative of additional elements.
It is an important longitudinal component in the roof structure. In addition to the decoration function, it protects the integrity of the roof itself and protects it from damage. The eaves strip is installed after the sheathing on the rafter structure is ready and waterproofing material is placed under it.
- It protects the frontal board of the cornice from getting wet during precipitation;
- Prevents moisture from entering under the roof and into the interior;
- Gives a complete attractive look to the entire structure;
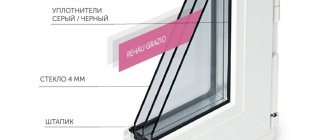
Sectional diagram
Design and principle of operation
Cornice strips form a metal protective edge with an anti-corrosion coating that protects the front or cornice boards from moisture.
Looking at the roof first, it may seem that this longitudinal element is brought under the edges of the roofing. In fact, its installation is carried out even before laying the metal tiles or corrugated sheets. Only after it has been strengthened on the frontal or cornice board will it be possible to begin laying facing materials.
Usually, made from the same material as the cladding, it is painted in a color similar to it and protects not only the eaves or front board from getting wet, but also prevents water from entering the under-roof space itself.
Cornice device
Let's sum it up
The eaves strip is an additional element that is installed on the roof eaves immediately before installing the main covering. It protects the eaves from blowing snow and rain, as well as from the wind. In addition, it is needed to drain condensate from the inside of the roof covering, additionally fasten the lining of a soft roof and simply design the overhang.
For all types of roofing, except ondulin, metal eaves strips are best suited. For copper and aluminum roofs, additional elements made of copper and aluminum are needed, respectively, and for steel roofs, eaves strips made of galvanized metal with a polymer coating are needed. The best price-quality ratio is available for planks with a galvanized density of 200-220 g/m2, which are covered with a protective layer of matte polyester.
Drip rail and cornice strip - what are the differences?
Many people mistakenly believe that the cornice strip and the drip edge are the same thing.
In reality, they are two different bars that perform two different functions.
- The eaves strip protects the front eaves board from getting wet, and the drip line is used to remove water, namely condensation from the waterproofing, from the most important elements of the roof structure into the gutter or directly to the ground. It is especially important in autumn and spring with high humidity and frequent rain;
- The drip cap protects the facade of the house from the formation of fungus, mold and leaching of the building mixture from the brickwork, as well as from rotting wood, while the eaves strip protects the roof itself;
- The drip cap strengthens the roof and protects it from air masses, and the eaves strip protects it from aggressive external influences;
Varieties of drip
According to their design features, roof drip pipes are:
- Cornice. Protects the ends and is fixed along the edge of the roof overhang. Made from steel. Visually similar to window tides, but they have more waves. The first bend removes precipitation from the roofing surface, the second bends it into the gutter of the drainage structure or directly into the ground - in the absence of an organized drain.
- Pedimental. This is a dropper for flexible tiles. Mounted on the sides of the gables on the edge of the roof. It has a T-shape, due to which it protects the pediment from sedimentary waters. Features: three stiffening ribs.
Cornice strip: dimensions
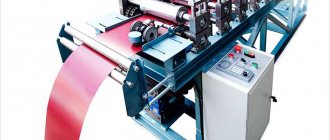
The strips protecting the roof are made of galvanized steel profiles. Manufacturers use the same thin sheets of steel for their production, the thickness of which varies from 0.4 to 0.5 mm, as for the production of metal tiles.
They are covered with the same polymer materials, for example polyester or plastisol, which, in turn, are covered with metal tiles. When using composite metal tiles, the planks are covered with basalt chips. The approximate length of the element is vaped within 50-60 cm.
Because the plank is, as it were, “planted” on the base of the roof, the required footage is collected from its individual parts.
Using the tool
When working with a screwdriver, you should not drive the screws at high speeds; it would be more correct to work at the very minimum. If necessary, it is better to weaken the torque, otherwise the view from the side of the end plate will not be very attractive, since it will begin to resemble sea waves. The fastening process will inevitably be accompanied by scratches. They are best painted over with spray paint. Otherwise, the metal will begin to experience corrosion processes as early as next year. There is only one difficulty - to guess the shade as accurately as possible. Otherwise, the painted areas will look very strange.
Installation of cornice strips
Installation of additional elements attached to the cornice is carried out on an already prepared front board, which is nailed with galvanized steel nails to the end parts of the rafter system. If the front board is level, attaching the plank will be much easier.
Installation of cornice strips is carried out in the following order:
- The frontal area of the roof base is hemmed with tongue and groove boards. You can use siding or corrugated sheets for these purposes;
- Then a support beam is installed on the wall of the house, which serves as a safety support when filing the eaves overhang;
- Right before finishing the cornice, the drainage system is equipped with brackets or hooks, attaching them to the rafters or to the cornice board. In them, further, the gutters of the drainage system will be folded. If the distance between the rafters is the same, it is better to attach hooks to them;
- Lower the first hook or bracket below the continuation of the slope line by 2 cm in order to ensure that water from the roof is guaranteed to enter the gutter.
- Next comes the turn of fixing the cornice strip over the gutter fastenings to the front board. It is nailed down with screw spacing of at least 30-35 cm in a checkerboard pattern.
- The planks cannot be attached end-to-end or with gaps between them. Each subsequent plank should overlap, namely, overlap the already fixed element by about 1 cm. The last plank is adjusted to size by a neat cut.
- Having completed the installation, you can begin cladding the roof with metal tiles or corrugated sheets. And after finishing laying the roofing materials, you should start installing other additional roof elements.
Photo of installation of cornice strips
Attaching the cornice
Installation of PVC holders for drains
If the design plan includes a fascia, the installation of a drainage system can be done at any stage of the roof's construction.
Please note that only plastic fasteners for the drainage system are attached to such an element, and not metal ones. If the roof is completely ready, use short hook holders
The fact is that when it rains and melts snow there will be a large load, so you should choose a board of appropriate thickness.
Step by step installation
The installation is as follows:
First you need to draw a clear cutting line for the rafter legs. Then check the verticality of the cut using a plumb line. Attach a strip to the end of the rafters, with the top edge being at the level of the starting board of the sheathing. Check the accuracy of installation with twine
It is important that you are absolutely sure that the boards are mounted evenly, otherwise the gutter line will also be uneven. After this, between the front board and the horizontal beam you need to stuff a sheathing to which the filing will be attached - this can be lining, siding, profiled sheet And so on
The main thing is that you do not forget about the installation of ventilation gaps and in the place of probable penetration under the roof you can provide good protection from birds
After this, between the front board and the horizontal beam, you need to fill the sheathing, to which the filing will be attached - this can be lining, siding, profiled sheet, etc. The main thing is that you do not forget about the installation of ventilation gaps and in the place of probable penetration under the roof you can provide good protection from birds.
Wood protection
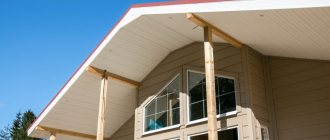
An eternal problem for this part of the roof is that wooden parts are short-lived due to constant high humidity, even with good treatment with fire retardants and antiseptics. In order to prevent moisture from getting on the front board, protect it with a special “apron” made of metal. If the roofing is metal tiles, then the front board will be protected from getting wet by a cornice strip - it can be installed after installing the hooks.
Cornice/front drip strip
This element of a metal tile roof has a specific purpose, and it cannot be excluded from the coating without permission. The eaves strip plays an important role with metal tiles. Although the total area of the elements is not that large, they help ensure the integrity and protection of the entire roof covering.
The eaves strip itself, as a final element, protects load-bearing wooden structures from moisture and wind loads.
All elements must be installed as indicated on the technological map. If the eaves strip is missing, this can lead to moisture getting under the roofs and dampness will appear on the walls of the building. The wooden elements of the roof may also begin to rot. There are two types of cornice strips - frontal and cornice drip.
The front strip helps protect the front board from moisture and provides additional support for the drain clamps. It is fastened before installing the cornice strip using self-tapping screws, keeping a step of 40 cm and making an overlap of at least 5 cm. The dimensions of the strips can be standard or made to order.
Additional elements
We invite you to familiarize yourself with other types of additional roofing elements:
- Skates are used as a decorative component to mask the joints of roof cladding with corrugated sheeting. They protect the ventilation gap of the under-roof space and joints from seepage and water retention;
- The end strip protects sheets of metal tiles or corrugated sheets, covering them at the ends from strong winds, the penetration of water under the roof in the area where the roof adjoins the gables, and also prevents insects or birds from entering under the roof;
- The wall strip is used in areas adjacent to walls or other vertical planes.
- The straight wall protects the joint without grooves with additional sealing;
- The wall bottom is attached under the facing material, metal tiles or corrugated sheets in the area of attachment to the wall or to another surface located vertically. At one edge of the additional element there is a fold that prevents the drainage water from overflowing over the edge.
- The upper valley directs water flowing from the roof, mainly performing a decorative role of masking the internal areas of the joint of sheets of roofing material.
- Bottom valley is an element used in areas where negative angles meet. It protects the junction of sheets of metal tiles or corrugated sheets from water seeping under the roof;
- Flashings are an element designed to protect the joints of windows and walls of a building from water penetration;
- Junction strips are used on various roof breaks. They protect the joint from the penetration of water under the roof space;
- Snow support strips protect against unexpected avalanche-like descent of snow masses, as well as unintentional falls of roof components;
- Internal and external corners are decorative elements used to mask the joints of the internal and external corners of the roof cladding material;
- A ridge aerator is a product used to get rid of excess moisture in the area under the roof;
- The ridge cap is an important component that prevents dirt and moisture from getting under the roof.
Connection panels
Cornice abutment strips are installed at the junction of the metal tiles with the external structures of the building. These include building walls, ventilation ducts, dormer and roof windows. Serve to perform drainage function.
When joining to brick structures, the material is chipped. A joint line is marked along the surface of the element. Using a grinder, a channel is made in the brick. The depth of the channel is 3-5 mm.
Attention! Chipping of brickwork is carried out only brick by brick. Gating of material along mortar joints is not allowed.
To clean brick dust, the channel is washed with water. To do this, use special sprayers or plastic bottles with a hole in the cork.
Junction of metal tiles to the wall
Waterproofing material is glued to the protected surface. An abutment strip is placed on top of the waterproofing. The upper edge of the apron is inserted into the groove. The lower part is fixed to the sheathing through metal tiles. The overlap of the panels is 5-10 cm.
When joining to wooden surfaces, the panel is secured with screws or nails. Fastening to a brick surface is carried out through pre-drilled holes. Plastic dowels are used to install self-tapping screws. The fastener installation step is from 25 to 35 cm.
The junction of the planks with the surface is sealed with sealant.
Useful video
Do-it-yourself installation of the eaves strip in the video below:
2017-02-10
Country expert
When arranging a metal tile roofing, the eaves strip for metal tiles, along with the end strip, play a significant role. And although these elements occupy a completely insignificant part of the entire area of the roofing carpet, they carry an important function in protecting and preserving the integrity of the roof.
Let us describe what such structural elements are and how they can be mounted.
End strip for metal tiles
What types of wind slats are there?
The wind strip is one of the units used when laying metal tiles. This is a plastic or galvanized corner designed to protect and decorate the roof.
There are the following types of end strips for roofing:
- Cornice . This strip is mounted on the front board, and is intended to protect metal tiles from cold air and water.
- End _ Installing an end strip on a metal tile is necessary to protect the end parts of the roof from wind and moisture. The difference between the end strip and the cornice strip is only in the installation location.
It is worth noting that the wind strip has two shelves for fastening, and the wider they are, the better it protects the roof from moisture and wind. Installation of a wind strip on an end-type metal tile is often carried out together with a seal, which duplicates the shape of the coating in the form of a wave.
Features and purpose of the end and cornice strips
Each of these strips is manufactured using a similar technology as the metal tile sheet from which the roofing deck is formed.
The strips are made from a metal profile, which in turn consists of passivated and galvanized steel 0.4-0.5 mm thick.
The profile is also subject to subsequent coating with a polymer protective layer - this coating can be polyester or plastisol, and as for composite-type metal tiles, a basalt-tiny coating is used in its manufacture.
If we talk about the functional load carried by the elements in question, it consists of the following:
- The cornice strip is an oblong element consisting of a material similar to the rest of the covering. The main function of the eaves strip is to protect the front eaves board from moisture when exposed to precipitation and, as a result, to protect the entire space under the roof from moisture.
- Metal tiles: the end strip forms a protective side edge between the ridge and the roof eaves
The end strip for metal tiles, in turn, has an identical design as the eaves, but unlike the second one, it must be fastened on the side ends of the roof slopes, and not in the eaves part. By overlapping the end, the end strip has a dual function:
- Protects the sheathing from getting wet.
- Protects the roofing deck from wind loads (prevents roofs from being torn off by strong gusts of wind).
As a result of the latter, the end strip received its second name - wind strip for metal tiles.
Tips and tricks
Most mistakes are made at the stage of laying the vapor barrier sheet and installing the drip line. Usually, they try not to place the canvas on the drip bar, but to lift it and lay it at the level of the metal eaves trim. In this case, the drip system remains dry, and most of the condensate drains and collects in a puddle under the metal sheet of the roof, since water is not able to overcome the rise through the additional wooden beam.
The idea of draining condensation into a gutter is good, but it only works in dry and hot climates. In severe frosts, such a drainage system for the eaves overhang does not work properly, and the accumulated water condensation will sooner or later penetrate into the thickness of the insulation, and the eaves overhang will gradually sag under its own weight. In this case, you have to open the waterproofing and drain the condensate through the soffits.
The second common mistake is installing vapor barriers without adhesive tape. Subsequently, the canvas either moves to the lower end of the rafters, or sags and exposes the edge of the insulation for condensed water vapor. If there is no tape, the canvas can be glued with any waterproof glue or sealant. It is clear that the waterproofing sheet must be laid on slats with a margin of 50-60 mm on each side. This is necessary to compensate for sagging and deformation of the material.
Installation of cornice strips
Installation of eaves strips on metal roofing is carried out in accordance with the following rules:
- They start with the installation of a frontal board, which is attached to the ends of the rafter legs using galvanized nails. A replacement for the windshield can be a cornice board attached to special rafter grooves.
Advice!
In addition, the simultaneous installation of both types of boards is practiced, which makes it possible to strengthen this roofing assembly.
- After this, the cornice must be hemmed using corrugated sheets or tongue and groove boards. At the same time, a support beam is attached to the wall of the building, which will serve as a second support for filing the roof eaves.
- Before installing the eaves strip, attach the brackets for installing the gutter. They can be mounted either on the eaves board or directly on the rafters.
- Then a cornice strip is installed, the installation of which must precede the installation of metal tiles. The plank is installed tensioned over the drainage brackets and secured with self-tapping screws to the cornice and/or front board. The distance between the screws is assumed to be around 30-35 mm.
Attaching the cornice strip
Advice!
When extending the cornice strip, you should ensure an overlap of no more than 100 mm. End plate device.
At the end of laying the roofing carpet, the main material of which is metal tiles, the end strip is mounted in order to cover the ends of the metal tile roof with your own hands.
The end plate is installed as follows:
- It is installed at a wave height of the metal tile above relative to the level of the sheathing. In this case, the corner of the roof end must be completely covered.
- Fasten the end strip on top and sides with self-tapping screws. The upper screws secure the strip to the crests of the metal tile waves.
- The overlap when extending the planks is allowed to be up to 50 mm.
- The joint between the roofing and the strip must be carefully sealed.
If, when forming the roofing deck, you correctly installed both the decking itself and the pair of eaves + end strips, the metal tiles will probably serve for a very long time. Protection of the under-roofing components of the roofing pie under metal tiles with slats plays a significant role in this.
Laying metal tiles with your own hands is a completely doable task. However, this will require desire and detailed instructions for action.
To achieve high-quality roofing, you will need to study many different subtleties, which we will share with you in this article.
Installation of metal tiles
Types and technical characteristics
According to building codes, when constructing a roof made of corrugated sheets or tiles, wind slats must be fastened. They are installed along the entire perimeter of the roof structure to prevent precipitation and gusts of wind from entering the rafter frame and sheathing. The following types of these shaped elements are distinguished:
- Front (end) strip. It is a corner, one of the mounting flanges of which is straight, and the other follows the wavy relief of the corrugated sheet. The gable strip is attached to the roof overhangs located on the gable side of the structure. This element, necessary to protect the rafters from moisture, covers 1-2 waves of corrugated board, and also completely covers the end board. Some models are equipped with a capinos for water drainage.
- Cornice strip. The eaves strip is mounted on the roof sheathing along the overhang before laying the roofing material and installing the drain. It is a corner made of galvanized steel with a polymer coating with straight, even fastening shelves.
- Ridge bar. To waterproof and protect the joint between the corrugated sheets at the junction of the slopes, a ridge strip is used. It can be straight, oval, rectangular. Models with a ventilation gap are also available to improve air circulation in the roofing pie.
Wind shaped elements for corrugated sheeting have a standard length of 200 cm, however, the useful length of the planks is only 190-195 cm, since they are installed with a gap of 50-100 mm. Manufacturers produce models with dimensions of 40x60 mm and 90x150 mm.
Important! Experienced roofers recommend attaching a narrow wind strip measuring 40x60 mm on flat roofs, as well as in regions with low wind load. Wide plank suitable for pitched structures with any slope
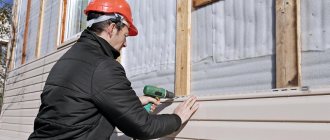
You can install a wind strip on a corrugated roof with your own hands, since the installation of this shaped element does not require special construction experience or specialized tools. To do this, you will need roofing screws with a rubber seal at the rate of 5-6 pieces per plank, a screwdriver, sealant and a hacksaw for cutting. The order in which the elements are fastened depends on the installation location:
- Installation of cornice strips. On the eaves of the roof, the wind strip is installed before the roof covering, before installing the drain. It is screwed with self-tapping screws in increments of 40 cm, starting from the edge, with an overlap of 50-100 mm. During fastening, the waterproofing film that covers the sheathing is lifted and laid on top of the plank. High-quality installation means that the wind curtain element will be pressed against the inner surface of the gutter, preventing any penetration of moisture from the slope to the rafters. Sometimes this requires strips made to individual sizes.
Note! To additionally insulate the joints between the roofing material and the wind slats, use special sealants, silicone sealant or construction tape. According to reviews from craftsmen, the most effective is a special seal that follows the profile profile of the corrugated sheet, since it has no restrictions on service life
Calculating the required amount of material
Everyone has their own methods of laying metal tiles, but we will present you, in our opinion, the most optimal of them.
Before starting the installation of metal tiles, you will need to calculate the required amount of material for roofing work.
The number of tile sheets is determined as follows:
- Count the number of rows of installation of metal tile sheets. To do this, divide the horizontal length of the slope (maximum) by the useful part of the sheet width. The result is rounded up.
- To calculate the number of sheets in a row, the width of the slope is divided by the length of the tile sheet without taking into account the overlap of 15 cm.
For installing a metal tile roof, it is recommended to use sheets measuring 4-4.5 m, but in general their length ranges from 0.7 to 8 m.
In addition, the main method of laying metal tiles involves the use of additional elements, heat and waterproofing materials.
How to calculate them:
- Additional elements, as a rule, have a standard length of 2 m. The calculation is carried out by measuring all sides of the slopes on which they are planned to be laid.
- Next, the resulting amount is divided by 1.9 (10 cm is left for overlaps) and rounded up.
- For the case with lower valleys, the result is divided by 1.7.
To find out the number of screws required for attaching sheets, the total roof area is multiplied by 8 and the additional amount required to attach additional elements is added.
“Metal tiles: installation technology involves the use of self-tapping screws for fastening material of various colors in accordance with the color of the coating”
Regarding waterproofing, it is supplied in rolls of 75 square meters. One of them can cover 65 sq.m., and the rest will be used for overlaps. In other words, the total roof area is divided by 65 and rounding the result up, the required number of rolls is obtained.
Construction of a rafter system for metal tiles, fastening of eaves and front boards.
The technique of laying metal tiles will also require a certain structure of the roof truss structure.
Under the metal tile roofing, rafters with a cross section of 100*50 or 150*50 mm are installed. The step between them is 60-90 cm.
They are made from wood with a moisture content of no more than 22%. Before installation, the beams are treated with an antiseptic composition. The roof slope should not be less than 14 degrees.
Next, special grooves are cut into the rafters for laying cornice boards in them, which gives rigidity to the structure.
Grooves are needed to maintain the height of the rafter system. If long gutter hooks are used, special grooves for the hooks are cut out in the cornice board; if short, they are attached directly to the front board. The front board is designed to perform a protective and reinforcing function and is attached to the ends of the rafters.
“Laying technology: metal tiles are installed in accordance with the following scheme”
Wind strip for corrugated sheeting: purposes and characteristics
The installation of a metal roof requires the use of wind strips for corrugated sheets. Their main purpose is to protect against moisture in the form of rain and snow under the side parts of the slope. In addition, its use gives the roof a finished look. How is installation carried out? What types of these products are used when installing corrugated sheets with your own hands?
What is a wind bar for?
Installing a wind strip gives the roof a finished and beautiful look, but it is necessary to install it not only for this reason. It helps protect the roof from moisture and gusts of wind, and also makes it possible to install soffits.
- Protects from wind. A side wind, especially in unfavorable climatic areas, can, if not tear off, then at least break the edges of metal tiles. The wind bar reduces the intensity of the impact. It also protects against wind penetration under the sheathing.
- Protects against moisture. The service life of a roofing pie largely depends on the protection of its wooden parts from moisture. The plank creates an obstacle for snow and rain to get under the sheathing
- Helps complete finishing work. It is the wind strip that provides the ideal connection to the soffits or chamfer (siding)
According to its purpose, it is divided into several varieties.
Main varieties
The plank must protect all ends of the roof along the perimeter. For this purpose, various types of such products are used. Namely:
- Front, end. Protects against lateral ingress of precipitation under the roof slope
- Cornice. Installed on the edges of the roof slope, in front of the gutters
- Skate. Closes the gap at the junction between two roof slopes
There are also differences regarding the material used in production. For metal tiles and corrugated sheets, a metal strip with different lifting heights is used (selected according to the wave height); for composite tiles, products with identical coating are installed. Galvanization can also be used as an addition.
Width, height and more
The calculation of the wind strip can be done using its standard dimensions. Typical products have the following characteristics:
- The product is produced in a standard total length of 2 m. The calculation must be made taking into account the usable area of the product. Effective length is 1.9 m
- Width may vary. Therefore, it is chosen depending on existing needs. Standard sizes 90*150 mm and 40*60 mm
A narrow strip is intended for flat roofs (for example, for a garage roof made of corrugated sheets), which have virtually no waves. For metal tiles, a wide relief end is mainly used.
Before you begin laying the corrugated board and attaching the wind strip, you need to pay attention to the sheathing. Lathing under corrugated sheeting is important for the durability of the roof
With the correct calculation of the distance between the beams, the load on the sheet will be distributed evenly, it will not deform during snowfalls and other impacts.
The sheathing pitch depends on the type of corrugated sheeting. For example, for C20 corrugated sheeting, the sheathing must be continuous. Read about the technical characteristics of C20 corrugated sheets here. This type of material is used not only for roofing, but also for wall cladding.
Wind bar fastening diagram
Price of wind strip for corrugated sheeting
Depending on the intended purpose and width, the price of a wind strip for corrugated sheeting may vary.
- Narrow end straight 140-160 RUR
- Wide end 300 RUR
Of course, this cost is approximate and may change. So, if you purchase metal tiles and component materials from Finnish manufacturers, this cost can increase by about a third.
The technological process of arranging a roof includes the installation of a wind board and strips. This product effectively protects against rain and snow, is easy to install and has an affordable price.
Lathing for metal tiles
When installing metal tiles, ventilation is provided under the roofing sheets. To do this, the lathing is placed on a 50 mm thick counter batten, which is attached to the rafters over the waterproofing along their entire length. Due to the fact that the lower beam of the sheathing will be located under the upper step of the metal tile, its cross-section is made large to the height of the wave.
The laying of this block is carried out parallel to the cornice.
The second bar is fastened in increments of 28 cm, and the rest in 350 mm increments. This step will be correct if Monterrey metal tiles are being installed. For material from other manufacturers, the pitch may vary slightly.
Fastenings for ventilation pipes and other passage elements are left on the battens. To securely fix the ridge, two additional battens of sheathing are stuffed into the place of its attachment at a distance of 5 cm from the top. Continuous sheathing is installed around chimneys, roof windows, etc. When installing gable overhangs, the sheathing boards are extended to the required length.
At their ends, from the underside, from the ridge to the cornice, a block is placed for reinforcement.
The end board is attached to it. The board is necessary to cover the sheathing and the differences in the waves of the roofing material. From the end board to the rafter leg, connecting bars are installed, which are necessary for filing the overhang.
Types of eaves overhangs for metal tiles
In order to effectively remove moisture and water vapor, two design options for the eaves overhang are used. The simplest option was developed and offered for use by the famous Finnish metal tile manufacturer RANILA.
Internal moisture removal from eaves overhang
In this case, the vapor barrier laid under the roof is not rolled out to the lower end of the eaves overhang, but is cut off in the middle of the overhang of the rafters or roof fillets. In this part there is no insulation under the metal tile, so almost all the condensed moisture does not flow to the eaves strip, but digs through the overhang lining. To avoid icing of the sheathing, in this case, instead of perforated soffit panels, the roof is lined with wooden slats.
This method works well in frosty northern air; in mid-latitudes, eaves on eaves are often covered with huge amounts of ice and icicles.
The classic version of the eaves overhang under metal tiles
Internal removal of steam-water condensate is used in a situation where a huge amount of snow accumulates on a metal roof and on gutters, preventing the normal flow of air under the roof. For normal conditions, the best option would be a classic cornice device. One of the overhang options is shown in the diagram below.
In this case, condensation from under the metal tile is removed by a stream of air flowing through a special hole in the end part of the roof eaves.
Installation of cornice strip and lower valley
- The eaves strip is attached before installing the sheets to the eaves and front boards.
- Galvanized self-tapping screws are used as fasteners, screwed in increments of 30 cm.
Advice! To prevent the cornice strip from rattling during gusts of wind, it is installed in tension.
“Location of the eaves strip on a metal tile roof”
- The length of the overlap of the planks should be 5-10 cm.
- The lower valley (if necessary) is fixed with self-tapping screws along the formed wooden gutter in increments of 30 cm. Make sure that the lower edge of the valley is located on top of the cornice board.
- When joining the valley horizontally, the overlap is at least 10 cm.
Advice! In the future, a special sealant will be required between the valley and metal tile sheets.
End panels
The end (wind) panel is a type of eaves strips for metal tiles. Acts as a protective and decorative material. The product is attached to the front board after laying the metal tiles. The end board is sewn to the gable of the building.
The end rail is installed from bottom to top. On the tile side, the product is fixed with self-tapping screws 60-80 mm long. From the side - through the end board, with 28 mm screws.
The panels are fixed with an overlap of 5-10 cm. The pitch of the screws is 45-60 cm. The joints of the joints are treated with sealant. The ends of the installed elements are closed with special plugs.
Installation of metal tile sheets
The technology for laying metal tiles - a video about which can easily be found on the Internet - is performed according to the following rules:
- To begin, select the side from which the flooring will begin. As a rule, for many types of metal tiles it does not matter which side the installation starts from. But some types of material have a capillary groove, which serves to drain water and is located on the left side. For this reason, if installation is done from right to left, the next sheet covers one wave of the previous one. Thus, the capillary groove on the left side is closed. However, when installing in the opposite direction, it is necessary to adjust the next sheet to the wave of the laid one. If the capillary groove is located on the other side (this also happens), then, accordingly, the process is performed in reverse.
- Each sheet is aligned relative to the cornice, regardless of the complexity of the slope. 5 cm of material is released behind the cornice.
- Next, the sheets are fastened. In the places where the sheet adjoins the sheathing, screw a self-tapping screw into the deflection of the wave. From the side of the end board, sheets are attached to each wave. Self-tapping screws are screwed into the bottom beam of the sheathing above the step through one wave. The sheets are screwed to the remaining bars of the sheathing closer to the step from below. As a rule, for 1 sq.m. there are 6-8 pieces of self-tapping screws.
Installation diagram of metal tile sheets
- Additional elements are screwed to each transverse wave or longitudinal wave crest. When tightening screws, use a screwdriver.
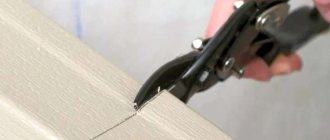
- If necessary, cut sheets of metal tiles with a hacksaw or metal scissors or an electric jigsaw with a metal blade.
The following video will introduce you to the process in more detail: laying metal tiles.
Ridge panels
Ridge strips are placed on top of the ridge beams. For installation, special fasteners are used. They are placed along the ridge in increments of 50-60 cm.
Ridge strips
First, install the outer mounts to the required height. The height is taken according to the attached instructions. Intermediate fastenings are placed along the cord line stretched between them.
A ridge beam is laid along the fastenings. The ridge is covered with an aero element made of dense non-woven material.
Attention! Tight fit of metal tile sheets under the ridge is not allowed. A gap of up to 5 cm serves for natural ventilation and protection of the attic space from precipitation.
From above, the aero element is sewn to the ridge with staples or roofing nails. The lower part of the material is glued to the metal tiles. Self-adhesive butyl rubber strips are used for stickers.
Sketch of the ridge structure
Ridge strips are produced in semicircular or rectangular shapes. Products with a cylindrical surface are installed with an overlap along the stiffening ribs. Straight panels - with an overlap of 10-15 cm.
The upper part of the ridge products is screwed to the beam with self-tapping screws. The length of the screws is 35 mm. Step - 30-40 cm.
The lower part of the ridge assembly is attached to the sheathing through the metal tiles. Self-tapping screws are screwed in at the top point of every second wave. The length of the screws is 50-70 mm.
Upon completion of the work, special plugs are inserted into the ends of the ridge products. They serve to protect the skate from birds and insects, side winds and precipitation.
How to install an end strip
After the roofing sheets have been laid, the wind strip is installed.
How to attach an element:
- first of all, a frontal board is installed on which the end strip is attached;
- at the height of the crest of the wave of the nearest sheet, with the corner of the end completely blocked;
- Fixation is carried out on the sides and top with screws. Using self-tapping screws from above, a previously installed sheet of tile is attached to the plank by the wave;
- when building up an element, an overlap of 5 to 10 cm is made, which is very convenient, since such protection can be cut to any fraction;
- all joints are sealed;
- a step is maintained between the overhangs, but within 200 mm;
- in case of presence or untimely detection of some distortions or other defects of the roof, with the help of end strips and often try to hide;
- After installation work, the wood elements are treated with an antiseptic substance.
The sequence of actions is very important to prevent system leakage.
The decorative role of this element is also important, so install end caps in the right places if necessary.
The wind strip must cover the roof ridge, otherwise water will get under the roofing. To prevent this, they additionally play it safe by flanging the edge of the sheet.
It is worth mentioning that the absence of installed wind strips will have a very negative impact not only on the roof itself, but also on the building as a whole.
An incorrectly installed wind element cannot fully perform its protective function in strong winds or precipitation. As a result, damaged sheets allow drafts, moisture and dust to enter the roof structure.
Every season you need to inspect the slats, checking for leaks and replace if necessary.
In general, under average climatic conditions in the Federation, a galvanized steel strip will last about 50 years, but if installation or operation techniques are not followed, after 10 years you will notice corrosion on the material
Therefore, it is very important to maintain the technology, and if you doubt your abilities, it is better to invite a specialist and be confident in the end
Installation Rules
The wind bar is installed as one of the very last parts. After framing the ends, all that remains is to install the ridge. Installation of the end element is carried out in the following order:
- An end board 80 mm wide and 25 mm thick is attached to the lathing on which the profiled flooring is laid. Installation of the board is carried out using construction nails with a diameter of at least 4 mm and a length of 100–120 mm.
- A wind strip is installed on top of the end board. Fastening is done using roofing screws with a diameter of 4.8 mm. The design of self-tapping screws implies the presence of a sealing washer (rubber gasket). Fasteners should be located in increments of 200–300 mm. Installation of self-tapping screws is carried out only with the help of a screwdriver.
- Installation of the planks is carried out from the bottom point of the end towards the ridge. The parts are overlapped. The overlap depth is at least 50 mm. Fastening corrugated sheets using construction nails is strictly prohibited, because the impact load violates the integrity of the protective coating. In addition, when driving nails, a hole in the corrugated sheet is 1–2 mm larger than the diameter of the fastener. Moisture penetrates into these cracks and the unprotected middle of the roofing sheet undergoes corrosion.
- The end of the wind bar is bent to direct the flow of precipitation. But often the installation of a part occurs with the formation of a gap between the strip and the surface of the profiled coating. In this case, it is necessary to provide for the installation of a seal. The seal should be attached to the inside of the additional element.
The following types of sealant can be used to fill the gap:
- universal self-adhesive;
- universal self-expanding (PSUL).
Due to their properties, these materials work well in roofing structures. They create a barrier to moisture penetration, are not destroyed by ultraviolet radiation, and tolerate temperature changes from -45°C to +85°C. Special impregnations protect against infection by fungi and mold. In order for the joint between the corrugated sheet and the plank to be 100% leak-proof, the additional element must cover two waves of the coating. Summarizing this information, it can be noted that there are three types of units and types of installation:
- The use of a front part with a wide horizontal part covering 2 waves of corrugated board. Fasten to the crest of the second wave with long self-tapping screws.
- The front strip is about 125 mm wide and covers only one wave, but the use of seals is mandatory. Installation using short self-tapping screws on the end board.
- It is allowed to install the front part with an end bar. However, such a fastening unit does not seem strong and reliable.
Is it possible to do without the end roof element completely? There is no strict indication in this regard in the building codes. Only unprotected coatings reduce their service life by 2–3 times. We recommend the following videos for your reference:
How does installation work?
After completion of all coating installation operations, the final touch is applied. At this stage, the roofing strip is also attached. If the installation of this product is neglected, proper ventilation of the roof space may be disrupted on the roof structure. Before installing wind slats, a preliminary calculation is carried out. When carrying out such operations, it is necessary to take into account the effective length of the product, which is equal to 1.9 meters, although the total length of the bar is 2 meters, 10 centimeters account for the connection of two sheets of metal. The width of the strip must be selected by the builder individually for a specific roof; its standard dimensions are 9 * 15 centimeters or 4 * 6 centimeters. This difference in the sides of the part is determined by the type of building. In the case where warehouses with a flat roof without a corrugated roof are being installed, the end strip should be narrow.
The quality of the roof will depend on the reliability of the fastening and the correct installation of the sheathing boards. The placement step of the guide bars will depend on the type of coating. At the preparatory stage of work, a pre-planed wind board measuring 2.5 * 8 centimeters is attached to the end side of the roof. After this, they begin to install the strip; this element is secured using roofing screws placed at a distance of forty centimeters from each other. Such work must begin from the lower section of the roof. During the installation process, the master gradually rises upward. When joining, the planks are overlapped, maintaining an overlap of 10 centimeters between the structural elements. If it is necessary to shorten the product to the required size, use metal scissors or a special hacksaw. You cannot use a grinder for such work; processing metal with such a tool will damage the front surface. As a result of this impact, the end strip will begin to collapse. After cutting with metal scissors, it is recommended to treat the cut areas with enamel, which will protect the material from corrosion, but this method of processing will not be suitable after cutting a metal strip with a grinder. In this case, the sheet will become unsuitable for further use. As for the installation location of the wind batten, such an element should be installed slightly higher from the sheathing at a distance equal to the wave height of the metal profile. The bar must be fixed with self-tapping screws with EPDM gaskets in the upper part, as well as on the sides. Fastening the strip in the indicated places helps to securely fix the roofing material, since most of them have a large windage and may not withstand strong gusts of wind.
The installation of the wind strip is carried out as follows:
- The craftsman must nail a wooden beam with a cross-section of 4*4 centimeters to the end of the sheathing. To prevent rotting and resistance to fire, the wood is impregnated with an antiseptic and fire retardants, then the wind slats are installed;
- Structural elements are measured. In this case, the end strip must overlap the end angle of the roof and the metal tile sheet;
- Before installing the plank, trim its edge with metal scissors, according to the markings;
- Using a special clamp, the upper edge of the panel is folded back, which is oriented towards the pediment. For high-quality work, the surface of the product should fit tightly to the wooden beam.
- As we have already said, screws are attached to the top and side of the plank at a distance of 40 centimeters. At the junction points, two adjacent planks should fit snugly against each other. Self-tapping screws are used in the same color as the wind batten.
Watch the video on the topic: