Gather tools and materials
In addition to tiles and glue, you will need:
- deep penetration primer;
- roller or brush;
- grout;
- basin or bucket;
- mixer for mixing the solution;
- drill or hammer drill;
- notched spatula;
- soft spatula;
- rubber mallet;
- level;
- rule;
- roulette;
- ruler or square;
- pencil;
- crosses for seams;
- angle grinder with a diamond disc or tile cutter;
- tile nippers;
- sponge.
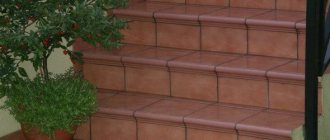
Repair of ceramic floor tiles
Under the influence of fluctuations in temperatures, loads and time, sooner or later repairs will be required. Let's look at common problems and options for solving them.
Repairing minor chips and scratches
You can easily fix such minor defects with your own hands. It is enough to take grout for the joints that matches the color. Dilute it with water to the consistency of thick sour cream and apply it to the surface of the ceramic tile with a rubber spatula (or just by hand).
Repair with replacement of one element
If one or more adjacent tiles are cracked or falling apart, repairs must be made to completely replace these areas. The most difficult thing is to remove the broken elements without touching the whole ones. There is a way to do this neatly:
- First of all, take care of yourself - put on safety glasses, a helmet or at least a cap, and take care of your hands and feet.
- Cover adjacent elements and joints with adhesive tape or masking tape to prevent damage to their surface.
- Using a grinder, make cuts along all four sides of the damaged tile. The cut should go as deep as possible so that our manipulations do not affect the adjacent plates.
- Drill several holes with a drill (without perforation mode).
- Using a chisel, pressing against the drilled holes, break the plate into pieces.
- Clean the surface of old tile adhesive. Apply a layer of deep penetration primer. Using a notched trowel, apply a layer of adhesive to the floor (or tiles).
- Lay the tiles. Use a building level to ensure the new element lies level.
- Let the glue dry completely, then use grout to go over the seams.
The video shows how to replace one tile on the floor (~ 3 minutes video)
Reasons for tile deformation
In any case, no matter what kind of repair you carry out, the most important thing is to understand the causes of such defects and try to correct the cause itself, and not deal with the consequences every time. If defects, and usually this is cracking of elements, occur due to temperature changes and, as a result, movement of the base structure, it is necessary to consider the possibility of thermal insulation of the floor. If the causes of defects are related to humidity, it is necessary to take care of waterproofing or selecting materials with the highest level (lower percentage) of water absorption.
These days they make floor tiles of amazing quality, so if you frequently repair tiles, you may have selected the specifications incorrectly. Contact your building materials supplier or find a new one.
Prepare the base
As a rule, the tiles are laid on a concrete screed. Installation on a wooden base and even on top of old tiles is also allowed, if it holds well. The parquet or board will first have to be covered with cement particle boards, and the old tiles will have to be covered with concrete contact primer. In both cases, the height of the finished floor will increase compared to laying it on a screed.
- Smooth out any rough spots on the floor and then sweep away debris or vacuum.
- If the height differences are more than 3-5 mm over two meters, remove all unevenness using a self-leveling mixture.
- Apply a primer appropriate for the type of coating.
- Wait 2-3 hours until the surface is completely dry.
Choosing adhesive for laying tiles
When choosing tile adhesive, you should be guided by the following criteria:
- type of tile, that is, the material from which it is made (tiles, porcelain tiles, etc.);
- what kind of base is the floor - not only a concrete screed, but also old tiles, as well as plywood or a polished wooden floor can serve as a base;
- operating conditions - humidity, temperature and its possible changes, intensity of exposure to ultraviolet rays on the tiles, etc.;
- planned layer thickness - according to this parameter, thin-layer adhesives are distinguished, as well as compositions intended for layer thicknesses up to 3 cm.
Information on the possibility of using tile adhesive in these various cases is on the packaging.
The standard classification of glue divides products depending on the component composition:
- cement;
- epoxy;
- silicone;
- latex.
It is the composition that determines the scope of their further exploitation. For example, cement-based mixtures are suitable for interior work in rooms with a normal microclimate, while epoxy ones can be used in facilities with high humidity (swimming pools, saunas).
Operating conditions are of great importance. If the room has a “warm floor” system, then you need to buy the glue that has a special emblem on the bag. For swimming pools and bathrooms, specialized mixtures have been developed whose properties are not lost during prolonged and frequent contact with water. Regarding porcelain stoneware, it is not recommended to lay it on cement glue, as there is a risk of detachment.
Decide on the type of installation
From left to right and top to bottom: traditional, diagonal, staggered, herringbone, modular, offset
There are three main methods: traditional, diagonal and staggered. In addition, there are various combinations that are used for beauty.
- Traditional is the simplest and most common method. The tiles are placed in even rows parallel to the walls. Suitable for square and rectangular tiles.
- Diagonal is a more original and complex option. The tiles are laid at an angle of 45 °
to the walls. Looks better with square ceramics. Requires more trimming and increases material consumption. - Scattered - each new row of tiles is shifted relative to the previous one, as in brickwork. Well hides defects in tile geometry. More suitable for rectangular tiles.
- Herringbone - imitation of a parquet board using rectangular tiles. Looks good with a wood finish. Produces minimal waste.
- Modular - the pattern is randomly assembled from tiles of different shapes and sizes to create a repeating, heterogeneous grid. Suitable for small rooms.
- Offset - small and large square tiles are laid in long rows to create a very interesting design. Definitely not for beginners.
For anyone working with tiles for the first time, the traditional laying method or staggered tiling is recommended. Other methods should be chosen only if you are confident in your abilities. Otherwise, it is better to entrust this work to professionals.
Step-by-step installation process
The initial step will be mixing the adhesive solution. When mixing, you should strictly follow the recommendations and proportions indicated by the manufacturer on the packaging.
Our expert advises: “It’s best to mix at a slow speed to prevent air bubbles from forming in the solution.”
After mixing, it usually takes some time (5-10 minutes) for the glue to sit and take on all its properties. This way it will demonstrate a better level of adhesion.
To start laying tiles, you need to decide on the size of the teeth on the trowel. Below we have presented a table that will help you choose the right spatula.
Comment from our master: “Tile adhesive dries quite quickly, for professionals this is a plus, but for a beginner it can be a problem. There is a simple “life hack” - you can add a little detergent (absolutely any) to the mixture, it will slow down the drying process, and the master can easily adjust the level of the product at any time. But you need to add very little of it - 20-30 grams per bucket of solution.
Installation steps:
On the leveled and cleaned floor, glue is applied with a spatula (it has a flat base on one side and a jagged base on the other), after which it is leveled with the jagged side until grooves are formed. The thickness of the solution should exceed the height of the teeth so that it is distributed as smoothly and without gaps as possible on the surface.
The size of the teeth on the spatula may vary. For prepared, level floors, teeth with a height of 6 mm are suitable. If the floor is not level, then 10 mm. The size of the tile also affects the size of the spatula - the larger it is, the larger the teeth should be. It is very important to choose the right spatula.
Laying the first tile. Craftsmen also recommend applying glue to the tiles with a notched trowel. If the floor has no differences in height, then glue can only be applied to the tiles.
After this, the product is pressed to the floor with your hands and tapped with a rubber mallet from the center to the edges to avoid the formation of voids. It is imperative to check the “horizontal” using a short level.
Comment from our master: “A rubber mallet is good, but most craftsmen prefer to tap the tiles simply with their fist or palm.”
If the first tile is laid next to the wall, be sure to leave a gap of at least 1.5-2 mm.
The following tiles are laid in the same way, but it is worth checking the evenness and uniform plane of the elements using a bubble level. Plastic crosses are inserted between the tiles to ensure uniform seams. How to choose the right size of crosses - read a separate article on our website.
After laying the last tile in a row, the master needs to check the accuracy of the laying using a long bubble level (its length is 1.5-2 m). It is laid over the entire row to evaluate a single plane. If there are deviations and gaps, they must be eliminated immediately, as this will then require a lot of time and effort. Deviations can be eliminated with your own hands by tapping on the protruding side of the tile.
Attention! There are differing opinions among craftsmen about the need to simultaneously apply glue to the tiles and the floor. Some recommend applying the base layer to the floor, and the adhesive applied to the tiles should be removed with the smooth side of the spatula. A number of other experts note that, provided the base is completely level, it is enough to just treat the tiles with glue. We recommend following the rule - if the floor is covered with screed (i.e., level), then apply only one layer of glue, either to the tiles or to the floor. If the floor is not level, apply to both surfaces.
Drying of the adhesive solution takes on average 24-36 hours, depending on the type of mixture and operating conditions. Each manufacturer provides information about the drying time on the bag.
For the glue to initially set so that the plastic crosses can be removed, a few hours are enough. When the tile adhesive has dried and the crosses have been removed, you can begin grouting the joints.
Apply the markings
To lay the tiles evenly, tie the layout pattern to the center of the room and start tiling from this point. The seams of adjacent rows or the middle of the tile should pass through the center - this will be the axis of symmetry. If the walls are uneven, it can be moved. For example, to the center of the doorway - so that the best view is from the open part of the floor, and the undercuts are hidden under the furniture.
For straight installation
- Mark the midpoints of the walls and draw lines from them to find the center of the room.
- Use a square to check the perpendicularity of the axes and, if necessary, adjust so that there is 90 degrees between them.
- If the axis runs along the edge of the doorway, it is better to move it towards the center for a more aesthetic appearance.
For diagonal laying
- Apply the rule to the wall and mark the points where the gap between them is minimal. If the wall plane is flat, you don’t have to do this.
- Measure the diagonal length of the tile. Step back this amount from the wall or marked points and draw a line on the floor parallel to the wall. This will be the edge of the first row of tiles.
- From the line drawn on the floor, mark a few more along the length of the diagonal to mark the next rows.
With a laser level, the marking procedure is simplified. It is enough to draw diagonals to find the center of the room, and then install the laser at this point and mark the axes perpendicularly or at an angle of 45 °
to the walls.
Tile sorting
Before directly laying the tiles, they are sorted to identify defects, tiles of uneven shape, differing from others in size and shades of color. This procedure is carried out for both cheap and expensive tiles. High-quality, smooth tiles are used in places that are visible. Tiles with imperfections or minor defects are allowed to be trimmed or used in hidden places.
Make a preliminary layout
To ensure the integrity of the tiled floor, it is necessary to distribute the tiles so that all cuts in width are more than half the tile. Narrow pieces are allowed if they are hidden under furniture and appliances. This will increase the material consumption slightly, but the finish will be as harmonious as possible.
- Calculate how many whole rows of tiles fit along the wall, taking into account the thickness of the joints.
- Remove the outermost row on either side.
- Place the remaining rows exactly in the center of the wall.
- As a result, in the corners there will be one trim more than half the tile wide.
- In bathrooms with a shower, lay out the entire floor area. In bathrooms with a bathtub, focus on the space from one of the walls to the edge of the bathtub - this way the narrow trim will be hidden.
- In L-shaped rooms, place a symmetrical layout in a visible area, and hide the trim where the furniture is.
Prepare the glue
- Pour water into a basin or bucket and add the required amount of adhesive in strict accordance with the instructions on the package.
- Stir well until smooth using a hammer drill or drill at low speed.
- After 10 minutes, stir the solution again for a more uniform consistency and complete saturation of the settled mixture.
- Do not prepare a large amount of solution at once. If you don’t have time to use it, it will dry out and lose its properties.
- You cannot add water to already prepared glue: this will impair the strength.
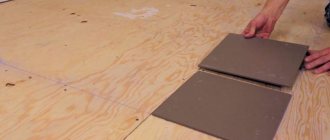
Lay the first row
- Using a notched trowel, apply adhesive to such an area of the floor that there is enough of it for one or two tiles with a small margin around the perimeter.
- Smooth the mortar in all directions using a notched trowel. Hold the tool at a 45 °
to the surface. - Find an arrow or manufacturer's logo on the back of the tile and lay all tiles with these symbols in the same direction.
- Place the dry tile on the prepared surface and align it with the markings.
- Tap the tiles with your hand or a rubber mallet until they are completely filled with adhesive.
- Use a level to make sure the tile is level. If necessary, level it by tapping.
- Lay the next tile and place crosses in the adjacent joint.
- Align the second tile with the first and use a level to make sure it is level.
- Lay the entire first row of tiles in the same way.
What markings are needed to lay tiles on the floor?
So, first you need to measure all the floor parameters in length and width. Why do this? To ensure that the markup is as correct as possible. This will allow you to comply with the tile laying technology. The angles from which you are supposed to start are marked separately. All tiles that will be cut should be in corners or in the most inconspicuous places. Such places are usually covered with furniture or are not visible from the entrance. If there is a joint with another type of tile, then metal thresholds are used.
The cut tiles are located in the place where it is covered by the door casing. In all other places, from the floor and in horizontal rows, a solid one is placed. Correct marking helps to avoid unwanted displacements and defects. By following it, you can lay tiles (or other coverings) as beautifully and efficiently as possible. Therefore, it is better to devote enough time to marking.
Place the trimmings
Lastly, tiles are laid around the perimeter of the walls, as well as those adjacent to pipes and external corners. Such tiles must first be cut to the required size using a tile cutter or an angle grinder with a diamond disc. And then lay it on the glue in the same way as whole tiles: using crosses and checking the flatness with a level.
How to cut with a tile cutter
- Measure the required length of the tiles, taking into account the seams.
- Place marks on each side with a pencil and draw a line.
- Place the tile on the tile cutter table according to the mark and press it against the edge of the bed.
- In one movement, move the roller along the cutting line.
- Apply light pressure to the handle to separate the tiles.
How to cut with an angle grinder
- Mark the cutting line on the tile and secure it with improvised means.
- Put on your glasses and grab a grinder with a solid diamond blade.
- Without applying pressure, gradually cut through the tiles, without going deep into the entire thickness at once.
- To avoid raising dust, you can moisten the tile and cut through only the top layer, and then place a nail under the tile and break it as if using a tile cutter.
How and with what to cut tiles
No matter how hard you try, you still can’t do without trimming elements. The number of manipulations associated with trimming can be minimized by selecting ceramic tiles of a certain size for the room in which tiling is planned. For example, if your wall is exactly 3 meters long, then a tile with a length of 50 centimeters will fit perfectly. Of course, it is not always possible to find tiles on sale that meet all the parameters; in this case, you can always use tools for cutting tiles. Perhaps the best of them is a manual tile cutter
.
As for other ways to cut the desired fragment, neither a grinder nor a glass cutter with wire cutters will give you the required evenness. There is still an electric option for a manual glass cutter, but its cost often exceeds the cost of your repair. Do you need this?
Important note: you should not cut the tiles in advance, but only during the laying process, because even the slightest miscalculations in millimeters may later prevent you from fitting an already recklessly prepared piece into an area on the wall.Grout the joints
- After a day, remove all the crosses from the seams and remove the protruding glue.
- Dilute the grout mixture with water according to the proportions indicated on the package and mix with a mixer.
- After 5 minutes, mix everything thoroughly again.
- Using a rubber spatula at an angle of 45 °
to the surface, apply grout to the seams. - Move across the seam and press the spatula in well to completely fill it.
- After 30 minutes, remove the remaining dried grout from the tiles with a sponge soaked in water.
- Finally wipe off the stains with a dry cloth.