Today, warm floors are a popular source of additional heating, and are especially relevant in ground floor apartments. The most common finishing option is laying ceramic tiles on a warm floor.
The variety of modern types of tiles allows you to match them to any interior. There are models imitating stone, wood and other materials. The combination of heated floors and ceramic tiles is practical, warm and beautiful.
Features of laying tiles on heated floors
Yes! Tiles, as we have already noted, can be used for laying on top of a warm floor. But let’s start studying the issue not with coverage, but with the types of this system. This is necessary to understand its functionality and structure.
In fact, a warm floor is a floor heating system. It provides comfort for the feet and coziness in the home. It is presented in several layers: insulation, heating device, cement screed, decorative coating.
Next, we will consider the most popular versions of heated floors.
Tile masonry
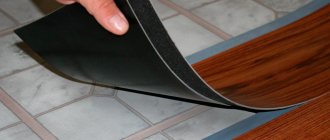
For work, you can choose any tile at your discretion. One of the possible options is PVC tiles, the back of which already has an adhesive layer. It is important to select moisture-resistant glue that does not release toxic impurities when heated.
Classic tiles can be used very successfully, striking the imagination with their varied decor and types.
The direction of the tile laying is also an independent parameter, which is determined by the owner himself. A mandatory element of the masonry are expansion joints, which consist of an elastic sealant.
Electric heated floor under tiles
It is considered the best option for using tiles. Therefore, we will consider this modification in more detail.
Heating methods:
- By cable. Before the start of installation, the base is inspected, uneven places are sealed, a cement solution is used, an insulation layer of up to 7 cm is laid, and waterproofing is added. A heating system is installed and reinforced with a screed. After this, tiles can be laid. The only drawback is the increase in floor height by 10 - 12 cm.
- Mat based system. A flat surface is used because chips, gouges and other defects can disrupt the insulation layer, which will damage the system and may cause failure. After preparing the floor, laying the mats begins. They are connected into a common system. You can carry out a test check of the functionality of the floor structure.
If everything goes well, the tiles are laid. This technology assumes a height of 4 - 5 cm.
Organization of the concrete layer
Tiling on a concrete screed is the most common method of installation work for installing a warm water floor.
Note!
Mosaic from broken tiles: step-by-step instructions on how to lay it out with your own hands (140 photo ideas)
Mosaic for the bathroom: TOP-150 photos of new designs, as well as modern ideas for combining mosaic tiles
Quartz vinyl floor tiles - what is it? Application features, advantages, disadvantages, choice, manufacturers, photos
Experts recommend using ready-made building mixtures that contain a number of polymer resins (the compositions are designed specifically for heated floors). The total thickness of the concrete screed is 6 cm, above the pipes - up to 3 cm.
Water heated floor under tiles
Structural difficulties limit the use, therefore it is installed mainly on the territory of a private house. But in rare cases, operation is allowed on the basis of a very spacious room in a public building or apartment.
Installation requires: pouring screed, laying damper tape, insulation with a thickness of 5 - 7 cm based on mineral wool and polystyrene foam.
- After preparation, pipe contours are laid for the movement of the coolant.
- This is the difficulty of installation, since further connection to the general heating system is required.
- Then the screed or self-leveling floor is poured. A decorative coating is added on top.
The finished system requires up to 15 cm from the height of the room. Therefore, electric heated floors based on mats have gained popularity in comparison with other modifications. Another question is how to install? Next, we will understand this process so that we can do the work ourselves.
System installation steps
Typically, work on laying water heated floors is carried out in the following order:
- Removing old flooring.
- Cleaning and leveling the base.
- Installation of damper tape.
- Laying thermal insulation.
- Installation of reflective film.
- Laying pipes in accordance with the previously drawn up diagram.
- Pouring concrete screed.
- Laying flooring.
It is not difficult to prepare the base for installing water floors under tiles. It is necessary to remove all unnecessary layers if we are talking about dismantling the old floor. After this, the surface must be leveled, for example, the depressions and cracks must be sealed with repair mortar. After this, dust and other contaminants are removed: stains of grease, paint, etc.
Of course, the results of the work will not be visible after installing the heated floor system, but still the preparation of the base should be leveled as best as possible. Unevenness and dirt can impair the quality of subsequent installation.
A special damper tape is laid along the walls. Some inexperienced craftsmen simply lean the material against the wall, hoping that subsequent pouring will firmly press it to the surface.
Disadvantages when installing a water heated floor: the film is cut flush with the wall, and not tucked under the thermal insulation, the damper tape simply lies along the walls, it is not secured
This tactic does not justify itself; voids form between the tape and the wall and the material becomes deformed. The tape should be attached to the wall with self-tapping screws so that it fits tightly and maintains the correct position. Extruded polystyrene foam is often used as a thermal insulation material.
This is a reliable material that comes in the form of slabs with convenient joints. If the base on which the slabs are laid is level, they will not wobble after laying. A reflective film is placed on top. It is very convenient if it is equipped with markings that will make laying out the pipes easier.
Image gallery
Photo from
Laying the coil on a lined substrate
Clamps for fixing pipes to the subfloor
Fastening pipes to metal mesh
Polymer backing with guide bosses
You can use more modern insulation options designed specifically for laying heated floors. On the surface of such materials there are special recesses that significantly facilitate the laying of pipes. No film is required for such insulation.
An example of the correct installation of film and damper tape under a water-heated floor: the film is securely tucked under the insulation, the tape fits tightly to the wall
Do not cut the film flush with the wall. The material is tucked under a layer of thermal insulation material so that it is slightly stretched and does not move. You need to lay a mounting grid on the film, after which you can begin laying the pipes.
Most often, metal-plastic pipes are used for heated floors, as they are the most reliable and relatively inexpensive. Pipes made of cross-linked polyethylene and copper soft tubes are also actively used in the construction of floor heating systems.
The pipes are laid on the grid in accordance with the previously drawn up project and fixed with ordinary plastic clamps in increments of about one meter. Do not secure the pipes to the mesh too tightly. When exposed to heat, they can expand slightly, and when cooled, they can contract. You need to leave a little space for this process.
This photo shows the correct laying of water heated floor pipes: the distance between them is maintained exactly, the structures are neatly bent at the correct angle
When laying coils, you must carefully observe the distance between the pipes and the distance from the wall. If these distances “walk”, then in the future the floor will be heated unevenly. Overloads will soon lead to system breakdowns, and repairs will be quite expensive.
This is an example of careless installation of water heated floor pipes: the bends are unclear, the distance between the pipes in certain areas fluctuates noticeably
Now you need to install the collector and connect the heated floor circuit to it. You can assemble this device yourself, but it will be easier and cheaper to buy a ready-made model. The manifold mixing unit looks like a neat cabinet; inside there are controls for the underfloor heating system and connectors for connecting pipes.
This diagram shows the place of the collector and water heated floor in the autonomous heating system of a private house or cottage
Each circuit is connected to the manifold twice: to the hole through which hot water will flow, and to the output connector designed to return the cooled coolant to the boiler heat exchanger. The pipes are secured with special clamping nuts, which are supplied with the manifold.
Of course, the collector should be connected to the heating boiler in accordance with the manufacturer's instructions. Before pouring, you should check the operation of the new heated floor system, i.e. perform pressure testing.
To do this, turn on the boiler and supply hot water to the system under pressure, which is 50% higher than the working norm. The system should be left in this state for approximately two hours.
At this time, it is necessary to inspect the pipes and identify shortcomings, for example:
- places where the pipe is clamped with a fixing clamp;
- the presence of leaks at the junction of the pipe with other elements of the system;
- violation of the integrity of the heating circuit.
If deficiencies are found, they must be eliminated and then the system must be pressure tested again. After this, you can start pouring the screed. During the process, the laid pipes should be handled very carefully so as not to accidentally move or damage them.
After the water heated floor pipes are secured, they should be covered with some kind of protective material to prevent accidental damage
To prepare the solution, you should use special dry construction mixtures that are intended for installing heated floors. Such compositions are designed for a constant heating process of structures laid in the thickness of the screed. The packaging of the CCC usually indicates the method of its preparation, which should be followed.
An important point is the shelf life of the finished composition. This time period should be taken into account when performing work. Before pouring, the pipes are filled with cold water to compensate for the pressure of the composition and prevent deformation.
The thickness of the screed above the pipes should be about three centimeters. Now you need to wait until the screed has completely dried, and only then begin laying the flooring.
To prepare the solution, use special SSS intended for installation of water heated floors. The screed layer above the pipes must be at least three centimeters
Material calculation
The floor area is measured to calculate how many tiles are required with a margin of 10% of the required quantity. The volume of glue is determined based on the height of the layer and the condition of the base; potholes and cracks require increased consumption. The manufacturer indicates the required costs on the packaging, but on average it is 200 - 300 grams per square meter.
Useful facts
- In Soviet times, tiles were soaked in water before laying. Nowadays, many “old school” finishers continue to perform this action, although this is no longer necessary.
- The problem with slippery tiles is solved by purchasing a special composition. It is applied to the surface and protects it for a long time. A budget option for the bathroom is a regular rubber mat.
- All modern floor tiles are manufactured industrially. There is one company in the world that produces and paints ceramic granite by hand. The cost per square meter of such coverage is beyond the reach of an ordinary person. Therefore, we must remember that all assurances from sellers in a hardware store about the exclusivity of the collection are most likely a PR stunt.
Preparatory stage before installation
The base is leveled and covered with a primer with the property of deep connection with the material. A polyethylene film is stretched over the floor or mastic containing bitumen is applied.
Tools for work
To install a warm water floor yourself, you will need a certain set of tools and materials:
- Pipes of any chosen composition and quality.
- Pump.
- Several valves.
- Reinforcing mesh for laying the base.
- A system of fasteners that will fix the pipes.
- Open-end wrench.
- Roulette.
- Hammer.
To install a floor with a screed, you will need tools to level it.
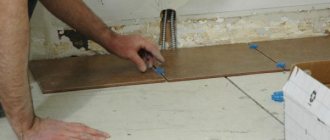
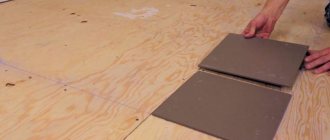
marking the floor
The tiles can be laid in rows or staggered. The first strategy involves matching the seams horizontally and vertically. The second is based on a checkerboard pattern.
But neither version provides an advantage during operation.
- The marking starts from the longest wall. For this purpose, chalk and cord are used. The first row of tiles is laid out.
- It becomes the basis for laying decorative coverings.
But if there is a drawing, a preliminary layout of the material is required in order to check the coincidence of the contours and details of the image. After this, the final work begins.
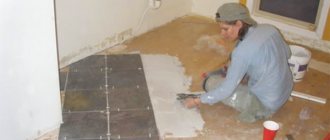
How to lay it correctly (step by step instructions)
An adhesive is created for installing tiles. Use a plastic bucket or other container. A little water is poured in and the composition is mixed with a special nozzle. Water is added and the work of the construction mixer continues until thick sour cream is formed.
But the glue dries quickly because it is created in portions approximately every 30 - 40 minutes. Apply to floors or tiles using spatulas. The material is pressed into the adhesive layer with light movements. Trimmed with a rubber hammer.
- Quality is controlled by level.
- Dismantling and adjustment of the adhesive layer is allowed.
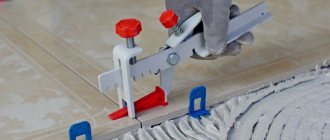
- The correct dimensions of the seams are ensured by construction crosses.
- The glue dries within 2 - 3 days.
- After this, after 72 hours, you can put up furniture and fully use the heated floor.
It is worth noting that cut tiles are laid in the area of corners, under baseboards or furniture, the main thing is that they are not visible. For cutting, use a tile cutter, glass cutter or grinder.
Pros and cons of ceramic flooring
Ceramic, as a material for flooring, is cold, but laying tiles on heated floors is considered fashionable in the bathroom, kitchen, and other rooms. Ceramics slowly absorbs heat, but accumulates it for a long time and has good heat transfer. This property, such as slow heating, allows you to distribute heat evenly over the entire surface, without creating zones with very cold or very hot coating.
The use of tiles is great for bathrooms and bathrooms, because these rooms always have a high level of humidity. The surface dries quickly and does not form mold. In addition, the tile covering is durable and reliable.
How to choose tiles for installation
The flooring material must be of high quality. An important condition is the indicator of hardness and density. There are many varieties of tiles, which are made from porcelain stoneware, natural stone or monocottur. These materials are suitable for laying heated floors. Tiles for heated floors differ from wall tiles in greater thickness. During installation, only serviceable tiles are used so that the floor surface is even and the level of the seams does not differ. For the floor, use tiles with a rough or matte surface to prevent slipping.
When calculating how many tiles you will need, you should start from the square meters of the room, and add about ten percent to the battle.
Which glue to choose
When choosing a grout or installation adhesive, they rely on elasticity and thermal conductivity.
Experts advise buying solutions such as:
- Cezerite in modification SM-14 EXTRA, or SM-16, or SM-17, or SM-115.
- Knauf Flex , which resists water and is suitable for installation in damp areas.
- Prospectors.
- Ceramic.
The grout for the joints should match the color of the tile covering.
Attention! When purchasing a solution for installation, you need to familiarize yourself with the instructions, characteristics, and dosing of the mixture during operation.
Set of tools for laying tiles
During installation work, it is worth preparing the following set of tools:
- regular and serrated spatula;
- rule;
- crosses for connecting seams of the required size;
- levels and roulette;
- a cutter to cut tiles;
- pencil, tape;
- hammer;
- bumper
Having prepared all the tools, you can start working.
How to seal tile seams
This is an important stage of work, since until the seams are sealed, the heated floor cannot be used and the installation must be considered complete.
How to seal different types of seams:
- Installation seams. They differ in size by 1.5 - 3 mm. Formed along the edges of the tiles.
- Seamless look. When the seam is less than the lower value, then the installation is considered seamless. Any option can be covered one day after installing the tiles. Construction crosses are removed. The grout mixture is coated with a spatula based on a rubber blade. Movements are made along the seams. After 40 minutes, the seams are washed with cold water.
- Perimeter seams. They appear in the area where the edge of the tile touches the wall. They are sealed with a sealant containing silicone, but the use of a rubber gasket is allowed. Skirting boards are installed.
After completing this stage, you can use a warm tiled floor.
Now we realize that tiles can be laid on a warm floor. We figured out the nuances for doing the installation yourself.
Selecting and connecting the collector and boiler
When it is clear how many circuits will be connected to the manifold, you can begin to select its length and decide on the number of valves, but also take into account that in order to be able to regulate the warm coating mode, you will need a pressure sensor, air vents, and drains.
The manifold with its lower pipe should be located at the same level as the supply pipeline, slightly above the floor level.
There are specially developed plumbing standards for the assembly of this unit. It is best to hide the collector in a niche in the wall, approximately in the middle in relation to all the contours.
The boiler is selected based on its power sufficient to heat water, plus a certain power reserve. The total required power is determined as follows: 20% should be added to the sum of the circuit powers for the reserve.
For greater efficiency of the system, it is advisable to install a circulation pump; in most boiler models, the pump is already included in the kit, capable of providing hot water to a one- or two-story house with an area of 120-140 m2. For large areas, additional pumps are needed.