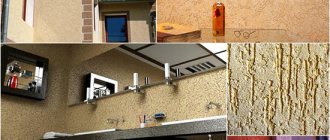
When talking about decorative rain plaster, they mean a special application technique that creates a texture similar to rain. Any structural plaster is suitable for this purpose. The fine fractions in its composition, together with a special application technique, will ensure the creation of the desired pattern on the wall. If you want to know which companies produce decorative rain plaster, there are a huge number of them. In fact, you can take a dry mixture of bark beetles from any manufacturer.
It’s worth mentioning right away that the “rain” texture is the same effect of the bark beetle, only done in a slightly special way. You could even say that this is a variation of it.
Advantages and disadvantages
Like other building materials, decorative plaster has its pros and cons.
Advantages
Practicality and durability. If the composition is applied correctly and all standards are followed, you can get an excellent coating that does not crumble or crack. It will have high resistance to mechanical stress.
Disguise. You can level the walls and disguise small cracks and irregularities.
Versatility. Decorative plaster can be applied to various surfaces, for example, concrete, wood, brick, metal, etc. Suitable for both interior and exterior decoration.
Flaws
Expensiveness of the material.
Difficult to dismantle. Removing decorative plaster from walls will require a lot of effort and time.
Requirements for surface cleanliness. Before applying the composition, it is necessary to thoroughly clean the walls and treat them with a primer. This is especially important when applying plaster to metal surfaces to prevent corrosion.
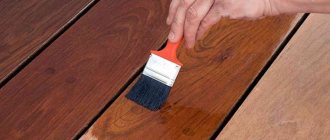
Painting the wall as a finishing touch
A day after applying the plaster, you need to paint the surface. You should decide on the color in advance. The paint is applied with a roller. This is faster and more convenient than using a brush. You need to work carefully to completely paint the entire surface.
Within a day the paint will dry and you will need to apply another layer. Without this, decorative plaster will not gain its expressiveness. For these purposes, pearlescent paint of a suitable shade is used. You will have to figure out the color scheme yourself, because this is a matter of personal taste.
The second coat should be applied only to the outer surface, not to the grooves. To do this, excess paint is removed from the roller, which is done by several passes of the tool along the prepared plywood or hardboard. All excess paint should remain there. After this, use a semi-dry roller to run it along the wall without pressing. All you have to do is let the coating dry for another day, and it will be completely ready.
DIY application technology step by step
Rain decorative plaster should only be applied to smooth and primed walls. Also, surfaces must be dry.
Base layer
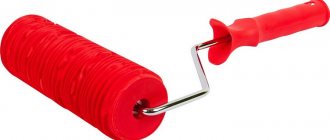
It is best to use water-dispersion paint as a base for plaster. Thanks to it, the wall surface will reduce absorbency. It is advisable to use a fur roller for application.
Stages of work:
- The paint is poured into the tray and the roller is dipped into it.
- Roll a little so that the entire roller becomes wet.
- The paint is applied from top to bottom. It is necessary to process the entire surface of the wall, avoiding gaps.
- The overlap does not need to be rolled in, as decorative plaster will hide everything.
- 2-3 hours are enough for complete drying.
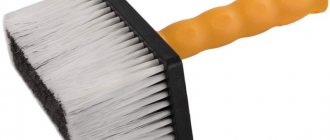
It is better not to use brushes or foam rollers. Foam rubber absorbs a lot of paint, and after the brush there are slight unevenness due to strokes. You need to work quickly and in one approach.
Second layer
If a ready-made mixture with a coarse filler is used, it should be kneaded at low mixer speeds or by hand. At high speeds the grains will be damaged. It is enough to mix the finished mixtures with a spatula to raise the fraction from the bottom.
Technology for applying and creating the “rain” texture
The solution is applied several times with a small spatula to a wide trowel, with which it is transferred to the wall, where it is leveled in a thin layer. The layer thickness is usually 3 mm, since granules of this exact diameter are in the solution that creates a decorative coating with a rain effect.
Apply the solution with slight pressure from top to bottom. There shouldn’t be a perfectly smooth surface, and you won’t be able to get one even if you wanted to because of the granules in the solution. Immediately after applying the mixture to the wall, we proceed to the next stage. Decorative plaster rain is created by using a trowel, which is passed over the wall over the entire working surface.
After each such wiring, you need to remove the solution from the ironing board that has stuck to it. This is done with a dry spatula, and the iron itself is washed only after all work is completed.
The easiest way is to run the iron vertically from top to bottom. After you have already walked along the wall once, you should walk a second time. The solution will dry out a little and the texture will not change so much. However, thanks to this repetition, it will be possible to make the rain effect more expressive. Moreover, this effect will manifest itself due to the fact that when you move the grater, you will pull through the granules contained in the solution. They will create the necessary grooves.
Calculation method
To calculate the required amount of mixture you will need:
- Calculate the layer thickness.
- Install beacons over the entire surface.
- Select several points on the wall. With their help, find out deviations from the plane. Typically, experts select only three points.
- Measure deviations.
- Calculate the average deviation.
To make it clearer, all calculations should be carried out in practice. For example, you need to apply plaster to 10 square meters. m. Deviations on the wall reach 5 cm. Now three points are selected. The result is deviations of one, three and five centimeters. The average deviation is 3 cm. It turns out that for uniform application an average layer of 3 cm is required.
Now you need to find out the recommendations of the manufacturer of the decorative mixture. The packaging usually indicates the consumption per 1 square meter. m. with a layer thickness of 1 cm.
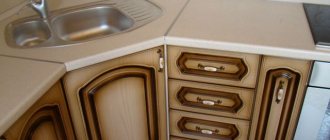
Application of “Rock” type coating
The “Skala” coating is easier to apply.
This type of decorative plaster is perhaps the easiest to apply. For both types of “structures” under consideration, any finishing putty can be used: either gypsum or cement. It is best to use Sheetrock putty, it is sold ready-made, you will not need to stir anything.
It is clear that the surface must be well primed. Before applying decorative plasters, we recommend that you first putty the walls in at least one layer, so that there are no different kinds of “gaps” later.
To begin with, in our minds we allocate for ourselves a certain area on the wall - approximately 0.5 sq.m. We will apply it in sections like this, not all over. We put a little putty on the trowel and evenly coat our square with it. The layer should be 2–3 mm, since the thicker it is, the rougher the texture will look. We try to spread the putty over the entire area as evenly as possible.
As soon as this is done, we proceed to structuring: thoroughly clean the trowel and sculpt it directly onto the fresh putty, almost flat, no matter what orientation, just barely lifting its lower part towards itself - where the end of the handle is facing. And immediately we make a slight movement in this direction of 15–20 centimeters.
When we stick the trowel flat to the mixture on the wall, small cavities with air remain under it, which are “pressed” into the putty and give it texture. We only additionally “carry” it across the surface with light movements. These movements are made in a chaotic manner and are difficult to describe. The point is that towards their final point, the trowel should gently pull away from the putty so as not to leave clear marks, that is, the angle between the trowel and the “structure” should gradually increase as it moves, but within 10–20 degrees, no more. It’s not easy to do this the first time, but it’s enough to structure 3-4 sections, the right feeling will come, and the process will be more fun. By the way, try to clean the ironing board after each such “slide”, at least at first. With experience, it will be possible to do several “slides” when the movement is well developed.
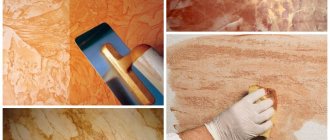
This is what the process of applying “Skala” plaster looks like:
We've done one section - apply putty to the adjacent one, with a slight approach to the first one, and repeat the steps. Ultimately, we should get something like this:
Final result
The stroker movements do not have to be done chaotically. The herringbone, criss-cross, vertical, etc. options also have a right to exist. Experiment freely, choose your own option, there is a large field for testing: if you don’t like it, smooth it out and refinish it.
The “rock” dries, as does the “rain” for about a day.
Typical errors during application
The main mistakes of novice masters:
- Incorrect consistency of solution. If there is not enough water, the solution will slide down. The thick composition does not adhere well to the surface, so the plaster may fall off. There is a risk of cracking after drying.
- Failure to comply with the vertical when creating rain relief. If the pattern has waves, the rain effect will not be achieved.
- Adding dry solution to change consistency. Very often the plaster turns out to be too liquid. In this case, inexperienced craftsmen add a dry mixture to it. This leads to a violation of the homogeneity of the solution. The consistency should be changed by adding water. To avoid overdoing it, you need to add it in small portions.
- No primer. Using a primer when preparing the surface is an important step. The primer should be selected depending on the type of base. Porous surfaces must be covered with deep penetration soils.
- Applying plaster from bottom to top. This seems like a more convenient option. But in reality, pieces of mortar from above will fall, damaging the finished surface below. Therefore, it is better to apply the solution from top to bottom.
- Drying plaster in the sun. If the sun hits the surface, it is advisable to darken the window. Due to the difference in temperature in the light and in the shade, cracks appear.
- Using a heat gun. A heat gun allows you to create a directed flow of hot air. This impact is bad for the plaster. Drying occurs too quickly and unevenly.
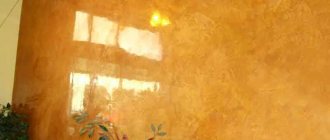
Decorative putty “wind and rain”.
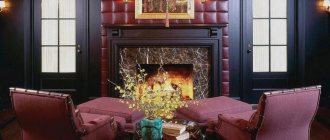
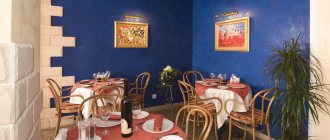
Gloomy weather and rain outside the window, the wind disperses the puddles and draws bizarre shapes... The picture is familiar to everyone. And it doesn’t evoke sadness and melancholy, on the contrary, it evokes romance, warmth and comfort. And only at such moments do you realize how beautiful nature really is! And how good it is that we live in a time when building materials can work real miracles.
Use the “wind and rain” decorative putty technique to create a cozy and original interior in the bedroom or living room.
Necessary materials:
- putty
- primer
- roller
- water-based paint
- sponge
- spatula large and small
Let's start creating!!!
Stage 1 - surface preparation.
Decorative putty is applied to previously primed walls. To do this, you need a primer from one of the manufacturers and a roller for ease of application. Follow the primer instructions and then allow the primer to dry. This stage of work should not be overlooked, because the durability and reliability of the repair will depend on the quality of the preparatory work.
Stage 2 - “wind and rain”.
Decorative putty of this type does not require preliminary preparation or perfectly smooth walls; on the contrary, it will even help to visually hide crooked walls and cracks. The putty must be applied to the wall with a large spatula and a medium-thick layer.
We should not rush and apply putty to the entire wall, it may dry out and we will not be able to create a decorative ornament.
After applying putty to a certain area, you need to change a wide spatula using a small and convenient one. And start creating.
The decor can be done both straight and at an angle; it looks equally beautiful, but if you do it at an angle, it will imitate a strong wind and raindrops in the wind.
We apply the spatula completely to the surface of the putty and slightly pull it towards ourselves, as if blurring the layer of putty. Thus, we do it many times, placing strokes next to each other. The picture of raindrops emerges immediately, and therefore there is an opportunity to correct or resend. The more movements you make with your hand and spatula, the better. The strokes fall one on top of the other, mixing and creating new unique images. The only rule is not to change the direction of movement of the spatula. The wind blows in one direction, so our creation must be in the same direction.
Stage 3 - painting and rubbing the drawing.
The painting stage is not at all difficult, it is interesting. The selected color and water-based paint must be mixed until a uniform color is formed. Using a roller, decorative putty is painted, but in the same stages as applying a picture.
After several meters of the wall have been painted, it is necessary to slightly remove excess paint with a sponge soaked in clean water.
At the same time, in some places you can rub harder, and in others less.
It is necessary to achieve the result of abrasion and a different color palette. The sponge must always be kept clean; to do this, it is washed in water. If you choose washable water-based paint, the decorative coating will not be afraid of moisture, and it can be washed if necessary.
Decorative coating “wind and rain” - ready!
p style=
< Plastic corners. Types and options for use during repairs.
Do-it-yourself decorative plaster “Flowers” from putty. Technique for making decorative plaster. >
Do-it-yourself installation of decorative plaster “Rain”
“Rain” is a more difficult application method, but the result is worth it
This method is significantly more complicated and takes much more time, but almost everyone likes the result.
Decorative plaster “Rain” in the interior
We start with markings - we draw inclined lines on the walls in the direction of the southeast from the ceiling to the floor with a step equal to slightly less than three widths of the trowel. For example, if the width of the tool is 18 cm, we make a step of about 50 cm. It is advisable to draw the lines continuously - this means that they will not break off at the internal and external corners.
This takes quite a long time, but the result is worth it, so take the time to do quality markings.
Once we have drawn all the lines, stick masking tape along each of them. The top edge of the tape should lie on the line.
We will start from the upper right corner of any wall. This is done to eliminate the risk of the putty falling onto the finished texture. Our first working area will be very small; on subsequent strips we will apply putty from right to left.
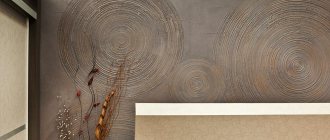
The putty is spread with a layer of 2–3 mm onto a strip slightly less than the width of the trowel and approximately 1 meter long. After this, the ironer is placed flat on it (without pressing hard) and peeled off; and so on throughout the strip 10–15 times, the surface will resemble something like a hedgehog:
The process of applying “Rain” plaster
Then we clean the iron and very gently and carefully run it almost flat (slightly raising the lower part above the surface) along our “hedgehog” in the south-east direction, smoothing the relief:
The process of applying and smoothing the relief
The severity of the texture will depend on the force of pressure: the weaker the pressure, the brighter the texture. It also depends on the thickness of the layer: the thicker it is, the more noticeable the relief. In this way, you can bring the strip to the end, or you can start the next one, but without bringing it to the end of the first - whichever is more convenient for you.
The next strip is applied with a small (maximum 1 cm) overlap onto the already finished strip, and the sequence of actions is repeated. The last strip of three will stick slightly onto the tape. As soon as it is finished, we unstick it and move on.
All this is needed so that in this place the layers of putty creep onto each other more strongly - this has a positive effect on the appearance.
In addition, the tape helps you avoid messing up the angle of the design. Immediately after application, the finished surface looks like this:
This is what the surface looks like after applying plaster
After drying, it is advisable to treat it with an abrasive mesh or sandpaper to remove various types of flaws. The main difficulties that may arise when applying “rain” are the same as for “rock”: sticks of the trowel, clear marks from it, unevenness of the relief.
In principle, if it is not possible to achieve heterogeneity of texture over the entire area of the wall, it’s okay, this is even a plus, because we are simulating some kind of fantastic rock, which, in theory, cannot be completely uniform. The main thing is to try to avoid sudden changes in texture in a small area, otherwise it will immediately catch your eye.
After applying and completely drying both of the described types of decorative plasters, they need to be thoroughly primed.