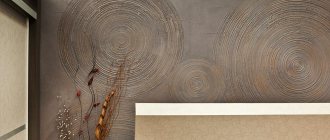
Construction work is completed with finishing. When it comes to the interior, everything is important - every nuance (even a small touch), every phase of finishing work. And the most important stage is the finishing coating. They can ruin all previous work or make it perfect. The stage responsible for the overall result is waxing; in particular, wax becomes a protection for decorative plaster. A mirror-shiny or softly reflective coating looks great and can decorate and elevate the interior. There are special types of wax that give imitation stone from decorative plaster a special depth or silky surface of the walls.
What is the material
Everyone is familiar with beeswax. It is used in a variety of fields, from cosmetics to construction.
This substance has a number of useful properties:
- is a natural substance with a fairly high density;
- does not dissolve upon contact with water, acids and alcohols;
- melts at a temperature of about +68ºC;
- When heated, the material becomes plastic.
Before use, the substance is melted to eliminate foreign impurities and natural inclusions.
Wax, when applied to plaster, creates a very interesting effect, adding shine and at the same time aging the coating. The substance seems to tint the surface. After its application, a thin layer of film is formed on the material, and it will be impossible to change the plaster underneath without damaging the coating, so the choice of wax must be carefully approached.
Composition of natural wax in%:
- fatty acids - 14;
- alkanes - from 11 to 13;
- polyesters - up to 75;
- high molecular weight alcohols - from 1 to 1.25.
What to replace
If there is no wax of the required quality or it is difficult to apply without the proper experience, the task can be simplified and a construction varnish can be used instead of this composition, but it is not so good. The solution is simple, but not the best for a Venetian woman, because... the appearance of plaster treated with such a product will look much worse. At the same time, after hardening, the varnish will perform the same functions as wax: protect the surface from dirt and dust, and also add the necessary shine.
Source
Types of wax
The choice of wax depends entirely on the type of plaster, which can be porous or very dense. Liquid wax options should be applied to the porous base. For dense types of plaster, it is recommended to use the gel-like form of this substance.
When purchasing wax for finishing, you should definitely pay attention to one more parameter - the origin of the substance:
- Completely natural product
, containing no artificial additives.
- Synthetics
. The composition includes stearin and polymers.
Both types of coating are aqueous or other solutions. When natural wax is present on the wall, the plaster becomes shiny. When applying the artificial composition, the gloss is semi-matte.
Depending on the wishes of the owner of the premises, the wax can be colored or colorless, which can be used by mixing it with dye.
Tags
Decorative plaster Types of plaster decorative plaster decorative plaster becomes decorative plaster special decorative plaster. for plaster not plaster effect Decorative plaster on Venetian plaster Decorative plaster for decorative plaster for decorative plaster for decorative plaster of decorative plaster coatings for decorative plaster or decorative plaster Decorative plaster decorative wax is used for decorative plaster the final coating. the reflective coating is excellent
We select for different surfaces (which one is better suited, consumption)
The type of wax applied to the wall depends entirely on the method and type of plaster. For example, the coating for plaster will be different from that for the Moroccan version.
Nowadays Venetian plaster is very popular. It has a smooth glossy structure. The drawing in this case should be translucent. This effect can only be achieved if several layers are applied. If the work is done correctly, the walls will convey the structure of granite or marble. Thanks to wax, the necessary shimmer and shine appear on the surface. With rare exceptions, Venetian wax should be transparent.
Types of color palettes
If you are using Venetian plaster wax as a final surface treatment, then you should know the basic and most common color schemes. So, the decorative and protective composition can be:
- Transparent.
- Color.
- Contains additional components.
Transparent or Venetian wax is used in tandem with the appropriate type of decorative finish, emphasizing its textural features. The surface treated with a transparent composition has a glossy shine and looks great on a coating made to look like a rocky surface. Colored gives the work area being treated an additional color tint. This is an excellent auxiliary correction in case of unsuccessful selection of the main color.
Silver and gold shades are used to create a gilded or metallic effect. This is an ideal option for work if you plan to keep your interior in the Empire or Baroque style. This option, containing additional components, can be prepared independently at home. For this, a special construction powder of golden, bronze or silver color is used, which is added to a transparent or colored composition. In this way you can achieve original highlights.
Mass dyeing tinting
The transparent coating is applied mainly to Venetian plasters. In this case, the main purpose of their creation is to protect the coating. This wax does not require the addition of color. These plasters, in accordance with the manufacturer's recommendations, are coated only with wax, but not with varnish.
In rare cases, Venetian plaster wax with gilding is applied to yellow walls. A combination of pigment pastes and glitters can give walls the appearance of antique structures. When using coloring powders, proportions must be observed, but the volume of additives in wax should not exceed 15%.
Kinds
When using wax on Venetian plaster, the basic scale of finishing is specified. The finishing layer is:
- transparent;
- colored;
- with different inclusions.
The transparent composition helps to emphasize the texture of the finish. After processing, a glossy shine appears and looks good on a natural stone surface.
Colored wax gives the treated base an additional shade. You can adjust the main color when it turns out not to be as successful as expected. Golden, silvery shades are used for gilding, metallic effect - suitable for medieval styles. You can add construction gold, bronze, or silver powder to regular wax to give the surface original highlights.
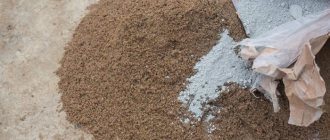
There are two types of compositions for walls in accordance with the criteria - thickness and composition:
- Gel or liquid consistency. Liquid mixtures are used for more porous materials. They are well distributed over uneven surfaces, fill voids, and create protection. Gel wax is thicker and is used for smooth walls, for example under stone. It is not so easy to apply, but the stone finish begins to shine like a mirror, like polished marble.
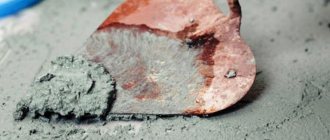
- Natural or synthetic composition. Wax with natural ingredients is usually a beekeeping product with good properties - safety, absence of harmful impurities, beautiful shine. Synthetic masses are produced industrially; compared to natural ones, they are more resistant to moisture and temperature fluctuations, the service life is longer, and a dense impermeable layer with a matte effect is formed on the surface. The synthetic composition is better combined with structural surfaces.
The varnish must be moisture resistant and vapor permeable. Drying time – 3 hours. Varnishes can be matte, glossy, colored, or with a metallic sheen.
Natural wax
What to replace
The plaster should not be left completely without a final coating, especially in a room with high humidity. The finish will not have the necessary protection.
When wax has to be abandoned, it is replaced with varnish. It plays a similar role - it preserves the attractiveness of the finish longer and adds shine. Acrylic or water-based compositions are suitable for plaster. They are environmentally friendly and are used for work inside buildings.
How to make wax for decorative plaster yourself
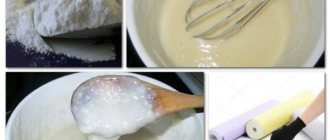
If you buy wax and try to simply apply it to the walls, most likely nothing will work. The natural product has a solid structure. In order to obtain the required consistency of the substance for application to plaster, it is necessary to prepare a creamy mixture. There are several recipes that allow you to create a similar composition and apply it to plaster.
Recipe 1 wax based on detergents - soap
The simplest and most economical way to add shine to decorative plaster is to use soap-based compositions. They turn out to be no worse than a natural product.
To create it you need:
- a piece of toilet soap weighing 150 g;
- baking soda - 2 tsp;
- boiling water - 7 l.
The cooking process is very simple and does not take much time. First, take a large grater and use it to grind a piece of soap. The resulting shavings are poured with boiling water and waited for complete dissolution.
Soda is also mixed in a small amount of water. The mass needs to be mixed thoroughly; it is most convenient to use a whisk for this purpose. This must be done until the mixture has cooled.
Then the quality of the resulting solution must be checked for viscosity. If the mass is quite sticky, you need to add a little more soda to it. In order not to spoil the final product, this must be done by placing the solution in a water bath.
Recipe 2 based on natural wax
The second option is more expensive, because its preparation requires natural plaster wax.
To obtain the required mixture, take:
- 2 parts of a natural substance (this can be wax or paraffin);
- 1 part purified turpentine;
- 1 part flaxseed oil;
- fat-soluble dyes, best for candles, but any others with similar properties will do.
The wax must be crushed in any way. After this, it is heated in a water bath. Then all the available components are mixed in one container until smooth. It becomes usable immediately after cooling.
Recipe 3 based on wallpaper glue
For the third option, you need to purchase non-woven glue. It can be used to create many compositions, including substances for adding shine to decorative plaster.
In this case, the set of components is minimal:
- 2 parts glue;
- 1 part of any varnish with the addition of acrylic;
- a small amount of decorative paint of any suitable color - gold, pearlescent.
The process of making the desired mixture consists of the following steps:
- The adhesive component is diluted in the proportions specified in the instructions. It is better not to use Moment glue for such purposes.
- Let the mixture sit for 30 minutes before adding the remaining ingredients.
- After adding varnish and paint to the mixture, it must be thoroughly mixed.
- If there are lumps, you can get rid of them by straining the solution through gauze or a nylon stocking.
From putty
A textured finishing composition can be prepared from a putty finishing mixture. This method is popular due to the fact that it is simple to implement and can be used to create original wall decoration.
Putty is divided into two types, which is important when choosing it as decorative plaster:
- starting;
- finishing.
Starting putty is used to level the walls. Its texture is a little rough and its color has a grayish tint. As an example, such putty can be used to decorate the walls of a room whose interior will be made in a loft style.
From putty
The finishing putty is smooth and soft. This composition can create an almost glossy surface. Thanks to its softness and elasticity, you can create various wall decors from simple chaotic irregularities to ornate patterns.
For self-plastering aerated concrete walls with putty, they mainly use a starting mixture, since it is cheaper.
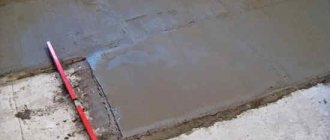
For the final finishing of the walls, you need to prepare a solution: mix dry putty and water. The ingredients must be thoroughly mixed with a construction mixer or a drill with an attachment. It is important that there are no lumps.
Next, you need to add PVA glue to the mixture.
The proportions of the constituent components are as follows:
- 2 liters of water;
- 6 kg of gypsum dry putty;
- 0.2 kg PVA glue.
The solution should be mixed little by little, since the putty tends to dry out quickly, and accordingly it loses its properties. An important step in working with this type of finishing is preparing the walls for work. Putty does not adhere well to dirty, dusty walls, so they need to be washed.
Then the cleaned wall must be coated with a primer. If required, you need to reinforce the wall with a special plaster mesh.
It is also worth treating the surface of the walls with regular leveling putty to prevent the appearance of dark spots. The decorating layer may be different. It depends on what effect you want to achieve in the end.
Applying the solution should be done quickly, since the putty dries quickly, and then it will be more difficult to work with it. Find out which plaster is best for the facade here.
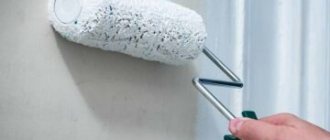
Applying and polishing wax surfaces
Not all beginners who are starting repairs for the first time know how to apply wax to plaster correctly. Before processing it, you must wait until the layer dries. After applying it to the wall, at least 3 days must pass. This time should be spent usefully and all identified defects should be eliminated, because After applying the mixture, this will no longer be possible.
In some cases, the wax for walls turns out to be too dense, so it is diluted with water and stirred well again. The mixture needs to be warmed up a little. This is best done in a water bath.
When diluting, you should adhere to the rule that the amount of added water should not exceed 3% of the total volume of the mixture. The liquid poured into the solution must be warm. It is advisable that the prepared mixture stand for at least a week before use.
Special requirements are imposed on the condition of the surface on which work will be carried out. It should be dry, free of dust, particles of which can be removed with a vacuum cleaner. Experts advise before applying the base layer to carry out additional treatment with colorless wax, which can be purchased in specialized stores. It is diluted in the following ratio: 1 part of the substance is taken to 4 parts water.
If the layer of plaster on the wall has a shallow relief, then a rubber spatula will be suitable for the job, provided that the initial composition is thick enough. Otherwise, it is more convenient to use special sponges and rollers. You can apply it with a brush, but in this case it will take much longer to process.
Wax for plaster should be placed on the wall in such a way that it completely fills all the recesses on it and rises above the surface. The consumption of the composition will increase greatly if the surface structure is heterogeneous, with grooves. In some cases, the substance will have to be reapplied to achieve a better effect.
The wall should be covered with the product very carefully, and in such a way that there is no excess, and the time period during which the film is applied is approximately the same. This is necessary so that the areas are painted evenly.
The method of applying the wax layer largely depends on the plaster itself. In most cases, the plaster additionally absorbs the applied composition. If the cracks on the surface are deep enough, the tinting composition is not removed, even if excess is formed.
After application is completed, the wax for decorative plaster must be ground. A damp sponge is suitable for this, which will give the plaster a clearer texture. After applying wax to Venetian plaster, it is recommended to process the surface using a grinding wheel. The formation time of the protective film is approximately 13 hours. But it is not recommended to touch the wall for 3 days, and the surface will completely harden in 1 week.
Variety of coatings
Today, without much difficulty, in construction supermarkets you can choose exactly the wax that suits a specific surface, read the instructions for application and get advice from the seller.
When decorating Venetian plaster, wax acts as a moisture protector , which creates a thin film. In addition, a wall treated with this wax looks elegant and acquires additional shine.
There are two options for choosing wax in this case. It comes in liquid or gel form. The glossy surface can simply be coated with liquid wax. Gel-like wax is suitable for porous surfaces.
Wax may contain substances with natural or synthetic components. Natural beeswax can be used to create a thin layer on the wall, thereby giving it shine.
If shine is not of particular importance, you can use a composition made artificially based on synthetic materials. It tends to give the wall a matte appearance, but it is believed that this coating is much more reliable and will last longer.
Each wax option is based on water. Based on this, you can slightly adjust the composition purchased in the store. If it looks excessively thick, you can warm it up slightly, but not over an open fire, but simply place it near a warm place, for example, near a radiator. When it melts, you can add water. Its amount should not exceed three percent. Then it is recommended to leave the composition for three days so that the mass becomes homogeneous. After this, you can begin finishing work.
Error correction
If the work is performed by an inexperienced craftsman, then the likelihood of various defects occurring is quite high. Most often, beginners who perform this type of work for the first time have to face a problem when the applied layer does not dry out. In this case, correcting the situation is easy.
If the mixture consists entirely of natural ingredients, then wipe the surface with a clean rag soaked in water. If artificial elements are present in the composition, then the liquid is replaced with a solvent. Most likely, in a place where the wax layer does not dry out, a lot of substance has accumulated. Therefore, excess must be removed with the same solvent.
If, on the contrary, the applied layer is too thin, it is increased by adding mixture to this place. If there are dull areas on the wall, they are processed using a sanding machine, and the disc must be fur to obtain the desired effect.
What is the best way to wash off and remove the wax layer from the wall and other surfaces?
If there is a need to remove decorative plaster, this can be done using warm water or a solvent. It is most convenient to use a cloth for these purposes. It is best to remove the composition with a solution designed for removing primer from wooden surfaces.
Experienced craftsmen do not advise, without having experience, to process the entire wall at once. It is best to practice application on a small area that is not noticeable. If the result is satisfactory, you can proceed to the rest of the wall area.
If the surface has already dried, then removing the wax layer is quite difficult. It can be removed using fine-grained sandpaper or a sanding machine. In this case, cleaning should be done very carefully. Dust is removed from the surface of the entire wall using a vacuum cleaner.
What to replace it with?
It is impossible to do without the final treatment of the plaster with wax, because it will not get the finished look that it was planned to give it. But in some cases, when, for example, there is not enough skill when applying wax or it was not possible to buy the right option, there is an alternative. Varnish performs the same functions as wax. It protects the surface from harmful influences, preserves paint for a long time, and adds shine.
A few days after varnishing, the surface can be safely washed with a damp cloth without fear of damaging the coating.
Varnishes also have their own classification. For decorative plaster, those that have safe compositions for humans and dissolve with water are intended. The varnish may be more matte or glossy, and it may vary in drying time.
The main thing you need to pay attention to when choosing a particular composition is that it is breathable and at the same time moisture resistant. These characteristics are the most important.
Usually, for processing decorative plaster, acrylic varnish, which is water-based, is chosen. It has no odor, is non-toxic and is considered an environmentally friendly material.
When dry, the white liquid turns into a protective transparent layer, which gives the wall a glossy shine and does not change colors at all. Sometimes this solution is tinted if there is a need not only to give the surface gloss, but also to add a tint.
The varnish usually dries very quickly. Three hours is enough for complete drying. In addition, varnish is used when you need to give the surface an antique effect and create cracks. In such cases, pearlescent varnish is usually used. It gives silver or golden tints.
Applying varnish to a wall is not a difficult process, but even enjoyable. But you need to take into account some points that will make the work easier and improve the quality of the final coating. Before applying varnish to the plastered surface, it must be treated with a primer. It will protect the surface from mold and mildew in the future, strengthen the plaster and reduce varnish consumption. It is applied in several ways: by spraying or using a brush, roller, sponge.
As for varnish, it is easier to correct mistakes with it than with wax. It is enough to remove the old layer with a special solution and apply a new one.
Cost and quality
The price of ready-to-use wax depends on a number of factors. First of all, the cost is influenced by the manufacturer’s brand, the popularity of the product; you will also have to pay for the name. The next factor affecting costs is the surface area being treated. Taking this parameter into account, approximately a mixture of 50 to 69 g/m² is required.
The average cost of wax is 5 thousand rubles. For domestic material you will have to pay about 440 rubles. A product designed for Venetian plaster will be a little more expensive, especially if it contains synthetic components. The highest prices are for mixtures made from natural materials and also imported. For them you will have to pay an amount several times higher than the cost of domestic building materials.