Floor leveling is mainly used for laying ceramic tiles or in the case of installing heated floors. For leveling, semi-dry or liquid cement-sand mortar can be used. There are several types of beacons for leveling the floor, some of them can only be used under semi-dry screed, while others are universal or only under liquid screed. We will talk about the most commonly used options and describe the universal technology for preparing beacons. Each master makes his own changes to it, and chooses the option that is more convenient for him to do.
Leveling floors according to beacons
The task of all beacons without exception is to serve as reliable guides for the rule, to ensure the most even horizontal plane of the screed. Craftsmen independently choose the leveling method, taking into account not only the physical properties of the materials, but also specific conditions: the size of the premises, the material used to make the base, the presence of various special and available materials.
Using beacons
Cement screed - implementation features
How to place beacons on a wall under plaster
Such devices are necessary for leveling walls with unevenness, chips, and cracks. Before installation, the method of attaching the beacons, the type of profiles, and the frequency of placement of elements are selected. Before installing the beacons on the wall for plastering, the distance between the guides is determined.
The placement of beacons is carried out in accordance with the size of the surfaces being processed and the length of the rule. When applying the rule with dimensions up to 1.5 m, the pitch of the beacon strip is up to 1.3 m. The smallest gap in small areas for plastering is 0.8 m. The extreme guides can be placed from the internal corners at a distance of 10-30 cm. From window or When installing doorways, the beacon is placed at intervals of 0.1-0.15 m.
Installation of plaster beacons for leveling bases is carried out in compliance with the following steps:
- surfaces are marked for leveling;
- landmarks for the outer beacons are placed;
- with a slight indentation from the leveled base using threads and cords, a vertical plane is created, accuracy is checked with a plumb line and level;
- calculations of deviations on the plane are carried out;
- distortions on the plane are corrected;
- intermediate profiles are installed;
- The mortar part for installing beacons is primed.
How to choose
The choice of beacons should be approached responsibly. If we take into account what the profiles were made of, then the plastic variety is used in cases where it is planned that the beacons must be removed after plastering or their operation will be carried out in very comfortable temperatures with no sudden changes.
Steel beacons are quite reliable, because they cannot be affected at all by temperature, humidity, chemicals and fungi. When using these guides, it is not at all necessary to remove them, both from the inside and outside of the building.
If craftsmen choose beacons by size (3 - 30 mm), then they need to buy profiles that correspond to the curvature of the walls. The thickness of the plaster layer is applied in such a way that the top one is sanded well, without reaching the guides. The length of the product ranges from 2 to 6 meters. Small ones are used for ordinary repair work in residential areas, and large ones are purchased for plastering warehouses and production workshops.
Lighthouses also differ in their shape. The T-shaped plaster beacon profile is placed in the corners of the rooms, the V-shaped one is placed on the entire wall and ceiling surface. A corner beacon is indispensable in the process of arranging a window, when there are few fastenings and materials that are strong enough are required. Metal guides are more promising in such situations; they better protect corners from damage, cracks and other types of negative impacts.
The use of homemade beacons is advisable if special profiles from the manufacturer are not available or there is not enough finance to purchase them. The simplest option in such cases is to pull the strings onto self-tapping screws. Instead, it is possible to install a wire, and then use it to remove the surface layer of the solution to ensure perfect evenness.
How to place beacons under plaster walls without a laser level
Beacons under plaster can be installed without a laser level using the following marking methods:
- standard markup;
- using the "spider" method.
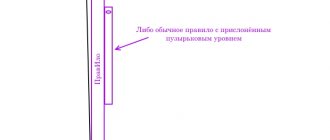
The verticality of the elements is checked with a building level, ruler or plumb line.
Common markings when plastering walls
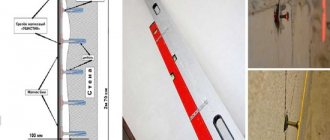
Beacons for plaster are installed using the standard method using nylon thread and a building level.
The work is carried out in compliance with the following stages:
- Markings are made with a distance of 10 cm from the corner of the room, and 15-20 cm from the ceilings. Self-tapping screws are installed at the marked points, protruding 3-5 cm above the surface
- A plumb line is tied to the screw, 2 new points are marked along the thread, into which the screws are screwed.
- When installing self-tapping screws step by step, the height of the element caps is checked. The surfaces of the screws must be placed in a single plane.
- The threads are pulled horizontally and vertically onto the self-tapping screws.
- The result should be a vertical plane.
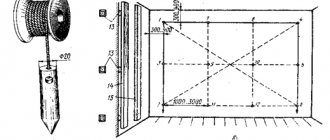
Marking using the "spider" method
Before installing beacons for plastering walls, you can mark using the “spider” method using 4 stretched threads. The technique allows you to accurately calculate the thickness of the plaster coating and reduce the consumption of finishing material.
Marking stages:
- Taking into account a distance of 5-15 cm from the corners of the ceiling or wall, points for drilling holes for dowels are marked.
- Place 2 self-tapping screws into the prepared holes, protruding 5 cm from the surface.
- A nylon thread is tied to the screws.
- The accuracy of the marking is checked with a plumb line.
- After fixing the horizontal threads along the surface, the curvature, the maximum protruding point, is determined.
- Then the plaster coating layer is calculated.
- Intermediate beacon profiles are placed along the main beacons and extended threads.
How to correctly place beacons under plaster walls using a laser level
Installation of beacons is also carried out using a laser level, rules.
The work is carried out in compliance with the following stages:
- The laser level is installed to the wall at a distance of 3-4 cm.
- Deviations in level are marked with a pencil.
- A metal square marks deviations from the surface.
- The zero point is determined and marked on the wall.
- The distance between the beacons is marked on the wall.
- The solution is poured along the lines.
- The profile strips are installed and fixed to the solution.
- After fixing the beacons and leveling them, the remaining solution is removed.
Final works
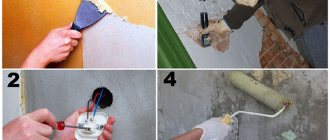
After installation, they move on to plastering the surface itself. It is carried out as follows:
- The first layer of plaster is applied between the beacons using a sweeping motion.
- After filling the entire surface, level the plaster using a short rule.
- The rule is to move along the beacons from bottom to top and top to bottom, also from left to right and from right to left. The excess must be removed as a rule; it must be thrown back onto the wall. This will get rid of excess air, which will improve quality. Works across the entire wall.
- After 6-12 hours, the beacons can be removed by pulling them out from the bottom up.
- Then the resulting voids are closed with the mixture.
The rule is to move along the beacons from bottom to top and top to bottom, also from left to right and from right to left.
Types of plaster beacons and beacon profiles
The following types of beacons for plaster are used in the work:
- metal (stainless steel, aluminum);
- plastic;
- mortar;
- wooden;
- strings;
- from plasterboard;
- markers, etc.
Elements come in different configurations:
- corner - used to align internal and external corners;
- V-shaped - used as guides to create an even plaster coating.
Plastic ones are made from durable polymers and are stable after fixation. The mass of the elements is small, so the load on the supporting structures during operation is reduced, installation is carried out easily and quickly. The products are resistant to deformation. Plastic elements do not need to be removed from the hardened plaster surface after finishing is completed. However, it is necessary to take into account the instability of plastic elements to temperature changes.
Therefore, a variety of plastic beacons is used only for interior decoration. The elements are also not used for facade plastering due to their low resistance to mechanical damage. The plastic beacon must be installed correctly during plastering to prevent subsequent cracking of the decorative coating.
Metal beacons are distinguished by their strength, durability, and versatility in construction work. Beacons for plaster are presented in sizes 3-10 mm. When selecting beacons, deviations from the surface are taken into account. For large uneven areas, wide elements will be required. Beacons are made from steel or iron.
When installing, elements can be cut using pliers or metal scissors. To securely fix the elements, a solution or special fastenings are required. After completion of finishing work, metal elements must be removed from the wall to prevent rust. When purchasing beacons, the quality of the products is checked. There should be no deformation to create an uneven plaster coating.
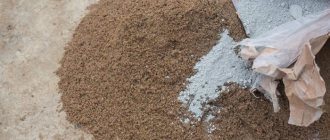
Mortar elements are made from a composition that is subsequently used for plastering surfaces. The work is recommended to be carried out by experienced craftsmen, because... The accuracy of the placement and manufacture of elements is important. Mortar elements are suitable for leveling concrete or wooden floors.
The beacons do not need to be removed from the plaster coating; the protruding parts are cut off with a tool and sanded to create a uniform surface. Mortar elements are economical to use and are suitable for finishing rooms of different sizes.
Wooden beacons are produced in the form of slats. The advantage of the elements is the possibility of repeated use during plastering work. However, it must be taken into account that wooden planks are used only in rooms with dry air and are not suitable for finishing bathrooms, toilets, kitchens, or facade decoration.
Wire beacons are easy to manufacture, inexpensive, and produced using a solution. After leveling the base, the elements can be removed and the openings can be leveled with plaster mixture.
Gypsum beacons are used to level surfaces of small areas. Elements from the solution are used to create a layer of small thickness. Gypsum beacons are environmentally friendly, safe to use, and do not require removal from walls and ceilings after finishing work is completed.
Types of devices
By beacon guidelines we mean 2 or more limiting lines for the rule that relies on them when removing excess solution. Before figuring out how to set up beacons for leveling walls under plaster, you need to decide directly on the type of guide elements. They can be ready to install and formed on the work surface.
Let's look at the first group in more detail. Factory products go on sale up to 3 meters long. The height of the part supporting the rule may be different, but not less than 3 mm. A constructive solution could be like this:
- Corner-forming. Samples are made of plastic or aluminum, galvanized steel. The central axis is a rounded protrusion, also known as a stiffener. The strips have perforations on the mounting plates to squeeze out excess leveler and create a more reliable fixation of the corner. Also, in order to reinforce the adjacent area, pieces of fiberglass mesh can be attached to the beacons. There is an alternative to the beacon profile - paper tape. There may also be inserts made of thin sheet metal and small holes.
Corner-forming metallized tape with perforation Source satu.kz
But their role is only to strengthen the corner and bring it to finishing.
- T-shaped beacons for plaster. Such products differ from angle-forming analogues made of steel and plastic in that the mounting plates are located in the same plane.
A separate type are arched or flexible guides. Here, the distinguishing feature from corner-forming analogues is the slots on the mounting plates. Such beacons are also installed as elements for leveling corners and walls. The only difference is the possibility of forming arched openings and other curved structures with a 90-degree turn.
Arched beacon profile with reinforcing mesh Source aspin.by
Reusable profiles are less common. They are used by professional teams. After hardening, they are dismantled and cleaned. The cost for one object may be a disadvantage, but the beacons, if the operating rules are followed, do not deform for a long time. That is, for large-scale projects, the products ultimately make it possible to reduce the cost estimate to one degree or another.
It is worth noting one feature of the metal profile. Its mounting strips are easily deformed. Such areas are unsuitable for work; craftsmen cut them out and work with the remains. Therefore, it is important to allocate a place for storing guides where damage to the products will be excluded.
Homemade beacons for plastering walls are made from various solutions and available materials. As a rule, a composition is used that is characterized by rapid hardening. Additions can include plasterboard profiles, pipes, and wooden beams.
Wooden beams with different sections Source santehkeram.ru
See also: Catalog of companies that specialize in finishing materials and related work
They are often dismantled after the leveler has dried. The resulting groove is filled with plaster mortar. Less often they are used as ready-made grooves for hidden communications (if the size allows). In any case, the area must be reinforced with mesh before finishing.
There is only one drawback here - you cannot level the structures until the mortar guides are completely dry. In the case of cement, it is enough to wait a day or two to gain strength to the required degree, so that, according to the rule, they do not wear off immediately. Otherwise, the surface will end up with indentations, which does not correspond to the expected evenness.
Do-it-yourself wall surface preparation
Before correctly positioning beacons for plastering walls, it is necessary to prepare the surfaces. You will need to clean the walls of old finishing materials (wallpaper, plaster, dyes). Then stains and mold are removed from the surfaces and treated with antiseptic compounds. Metal fasteners are removed from the wall or treated with water-based paint. Cracks and chips are filled with primer and leveled. Smooth concrete surfaces are covered with notches to increase adhesion to the plaster mixture.
When preparing a base with brickwork, the seams are opened to a depth of about 10 mm, dust is removed from the surfaces, a primer is applied, the primer layer is dried and, if necessary, reinforced.
Installing beacons in different ways
Before placing beacons on the wall, you need to choose a method:
- on plaster solution or tile adhesive;
- without solution;
- from cement or gypsum composition, etc.
The plaster beacon must be securely fixed and leveled on the wall. The work uses clips, corner elements, staples, etc.
Installation on the wall using plaster mortar or tile adhesive
Placing beacons for applying a plaster coating on an adhesive base or mortar is an affordable and easy-to-use technology. Next to the fastenings, the plaster mixture is laid out with a spatula. Round or rectangular beacons are formed from the mass.
The upper part of the elements is aligned to a single level. Beacons are placed on the hardened bases and fixed with plaster mortar or glue. The profiles are fixed using plasterboard profiles. We set the distance between the beacons taking into account the standards for the placement of fixing elements (up to 1.2 m between the beacons).
Installing beacons on a wall without mortar
A quick way to place beacons without mortar on the wall is used to decorate small spaces.
To fix profiles to self-tapping screws, several types of fasteners are used:
- clips;
- "eared ears";
- creamers;
- homemade staples;
- smarts, etc.
The advantage of these types of fastenings is the ease of installation and the absence of the need to prepare an adhesive base or solution. The elements do not move and ensure reliable alignment of the base. After installing the fasteners, begin plastering the surface.
When and how best to install mortar beacons on walls
Beacons for leveling bases can be made independently from a solution (based on cement powder or gypsum). After plastering, the beacons do not need to be removed from the wall panel. To work you will need a trowel, a set of spatulas of different shapes, sizes and a rule.
The work is carried out in stages:
- the axes of the beacons are preliminarily marked on the wall, the size of the indents is calculated taking into account the dimensions of the room;
- a laser device detects surface irregularities;
- an elastic plaster solution is prepared;
- the rule is installed on the edge and fixed;
- a trowel is applied on top of the rule;
- the bar is pressed onto the base onto the solution;
- use a trowel to adjust the angle of contact of the beacon strip with the wall;
- remove the remaining solution with a spatula;
- the rule is removed;
- the applied solution is dried for 24 hours, then a block with sandpaper is applied along the top of the beacons for grinding.
This method creates mortar paths with a width of up to 2 cm. After a day, the beacons are ready for plastering.
The technology is optimal for small unevenness and height differences. Execution requires specialist skill to accurately place elements.
Purpose
When a house is being renovated, finishing the walls takes up most of the time. To remove cracks and level the walls, you must first plaster them. If there are problem surfaces, special beacons are installed that act as a guide where it is necessary to create a perfectly flat plane. Beacons for plaster vary in size.
The guide is installed on the wall in the place of the depression so that the master can make the surface even. It should be secured with several self-tapping screws, otherwise the construction beacon will not hold tightly. Afterwards, dowel-nails with threads are inserted, which serve as the main guide for applying the plaster in an even layer. Beacons are attached to the mixture, which must first be spread over the walls and ceiling every 30 centimeters maximum.
The variety of problems with walls and ceilings forces craftsmen to take different approaches to their repair, choosing the best option for work. Also, beacons for leveling walls differ from each other.
If you choose the right type of guides, you can achieve excellent results without spending a lot of effort and materials.
Construction materials and tools
Before installing beacons, you need to prepare the following tools:
- plumb line, building level;
- laser level;
- nylon threads or cord;
- a set of screws or dowels;
- putty knife;
- trapezoidal rule;
- trowel;
- pencil or marker for markings;
- container for mixing the solution;
- perforator;
- screwdriver;
- scissors for working with metal;
- chisel;
- masking tape;
- pliers, etc.
Depending on the type of surface, it is necessary to use a primer, putty, dry or ready-made plaster, a set of beacon profiles, self-tapping screws of the required size, guides, adhesive solution, etc., depending on the type of surface.
It is determined which beacon is suitable for surfaces depending on the level of wall deformation, the method of fixing the elements, and the base material (concrete, brickwork, plasterboard sheets, porous blocks, etc.).
Rules for plastering lighthouses
When leveling the bases along the beacons, the following technical requirements are observed:
- The plaster coating should not be stronger than the base material to prevent cracking.
- Before leveling, surfaces are carefully prepared (cleaned of old finishing materials, primed, etc.). Oil stains are cleaned, surfaces are treated with degreasing agents.
- The planks are set with step-by-step alignment and checking the symmetry of the elements.
- The solution is applied during plastering in a uniform layer without indentations.
- The strip between the beacon guides is plastered in small sections to evenly distribute the solution.
- As a rule, press the guides with little force to prevent damage to the installed beacons.
- After the solution hardens, the beacon profiles are removed from the wall.
- The remaining irregularities on the wall are covered with a dense plaster solution.
To level the base, the outer guides are first installed, along which the remaining fasteners are placed. Properly performed marking work before installing plaster beacons ensures easy and accurate leveling of the base, correction of height differences, and reduction in the cost of finishing materials.
Features of using beacons
To perform the work efficiently, you need to know a number of its features:
- It is necessary to install the guide profile in the deepest place, otherwise more plaster mortar will have to be used;
- Metal products should be secured securely; they may become deformed. To do this, the interval between fasteners is made small, or a solution is applied between them;
- Removing the profiles is necessary so that rust stains do not appear on the surface afterwards;
- If plastering work is done with gypsum, then the excess should be thrown directly onto the surface, or stored in a separate container. Gypsum that has been on the surface can accelerate the hardening of the entire solution if it ends up in it;
- The remaining voids after removing the profiles are filled with a more viscous mixture than was used for the main work;
- The rule is that when resting on the guides, hold it without force so as not to deform the ends of the profiles.
Metal products should be secured securely; they may become deformed.
The article explained why beacons are needed; they can greatly facilitate the work of leveling walls, ceilings and floors. Non-professionals can also get a good result, which will significantly reduce the required funds for repairs, the main thing is to act slowly. Using special fasteners and ready-made profiles will be much more convenient for independent work and will save time. Obtaining a flat surface will simplify further finishing work.