The use of beacons is required to perfectly level the plaster mortar on the wall and create even corners. Such guides help to significantly save expensive mixtures. Beacons for plaster are made in factories from different materials, as well as by craftsmen directly at the place of repair. To get the best result in plastering walls, it is important to delve into all the nuances that are associated with the use of beacons.
Purpose
When a house is being renovated, finishing the walls takes up most of the time. To remove cracks and level the walls, you must first plaster them. If there are problem surfaces, special beacons are installed that act as a guide where it is necessary to create a perfectly flat plane. Beacons for plaster vary in size.
The guide is installed on the wall in the place of the depression so that the master can make the surface even. It should be secured with several self-tapping screws, otherwise the construction beacon will not hold tightly. Afterwards, dowel-nails with threads are inserted, which serve as the main guide for applying the plaster in an even layer. Beacons are attached to the mixture, which must first be spread over the walls and ceiling every 30 centimeters maximum.
The variety of problems with walls and ceilings forces craftsmen to take different approaches to their repair, choosing the best option for work. Also, beacons for leveling walls differ from each other.
If you choose the right type of guides, you can achieve excellent results without spending a lot of effort and materials.
Types of beacons for plastering walls
“Landmarks” come in various modifications. For example, beacons for plaster can be barrier paths made of hardened mortar with a rectangular or trapezoidal cross-section. They can also be made of stretched strings supported by a mortar roller. The beacon can be a profiled corner fixed at a corner or a T-shaped metal profile. The edges of planed hewn boards or panels of plywood attached to the side of a corner or arched opening also serve as beacons.
An excellent video on the types of beacons and how to install guides. Information about the species begins at the 7th minute of the video.
Types and sizes
Many home craftsmen who are starting to plaster walls for the first time do not know what kind of beacons there are in terms of type and parameters, and which ones are best to buy. Their main difference lies in the materials from which they are made.
Metal
They are the most popular among builders because they are convenient and quick to work with. The profile length can be easily adjusted using ordinary scissors. You can purchase a metal plaster beacon at any hardware store.
Guides are available in sizes 3, 6 and 10 mm. The appropriate option is selected depending on the unevenness of the wall or ceiling. The greater the curvature of the surface, the wider the profile used.
A metal beacon for plaster has the following advantages:
- low cost;
- easy installation;
- quick setting of the solution, which allows you not to stop work.
Metal guides are characterized not only on the positive side. For example, it is quite common to find finished products with curved geometry due to irregularities in the production process, during transportation or storage. In order not to run into defects, it is recommended to carefully check each guide before purchasing and transport them correctly to their destination.
Another common flaw with metal beacons is the possible formation of rust spots on the surface. They appear after the destruction and oxidation of zinc located on the surface of the guides. After applying the plaster, it is better to remove them immediately.
Aluminum beacons have a fairly flexible structure. To provide them with additional rigidity, you need to first fill the surface with a solution, and then install the guides.
Plastic
This type of beacon is very similar to metal, but heavy-duty plastic is used for their manufacture. The result is parts with less weight and greater strength. It's much easier to work with them.
Plastic beacons are resistant to deformation, their original geometry is well preserved even in conditions of improper transportation. After using the profile, spots and stripes do not appear on surfaces.
Such plaster beacons cannot be installed in places with negative temperatures, as they can crack from frost. It is not recommended to impact them with heavy weight and strong impacts, because the impact resistance of plastic guides is very low.
Improper fastening of the beacon profiles entails their sagging during the process of leveling the plaster, which will ultimately provide unevenness to the coating.
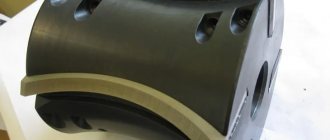
Reusable steel
These guides are expensive because they can be used more than once. Basically, they are used by builders who use beacons constantly.
Reusable steel profiles have increased strength, so there is no need to thoroughly fix them. Galvanized beacons will not bend or lose their original appearance, and the result of plastering the walls will be positive in any case.
Despite the fact that these beacons are convenient to use, they have their drawbacks. Not every person can afford to purchase a reusable steel profile for minor repairs; the high price forces them to choose a different type of beacon.
It is better to remove the steel product before the solution has completely hardened. Otherwise, despite the strength of the profiles, they can be broken.
Homemade
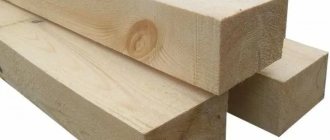
When special guides are not at hand, various devices are used instead. Some use metal pipes or corners. Wooden slats also work very well, but are used less frequently due to their tendency to warp.
Craftsmen often select profiles for drywall as homemade beacons, but then more solution is wasted than in other options.
In construction stores you can easily pick up ready-made beacons for plaster for any repair. However, homemade products are still often used. The process of making them is completely simple, and the costs are minimal.
Strings
Installing string beacons is considered the simplest and cheapest option for using guides for the rule. For placement you will need screws, thread or wire, as well as a drill. First, holes are made for the dowels, then the screws are screwed in, and the thread is tensioned. It is at the level with it that the solution is subsequently applied.
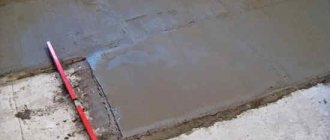
The layer of solution is laid slightly thicker than the surface itself. Next, after the plaster has slightly hardened, the top ball is cut off using a thread. The surface is leveled according to the obtained reference point.
Using string beacons does not come without some drawbacks. If the screws are attached incorrectly, the threads will be tied unevenly, which will then certainly affect the curvature of the walls or ceiling.
The advantages of this method include the low cost of string guides, because wire and thread cost pennies, and almost every home craftsman has self-tapping screws.
By brand
Using this type of plaster beacon is great for one-time repairs. The costs are minimal and installation is very simple.
First, vertical lines are drawn, in which holes are drilled every 40-50 centimeters. After which the screws are screwed in at the same level. Then a slightly larger amount of solution is applied, and the rule is pressed against the screws to remove excess. As soon as the plaster is thoroughly dry, the surface is leveled using a spatula.
Lighthouses by brand have some disadvantages. If the screws are set unevenly, the plane will end up with noticeable deformation. In addition, the work should be carried out very carefully, otherwise the pronounced curvature of the wall and ceiling surface will subsequently be evident.
You can plaster the walls yourself. An important condition is to obtain all the necessary materials and equipment, as well as follow the technology. Beacons should always be removed, regardless of the materials from which they are made. This measure will provide excellent results for a long time.
How to choose
The choice of beacons should be approached responsibly. If we take into account what the profiles were made of, then the plastic variety is used in cases where it is planned that the beacons must be removed after plastering or their operation will be carried out in very comfortable temperatures with no sudden changes.
Steel beacons are quite reliable, because they cannot be affected at all by temperature, humidity, chemicals and fungi. When using these guides, it is not at all necessary to remove them, both from the inside and outside of the building.
If craftsmen choose beacons by size (3 - 30 mm), then they need to buy profiles that correspond to the curvature of the walls. The thickness of the plaster layer is applied in such a way that the top one is sanded well, without reaching the guides. The length of the product ranges from 2 to 6 meters. Small ones are used for ordinary repair work in residential areas, and large ones are purchased for plastering warehouses and production workshops.
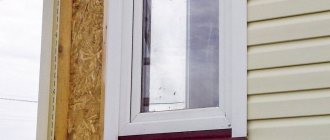
Lighthouses also differ in their shape. The T-shaped plaster beacon profile is placed in the corners of the rooms, the V-shaped one is placed on the entire wall and ceiling surface. A corner beacon is indispensable in the process of arranging a window, when there are few fastenings and materials that are strong enough are required. Metal guides are more promising in such situations; they better protect corners from damage, cracks and other types of negative impacts.
The use of homemade beacons is advisable if special profiles from the manufacturer are not available or there is not enough finance to purchase them. The simplest option in such cases is to pull the strings onto self-tapping screws. Instead, it is possible to install a wire, and then use it to remove the surface layer of the solution to ensure perfect evenness.
Marking for beacons
Before starting the process of installing beacons, it is necessary to first mark the surface. Today, different methods are used with their positive and negative sides.
Simple method
This method involves installing guides on plaster, which will then be used to finish the walls. Marking is carried out according to the following instructions:
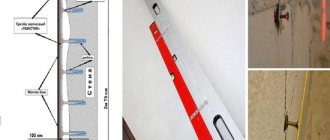
- The distance from the corner is 30 centimeters, the floor and ceiling are 15 cm.
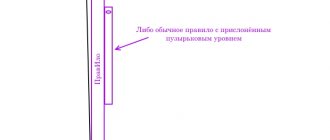
- A vertical line is drawn, the evenness of which is measured by a level.
- The operation is repeated on all walls in the room.
- The distance between the stripes is measured, it must be divided by 1.5 meters. The result obtained means the number of beacons that should be placed on a certain wall.
- The profiles are cut so that their length is reduced by 30 cm.
- At the very beginning and end of the lines, holes are drilled into which dowels are installed.
- The entire wall is drawn with lines at a distance of 1.5 meters from each other.
- Self-tapping screws are placed in the holes, and two threads are stretched between them.
- In places where the threads and drawn lines intersect, holes are also drilled into which dowels and screws are inserted.
- The level of the screws is leveled according to their heads: the number of wall obstructions, the thickness of the beacon and the additional margin (about 0.5 cm) are summed up. The result obtained means the length of the protrusion of the fastener from the walls.
As soon as the screws are installed, the threads are tensioned diagonally. The beacons are attached under the resulting plane. The products only need to slightly touch the threads. Then the ropes are removed and the walls are covered with mortar.
Using a laser level
Not every home craftsman has such a device. However, its use simplifies the process of placing beacons under plaster, which is carried out according to the following scheme:
- The laser level is used to locate the blockage of the wall. The device is installed against the wall opposite, then the cross-level is turned on. This procedure will help you find out the required thickness of the plaster layer without carrying out preparatory work.
- Using the device, vertical stripes with indentations are drawn on the wall, which were indicated in the simple method above.
- The level is placed 40 cm from the corner, a vertical line is included.
- The location where the laser beam reaches the wall at the minimum distance, for example 36 cm, is determined.
- A long strip (0.5 m) is taken and a point at a length of 37 cm is marked on it. This result was obtained by adding the distance from the laser strip to the wall, the thickness of the beacon and the required margin.
After the calculations have been carried out, glue is applied to the drawn lines. Then the beacons are pressed with a wooden strip until the mark coincides with the laser strip.
Installation of beacon profiles
After the preparatory work is completed, the craftsmen install the guides.
Installation with mortar or glue
The first thing to do is prepare the solution according to the instructions on the box. When planning to plaster surfaces using cement or lime mixtures, which tend to dry for a long time, gypsum or alabaster is added to them in small quantities, which helps the solution set faster.
The prepared mass is applied in small volumes at a distance of 15-20 cm from each other in accordance with pre-drawn lines. Next, the trimmed beacon profiles are applied to the solution and pressed to the surface.
If the craftsman used simple markings, the guide is installed flush with the screws. If there is a laser device, the position of the beacon is checked in accordance with the previously applied marks. Excess solution is removed, after which the following products are installed.
Mounting on fasteners
To accommodate beacon profiles, fastenings made of plastic have been invented. Their installation begins with removing the retainer from the product, which is placed on self-tapping screws screwed into lines every 30 cm. After this, the beacons are attached, and the retainer is returned back to the beacon profile.
The main advantage of this method is the speed and ease of installation. However, the plaster layer thickens by 0.5 cm, and therefore the final cost of repair work increases significantly.
Using “eared ears” made of metal
More recently, painters and plasterers used one trick. They cut out legs with holes for fastenings, with the help of which plasterboard panels are installed. Beacons were placed on these metal parts. Today, such products are made from metal in large factories and are available in all hardware stores.
The installation process of the guides is not complicated. Beacons are applied to the walls, then attached to the surface with metal ears. They already have self-tapping screws that are screwed in to the required depth, which ensures the installation of a level for applying plaster. Installing beacons with special ears is easy, but removing them afterwards is much more difficult.
Conclusion
Choosing the optimal option for plaster beacons is no less important than their correct installation. The quality of surface plastering directly depends on this stage, so pay close attention to it. The video in this article will clearly show some important points of the process, and if you still have any questions, ask them in the comments.
Similar articles
- Plastering walls using beacons: video instructions for do-it-yourself installation, technology, cost, photos
Plastering walls along lighthouses with cement mortar is the most affordable finishing option today. This is due to the fact that the cost of the components... - Cement mortar for plaster: video instructions for preparation, consumption per 1 m2, proportions, photo
Judging by the amount of use, cement mortar plaster is the most popular and sought-after type of rough, and sometimes front... - Plastering walls on beacons with your own hands - photo instructions in detail
This master class will help you master the basic mechanics of plastering walls. Many people have questions when choosing a plaster mixture, which is the right one...
Alternative materials
Not everyone can carry out repair work well. Here it is necessary to use tools and auxiliary equipment correctly. This facilitates high-quality plastering on all surfaces on the internal and external sides of the objects being repaired.
Before the advent of modern lighthouses, wooden slats were used almost everywhere as guides. They were installed on gypsum and cement mortars, then leveled using a plumb line. However, wood is considered an inconvenient and unreliable material, because it swells over time. Strong wetting causes the surface to swell, causing the walls to become severely curved.
Another option for installing beacons was the use of shavings. These remains from cutting wood were glued together into a common mass with special substances. The result was chipboard, MDF, wood concrete. The structure of these materials (the fibers have different directions) allows the products not to deteriorate or warp from exposure to moisture, which facilitates high-quality repairs for a long time. It is only necessary to soak the products in advance with antipyrine, an antioxidant. Such glued strips of sawdust are still used as beacon guides today.
Plaster beacons are very valuable and useful products, with the help of which craftsmen achieve perfectly smooth surfaces and high-quality coatings. The main thing is to act in accordance with the above recommendations, and also remove beacons from the walls in a timely manner. After all, even expensive galvanized profiles have the unpleasant property of causing the appearance of rust spots and stripes, which will require the application of a new layer of plaster. Do not neglect effective means for marking, for example, a laser level. This device will help you quickly complete the preparatory work and begin installing beacons and further plastering.
Introductory part - plaster beacons
Checking the vertical level of the wall
Not so long ago, the vast majority of plastering work was carried out without strict adherence to technical regulations, or rather with its minimum requirements. And this is understandable, the country was experiencing a housing crisis - the main thing was getting living space, and not the correct geometry of the internal partitions.
And there was a problem with building materials - even paper wallpaper was in short supply. But times have changed, the requirements have changed somewhat, there is a complete surplus of building materials, and everyone is talking about quality. I had to remember and learn to meet increased construction requirements.
So in this regard there are clear instructions prescribed in the main standards of the builder - SNIPakh.
SNiP 3.04.01-87
According to this provision, the plastered surface is subject to requirements regarding the following points:
- thickness of one layer of gypsum plaster
- reinforcement of plastered surfaces
- maximum permissible humidity of plaster material
- formation of plaster beacons in the conditions of creating an improved and high-quality finish
- layer strength
- the concept of “European-quality renovation” is also introduced
As can be seen from the situation, for improved and high-quality repairs, the installation of beacons is required.