Cement plaster is considered the most suitable option for finishing internal and external surfaces in residential, industrial, commercial and utility premises. This material is characterized by mechanical strength and resistance to moisture. With its help, you can plaster walls made of brick, cinder block, and cellular concrete “from scratch.” Finished coatings can be repaired in fragments. That is, to repair crumbling plaster, you do not need to remove the entire coating - just clean and finish part of the wall.
Material requirements
Subject to the proportions and rules for making the solution, it must meet the following requirements:
- The coating must be smooth without cracks or other defects. In addition, it should not move away from the wall surface.
- Cement plaster allows steam to pass through, so moisture will not accumulate under it, which significantly increases the service life of the coating.
- At the same time, cement plaster has thermal insulation properties and easily tolerates temperature changes.
The presence of cracks and other defects indicates improper preparation of the cement plaster solution.
Do-it-yourself mortar for plastering walls is made according to almost the same recipe, but depending on where it will be used, slight deviations from the technology are allowed.
Installation of beacons
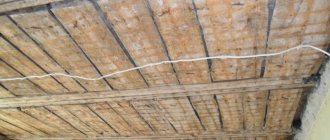
The adhesion of the material to such walls leaves much to be desired, so it is worthwhile to provide for the installation of shingles - thin wooden plates that act as a kind of sheathing - to the bases.
To simplify the task of applying the cement composition in an even layer, it is necessary to install beacons. They are carefully inserted into the plaster, previously applied along marked vertical lines, in increments of a meter and a half, maintaining a distance of 200-300 mm from the corners. But in general, when arranging beacons, the length of the building rule must be taken into account so that the tool can pass freely between the devices.
Residential solutions
For bedrooms, living rooms and children's rooms, it is better to make mixtures based on cement grade 400 or 500, to which coarse sand and lime are added. The proportions are as follows: 2:6:1. In some cases, 1 part of gypsum is added to the solution to make the rough coating better. If such a solution was used, then for finishing work it is better to use sand of small rather than coarse fractions, and also add a little polyacetate glue to the plaster (mass part no more than 10%). This type of cement-based plaster will last about 15 years, and it does not require further decoration. If the desire to decorate your home appears, the wall can be painted, wallpapered or tiled.
For finishing living rooms it is better to use a solution with the addition of gypsum.
For finishing kitchens, corridors, bathrooms and similar rooms, you can prepare a cheaper solution. Cement mortars for plaster are prepared on the basis of a binder of grade 100 or 200. Sand is simply added to them in a ratio of 1:4, after which they are thoroughly mixed and diluted with water. All layers (rough and finishing) can be applied using plaster of the same consistency. The resulting coating will be of low quality, so most often it is decorated with paint, tiles, etc.
Cement plaster mixture, which does not contain lime paste, but clay, is used in those rooms where maximum insulation is needed. Alumina is both a cheap and effective thermal insulator. Typically the proportions of cement, clay and sand are as follows: 1:4:8. To increase mechanical strength, mineral fillers are added to cement-based plaster (no more than 10% by weight of the entire solution). Sometimes, to reduce the cost of the mixture, crushed asbestos is added to it, but such plaster can only be used in non-residential premises.
For finishing non-residential premises, you can use a cheaper solution with the addition of asbestos
Important! If you plan to finish hot surfaces, such as the walls of a stove, fireplace, chimney, etc., you must use only solutions with clay. If you prepare plaster solutions with your own hands with the addition of lime, the coating will crack very quickly.
Advantages
The material has many positive qualities, including:
- reasonable cost: the ready-made mixture is a quarter cheaper than its gypsum-based counterpart;
- high strength of the finished layer;
- long-term operation reaching fifteen years;
- ease of making a mortar mixture - combine cement and water in the required proportions, mix thoroughly;
- excellent grip on different surfaces;
- resistance to moisture and temperature changes.
To be fair, we note that there are certain disadvantages:
- the solution turns out to be of a thick consistency, viscous, and difficult to work with;
- a thin layer may become cracked when dry;
- the mixture is not applied on top of the plaster;
- the solution does not adhere well to the wood surface;
- the composition adds weight to the walls, increasing the load on the foundation.
What kind of plaster should be used for external surfaces?
Cement plaster mixtures for external work are manufactured using approximately the same technologies as materials for interior finishing. If lime is used as an additional component, then it should be 2 times less than in the case of internal surfaces. The fact is that external walls are subject to more serious loads, so they must first of all be strong, and then beautiful.
Cement plaster for external use is subject to more severe loads
External plastering is carried out in three stages, each of which requires specific plaster mixtures:
- For spraying. This layer is made to increase the reliability of contact between the plaster and the wall. It is applied in a thin layer of no more than 3 mm, and it is simply thrown onto the surface, so cement mortars for plastering walls must be liquid. For production, you will need Portland cement of a grade of at least 400. To one part of this material add 2 parts of sand and 0.1 part of the adhesive base. To increase adhesion to concrete substrates, you can add a small amount of liquid soap or dishwashing gel to the solution.
- The next layer is called soil. It must be durable, so the proportions of cement, sand and mineral filler are as follows: 1:3:1.
- After the primer layer has dried, a covering is applied. The proportions of the solution are the same as for spraying, but it is recommended to use fine sand.
The more layers of plaster, the lower the strength of the coating, so it is better to try to level the surface the first time.
For external work it is better to give preference to higher quality cement
Varieties of plaster compositions - not everything is so simple
A simple mixture is used in rooms located inside a heated building for:
- rough leveling before installing the reinforcing mesh, which must be applied to create a decorative type of material;
- sealing various defects: cracks, gaps, grooves and irregularities. Acts as a preliminary layer for finishing;
- creating an antibacterial surface, but special additives are added to the composition to protect against fungus.
A simple composition of sand-cement plaster is used for installation using a two-stage system: preliminary spraying of the surface and a primer layer.
The composition of the plaster changes if it is necessary to perform work in difficult conditions: high humidity, exposure to ultraviolet radiation, temperature changes. In the above conditions, a universal DSP is used. The characteristics of cement-sand plaster with additives differ due to increased resistance to negative influences. A universal type of product is used to increase waterproofing, including for reinforced concrete rings, septic tanks, etc.
The universal mixture used to plaster walls is applied in 3 stages (discussed earlier), but to improve quality, 4 steps can be used (a primer layer is performed 2 times).
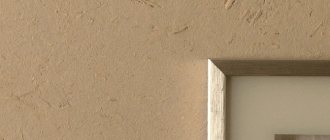
A simple composition is used where the quality of the finish is not particularly important
If walls with high humidity are plastered, it is recommended to use high-quality compounds that require certain skills and tools. For high-quality plaster mortar it is necessary to install beacons; for other plasters they are optional. It is recommended to iron the covering layer for waterproofing and increasing the strength of the surface.
Independent production of cement-sand mortars
Before making a mortar for plaster, it is important to remember that such materials consist of a main binder (in this case cement), a filler (the cheapest and most accessible option is sand, but there may be other minerals), as well as additional components, which increase the thermal insulation, hydrophobic and other qualities of the plaster. A solution for cement plaster is diluted with water; its consistency, which is called fat content, depends on the amount of liquid. Fatty, normal or liquid formulations are used for various purposes.
On a note! Fat cement mortar for plastering walls contains a lot of binder. After such a solution dries, cracks may form on the surface. An insufficient amount of cement and sand can lead to the coating simply falling off the wall after a short time. For optimal solution quality, it is necessary to mix the main components in approximately 1:3 proportions.
The simplest and most common type of this material is a cement-sand mixture. The manufacturing proportions depend on the type of binder used. If Portland cement grade 400 or higher was selected, then 8 portions of sand per portion of cement will be required. For grade 100 material, you will need only 2 portions per 1 part of binder.
The preparation of ordinary plaster is as follows:
- Measured portions of cement and sand are mixed in a container.
- Then water is gradually added to it, constantly stirring the solution using a drill and a mixer attachment.
- After the consistency approaches the thickness of sour cream, you need to leave the solution to infuse for 15 minutes and then mix it again.
- In order for the solution to retain its plasticity index when drying, a small amount of PVA glue, soap base or dishwashing gel (no more than 2%) is added to it.
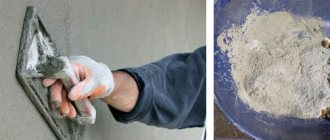
When preparing a solution, first mix sand and cement in the required proportion, and then gradually add water
How to make functional and aesthetic repairs.
Decorative plaster is often used to give rooms and building facades additional aesthetic appeal. This technology is relatively cheap and can be applied in practice with one’s own hands.
It will not be news that decorative processing is carried out on leveled surfaces. On the facades of houses this most often happens after insulation work has been carried out. Traditionally, before applying the mortar, the surface of the building is primed, which ensures a better connection of the plaster with the base. It is also appropriate to use the primer for objects whose finishing is not completed before the onset of frost, for better preservation.
With this type of wall treatment, ready-made plaster or dry mixtures are used. It is applied with a spatula and then rubbed. The rubbing technique plays a special role, since it is this that gives a unique pattern to the finishing of the structure. If you add special small balls to the mixture, the plaster will come out with grooves and depressions, which will give it a special flavor.
When performing work, it is important not to stop until the finishing of the full area of one of the surfaces is completely completed, since if you do the opposite and continue work after part of the wall has already dried, noticeable stains and tonal transitions may appear between the treated areas. It is better not to work in hot weather, since rapid drying will not benefit the quality of the plaster. After the solution has completely dried, the surface is primed again.
Blowing hot air onto the walls can significantly damage the applied layer. With partial drying or uneven distribution of air streams, the material may sag, crack and deform, which, of course, is quite undesirable.
It is better to speed up the hardening process not with the help of heat treatment, but with the addition of plasticizers, which will reduce drying down to several days, without disturbing the structure of the solution and without causing the appearance of cracks and bubbles.
Production of cement-lime mortars
Work on the production of such materials begins with slaking lime. For this operation you will need:
- lime;
- capacity;
- clean cold water;
- personal protective equipment (goggles, gloves, thick clothing).
First of all, dry lime is immersed in a container and filled with water. Lime slaking is accompanied by a violent exothermic reaction, so the volume of lime and water should not exceed 30% of the container volume to prevent splashing of the material.
The preparation of cement-lime mortars begins with slaking lime
After 10 minutes, the reaction will subside, so you will need to add water again and leave the mixture to steep for about 1 hour. After this, add some water again, cover the container and let it brew for 2 weeks.
You should know! When using quicklime, the above reaction will occur on the walls, causing the plaster to crack.
After two weeks, you need to remove the lime from the container and rub it through a sieve with a 3 mm mesh. Then mix it with cement in a separate container, and then add sand. For 1 part of cement, it is recommended to use 1 portion of lime and 3 sand. Then you should pour a small amount of water and mix the plaster thoroughly.
Slaked lime is rubbed through a fine mesh sieve.
Cement mortars cannot be soaked with water after they have dried, so it is better to prepare a small amount of material so that it does not have time to dry in the container.
Where is the best place to order and buy.
The price of plaster depends on the “promotion” of the brand under which it is produced, as well as on the cost of its components. If you can’t prepare it yourself, you can buy it ready-made in building materials stores. To do this, it is not necessary to directly visit such stores; it is enough to place an order on one of the Internet sites that represent real-life retail outlets.
You can also purchase a wholesale batch by placing a preliminary order on one of the electronic trading platforms.
In order not to be mistaken with the type of plaster that is required for finishing work, you should calculate how much of it is per m2, as well as how much you will have to pay per square meter. Material consumption per sq. m. must be multiplied by the area of the planned work to clarify their book value. data-matched-content-ui-type=”image_stacked” data-matched-content-rows-num=”2″ data-matched-content-columns-num=”3″ data-ad-format=”autorelaxed”>
Additional components
In some cases, additional ingredients are added to the formulations:
- Ground quartz. The fraction of this material can be from 0.1 to 6 mm. It is added to enhance the decorative properties of plaster and improve its resistance to acidic environments.
- Barite sand. This material protects surfaces from exposure to radio frequency waves. Plasters with such a substance are needed in areas with high background radiation, in various enterprises and in medical institutions.
- Crushed marble. This substance increases the strength characteristics of the composition, as well as its decorative properties.
- Mica. Makes the coating immune to ultraviolet waves.
- Metal shavings. Significantly increases compressive strength, but is susceptible to corrosion, so its use is not always justified.
- Expanded polystyrene. This material is added to plaster to increase thermal insulation performance.
Main technical characteristics
The parameters of cement plasters directly depend on the chemical composition of the mixtures. Indicators may vary as manufacturers use different formulations. However, when purchasing a product in all cases, it is recommended to pay attention to such characteristics as:
- Permissible layer thickness.
- Grain.
- Solution pot life time.
- Peel and compressive strength.
- Degree of adhesion.
- Moisture absorption level.
- Vapor permeability coefficient.
- Frost resistance.
The complexity of the work, the strength and service life of the applied coating depend on these indicators.
Step-by-step technology for applying cement plaster
Before applying the solution, it is necessary to remove the old layer of plaster.
Before you begin applying the plaster solution to the surface, it should be carefully prepared. Preparatory activities include the following processes:
- Removing old coatings.
- Cleaning from grease stains, paint residues, dust and so on.
- Primer treatment.
- Installation of reinforcing mesh (not required for external finishing).
Before starting work, you need to prepare the following:
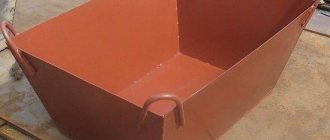
- Container for plaster.
- Spatulas and trowels for applying material.
- As a rule, a trowel and a grater for surface treatment.
Tools for preparing and applying cement plaster
First stage
After all the preparatory work has been carried out, as well as the required amount of solution has been prepared, you can begin to apply the first layer of material. This layer is called spray. The strength of contact between the plaster and the wall depends on it, so it is important to do everything correctly. Instructions for spraying:
- Add a little water and adhesive base to the finished solution, then mix thoroughly.
- Place the plaster on a spatula or trowel and spread it onto the surface.
- Level the coating with half tint or rule.
On a note! For concrete walls, the thickness of this layer should be 3 mm, for brick 7 mm, for wood 10 mm.
Second phase
10 hours after applying the spray, a reinforcing mesh must be installed. For concrete or brick surfaces, you can use a regular mesh or painting reinforcing products; for wooden surfaces, shingles are better suited. Install the products on self-tapping screws around the perimeter of the mesh and in its center. Then you need to scoop the solution onto a wide spatula and transfer it to the surface. Using a trowel, the coating is leveled. Then they take the rule and smooth the wall with it, removing excess mortar. You need to make zigzag movements and walk along the entire wall from bottom to top, then repeat the procedure. The thickness of this layer should be no more than 5 cm, and it is called soil.
The second stage, called soil, is a layer of plaster that bears the main functional load
Third stage
After the wall has dried and gained strength (about 9 days are required), the finishing layer is applied - a covering. The mixture for plastering walls should be the same consistency as for spraying, and the thickness should be about 3 mm. Water is applied to the soil using a spray bottle, after which the surface is finished using spatulas and trowels. After the layer has dried, it is further processed with graters.
Compliance with the technologies for preparing and applying cement plasters is the key to successful repairs. Even a novice home craftsman can cope with these tasks.
Conclusion
At first glance, it may seem that gypsum plaster is of higher quality - it is easy to apply, allows moisture to pass through, does not disturb the microclimate, and allows you to quickly complete the finishing. However, this does not make gypsum mixtures universal, which means you need to choose plaster based on its purpose.
Cement mortar is suitable if finishing a facade, basement or bathroom is required. It should also be preferred if it is necessary to ensure maximum surface strength, but ideal smoothness “for painting” is not needed. Also keep in mind that cement plaster is more difficult to apply - without the appropriate experience it will be almost impossible to cope with.
It is better to choose a gypsum mixture if you need to decorate your living space, and if you plan to do the work yourself.
Gypsum plaster is easy to apply and is well suited for pre-finishing. Good luck!