Methods for plastering a wooden ceiling
Before plastering a wooden ceiling, you need to understand the nuances of this process. It will not be possible to immediately plaster a ceiling surface lined with boards, consisting of beams or logs, because there will be many holes and cracks in the ceiling that will impair the adhesion of the mortar to the base. To facilitate plastering work, professionals attach a chain-link mesh, wooden shingles to the ceiling surface, or cover it with plywood. Then the solution is poured onto a smooth, even base without gaps.
To improve the adhesion of the plaster to the mortar, plasticizers are added to it and the mixture is made thicker.
Plastering is carried out in three stages:
- using a spatula, spread the solution onto individual sections of the ceiling surface and pre-level it;
- significant irregularities are eliminated during the leveling process with a wide spatula or rule;
- Finishing grouts are used to eliminate minor irregularities.
When plastering wooden ceilings, special attention is paid to the design of the interface between the ceiling and wall surfaces. To achieve a perfectly even joint, use perforated corners that hold their shape well and are lightweight.
Important! There are three methods of plastering the ceiling - machine, manual and combined. To do it yourself on small areas, manual application is used.
Beautiful ceiling with your own hands: we plaster according to all the rules
Complex suspended structures made of plasterboard or tensioned fabrics look very elegant and stylish, but the height of the ceiling in typical apartments often prevents changes in its level. In such cases, many designers recommend choosing the European option - leveling the ceiling and then decorating it. Knowledge of the basics of construction skills and a few tips will tell you how to plaster the ceiling with your own hands so that it becomes smooth, beautiful, and ready for further painting or pasting.
Master class: how to plaster the ceiling and walls
How to choose materials
We will introduce you in detail to the technology of work, but first we will tell you what materials and tools will be needed in the process of preparing and applying the plaster mortar. If anyone has had to level walls, they will notice that there are no big differences in the choice of materials.
Cement mortars with the addition of sand gave way to gypsum compositions, which are more plastic and convenient for precise application. Modern plastering mixtures do not shrink after drying, as a result of which the appearance of cracks and chips is completely eliminated.
Helpful advice. Sharp transitions at the joints and deep cracks between the slabs of the ceiling structure must be repaired before processing. Typically, a reinforcing mesh and a thick polymer composition are used for this.
Classic plaster mixture from the Knauf brand - Rotband
So, to complete the work at all stages, you must purchase the following materials in advance:
- deep penetration primer for concrete, brick, stone surfaces (containers from 1 to 10 liters), 250-300 grams are consumed per 1 m²;
- plaster mixture (the products of the manufacturer Knauf have proven themselves to be excellent);
- galvanized beacons for marking (6 mm high);
- construction plaster (for fixing beacons).
To mix the solution you will need liquid - ordinary tap water is perfect.
Plaster dry mixes Rotband (Knauf) have several types and are sold in most construction supermarkets. The good thing about the material is that it can be used to adjust the layer thickness from 5 to 50 mm, which is required for uneven ceilings. When purchasing the mixture (a standard bag weighs 30 kg), consider the consumption - 8-9 kg of dry material is needed per 1 m².
If this is your first time plastering the ceiling with your own hands, you should know one nuance: the freshly prepared solution must be used within the next 25 minutes, otherwise it will dry out and become unsuitable for application. One of the advantages of Rotband is its versatility. Using it completely eliminates the traditional final stage - putty, since the mixture lays perfectly smooth and is suitable for further processing.
Using a drill with a special whisk attachment ensures uniformity and high quality of the solution
Set of tools for plastering
In order for the plastering of the ceiling to proceed smoothly, quickly and without incidents, along with the materials, tools should be prepared in advance. You will need:
- one of the levels is better laser than hydro;
- impact drill with a set of drills and an attachment for preparing a solution;
- beacons, cord for marking;
- devices for applying materials - roller (or brush), trowel (trowel), narrow spatula, usually with a spirit level (2m), sponge plaster grater;
- dowels
The speed of work will be much higher if the priming liquid and plastering solution are placed in convenient wide containers.
To reduce the amount of leveling work, apply the solution in small portions
Stages of work
Each of the stages is important, mandatory and has its own characteristics, so we will try to figure out how to properly plaster the ceiling so that it becomes smooth, even and does not require alterations.
Surface preparation
Before applying a fresh solution, it is necessary to scrape off the old paint, plaster or whitewash using available tools (spatulas, brushes). If there are sealed cracks, they should be expanded (remove the old mortar and widen them). We generously coat the entire surface, including joints and cracks, with primer and wait until it dries completely.
Helpful advice. Any old materials containing lime can be easily washed off with plain water. Do not forget to put on throwaway clothing or a plastic raincoat before the procedure.
Approximate diagram of installing beacons in a small room
We carry out the markings. A laser level is perfect for this, with the help of which we find the lower and upper boundaries of the ceiling and mark them with marks along the entire perimeter. For visual perception, we stretch the cord - it will serve as a guide when attaching the beacons and applying the solution. In order for the beacons to be evenly located, we draw straight lines along the ceiling, the first of them at a distance of 30 cm from the wall, the rest taking into account the use of the rule (it should overlap the beacons by about 15-20 cm).
Installation of beacons
To fix the beacons on the ceiling, you need to prepare a thick solution. To do this, dilute the plaster with water to the consistency of thick sour cream (so that it does not drip from the ceiling, but sticks firmly to it) and apply the resulting solution along the first drawn line (30 cm from the wall), using a small trowel or spatula. The distance between the slaps is 25-30 cm. The first beacon strip is attached to the finished plaster “track”, and the rest are fixed in the same way.
Don’t forget to follow the stretched cord and check the horizontal level with a level. The slats will “freeze” for about a day; during this forced break, you can start repairing the walls or purchasing missing materials.
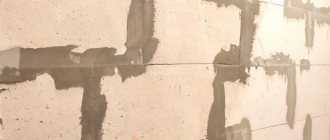
Sealing cracks in the ceiling is a mandatory step before applying a layer of plaster
Applying plaster
Instructions for preparing the solution are printed directly on the packaging of the plaster mixture, but usually 1 standard bag (30 kg) requires approximately 17-18 liters of water. For more even, uniform mixing, you can use a drill with a whisk attachment.
Helpful advice. The quality of the solution will improve if it is mixed again after 5 minutes. You cannot add water or dry mixture after this.
Then we proceed according to plan:
- We throw or apply the solution with a spatula onto the area between the wall and the first lighthouse, starting from the corner.
- We level the applied plaster using the rule, holding the tool perpendicular to the slats. Remove excess solution.
- We plaster the following areas in the same way, maintaining the level.
- We bring the surface to its final state - level it with a sponge grater approximately 20-25 minutes after plastering.
There are no big difficulties in how to plaster the ceiling. The main thing is to follow the instructions and improve your skills as you work.
Plastering a ceiling without beacons
The nuances of plastering a wooden ceiling
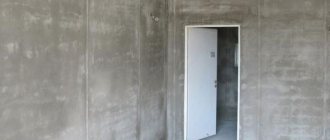
A wooden ceiling assembled from logs or timber, as well as covered with boards or slats, is not suitable for plastering, because its surface must be smooth, without openings or cracks. Therefore, the first thing to do is to cover the ceiling with sheets of plasterboard or plywood. More experienced craftsmen nail a chain-link mesh to a wooden ceiling and throw the solution directly onto it.
A wooden ceiling must first be covered with plasterboard or plywood.
To increase the adhesion of the solution to the coating, it is made thicker by adding special plasticizers during the preparation process. Plastering occurs in two stages: first, the solution is spread with a spatula onto a separate section of the ceiling, then it is leveled. Large irregularities are removed during leveling with a rule or a wide spatula; finishing grout helps get rid of small ones.
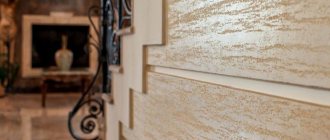
A perfectly smooth ceiling can be decorated with Venetian plaster, painted in any shade to match the walls, covered with wallpaper and even decorated with an exquisite colored pattern or ornament.
Decorative plaster ceiling in the bathroom
toppotolok.su
Which plaster to choose for wood
Ready-made mixtures or solutions prepared with your own hands are suitable for work. The following types of plaster mixtures are suitable for woodworking:
- Clay compositions are environmentally friendly and affordable. They are allowed to be used in premises for any purpose. The solution is quickly prepared, easy to apply, but takes a very long time to dry. In this case, the surface should dry at normal humidity and above-zero temperature in the room. Using a heat gun or hair dryer to speed up drying will cause the surface to crack.
- Cement-sand mortars are most often used. Lime can be added to them or used without it. These mixtures are suitable for indoor and outdoor use.
Gypsum compositions are suitable for any premises. They adhere well to the wooden base, smooth out easily and lie flat.
Dry factory mixtures for working on wooden surfaces are made on the basis of gypsum. Depending on the place of application, gypsum plasters are available for sale for external or internal use. You can also purchase universal mixtures that are suitable for any surface and work indoors and outdoors.
Technology for insulating a wooden ceiling with clay and reeds
The main types of wood putty on the market
In a specialized store, a home craftsman can select a putty that is optimally suited for a specific type of room where finishing work is required. Among the range of these materials on the market, the following product categories are available:
- A gypsum mixture known for its versatility, ease of application, plasticity, decent appearance and practicality. This type of putty should be used in rooms with normal humidity, since gypsum is an airy binder and begins to deteriorate when exposed to water vapor or when condensation falls on the horizontal surface of the ceiling.
Preparing the surface for plastering
First of all, the horizontalness of the base is checked. The ceiling is inspected for defects and irregularities. The base is cleaned of the old finish and leveled. Protruding boards and logs are cut off, and the voids are filled with wooden planks. Otherwise, the plastered surface will turn out uneven.
We treat the base with antiseptic compounds. We use antifungal primers that are suitable for application to wooden surfaces. You can purchase universal formulations. We apply the primer in two or three layers, followed by drying each of them.
What is shingles?
The material consists of narrow planks with a thickness of two to five millimeters, their length can be up to 4 m. Inch boards or veneer of aspen, pine, spruce, and larch are cut into shingles. Coniferous wood species are used as raw materials, since they contain a large amount of resinous substances. Resins are a natural antiseptic and will not allow putrefactive bacteria and moldy fungi to appear and develop during operation.
Plaster slats are made from third-grade wood, their price is low, so it is much more profitable to buy ready-made slats. Since making shingles for plaster at home using a circular saw is a long and thankless task. As they say, “the game is not worth the candle.”
Tools and materials for work
To work you will need the following materials and tools:
- stepladder or small scaffolding;
- container for preparing plaster mortar;
- dry plaster mixture or components for preparing the solution yourself;
- water;
- drill with mixer attachment;
- narrow and wide spatula;
- rule;
- rollers or brush for applying primer;
- antiseptic impregnation;
- grater;
- construction trowel;
- perforated corner;
- sanding mesh;
- building level or beacons;
- deep penetration soil.
Solution application technology
Before starting work, the wooden base is coated with a primer or sprayed with water to improve adhesion to the plaster. Since any wooden ceiling is not ideally even, the plaster mixture is applied in three stages. First of all, fill the voids and unevenness of the base with the solution. The first layer does not need to be carefully leveled because it is intended for rough leveling. It is enough to remove only large influxes.
While the first layer has not dried, proceed to the next stage of plastering. To apply the second layer, you can use the throwing or spreading method manually, using a machine or a construction gun. This primer layer is well leveled, controlling the thickness by level or beacons. Sometimes it is necessary to apply a second leveling layer, which will be thinner and smoother than the previous one.
Important! The final result depends on the quality of the main leveling layer.
The third layer is applied after the previous layer has set. Features of the manufacture of the covering layer depend on the finish used:
- If you decide to make relief plaster, then the textured composition simultaneously serves as a covering and finishing layer. The relief pattern is formed immediately during the work process.
- Finishing made from piece materials (panels, tiles, stone) is attached to a well-leveled primer layer, that is, a covering layer is not needed.
- For pasting with thin wallpaper or painting, the covering layer must be of high quality. To do this, the applied solution is well leveled, smoothed and subsequently sanded.
Finishing a plastered ceiling
The plastered ceiling needs finishing decorative finishing. Traditional whitewashing is considered the most budget-friendly finishing option, but it is short-lived and does not have high aesthetic appeal.
Technology of ceiling insulation from the inside and outside of a wooden house with polystyrene foam
A smooth ceiling surface can be decorated with decorative Venetian plaster. A smooth, even base can also be painted or wallpapered. However, when painting or gluing thin paper wallpaper, the ceiling must be perfectly smooth and even. In this case, the covering layer is performed in compliance with the rules for manufacturing high-quality plaster. Before finishing, the surface is coated with a primer.
In what cases is it better to use putty?
Ceiling putty is used to obtain a smooth, uniform surface without roughness or small irregularities. It will not be possible to achieve such smoothness with a plaster mixture, because it contains a larger grain than putty.
Important! Putty, unlike plaster, is needed to thinly level the ceiling. After puttying and sanding, the surface becomes perfectly smooth and even.
Puttying of a plastered ceiling is done before painting or pasting with thin wallpaper. In this case, the ceiling is first primed, then puttied in two layers, then sanded and again coated with deep penetration impregnation. Only after this is the ceiling ready for finishing.
Choosing putty for a wooden ceiling
The following types of putties for ceilings made of wood materials are suitable for work:
- gypsum (plastic mixture, adheres well, is inexpensive, therefore it is used most often);
- acrylic (same as gypsum, but costs more and is applied only in a thin layer);
- adhesive (comes in different colors);
- latex (similar to gypsum, but much more expensive, requires application in a thin layer);
- oil (suitable for conditions of high humidity).
Worth knowing! There are finishing and starting putty mixtures. There are also universal compositions that are suitable for preliminary and final puttying.
When choosing putty, pay attention to the following points:
- The durability of the coating depends on the degree of adhesion of the putty composition to the base.
- Use plastic solutions. It is easier to distribute them evenly over the base.
- High-quality mixtures dry out quite quickly.
- Choose putties that do not contain toxic components.
- Dilute ready-made dry mixtures with water according to the instructions on the package.
Ready-made or dry mixes
Ceiling putties are:
- Ready-made, not requiring preliminary dilution with water, produced in paste-like consistencies and sold in closed containers. Before applying to the ceiling, the composition simply needs to be mixed thoroughly.
- Dry. They need to be prepared by mixing with a certain amount of water. Information about proportions is usually indicated on the packaging.
What putty should I use to putty the ceiling? Ready or dry? In this case, it is necessary to focus on the working conditions. Ready-made compounds are best used for finishing small surfaces. For large areas, it is recommended to buy dry mixes.
Application technology
Acrylic putty is suitable for preparing the surface for wallpapering or painting. It is easy to apply and rub over, and is environmentally friendly.
We putty the wooden ceiling in the following sequence:
- To begin, go over the ceiling surface with a roller dipped in the primer solution.
- Prepare the starting putty according to the instructions. Apply the mixture onto the surface of a wide spatula, apply it to the ceiling and level it well. We hold the spatula at an acute angle to the surface.
- If necessary, apply a second coat of starting putty mixture.
- Then go over the ceiling with a wide spatula or scraper to smooth out any unevenness.
- Apply one layer of finishing putty under the wallpaper. Two layers are applied before painting.
After drying, the surface is carefully sanded with sandpaper, cleaned of dust and coated with deep penetration impregnation. After it has dried, the ceiling is ready for finishing.
Common Mistakes
The result of finishing the ceiling depends on the quality of the material. The most common mistake is trying to putty with a mixture with inadequate characteristics. Usually they rub with a spatula, not paying attention to the fact that the putty has already begun to become too viscous and hard. In this case, the desire to use all the material can play a cruel joke; putting putty with the old mixture means risking the quality of the entire finish.
It is better to putty the finishing mixture with a wide spatula
The second common mistake is related to the violation of the recipe. Often, in order to make the material harder and more plastic, acrylic and plasticizers are additionally added to it. In this case, the laid mass may shrink strongly and peel off from the ceiling, even if the surface is puttied according to all the rules.